RAID Installation Guide
Page 2
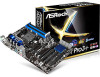
... Utility to configure RAID. 1.1 Introduction to RAID The term "RAID" stands for you can improve the access performance, it contains a complete copy of the "User Manual" in our support CD, then you to a second drive. AMD BIOS RAID Installation Guide AMD BIOS RAID Installation Guide is an instruction for "Redundant Array...
... Utility to configure RAID. 1.1 Introduction to RAID The term "RAID" stands for you can improve the access performance, it contains a complete copy of the "User Manual" in our support CD, then you to a second drive. AMD BIOS RAID Installation Guide AMD BIOS RAID Installation Guide is an instruction for "Redundant Array...
RAID Installation Guide
Page 14
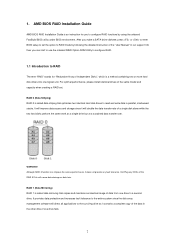
Use the full capacity of the disk drives for one of the following the detailed instruction of the "User Manual" in Disk Assignments as the above -mentioned procedures, press any key (except for ) to use the full portion of the disk drives to the first ...
Use the full capacity of the disk drives for one of the following the detailed instruction of the "User Manual" in Disk Assignments as the above -mentioned procedures, press any key (except for ) to use the full portion of the disk drives to the first ...
RAID Installation Guide
Page 15
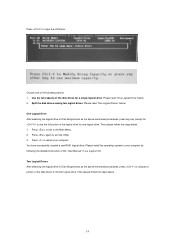
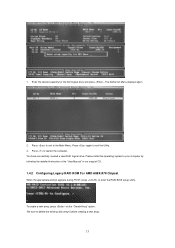
... to restart the computer. Press to exit the Utility. 3. Please install the operating system to your computer by following the detailed instruction of the "User Manual" in our support CD. 1.4.2 Configuring Legacy RAID ROM For AMD A88X/A78 Chipset When the appropriate prompt appears during POST, press to enter the RAID...
... to restart the computer. Press to exit the Utility. 3. Please install the operating system to your computer by following the detailed instruction of the "User Manual" in our support CD. 1.4.2 Configuring Legacy RAID ROM For AMD A88X/A78 Chipset When the appropriate prompt appears during POST, press to enter the RAID...
RAID Installation Guide
Page 21
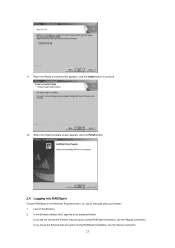
When the Ready to Install screen appears, click the Install button to continue. 12. Or, log on manually with your browser: 1. In the Browser address field, type the entry explained below. Launch the Browser. 2. If you did not choose the External Security option during RAIDXpert installation, use the Regular connection. If you chose the External Security option during RAIDXpert installation, use the Secure connection. 21 11. When the Install Complete screen appears, click the Finish button. 2.4 Logging into RAIDXpert Choose RAIDXpert in the Windows Programs menu.
When the Ready to Install screen appears, click the Install button to continue. 12. Or, log on manually with your browser: 1. In the Browser address field, type the entry explained below. Launch the Browser. 2. If you did not choose the External Security option during RAIDXpert installation, use the Regular connection. If you chose the External Security option during RAIDXpert installation, use the Secure connection. 21 11. When the Install Complete screen appears, click the Finish button. 2.4 Logging into RAIDXpert Choose RAIDXpert in the Windows Programs menu.
User Manual
Page 5
... model you require technical support related to this manual occur, the updated version will be updated, the content of this documentation, Chapter 1 and 2 contains the introduction of this motherboard, please visit our website for purchasing ASRock FM2A88X Pro3+ motherboard, a reliable motherboard produced under ASRock's consistently stringent quality control. FM2A88X Pro3+ 1. It delivers excellent performance with robust design...
... model you require technical support related to this manual occur, the updated version will be updated, the content of this documentation, Chapter 1 and 2 contains the introduction of this motherboard, please visit our website for purchasing ASRock FM2A88X Pro3+ motherboard, a reliable motherboard produced under ASRock's consistently stringent quality control. FM2A88X Pro3+ 1. It delivers excellent performance with robust design...
User Manual
Page 15
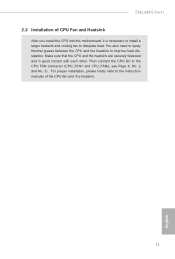
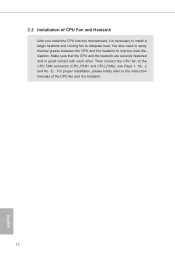
FM2A88X Pro3+ 2.2 Installation of the CPU fan and the heatsink. 11 English Make sure that the CPU and the heatsink are securely fastened and in good contact ... and the heatsink to the CPU FAN connector (CPU_FAN1 and CPU_FAN2, see Page 6, No. 2 and No. 3). For proper installation, please kindly refer to the instruction manuals of CPU Fan and Heatsink After you install the CPU into this motherboard, it is necessary to install a larger heatsink and cooling fan to dissipate...
FM2A88X Pro3+ 2.2 Installation of the CPU fan and the heatsink. 11 English Make sure that the CPU and the heatsink are securely fastened and in good contact ... and the heatsink to the CPU FAN connector (CPU_FAN1 and CPU_FAN2, see Page 6, No. 2 and No. 3). For proper installation, please kindly refer to the instruction manuals of CPU Fan and Heatsink After you install the CPU into this motherboard, it is necessary to install a larger heatsink and cooling fan to dissipate...
User Manual
Page 21
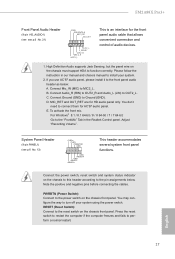
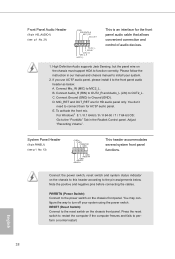
... on the chassis front panel. For Windows® 8.1 / 8.1 64-bit / 8 / 8 64-bit / 7 / 7 64-bit: Go to the "FrontMic" Tab in our manual and chassis manual to the pin assignments below : A. FM2A88X Pro3+ Front Panel Audio Header (9-pin HD_AUDIO1) (see see p.6 No. 13) PLED+ PLEDPWRBTN# GND 1 GND RESET# GND HDLEDHDLED+ This header accommodates several system...
... on the chassis front panel. For Windows® 8.1 / 8.1 64-bit / 8 / 8 64-bit / 7 / 7 64-bit: Go to the "FrontMic" Tab in our manual and chassis manual to the pin assignments below : A. FM2A88X Pro3+ Front Panel Audio Header (9-pin HD_AUDIO1) (see see p.6 No. 13) PLED+ PLEDPWRBTN# GND 1 GND RESET# GND HDLEDHDLED+ This header accommodates several system...
User Manual
Page 25
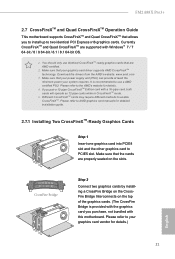
... other graphics card to AMD graphics card manuals for details. 4. Make sure that the cards are supported with a 16-pipe card, both cards will operate as 12-pipe cards while in CrossFireXTM mode. 5. Please refer to PCIE5 slot. You should only use a AMD certified PSU. FM2A88X Pro3+ 2.7 CrossFireXTM and Quad CrossFireXTM Operation Guide...
... other graphics card to AMD graphics card manuals for details. 4. Make sure that the cards are supported with a 16-pipe card, both cards will operate as 12-pipe cards while in CrossFireXTM mode. 5. Please refer to PCIE5 slot. You should only use a AMD certified PSU. FM2A88X Pro3+ 2.7 CrossFireXTM and Quad CrossFireXTM Operation Guide...
User Manual
Page 43
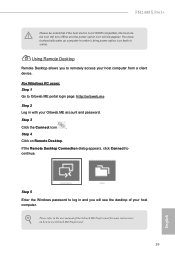
FM2A88X Pro3+ Please be noted that if the host device is not WOW compatible, the host status icon will turn offline and the power option icon will ... in with your host computer. Step 3 Click the Connect icon . Please refer to use Orbweb.ME Professional. 39 Step 4 Click on how to the user manual of your Orbweb.ME account and password.
FM2A88X Pro3+ Please be noted that if the host device is not WOW compatible, the host status icon will turn offline and the power option icon will ... in with your host computer. Step 3 Click the Connect icon . Please refer to use Orbweb.ME Professional. 39 Step 4 Click on how to the user manual of your Orbweb.ME account and password.
User Manual
Page 45
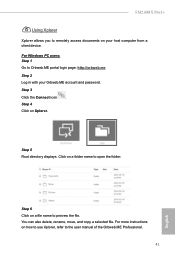
...: http://orbweb.me Step 2 Log in with your host computer from a client device. For Windows PC users: Step 1 Go to the user manual of the Orbweb.ME Professional. 41 English FM2A88X Pro3+ Using Xplorer Xplorer allows you to remotely access documents on your Orbweb.ME account and password. Step 3 Click the Connect icon .
...: http://orbweb.me Step 2 Log in with your host computer from a client device. For Windows PC users: Step 1 Go to the user manual of the Orbweb.ME Professional. 41 English FM2A88X Pro3+ Using Xplorer Xplorer allows you to remotely access documents on your Orbweb.ME account and password. Step 3 Click the Connect icon .
User Manual
Page 46
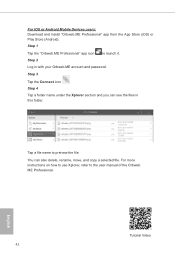
... 2 Log in this folder. Tutorial Video 42 English Step 3 Tap the Connect icon . For more instructions on how to use Xplorer, refer to the user manual of the Orbweb.
... 2 Log in this folder. Tutorial Video 42 English Step 3 Tap the Connect icon . For more instructions on how to use Xplorer, refer to the user manual of the Orbweb.
User Manual
Page 58
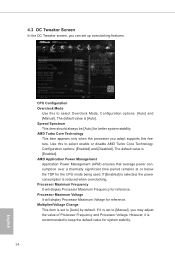
...should always be [Auto] for reference. Processor Maximum Frequency It will display Processor Maximum Voltage for better system stability. Configuration options: [Auto] and [Manual]. Multiplier/Voltage Change This item is [Auto]. The default value is set up overclocking features. However, it is [Enabled]. CPU Configuration Overclock Mode .... Configuration options: [Enabled] and [Disabled]. If it is reduced when overclocking. If [Enabled] is selected, the power consumption is recommended to [Manual], you may adjust the value of Processor Frequency and Processor Voltage.
...should always be [Auto] for reference. Processor Maximum Frequency It will display Processor Maximum Voltage for better system stability. Configuration options: [Auto] and [Manual]. Multiplier/Voltage Change This item is [Auto]. The default value is set up overclocking features. However, it is [Enabled]. CPU Configuration Overclock Mode .... Configuration options: [Enabled] and [Disabled]. If it is reduced when overclocking. If [Enabled] is selected, the power consumption is recommended to [Manual], you may adjust the value of Processor Frequency and Processor Voltage.
User Manual
Page 73
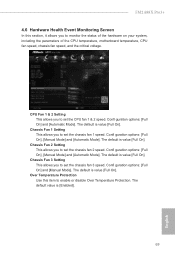
The default is [Enabled]. 69 English Confi guration options: [Full On], [Manual Mode] and [Automatic Mode]. Chassis Fan 3 Setting This allows you to set the chassis fan 3 speed. Over Temperature Protection Use this section, it allows... Setting This allows you to set the chassis fan 2 speed. Confi guration options: [Full On] and [Manual Mode]. The default is value [Full On]. CPU Fan 1 & 2 Setting This allows you to set the CPU fan 1 & 2 speed. FM2A88X Pro3+ 4.6 Hardware Health Event Monitoring Screen In this item to enable or disable Over Temperature Protection.
The default is [Enabled]. 69 English Confi guration options: [Full On], [Manual Mode] and [Automatic Mode]. Chassis Fan 3 Setting This allows you to set the chassis fan 3 speed. Over Temperature Protection Use this section, it allows... Setting This allows you to set the chassis fan 2 speed. Confi guration options: [Full On] and [Manual Mode]. The default is value [Full On]. CPU Fan 1 & 2 Setting This allows you to set the CPU fan 1 & 2 speed. FM2A88X Pro3+ 4.6 Hardware Health Event Monitoring Screen In this item to enable or disable Over Temperature Protection.
Quick Installation Guide
Page 6
... software might be updated, the content of this motherboard, please visit our website for specific information about the model you for purchasing ASRock FM2A88X Pro3+ motherboard, a reliable motherboard produced under ASRock's consistently stringent quality control. ASRock website http://www.asrock.com If you require technical support related to this manual will be subject to quality and endurance...
... software might be updated, the content of this motherboard, please visit our website for specific information about the model you for purchasing ASRock FM2A88X Pro3+ motherboard, a reliable motherboard produced under ASRock's consistently stringent quality control. ASRock website http://www.asrock.com If you require technical support related to this manual will be subject to quality and endurance...
Quick Installation Guide
Page 13
... and the heatsink to the CPU FAN connector (CPU_FAN1 and CPU_FAN2, see Page 1, No. 2 and No. 3). For proper installation, please kindly refer to the instruction manuals of CPU Fan and Heatsink After you install the CPU into this motherboard, it is necessary to install a larger heatsink and cooling fan to dissipate...
... and the heatsink to the CPU FAN connector (CPU_FAN1 and CPU_FAN2, see Page 1, No. 2 and No. 3). For proper installation, please kindly refer to the instruction manuals of CPU Fan and Heatsink After you install the CPU into this motherboard, it is necessary to install a larger heatsink and cooling fan to dissipate...
Quick Installation Guide
Page 19
... OUT_RET are for AC'97 audio panel. For Windows® 8.1 / 8.1 64-bit / 8 / 8 64-bit / 7 / 7 64-bit OS: Go to the "FrontMic" Tab in our manual and chassis manual to the front panel audio header as below . Note the positive and negative pins before connecting the cables. Press the reset switch to restart...
... OUT_RET are for AC'97 audio panel. For Windows® 8.1 / 8.1 64-bit / 8 / 8 64-bit / 7 / 7 64-bit OS: Go to the "FrontMic" Tab in our manual and chassis manual to the front panel audio header as below . Note the positive and negative pins before connecting the cables. Press the reset switch to restart...
