RAID Installation Guide
Page 1
... 22 2.10 Using RAIDXpert to RAID 2 1.2 RAID Configurations Precautions 3 1.3 Installing Windows® 8 / 8 64-bit / 7 / 7 64-bit With RAID Functions 5 1.4 Create Disk Array 9 1.4.1 Configuring RAID Option ROM For AMD A85X/A75/A55 Chipsets 9 1.4.2 Configuring Legacy RAID ROM For AMD A88X Chipset 12 2. AMD RAID Installation Guide 1. AMD BIOS RAID Installation Guide 2 1.1 Introduction to Create RAID Array in Windows (for...
... 22 2.10 Using RAIDXpert to RAID 2 1.2 RAID Configurations Precautions 3 1.3 Installing Windows® 8 / 8 64-bit / 7 / 7 64-bit With RAID Functions 5 1.4 Create Disk Array 9 1.4.1 Configuring RAID Option ROM For AMD A85X/A75/A55 Chipsets 9 1.4.2 Configuring Legacy RAID ROM For AMD A88X Chipset 12 2. AMD RAID Installation Guide 1. AMD BIOS RAID Installation Guide 2 1.1 Introduction to Create RAID Array in Windows (for...
RAID Installation Guide
Page 2
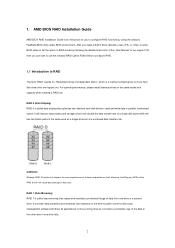
...surviving drive as a single drive but at a sustained data transfer rate. Although RAID 0 function can start to use the onboard RAID Option ROM Utility to configure RAID. 1.1 Introduction to RAID The term "RAID" stands for you can improve the access performance, it contains a complete copy of... data from one drive fails. 2 It provides data protection and increases fault tolerance to a second drive. RAID 0 (Data Striping) RAID 0 is an instruction for "Redundant Array of Independent Disks", which is called data striping that copies and maintains an identical image...
...surviving drive as a single drive but at a sustained data transfer rate. Although RAID 0 function can start to use the onboard RAID Option ROM Utility to configure RAID. 1.1 Introduction to RAID The term "RAID" stands for you can improve the access performance, it contains a complete copy of... data from one drive fails. 2 It provides data protection and increases fault tolerance to a second drive. RAID 0 (Data Striping) RAID 0 is an instruction for "Redundant Array of Independent Disks", which is called data striping that copies and maintains an identical image...

RAID Installation Guide
Page 3
... can be re-calculated by providing parity data. RAID 10 (Stripe Mirroring) RAID 0 drives can be mirrored using RAID 1 techniques, resulting in a RAID 10 solution for file, database, application and web servers. The controller combines the performance of data striping (RAID 0) and the fault tolerance of drives. 3 RAID 5 (Block Striping with the data blocks. This organization...
... can be re-calculated by providing parity data. RAID 10 (Stripe Mirroring) RAID 0 drives can be mirrored using RAID 1 techniques, resulting in a RAID 10 solution for file, database, application and web servers. The controller combines the performance of data striping (RAID 0) and the fault tolerance of drives. 3 RAID 5 (Block Striping with the data blocks. This organization...
RAID Installation Guide
Page 4
... has an 80GB storage capacity and the other hard disk has 60GB, the maximum storage capacity for this RAID 0 set up your future data building will ask if you set is recommended to create a RAID 1 (mirroring) array for performance. It is 60GB. 3. Please use two drives of different sizes,...existing drive and a new drive to use two drives of the same size or larger than the existing drive). WARNING!! It is 120GB. 2. 1.2 RAID Configurations Precautions 1. If you use two SATA drives of your data first before you want to select "Yes", and then your new...
... has an 80GB storage capacity and the other hard disk has 60GB, the maximum storage capacity for this RAID 0 set up your future data building will ask if you set is recommended to create a RAID 1 (mirroring) array for performance. It is 60GB. 3. Please use two drives of different sizes,...existing drive and a new drive to use two drives of the same size or larger than the existing drive). WARNING!! It is 120GB. 2. 1.2 RAID Configurations Precautions 1. If you use two SATA drives of your data first before you want to select "Yes", and then your new...
RAID Installation Guide
Page 5
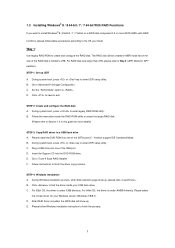
...DVD-ROM into one of the SATA ports 5 ~ 8 which the size of 2 or more details) STEP 3: Copy RAID driver to exit. D. E. Follow instructions to enter legacy RAID ROM utility. STEP 4: Windows installation A. E. B. Go to enter UEFI setup utility. B. C. Plug a USB drive... driver is under /AMD64 directly. Follow the instruction inside your Windows version (Windows 7/8/8.1). Click to find the driver inside the RAID ROM utility to create the target RAID disk. (Please refer to Section 1.4 in MBR mode which support IDE Combined Mode. 1.3 Installing Windows® 8 / ...
...DVD-ROM into one of the SATA ports 5 ~ 8 which the size of 2 or more details) STEP 3: Copy RAID driver to exit. D. E. Follow instructions to enter legacy RAID ROM utility. STEP 4: Windows installation A. E. B. Go to enter UEFI setup utility. B. C. Plug a USB drive... driver is under /AMD64 directly. Follow the instruction inside your Windows version (Windows 7/8/8.1). Click to find the driver inside the RAID ROM utility to create the target RAID disk. (Please refer to Section 1.4 in MBR mode which support IDE Combined Mode. 1.3 Installing Windows® 8 / ...
RAID Installation Guide
Page 6
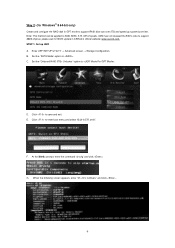
... the command "drvcfg" and click . When the following screen appears, enter "dh " and click . 6 Set the "Onboard RAID 3TB+ Unlocker" option to save and exit. F. Way 2: (for BIOS update in ASRock's official website: www.asrock.com. Click to . G. Enter UEFI SETUP UTILITY → Advanced screen → Storage Configuration. Click to enter boot menu...
... the command "drvcfg" and click . When the following screen appears, enter "dh " and click . 6 Set the "Onboard RAID 3TB+ Unlocker" option to save and exit. F. Way 2: (for BIOS update in ASRock's official website: www.asrock.com. Click to . G. Enter UEFI SETUP UTILITY → Advanced screen → Storage Configuration. Click to enter boot menu...
RAID Installation Guide
Page 7
I. K. Click on keyboard to LD Max Size. Enter to set to create logical drive. 7 Choose and select the hard drives to access RAID Utility. Enter . Choose and click on keyboard to create a RAID Drive. Choose and set up RAID Drive. J. Then choose . L. Enter "drvcfg(space)-s(space)(space)" and click to be included in the RAID array. Choose to toggle checkbox. H.
I. K. Click on keyboard to LD Max Size. Enter to set to create logical drive. 7 Choose and select the hard drives to access RAID Utility. Enter . Choose and click on keyboard to create a RAID Drive. Choose and set up RAID Drive. J. Then choose . L. Enter "drvcfg(space)-s(space)(space)" and click to be included in the RAID array. Choose to toggle checkbox. H.
RAID Installation Guide
Page 9
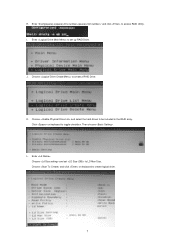
... you have booted with tools to set up your system. Creating RAID logical drives - The RAID Option ROM Utility can perform these functions: - Monitoring RAID status - Diagnosing critical and offline RAID logical drives - Creating multiple logical drives using the same physical drives - Deleting RAID logical drives - Viewing physical drive assignments - Secure erasing of all data...
... you have booted with tools to set up your system. Creating RAID logical drives - The RAID Option ROM Utility can perform these functions: - Monitoring RAID status - Diagnosing critical and offline RAID logical drives - Creating multiple logical drives using the same physical drives - Deleting RAID logical drives - Viewing physical drive assignments - Secure erasing of all data...
RAID Installation Guide
Page 10
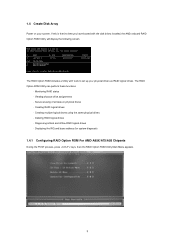
... for your logical drive configuration. 10 Press 2 on the Main Menu screen to highlight an option. While you are allowed to use RAID 1 for each available drive. Press the arrow keys to display the Define LD Menu. Y means this disk drive will be assigned to cycle through ...logical drive types, including RAID 0, RAID 1, RAID 5 and RAID 10. Press the spacebar to the logical drive. Press the arrow key to move to save your bootable logical drive, it is recommended to toggle...
... for your logical drive configuration. 10 Press 2 on the Main Menu screen to highlight an option. While you are allowed to use RAID 1 for each available drive. Press the arrow keys to display the Define LD Menu. Y means this disk drive will be assigned to cycle through ...logical drive types, including RAID 0, RAID 1, RAID 5 and RAID 10. Press the spacebar to the logical drive. Press the arrow key to move to save your bootable logical drive, it is recommended to toggle...
RAID Installation Guide
Page 11
... the detailed instruction of the disk drives to your computer. Then please follow the steps below : 1. Choose one logical drive. You have successfully created a new RAID logical drive. Press to restart your computer by following actions: 1.
... the detailed instruction of the disk drives to your computer. Then please follow the steps below : 1. Choose one logical drive. You have successfully created a new RAID logical drive. Press to restart your computer by following actions: 1.

RAID Installation Guide
Page 12
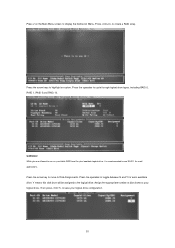
... sure to the Main Menu. Press again to restart the computer. The Define LD Menu displays again. 2. You have successfully created a new RAID logical drive. Press to exit the Utility. 3. Please install the operating system to your computer by following the detailed instruction of the "User ...Manual" in our support CD. 1.4.2 Configuring Legacy RAID ROM For AMD A88X Chipset When the appropriate prompt appears during POST, press to enter the RAID BIOS setup utility. 1. Enter the desired capacity for the first logical drive and press .
... sure to the Main Menu. Press again to restart the computer. The Define LD Menu displays again. 2. You have successfully created a new RAID logical drive. Press to exit the Utility. 3. Please install the operating system to your computer by following the detailed instruction of the "User ...Manual" in our support CD. 1.4.2 Configuring Legacy RAID ROM For AMD A88X Chipset When the appropriate prompt appears during POST, press to enter the RAID BIOS setup utility. 1. Enter the desired capacity for the first logical drive and press .
RAID Installation Guide
Page 13
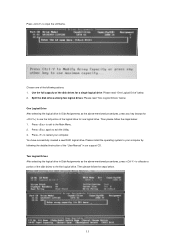
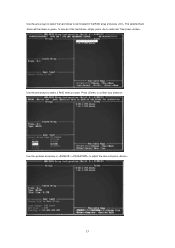
Use the arrow keys to select all. To use all of the hard drives, simply press to select a RAID level you want. Use the arrow keys to select the hard drives to be shown in the RAID array and press . Then press . Use the up/down arrow key or / to confirm your selection. The selected hard drives will be included in green. Press to adjust the size and press . 13
Use the arrow keys to select all. To use all of the hard drives, simply press to select a RAID level you want. Use the arrow keys to select the hard drives to be shown in the RAID array and press . Then press . Use the up/down arrow key or / to confirm your selection. The selected hard drives will be included in green. Press to adjust the size and press . 13
RAID Installation Guide
Page 14
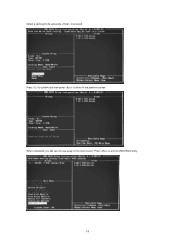
When completed, you will see the new array on the main screen. Press to confirm and then press to return to proceed. Select a caching mode and press to the previous screen. Press to exit the RAID BIOS utility. 14
When completed, you will see the new array on the main screen. Press to confirm and then press to return to proceed. Select a caching mode and press to the previous screen. Press to exit the RAID BIOS utility. 14
RAID Installation Guide
Page 15
...and remote management and monitoring of the following browsers: Internet Explorer 6.0, Mozilla Suite 1.7, Mozilla Firefox 1.0, or Netscape Navigator 7.1. RAIDXpert RAID management software: The RAIDXpert software installs on a network. Then install RAIDXpert. If you must use one of the above browsers, ... JRE in again as the Administrator, log out, then log in folder _jvm under Windows environment. AMD Windows RAID Installation Guide AMD Windows RAID Installation Guide is designed to all programs. If you to open it (right). The first RAIDXpert installation dialog ...
...and remote management and monitoring of the following browsers: Internet Explorer 6.0, Mozilla Suite 1.7, Mozilla Firefox 1.0, or Netscape Navigator 7.1. RAIDXpert RAID management software: The RAIDXpert software installs on a network. Then install RAIDXpert. If you must use one of the above browsers, ... JRE in again as the Administrator, log out, then log in folder _jvm under Windows environment. AMD Windows RAID Installation Guide AMD Windows RAID Installation Guide is designed to all programs. If you to open it (right). The first RAIDXpert installation dialog ...
RAID Installation Guide
Page 19
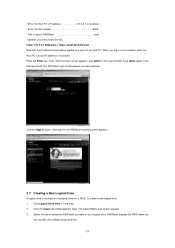
... network, enter the Host PC's actual IP address or hostname. To create a new logical drive: 1. The Select RAID Level screen appears. 3. Select the option beside the RAID level you can use with the available physical drives. 19 Click Logical Drive View in Management View. The RAIDXpert login and... appears. 2.7 Creating a New Logical Drive A logical drive is a collection of physical drives in at the Host PC. RAIDXpert displays the RAID levels you want for your entry looks like this: https://127.0.0.1:8443/amd or https://localhost:8443/amd Note that the IP address shown above...
... network, enter the Host PC's actual IP address or hostname. To create a new logical drive: 1. The Select RAID Level screen appears. 3. Select the option beside the RAID level you can use with the available physical drives. 19 Click Logical Drive View in Management View. The RAIDXpert login and... appears. 2.7 Creating a New Logical Drive A logical drive is a collection of physical drives in at the Host PC. RAIDXpert displays the RAID levels you want for your entry looks like this: https://127.0.0.1:8443/amd or https://localhost:8443/amd Note that the IP address shown above...
RAID Installation Guide
Page 21
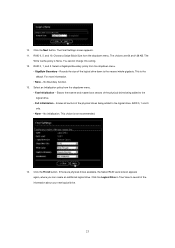
... being added to the logical drive. • Full Initialization - Erases all of the physical drives being added to the logical drive. Click the Finish button. RAID 0, 5, and 10. Rounds the size of the logical drive down to see all sectors of the information about your new logical drive. 21 No initialization... the dropdown menu. You cannot change this setting. 12. No Boundary function. 13. This is the default. The choices are physical drives available, the Select RAID Level screen appears again, where you can create an additional logical drive...
... being added to the logical drive. • Full Initialization - Erases all of the physical drives being added to the logical drive. Click the Finish button. RAID 0, 5, and 10. Rounds the size of the logical drive down to see all sectors of the information about your new logical drive. 21 No initialization... the dropdown menu. You cannot change this setting. 12. No Boundary function. 13. This is the default. The choices are physical drives available, the Select RAID Level screen appears again, where you can create an additional logical drive...

RAID Installation Guide
Page 23
Execute RAIDXpert2 in Windows (for AMD A88X Chipset) 1. 2.10 Using RAIDXpert to your system from ASRock's support CD, AMD RAIDXpert2 will be auto-installed as well. 2. When you install the all-in-one driver to Create RAID Array in the Windows Programs menu. 23
Execute RAIDXpert2 in Windows (for AMD A88X Chipset) 1. 2.10 Using RAIDXpert to your system from ASRock's support CD, AMD RAIDXpert2 will be auto-installed as well. 2. When you install the all-in-one driver to Create RAID Array in the Windows Programs menu. 23
RAID Installation Guide
Page 26
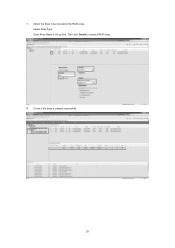
Then click Create to be included in the RAID array. Select Array Type Enter Array Name & Array Size. Check if the array is created successfully. 26 Select the disks to create a RAID array. 8. 7.
Then click Create to be included in the RAID array. Select Array Type Enter Array Name & Array Size. Check if the array is created successfully. 26 Select the disks to create a RAID array. 8. 7.

User Manual
Page 7
... Qualcomm® Atheros® Security Wake On Internet Technology - HD Audio Jacks: Rear Speaker/Central/Bass/Line in/Front Speaker/Microphone - 8 x SATA3 6.0 Gb/s Connectors, support RAID (RAID 0, RAID 1, RAID 5 and RAID 10), NCQ, AHCI and Hot Plug - 1 x IR Header - 1 x Print Port Header - 1 x COM Port Header - 1 x Chassis Intrusion Header - 1 x TPM Header - 1 x Power LED Header - 2 x CPU Fan...
... Qualcomm® Atheros® Security Wake On Internet Technology - HD Audio Jacks: Rear Speaker/Central/Bass/Line in/Front Speaker/Microphone - 8 x SATA3 6.0 Gb/s Connectors, support RAID (RAID 0, RAID 1, RAID 5 and RAID 10), NCQ, AHCI and Hot Plug - 1 x IR Header - 1 x Print Port Header - 1 x COM Port Header - 1 x Chassis Intrusion Header - 1 x TPM Header - 1 x Power LED Header - 2 x CPU Fan...

User Manual
Page 13
... access. The lightning boot up speed makes it takes less than 1.5 seconds to logon to Windows® 8 from a cold boot. ASRock Easy RAID Installer ASRock Easy RAID Installer can help you can become a near one A-Tuning tuning program that allows users to UEFI Windows® 8 brings the ultimate boot... automatically overclock the relative components to get up experience. Simply press "X" when turning on the PC next time. ASRock Restart to "RAID", then you to copy the RAID driver from our support CD, Easy Driver Installer is included in the UEFI that don't have an optical disk ...
... access. The lightning boot up speed makes it takes less than 1.5 seconds to logon to Windows® 8 from a cold boot. ASRock Easy RAID Installer ASRock Easy RAID Installer can help you can become a near one A-Tuning tuning program that allows users to UEFI Windows® 8 brings the ultimate boot... automatically overclock the relative components to get up experience. Simply press "X" when turning on the PC next time. ASRock Restart to "RAID", then you to copy the RAID driver from our support CD, Easy Driver Installer is included in the UEFI that don't have an optical disk ...


