
User Manual
Page 3
... UEFI SETUP UTILITY 38 4.1 Introduction 38 4.1.1 UEFI Menu Bar 38 4.1.2 Navigation Keys 39 4.2 Main Screen 39 4.3 OC Tweaker Screen 40 4.4 Advanced Screen 43 4.4.1 CPU Coniguration 44 Introduction 1 1.1 Package Contents 1 1.2 Speciications 2 1.3 Motherboard Layout 6 1.4 I/O Panel 8 2. Installation 9 2.1 CPU Installation 10 2.2 Installation of CPU Fan and Heatsink 11 2.3 Installation of Memory Modules (DIMM) 12 2.4 Expansion Slots (PCI and PCI Express Slots) 14 2.5 Jumpers Setup 15 2.6 Onboard Headers and Connectors 16 2.7 AMD Dual Graphics Operation...
... UEFI SETUP UTILITY 38 4.1 Introduction 38 4.1.1 UEFI Menu Bar 38 4.1.2 Navigation Keys 39 4.2 Main Screen 39 4.3 OC Tweaker Screen 40 4.4 Advanced Screen 43 4.4.1 CPU Coniguration 44 Introduction 1 1.1 Package Contents 1 1.2 Speciications 2 1.3 Motherboard Layout 6 1.4 I/O Panel 8 2. Installation 9 2.1 CPU Installation 10 2.2 Installation of CPU Fan and Heatsink 11 2.3 Installation of Memory Modules (DIMM) 12 2.4 Expansion Slots (PCI and PCI Express Slots) 14 2.5 Jumpers Setup 15 2.6 Onboard Headers and Connectors 16 2.7 AMD Dual Graphics Operation...

User Manual
Page 5
... to ASRock's commitment to change without further notice. Because the motherboard speciications and the BIOS software might be updated, the content of this manual occur, the updated version will be available on ASRock website as well. www.asrock.com/support/index.asp 1.1 Package Contents ASRock FM2A68M-HD+ Motherboard (Micro ATX Form Factor) ASRock FM2A68M-HD+ Quick Installation Guide ASRock FM2A68M-HD+ Support CD 2 x Serial ATA (SATA) Data Cables (Optional) 1 x I/O Panel Shield 1 English FM2A68M-HD+ 1. Chapter 3 contains the operation guide of the BIOS setup. In case any...
... to ASRock's commitment to change without further notice. Because the motherboard speciications and the BIOS software might be updated, the content of this manual occur, the updated version will be available on ASRock website as well. www.asrock.com/support/index.asp 1.1 Package Contents ASRock FM2A68M-HD+ Motherboard (Micro ATX Form Factor) ASRock FM2A68M-HD+ Quick Installation Guide ASRock FM2A68M-HD+ Support CD 2 x Serial ATA (SATA) Data Cables (Optional) 1 x I/O Panel Shield 1 English FM2A68M-HD+ 1. Chapter 3 contains the operation guide of the BIOS setup. In case any...

User Manual
Page 8
...; 1 x Power Fan Connector (3-pin) • 1 x 24 pin ATX Power Connector • 1 x 4 pin 12V Power Connector • 1 x Front Panel Audio Connector • 2 x USB 2.0 Headers (Support 4 USB 2.0 ports) (Supports ESD Protection (ASRock Full Spike Protection)) • 1 x USB 3.0 Header by ASMedia ASM1042A (Supports 2 USB 3.0 ports) (Supports ESD Protection (ASRock Full Spike Protection)) • 64Mb AMI UEFI Legal BIOS with GUI support • Supports "Plug and Play" • ACPI 1.1 Compliant wake up events • Supports jumperfree • SMBIOS 2.3.1 support • DRAM, CPU Voltage...
...; 1 x Power Fan Connector (3-pin) • 1 x 24 pin ATX Power Connector • 1 x 4 pin 12V Power Connector • 1 x Front Panel Audio Connector • 2 x USB 2.0 Headers (Support 4 USB 2.0 ports) (Supports ESD Protection (ASRock Full Spike Protection)) • 1 x USB 3.0 Header by ASMedia ASM1042A (Supports 2 USB 3.0 ports) (Supports ESD Protection (ASRock Full Spike Protection)) • 64Mb AMI UEFI Legal BIOS with GUI support • Supports "Plug and Play" • ACPI 1.1 Compliant wake up events • Supports jumperfree • SMBIOS 2.3.1 support • DRAM, CPU Voltage...

User Manual
Page 19
... update the BIOS. Please be noted that the password, date, time, user default proile, 1394 GUID and MAC address will be detected. English 15 FM2A68M-HD+ 2.5 Jumpers Setup The illustration shows how jumpers are "Short" when jumper cap is placed on CLRCMOS1 for 5 seconds. If no jumper cap is placed on pins, the jumper is "Short". Jumper Clear CMOS Jumper (CLRCMOS1) (see p.6, No. 16) Setting Default Clear CMOS Description Note: CLRCMOS1 allows you clear the CMOS, the case...
... update the BIOS. Please be noted that the password, date, time, user default proile, 1394 GUID and MAC address will be detected. English 15 FM2A68M-HD+ 2.5 Jumpers Setup The illustration shows how jumpers are "Short" when jumper cap is placed on CLRCMOS1 for 5 seconds. If no jumper cap is placed on pins, the jumper is "Short". Jumper Clear CMOS Jumper (CLRCMOS1) (see p.6, No. 16) Setting Default Clear CMOS Description Note: CLRCMOS1 allows you clear the CMOS, the case...
User Manual
Page 24
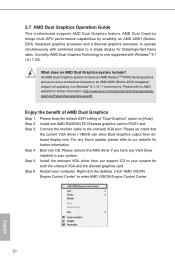
... slot. Step 4. Right-click the desktop. For any VGA driver installed in a Windows® 8.1 / 8 / 7 environment. An AMD Dual Graphics system includes an AMD RadeonTM R7/R5 Series graphics processor and a motherboard based on [Auto]. Please refer to AMD website for both the onboard VGA and the discrete graphics card. Connect the monitor cable to enter AMD VISION Engine Control Center. 20 English Step 6. Click "AMD VISION Engine Control Center" to the onboard VGA port. 2.7 AMD Dual Graphics Operation Guide This motherboard supports AMD Dual Graphics feature...
... slot. Step 4. Right-click the desktop. For any VGA driver installed in a Windows® 8.1 / 8 / 7 environment. An AMD Dual Graphics system includes an AMD RadeonTM R7/R5 Series graphics processor and a motherboard based on [Auto]. Please refer to AMD website for both the onboard VGA and the discrete graphics card. Connect the monitor cable to enter AMD VISION Engine Control Center. 20 English Step 6. Click "AMD VISION Engine Control Center" to the onboard VGA port. 2.7 AMD Dual Graphics Operation Guide This motherboard supports AMD Dual Graphics feature...
User Manual
Page 26
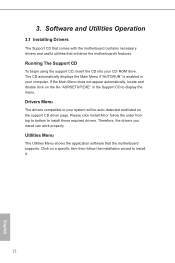
..., locate and double click on the support CD driver page. 3. The CD automatically displays the Main Menu if "AUTORUN" is enabled in the Support CD to install it. 22 English Click on a speciic item then follow the order from top to bottom to your system will be auto-detected and listed on the ile "ASRSETUP.EXE" in your CD-ROM drive. Software and Utilities Operation 3.1 Installing Drivers...
..., locate and double click on the support CD driver page. 3. The CD automatically displays the Main Menu if "AUTORUN" is enabled in the Support CD to install it. 22 English Click on a speciic item then follow the order from top to bottom to your system will be auto-detected and listed on the ile "ASRSETUP.EXE" in your CD-ROM drive. Software and Utilities Operation 3.1 Installing Drivers...

User Manual
Page 42
... Advanced Tool For overclocking conigurations For advanced system conigurations Useful tools H/W Monitor Displays current hardware status Boot Security For coniguring boot settings and boot priority For security settings Exit Exit the current screen or the UEFI SETUP UTILITY Use < > key or < > key to conigure your screen. 4.1.1 UEFI Menu Bar The top of system coniguration tools, cool sound effects and stunning visuals. UEFI SETUP UTILITY 4.1 Introduction ASRock Interactive UEFI is constantly being updated, the following UEFI setup screens and descriptions...
... Advanced Tool For overclocking conigurations For advanced system conigurations Useful tools H/W Monitor Displays current hardware status Boot Security For coniguring boot settings and boot priority For security settings Exit Exit the current screen or the UEFI SETUP UTILITY Use < > key or < > key to conigure your screen. 4.1.1 UEFI Menu Bar The top of system coniguration tools, cool sound effects and stunning visuals. UEFI SETUP UTILITY 4.1 Introduction ASRock Interactive UEFI is constantly being updated, the following UEFI setup screens and descriptions...

User Manual
Page 46
... mode. Configuration options: [Disabled], [Auto]. The default value is [Auto]. 42 English The default value is [Auto]. Power Down Enable Use this item to enable Channel Memory Interleaving. Bank Interleaving Interleaving allows memory accesses to select SB Voltage. SB Voltage Use this to be spread out over banks on the same node, or accross nodes, decreasing access contention. DRAM Timing Control DRAM Slot Use this item to select DRAM Voltage. The default value is [Auto]. Voltage Coniguration DRAM Voltage Use this item to control DRAM timing. DRAM...
... mode. Configuration options: [Disabled], [Auto]. The default value is [Auto]. 42 English The default value is [Auto]. Power Down Enable Use this item to enable Channel Memory Interleaving. Bank Interleaving Interleaving allows memory accesses to select SB Voltage. SB Voltage Use this to be spread out over banks on the same node, or accross nodes, decreasing access contention. DRAM Timing Control DRAM Slot Use this item to select DRAM Voltage. The default value is [Auto]. Voltage Coniguration DRAM Voltage Use this item to control DRAM timing. DRAM...

User Manual
Page 48
... When this option is [Auto]. 44 English Coniguration options: [Enabled] and [Disabled]. The default value is set this function may reduce CPU voltage and memory frequency, and lead to enable or disable Core C6 mode. The default value is [Enabled]. Coniguration options: [Enabled] and [Disabled]. Cool 'n' Quiet Use this item to system stability or compatibility issue with some memory modules or power supplies. Please note that enabling this item to [Enabled], a VMM (Virtual Machine Architecture) can utilize the additional...
... When this option is [Auto]. 44 English Coniguration options: [Enabled] and [Disabled]. The default value is set this function may reduce CPU voltage and memory frequency, and lead to enable or disable Core C6 mode. The default value is [Enabled]. Coniguration options: [Enabled] and [Disabled]. Cool 'n' Quiet Use this item to system stability or compatibility issue with some memory modules or power supplies. Please note that enabling this item to [Enabled], a VMM (Virtual Machine Architecture) can utilize the additional...

User Manual
Page 49
... can use Dual Link DVI monitor without audio function. The default value of multiple video controllers. If you select [as Dual Link DVI]. 45 English 4.4.2 North Bridge Coniguration FM2A68M-HD+ IOMMU This allows you to DVI port. Coniguration options: [as Dual Link DVI] and [as HDMI], you can use HDMI monitor with audio function. If you install the DVI to HDMI adapter to enable or disable IOMMU support. The default value is [PCI Express]. DVI Function Use...
... can use Dual Link DVI monitor without audio function. The default value of multiple video controllers. If you select [as Dual Link DVI]. 45 English 4.4.2 North Bridge Coniguration FM2A68M-HD+ IOMMU This allows you to DVI port. Coniguration options: [as Dual Link DVI] and [as HDMI], you can use HDMI monitor with audio function. If you install the DVI to HDMI adapter to enable or disable IOMMU support. The default value is [PCI Express]. DVI Function Use...

User Manual
Page 51
... option is [AHCI Mode]. Use this item to adjust SATA Mode. SATA Mode Use this item to enable or disable the S.M.A.R.T. (Self-Monitoring, Analysis, and Reporting Technology) feature. AMD AHCI BIOS ROM Use this item to enable or disable the "SATA Controller" feature. Hard Disk S.M.A.R.T. Coniguration options: [AHCI Mode], [RAID Mode] and [IDE Mode]. English 47 The default value of this option is [Disabled]. Coniguration options: [Disabled], [Auto], [Enabled]. 4.4.4 Storage Coniguration FM2A68M-HD+ SATA Controller Use this item to enable or disable AMD AHCI BIOS ROM.
... option is [AHCI Mode]. Use this item to adjust SATA Mode. SATA Mode Use this item to enable or disable the S.M.A.R.T. (Self-Monitoring, Analysis, and Reporting Technology) feature. AMD AHCI BIOS ROM Use this item to enable or disable the "SATA Controller" feature. Hard Disk S.M.A.R.T. Coniguration options: [AHCI Mode], [RAID Mode] and [IDE Mode]. English 47 The default value of this option is [Disabled]. Coniguration options: [Disabled], [Auto], [Enabled]. 4.4.4 Storage Coniguration FM2A68M-HD+ SATA Controller Use this item to enable or disable AMD AHCI BIOS ROM.

User Manual
Page 52
Parallel Port Enable or disable the Parallel port. Coniguration options: [3F8h / IRQ4] and [3E8h / IRQ4]. Serial Port Address Use this item to enable or disable the onboard serial port. Device Mode Select the device mode according to Auto. Serial Port Use this item to set this option to your connected device. Change Settings Select the address of the Parallel port. 48 English 4.4.5 Super IO Coniguration PS2 Y-Cable Enable the PS2 Y-Cable or set the address for the onboard serial port.
Parallel Port Enable or disable the Parallel port. Coniguration options: [3F8h / IRQ4] and [3E8h / IRQ4]. Serial Port Address Use this item to enable or disable the onboard serial port. Device Mode Select the device mode according to Auto. Serial Port Use this item to set this option to your connected device. Change Settings Select the address of the Parallel port. 48 English 4.4.5 Super IO Coniguration PS2 Y-Cable Enable the PS2 Y-Cable or set the address for the onboard serial port.

User Manual
Page 53
... power recovers. RTC Alarm Power On Use this item to enable or disable RTC (Real Time Clock) to enter the operating system after an unexpected AC/power loss. 4.4.6 ACPI Coniguration FM2A68M-HD+ Suspend to RAM Use this item to select whether to turn on the system from the power-soft-off mode. Check Ready Bit Enable to power on the system from the power-soft-off mode. Deep Sleep Conigure deep sleep mode for power...
... power recovers. RTC Alarm Power On Use this item to enable or disable RTC (Real Time Clock) to enter the operating system after an unexpected AC/power loss. 4.4.6 ACPI Coniguration FM2A68M-HD+ Suspend to RAM Use this item to select whether to turn on the system from the power-soft-off mode. Check Ready Bit Enable to power on the system from the power-soft-off mode. Deep Sleep Conigure deep sleep mode for power...

User Manual
Page 55
...to enter OS. [UEFI Setup Only] - Enables support for the details of USB 3.0 controller. USB devices are allowed to use of these four options: [Enabled] - If you have USB compatibility issue, it is selected. Legacy USB Support Use this option to enable or disable legacy support for USB devices. There are connected. [Disabled] - Legacy USB 3.0 Support Use this option to select legacy support for USB 3.0 devices. USB devices are not allowed to use of USB 2.0 controller. Please refer to below descriptions for legacy USB. [Auto] - 4.4.7 USB Coniguration FM2A68M-HD...
...to enter OS. [UEFI Setup Only] - Enables support for the details of USB 3.0 controller. USB devices are allowed to use of these four options: [Enabled] - If you have USB compatibility issue, it is selected. Legacy USB Support Use this option to enable or disable legacy support for USB devices. There are connected. [Disabled] - Legacy USB 3.0 Support Use this option to select legacy support for USB 3.0 devices. USB devices are not allowed to use of USB 2.0 controller. Please refer to below descriptions for legacy USB. [Auto] - 4.4.7 USB Coniguration FM2A68M-HD...
User Manual
Page 57
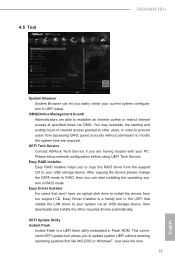
... RAID mode. Just save the new 53 English Please setup network coniguration before using UEFI Tech Service. UEFI Update Utility Instant Flash Instant Flash is a handy tool in Flash ROM. This convenient UEFI update tool allows you easily check your USB storage device. UEFI Tech Service Contact ASRock Tech Service if you to copy the RAID driver from the support CD to establish an internet curfew or restrict internet access at speciied times via an USB storage device, then downloads and installs...
... RAID mode. Just save the new 53 English Please setup network coniguration before using UEFI Tech Service. UEFI Update Utility Instant Flash Instant Flash is a handy tool in Flash ROM. This convenient UEFI update tool allows you easily check your USB storage device. UEFI Tech Service Contact ASRock Tech Service if you to copy the RAID driver from the support CD to establish an internet curfew or restrict internet access at speciied times via an USB storage device, then downloads and installs...
Quick Installation Guide
Page 7
Introduction Thank you are using. This Quick Installation Guide contains introduction of this manual occur, the updated version will be found in the user manual presented in the Support CD. www.asrock.com/support/index.asp 1.1 Package Contents ASRock FM2A68M-HD+ Motherboard (Micro ATX Form Factor) ASRock FM2A68M-HD+ Quick Installation Guide ASRock FM2A68M-HD+ Support CD 2 x Serial ATA (SATA) Data Cables (Optional) 1 x I/O Panel Shield 5 English In case any modiications of the motherboard and step-bystep installation guide. ASRock website http://www.asrock.com If you require...
Introduction Thank you are using. This Quick Installation Guide contains introduction of this manual occur, the updated version will be found in the user manual presented in the Support CD. www.asrock.com/support/index.asp 1.1 Package Contents ASRock FM2A68M-HD+ Motherboard (Micro ATX Form Factor) ASRock FM2A68M-HD+ Quick Installation Guide ASRock FM2A68M-HD+ Support CD 2 x Serial ATA (SATA) Data Cables (Optional) 1 x I/O Panel Shield 5 English In case any modiications of the motherboard and step-bystep installation guide. ASRock website http://www.asrock.com If you require...

Quick Installation Guide
Page 10
...; 1 x Power Fan Connector (3-pin) • 1 x 24 pin ATX Power Connector • 1 x 4 pin 12V Power Connector • 1 x Front Panel Audio Connector • 2 x USB 2.0 Headers (Support 4 USB 2.0 ports) (Supports ESD Protection (ASRock Full Spike Protection)) • 1 x USB 3.0 Header by ASMedia ASM1042A (Supports 2 USB 3.0 ports) (Supports ESD Protection (ASRock Full Spike Protection)) • 64Mb AMI UEFI Legal BIOS with GUI support • Supports "Plug and Play" • ACPI 1.1 Compliant wake up events • Supports jumperfree • SMBIOS 2.3.1 support • DRAM, CPU Voltage...
...; 1 x Power Fan Connector (3-pin) • 1 x 24 pin ATX Power Connector • 1 x 4 pin 12V Power Connector • 1 x Front Panel Audio Connector • 2 x USB 2.0 Headers (Support 4 USB 2.0 ports) (Supports ESD Protection (ASRock Full Spike Protection)) • 1 x USB 3.0 Header by ASMedia ASM1042A (Supports 2 USB 3.0 ports) (Supports ESD Protection (ASRock Full Spike Protection)) • 64Mb AMI UEFI Legal BIOS with GUI support • Supports "Plug and Play" • ACPI 1.1 Compliant wake up events • Supports jumperfree • SMBIOS 2.3.1 support • DRAM, CPU Voltage...

RAID Installation Guide
Page 5
...-bit / 8.1 / 8.1 64-bit on a RAID disk composed of 2 or more details) STEP 3: Copy RAID driver to a USB flash drive A. Go to finish the driver copy process. Follow the instruction inside your Windows version (Windows 7/8/8.1). During system boot, press or key to Tools Easy RAID Installer F. Plug a USB drive into one of the USB port. Go to enter UEFI setup utility. For RAID disk size larger than 2TB, please refer to . Set the "SATA Mode" option to Way 2 (UEFI Mode for more SATA HDDs with RAID functions, please follow Windows installation instruction...
...-bit / 8.1 / 8.1 64-bit on a RAID disk composed of 2 or more details) STEP 3: Copy RAID driver to a USB flash drive A. Go to finish the driver copy process. Follow the instruction inside your Windows version (Windows 7/8/8.1). During system boot, press or key to Tools Easy RAID Installer F. Plug a USB drive into one of the USB port. Go to enter UEFI setup utility. For RAID disk size larger than 2TB, please refer to . Set the "SATA Mode" option to Way 2 (UEFI Mode for more SATA HDDs with RAID functions, please follow Windows installation instruction...

RAID Installation Guide
Page 9
... driver inside the RAID ROM utility to create the target RAID disk. (Please refer to Section 1.4 in BIOS setup. During system boot, press or key to enter UEFI setup utility. B. D. C. After RAID driver is limited to 2TB. Please follow Windows installation instruction to support RAID disk size over 2TB and speed up . STEP 2: Create and configure the RAID disk A. Please install the DVD-ROM into one of the SATA ports 1 ~ 4 and set the "SATA Mode" option back to in this guide for AMD A88X, A78, A68H, A58 chipsets Way 1: Use legacy RAID ROM...
... driver inside the RAID ROM utility to create the target RAID disk. (Please refer to Section 1.4 in BIOS setup. During system boot, press or key to enter UEFI setup utility. B. D. C. After RAID driver is limited to 2TB. Please follow Windows installation instruction to support RAID disk size over 2TB and speed up . STEP 2: Create and configure the RAID disk A. Please install the DVD-ROM into one of the SATA ports 1 ~ 4 and set the "SATA Mode" option back to in this guide for AMD A88X, A78, A68H, A58 chipsets Way 1: Use legacy RAID ROM...
RAID Installation Guide
Page 18
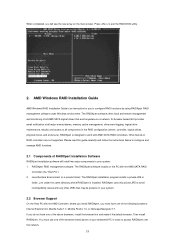
... work with the AMD SATA RAID Controller (the "Host PC"). 2. RAIDXpert RAID management software: The RAIDXpert software installs on your networked PC in folder _jvm under the same directory where RAIDXpert is an instruction for you to configure RAID functions by using RAIDXpert RAID management software under Windows environment. You must have one of RAIDXpert Installation Software RAIDXpert installation software will see the new array on the main screen. When completed, you will install...
... work with the AMD SATA RAID Controller (the "Host PC"). 2. RAIDXpert RAID management software: The RAIDXpert software installs on your networked PC in folder _jvm under the same directory where RAIDXpert is an instruction for you to configure RAID functions by using RAIDXpert RAID management software under Windows environment. You must have one of RAIDXpert Installation Software RAIDXpert installation software will see the new array on the main screen. When completed, you will install...


