
RAID Installation Guide
Page 7
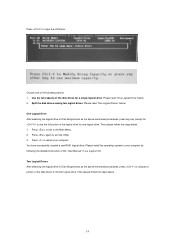
Click on keyboard to be included in the RAID array. Enter . Choose to toggle checkbox. Then choose . K. Enter to set to LD Max Size. Choose and set up RAID Drive. J. Click two times. 7 I. Choose and select the hard drives to create logical drive. L. Choose and click on keyboard to create a RAID Drive. M.
Click on keyboard to be included in the RAID array. Enter . Choose to toggle checkbox. Then choose . K. Enter to set to LD Max Size. Choose and set up RAID Drive. J. Click two times. 7 I. Choose and select the hard drives to create logical drive. L. Choose and click on keyboard to create a RAID Drive. M.

RAID Installation Guide
Page 12
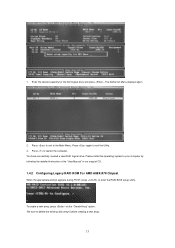
... system diagnosis) 1.4.1 Configuring RAID Option ROM For AMD A85X/A75/A55/A58 Chipsets During the POST process, press keys, then the RAID Option ROM Utility Main Menu appears. 12 Monitoring RAID status - Secure erasing of all data on your physical drives as RAID logical drives. If this is the first time...
... system diagnosis) 1.4.1 Configuring RAID Option ROM For AMD A85X/A75/A55/A58 Chipsets During the POST process, press keys, then the RAID Option ROM Utility Main Menu appears. 12 Monitoring RAID status - Secure erasing of all data on your physical drives as RAID logical drives. If this is the first time...

RAID Installation Guide
Page 13
Press 2 on the Main Menu screen to your logical drive. Assign the appropriate number of disk drives to display the Define LD Menu. Press the arrow keys to cycle ...
Press 2 on the Main Menu screen to your logical drive. Assign the appropriate number of disk drives to display the Define LD Menu. Press the arrow keys to cycle ...
RAID Installation Guide
Page 14
... read "Two Logical Drives" below . 2. Two Logical Drives After selecting the logical drive in our support CD. Choose one logical drive. Press again to the Main Menu. 2. You have successfully created a new RAID logical drive. Press to the first logical drive. Press to your computer. Split the disk drives among two...
... read "Two Logical Drives" below . 2. Two Logical Drives After selecting the logical drive in our support CD. Choose one logical drive. Press again to the Main Menu. 2. You have successfully created a new RAID logical drive. Press to the first logical drive. Press to your computer. Split the disk drives among two...
RAID Installation Guide
Page 15
... "User Manual" in our support CD. 1.4.2 Configuring Legacy RAID ROM For AMD A88X/A78 Chipset When the appropriate prompt appears during POST, press to the Main Menu. Press again to exit the Utility. 3.
... "User Manual" in our support CD. 1.4.2 Configuring Legacy RAID ROM For AMD A88X/A78 Chipset When the appropriate prompt appears during POST, press to the Main Menu. Press again to exit the Utility. 3.
RAID Installation Guide
Page 18
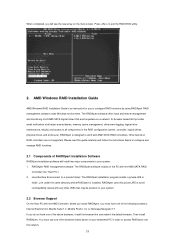
... installation program installs a private JRE in order to access RAIDXpert over the network. 18 If you do not have one of the above on the main screen. You must have one of the browsers listed above browsers, install the browser first and make it the default browser. When completed, you will...
... installation program installs a private JRE in order to access RAIDXpert over the network. 18 If you do not have one of the above on the main screen. You must have one of the browsers listed above browsers, install the browser first and make it the default browser. When completed, you will...
User Manual
Page 4
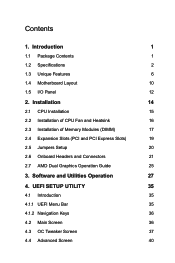
... 2.6 Onboard Headers and Connectors 21 2.7 AMD Dual Graphics Operation Guide 25 3. Contents 1. UEFI SETUP UTILITY 35 4.1 Introduction 35 4.1.1 UEFI Menu Bar 35 4.1.2 Navigation Keys 36 4.2 Main Screen 36 4.3 OC Tweaker Screen 37 4.4 Advanced Screen 40 Introduction 1 1.1 Package Contents 1 1.2 Specifications 2 1.3 Unique Features 6 1.4 Motherboard Layout 10 1.5 I/O Panel 12 2.
... 2.6 Onboard Headers and Connectors 21 2.7 AMD Dual Graphics Operation Guide 25 3. Contents 1. UEFI SETUP UTILITY 35 4.1 Introduction 35 4.1.1 UEFI Menu Bar 35 4.1.2 Navigation Keys 36 4.2 Main Screen 36 4.3 OC Tweaker Screen 37 4.4 Advanced Screen 40 Introduction 1 1.1 Package Contents 1 1.2 Specifications 2 1.3 Unique Features 6 1.4 Motherboard Layout 10 1.5 I/O Panel 12 2.

User Manual
Page 27
... off (S5). English 22 To activate the front mic. The LED keeps blinking when the sys-tem is reading or writing data. A front panel module mainly consists of power switch, reset switch, power LED, hard drive activity LED, speaker and etc. For Windows® 8.1 / 8.1 64-bit / 8 / 8 64-bit / 7 / 7 64-bit OS...
... off (S5). English 22 To activate the front mic. The LED keeps blinking when the sys-tem is reading or writing data. A front panel module mainly consists of power switch, reset switch, power LED, hard drive activity LED, speaker and etc. For Windows® 8.1 / 8.1 64-bit / 8 / 8 64-bit / 7 / 7 64-bit OS...

User Manual
Page 32
Utilities Menu The Utilities Menu shows the application software that enhance the motherboard's features. If the Main Menu does not appear automatically, locate and double click on a specific item then follow the order... to bottom to display the menu. Click on the file "ASRSETUP.EXE" in your computer. The CD automatically displays the Main Menu if "AUTORUN" is enabled in the Support CD to install those required drivers. Running The Support CD To begin using... The drivers compatible to install it. 27 English Therefore, the drivers you install can work properly. FM2A58M-HD+ 3.
Utilities Menu The Utilities Menu shows the application software that enhance the motherboard's features. If the Main Menu does not appear automatically, locate and double click on a specific item then follow the order... to bottom to display the menu. Click on the file "ASRSETUP.EXE" in your computer. The CD automatically displays the Main Menu if "AUTORUN" is enabled in the Support CD to install those required drivers. Running The Support CD To begin using... The drivers compatible to install it. 27 English Therefore, the drivers you install can work properly. FM2A58M-HD+ 3.

User Manual
Page 33
... auto-installed as well. English 28 After the installation, you install the all-in A-Tuning main menu: Operation Mode, Tools, OC Tweaker, System Info and Tech Service. Operation Mode Choose an operation mode for your system from ASRock's support CD, A-Tuning will pop up. 3.2.2 Using A-Tuning There are five sections in -one...
... auto-installed as well. English 28 After the installation, you install the all-in A-Tuning main menu: Operation Mode, Tools, OC Tweaker, System Info and Tech Service. Operation Mode Choose an operation mode for your system from ASRock's support CD, A-Tuning will pop up. 3.2.2 Using A-Tuning There are five sections in -one...
User Manual
Page 40
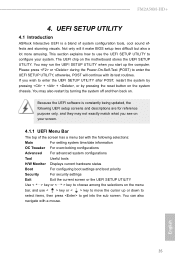
UEFI SETUP UTILITY 4.1 Introduction ASRock Interactive UEFI is constantly being updated, the following selections: Main For setting system time/date information OC Tweaker For overclocking configurations Advanced For advanced system configurations Tool Useful tools H/W Monitor Displays ...UEFI Setup Utility to move the cursor up the computer. Not only will continue with a mouse. You can also navigate with its test routines. FM2A58M-HD+ 4. Because the UEFI software is a blend of the screen has a menu bar with the following UEFI setup screens and descriptions are for ...
UEFI SETUP UTILITY 4.1 Introduction ASRock Interactive UEFI is constantly being updated, the following selections: Main For setting system time/date information OC Tweaker For overclocking configurations Advanced For advanced system configurations Tool Useful tools H/W Monitor Displays ...UEFI Setup Utility to move the cursor up the computer. Not only will continue with a mouse. You can also navigate with its test routines. FM2A58M-HD+ 4. Because the UEFI software is a blend of the screen has a menu bar with the following UEFI setup screens and descriptions are for ...

User Manual
Page 41
English Active Page on Entry This allows you to the Exit Screen or exit the current screen 4.2 Main Screen When you enter the UEFI Setup Utility, the Main screen will appear and display the system overview. To change option for the selected items Switch to next function To bring up or down to...
English Active Page on Entry This allows you to the Exit Screen or exit the current screen 4.2 Main Screen When you enter the UEFI Setup Utility, the Main screen will appear and display the system overview. To change option for the selected items Switch to next function To bring up or down to...

Quick Installation Guide
Page 23
... state. A front panel module mainly consists of power switch, reset switch, power LED, hard drive activity LED, speaker and etc. PWRBTN (Power Switch): Connect to the hard drive activity LED on the chassis front panel. The LED is off when the system is reading or writing data. FM2A58M-HD+ E. You may differ by...
... state. A front panel module mainly consists of power switch, reset switch, power LED, hard drive activity LED, speaker and etc. PWRBTN (Power Switch): Connect to the hard drive activity LED on the chassis front panel. The LED is off when the system is reading or writing data. FM2A58M-HD+ E. You may differ by...