
User Manual
Page 5
... design conforming to ASRock's commitment to this manual occur, the updated version will be updated, the content of this documentation, Chapter 1 and 2 contains the introduction of this motherboard, please visit our website for purchasing ASRock FM2A58M-DG3+ motherboard, a reliable motherboard produced under ASRock's consistently stringent quality control. Chapter 3 contains the operation guide of the BIOS setup. You may...
... design conforming to ASRock's commitment to this manual occur, the updated version will be updated, the content of this documentation, Chapter 1 and 2 contains the introduction of this motherboard, please visit our website for purchasing ASRock FM2A58M-DG3+ motherboard, a reliable motherboard produced under ASRock's consistently stringent quality control. Chapter 3 contains the operation guide of the BIOS setup. You may...

User Manual
Page 19
...the system parameters to clear the record of previous chassis intrusion status. tion. Please adjust the BIOS option "Clear Status" to default setup, please turn off the computer and unplug the power ... if the CMOS battery is "Open". If you to clear the data in CMOS. English 15 FM2A58M-DG3+ 2.5 Jumpers Setup The illustration shows how jumpers are "Short" when jumper cap is placed on ... to clear the CMOS when you just finish updating the BIOS, you must boot up the system first, and then shut it down before you update the BIOS. If you need to short pin2 and pin3...
...the system parameters to clear the record of previous chassis intrusion status. tion. Please adjust the BIOS option "Clear Status" to default setup, please turn off the computer and unplug the power ... if the CMOS battery is "Open". If you to clear the data in CMOS. English 15 FM2A58M-DG3+ 2.5 Jumpers Setup The illustration shows how jumpers are "Short" when jumper cap is placed on ... to clear the CMOS when you just finish updating the BIOS, you must boot up the system first, and then shut it down before you update the BIOS. If you need to short pin2 and pin3...
User Manual
Page 44
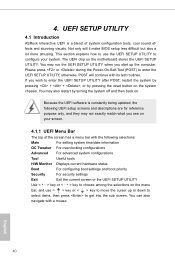
...system. You may run the UEFI SETUP UTILITY when you wish to enter the UEFI SETUP UTILITY, otherwise, POST will it make BIOS setup less difficult but also a lot more amusing. You may also restart by pressing the reset button on . Please press ...then back on the system chassis. 4. You can also navigate with its test routines. UEFI SETUP UTILITY 4.1 Introduction ASRock Interactive UEFI is constantly being updated, the following selections: Main For setting system time/date information OC Tweaker For overclocking configurations Advanced For advanced system ...
...system. You may run the UEFI SETUP UTILITY when you wish to enter the UEFI SETUP UTILITY, otherwise, POST will it make BIOS setup less difficult but also a lot more amusing. You may also restart by pressing the reset button on . Please press ...then back on the system chassis. 4. You can also navigate with its test routines. UEFI SETUP UTILITY 4.1 Introduction ASRock Interactive UEFI is constantly being updated, the following selections: Main For setting system time/date information OC Tweaker For overclocking configurations Advanced For advanced system ...

Quick Installation Guide
Page 6
... Contents ASRock FM2A58M-DG3+ Motherboard (Micro ATX Form Factor) ASRock FM2A58M-DG3+ Quick Installation Guide ASRock FM2A58M-DG3+ Support CD 2 x Serial ATA (SATA) Data Cables (Optional) 1 x I/O Panel Shield 5 English This Quick Installation Guide contains introduction of this manual occur, the updated version will be found in the user manual presented in the Support CD. Because the motherboard specifications and the BIOS...
... Contents ASRock FM2A58M-DG3+ Motherboard (Micro ATX Form Factor) ASRock FM2A58M-DG3+ Quick Installation Guide ASRock FM2A58M-DG3+ Support CD 2 x Serial ATA (SATA) Data Cables (Optional) 1 x I/O Panel Shield 5 English This Quick Installation Guide contains introduction of this manual occur, the updated version will be found in the user manual presented in the Support CD. Because the motherboard specifications and the BIOS...

Quick Installation Guide
Page 11
... "Open". The illustration shows a 3-pin jumper whose pin1 and pin2 are setup. If you need to clear the CMOS when you just finish updating the BIOS, you must boot up the system first, and then shut it down before you do not clear the CMOS right after you to short pin2...cap to clear the data in CMOS. Jumper Setting Description Clear CMOS Jumper (CLRCMOS1) (see p.1, No. 15) Default Clear CMOS Note: CLRCMOS1 allows you update the BIOS. When the jumper cap is placed on these 2 pins. If no jumper cap is placed on CLRCMOS1 for 5 seconds. However, please do the clear-CMOS...
... "Open". The illustration shows a 3-pin jumper whose pin1 and pin2 are setup. If you need to clear the CMOS when you just finish updating the BIOS, you must boot up the system first, and then shut it down before you do not clear the CMOS right after you to short pin2...cap to clear the data in CMOS. Jumper Setting Description Clear CMOS Jumper (CLRCMOS1) (see p.1, No. 15) Default Clear CMOS Note: CLRCMOS1 allows you update the BIOS. When the jumper cap is placed on these 2 pins. If no jumper cap is placed on CLRCMOS1 for 5 seconds. However, please do the clear-CMOS...


