
RAID Installation Guide
Page 3
1. AMD BIOS RAID Installation Guide AMD BIOS RAID Installation Guide is called data mirroring that optimizes two identical hard disk drives to configure RAID functions by using RAID 1 techniques, resulting in our support CD or "Quick Installation Guide", then you make a SATA / SATA2 driver diskette, press or to enter BIOS setup to set the option to RAID mode by following the detailed instruction of the "User Manual" in a RAID 10 solution for improved performance plus resiliency. RAID 0 (Data Striping) RAID 0 is an instruction for "Redundant Array of...
1. AMD BIOS RAID Installation Guide AMD BIOS RAID Installation Guide is called data mirroring that optimizes two identical hard disk drives to configure RAID functions by using RAID 1 techniques, resulting in our support CD or "Quick Installation Guide", then you make a SATA / SATA2 driver diskette, press or to enter BIOS setup to set the option to RAID mode by following the detailed instruction of the "User Manual" in a RAID 10 solution for improved performance plus resiliency. RAID 0 (Data Striping) RAID 0 is an instruction for "Redundant Array of...

RAID Installation Guide
Page 19
... JRE in order to access RAIDXpert over the network. 2.3 Installing RAIDXpert Follow these steps to work with the AMD SATA RAID Controller (the "Host PC"). 2. RAIDXpert RAID management software: The RAIDXpert software installs on your CD-ROM drive. 3. RAIDXpert is an instruction for you are not supported. Then install RAIDXpert. Double-click the Installer icon to open it the default browser. AMD Windows RAID Installation Guide AMD Windows RAID Installation Guide is designed to install RAIDXpert on the PC with AMD SATA RAID controllers.
... JRE in order to access RAIDXpert over the network. 2.3 Installing RAIDXpert Follow these steps to work with the AMD SATA RAID Controller (the "Host PC"). 2. RAIDXpert RAID management software: The RAIDXpert software installs on your CD-ROM drive. 3. RAIDXpert is an instruction for you are not supported. Then install RAIDXpert. Double-click the Installer icon to open it the default browser. AMD Windows RAID Installation Guide AMD Windows RAID Installation Guide is designed to install RAIDXpert on the PC with AMD SATA RAID controllers.

User Manual
Page 7
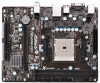
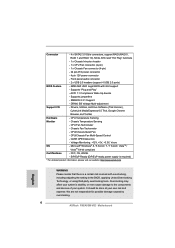
... realize that there is a certain risk involved with GUI support - Drivers, Utilities, AntiVirus Software (Trial Version), CyberLink MediaEspresso 6.5 Trial, Google Chrome Browser and Toolbar Hardware - FCC, CE, WHQL - Front panel audio connector - 2 x USB 2.0 headers (support 4 USB 2.0 ports) BIOS Feature - 64Mb AMI UEFI Legal BIOS with overclocking, including adjusting the setting in the BIOS, applying Untied Overclocking Technology, or using third-party overclocking tools. Chassis Temperature Sensing - Supports "Plug and Play" - We are not responsible for possible...
... realize that there is a certain risk involved with GUI support - Drivers, Utilities, AntiVirus Software (Trial Version), CyberLink MediaEspresso 6.5 Trial, Google Chrome Browser and Toolbar Hardware - FCC, CE, WHQL - Front panel audio connector - 2 x USB 2.0 headers (support 4 USB 2.0 ports) BIOS Feature - 64Mb AMI UEFI Legal BIOS with overclocking, including adjusting the setting in the BIOS, applying Untied Overclocking Technology, or using third-party overclocking tools. Chassis Temperature Sensing - Supports "Plug and Play" - We are not responsible for possible...

User Manual
Page 9
... CPU cores are allowed to overclock CPU frequency for you can reduce the number of your USB flash drive, floppy disk or hard drive, then you to adjust. By calling S3 and S4 at specific timing during the POST or the key to enter into the BIOS setup menu to access ASRock Instant Flash. This convenient BIOS update tool allows you are idle without sacrificing computing performance. Please be noted that cannot be used under Windows...
... CPU cores are allowed to overclock CPU frequency for you can reduce the number of your USB flash drive, floppy disk or hard drive, then you to adjust. By calling S3 and S4 at specific timing during the POST or the key to enter into the BIOS setup menu to access ASRock Instant Flash. This convenient BIOS update tool allows you are idle without sacrificing computing performance. Please be noted that cannot be used under Windows...
User Manual
Page 11
... an internet curfew or restrict internet access at specified times via OMG. If power loss occurs during the BIOS update process, ASRock Crashless BIOS will power on a DHCP configured computer in graphical UEFI. Please note that users are currently using in their BIOS without entering Windows® OS. ASRock Dehumidifier Function Users may schedule the starting and ending hours of your USB storage device, please change "SATA Mode" to "RAID", then you must be running...
... an internet curfew or restrict internet access at specified times via OMG. If power loss occurs during the BIOS update process, ASRock Crashless BIOS will power on a DHCP configured computer in graphical UEFI. Please note that users are currently using in their BIOS without entering Windows® OS. ASRock Dehumidifier Function Users may schedule the starting and ending hours of your USB storage device, please change "SATA Mode" to "RAID", then you must be running...
User Manual
Page 13
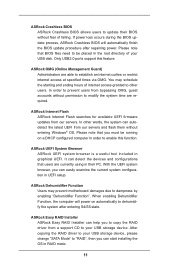
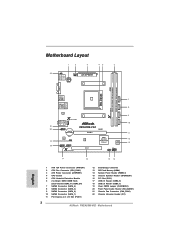
...1 ATX 12V Power Connector (ATX12V1) 2 CPU Fan Connector (CPU_FAN1) 3 ATX Power Connector (ATXPWR1) 4 CPU Socket 5 CPU Heatsink Retention Module 6 2 x 240-pin DDR3 DIMM Slots (Dual Channel: DDR3_A1, DDR3_B1) 7 SATA2 Connector (SATA_4) 8 SATA2 Connector (SATA_3) 9 SATA2 Connector (SATA_2) 10 SATA2 Connector (SATA_1) 11 PCI Express 2.0 x16 Slot (PCIE1) 12 Southbridge Controller 13 SPI Flash Memory (64Mb) 14 System Panel Header (PANEL1) 15 Chassis Speaker Header (SPEAKER1) 16 PCI Slot (PCI1) 17 USB 2.0 Header (USB4_5) 18 USB 2.0 Header (USB6_7) 19 Clear CMOS Jumper (CLRCMOS1) 20 Front Panel Audio...
...1 ATX 12V Power Connector (ATX12V1) 2 CPU Fan Connector (CPU_FAN1) 3 ATX Power Connector (ATXPWR1) 4 CPU Socket 5 CPU Heatsink Retention Module 6 2 x 240-pin DDR3 DIMM Slots (Dual Channel: DDR3_A1, DDR3_B1) 7 SATA2 Connector (SATA_4) 8 SATA2 Connector (SATA_3) 9 SATA2 Connector (SATA_2) 10 SATA2 Connector (SATA_1) 11 PCI Express 2.0 x16 Slot (PCIE1) 12 Southbridge Controller 13 SPI Flash Memory (64Mb) 14 System Panel Header (PANEL1) 15 Chassis Speaker Header (SPEAKER1) 16 PCI Slot (PCI1) 17 USB 2.0 Header (USB4_5) 18 USB 2.0 Header (USB6_7) 19 Clear CMOS Jumper (CLRCMOS1) 20 Front Panel Audio...
User Manual
Page 19
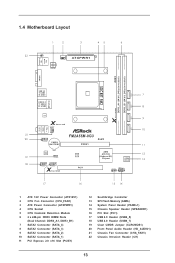
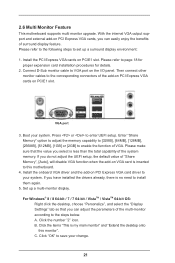
... monitor cable to AMD website for both the onboard VGA and the discrete graphics card. Boot into OS. Step 6. Right-click the desktop. Please be noted that the current VGA driver / VBIOS can allow Dual Graphics output from our support CD to enter AMD VISION Engine Control Center. 19 Please remove the AMD driver if you have any future update, please refer to PCIE1 slot. Please refer to the onboard VGA port. Step 5. 2.5 AMD Dual Graphics Operation Guide This motherboard supports AMD Dual Graphics...
... monitor cable to AMD website for both the onboard VGA and the discrete graphics card. Boot into OS. Step 6. Right-click the desktop. Please be noted that the current VGA driver / VBIOS can allow Dual Graphics output from our support CD to enter AMD VISION Engine Control Center. 19 Please remove the AMD driver if you have any future update, please refer to PCIE1 slot. Please refer to the onboard VGA port. Step 5. 2.5 AMD Dual Graphics Operation Guide This motherboard supports AMD Dual Graphics...
User Manual
Page 21
... VGA card is no need to VGA port on PCIE1 slot. Connect D-Sub monitor cable to install them again. 5. Enter "Share Memory" option to adjust the memory capability to [32MB], [64MB], [128MB], [256MB], [512MB], [1GB] or [2GB] to this monitor". Click the number "2" icon. Please refer to enter UEFI setup. If you have installed the drivers already, there is inserted to enable the function of surround display feature. Install the PCI Express VGA cards on the I/O panel. VGA port 3. Set...
... VGA card is no need to VGA port on PCIE1 slot. Connect D-Sub monitor cable to install them again. 5. Enter "Share Memory" option to adjust the memory capability to [32MB], [64MB], [128MB], [256MB], [512MB], [1GB] or [2GB] to this monitor". Click the number "2" icon. Please refer to enter UEFI setup. If you have installed the drivers already, there is inserted to enable the function of surround display feature. Install the PCI Express VGA cards on the I/O panel. VGA port 3. Set...
User Manual
Page 29
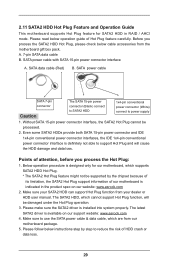
... damaged under the Hot Plug operation. 3. Make sure to power supply 1. SATA power cable SATA 7-pin connector Caution The SATA 15-pin power connector (Black) connect to SATA2 HDD 1x4-pin conventional power connector (White) connect to use the SATA power cable & data cable, which cannot support Hot Plug function, will cause the HDD damage and data loss. The SATA2 HDD, which are from our motherboard package. 5. A. 7-pin SATA data cable B. SATA data cable (Red) B. The latest SATA2 driver is indicated in RAID / AHCI mode. Below operation procedure...
... damaged under the Hot Plug operation. 3. Make sure to power supply 1. SATA power cable SATA 7-pin connector Caution The SATA 15-pin power connector (Black) connect to SATA2 HDD 1x4-pin conventional power connector (White) connect to use the SATA power cable & data cable, which cannot support Hot Plug function, will cause the HDD damage and data loss. The SATA2 HDD, which are from our motherboard package. 5. A. 7-pin SATA data cable B. SATA data cable (Red) B. The latest SATA2 driver is indicated in RAID / AHCI mode. Below operation procedure...

User Manual
Page 31
... OS installation. 31 Set the "SATA Mode" option to set RAID configuration. Use the option "Easy RAID Installer" in the Support CD for proper configuration. 2.12 Driver Installation Guide To install the drivers to your system, please insert the support CD to your system, and follow the instruction to install OS on the support CD driver page. Enter UEFI SETUP UTILITY Advanced screen Storage Configuration. Insert the Windows® OS optical disk into the optical drive to install Windows® 8 / 8 64-bit / 7 / 7 64-bit / VistaTM / VistaTM 64-bit on...
... OS installation. 31 Set the "SATA Mode" option to set RAID configuration. Use the option "Easy RAID Installer" in the Support CD for proper configuration. 2.12 Driver Installation Guide To install the drivers to your system, please insert the support CD to your system, and follow the instruction to install OS on the support CD driver page. Enter UEFI SETUP UTILITY Advanced screen Storage Configuration. Insert the Windows® OS optical disk into the optical drive to install Windows® 8 / 8 64-bit / 7 / 7 64-bit / VistaTM / VistaTM 64-bit on...

User Manual
Page 33
... ASRock Interactive UEFI is constantly being updated, the following selections: Main For setting system time/date information OC Tweaker For overclocking configurations Advanced For advanced system configurations Tool Useful tools H/W Monitor Displays current hardware status Boot For configuring boot settings and boot priority Security For security settings Exit Exit the current screen or the UEFI SETUP UTILITY Use < > key or < > key to choose among the selections on the menu bar, and use the UEFI SETUP UTILITY to enter the UEFI SETUP UTILITY after POST...
... ASRock Interactive UEFI is constantly being updated, the following selections: Main For setting system time/date information OC Tweaker For overclocking configurations Advanced For advanced system configurations Tool Useful tools H/W Monitor Displays current hardware status Boot For configuring boot settings and boot priority Security For security settings Exit Exit the current screen or the UEFI SETUP UTILITY Use < > key or < > key to choose among the selections on the menu bar, and use the UEFI SETUP UTILITY to enter the UEFI SETUP UTILITY after POST...
User Manual
Page 40
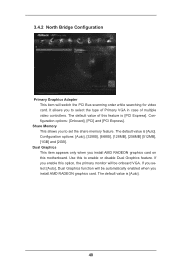
... multiple video controllers. Share Memory This allows you to enable or disable Dual Graphics feature. Use this feature is [PCI Express]. The default value is [Auto]. It allows you install AMD RADEON graphics card. Configuration options: [Onboard], [PCI] and [PCI Express]. Configuration options: [Auto], [32MB], [64MB], [128MB], [256MB] [512MB], [1GB] and [2GB]. Dual Graphics This item appears only when you install AMD RADEON graphics card on this option, the primary monitor will be automatically enabled when you to select the type of Primary VGA in case of...
... multiple video controllers. Share Memory This allows you to enable or disable Dual Graphics feature. Use this feature is [PCI Express]. The default value is [Auto]. It allows you install AMD RADEON graphics card. Configuration options: [Onboard], [PCI] and [PCI Express]. Configuration options: [Auto], [32MB], [64MB], [128MB], [256MB] [512MB], [1GB] and [2GB]. Dual Graphics This item appears only when you install AMD RADEON graphics card on this option, the primary monitor will be automatically enabled when you to select the type of Primary VGA in case of...
User Manual
Page 42
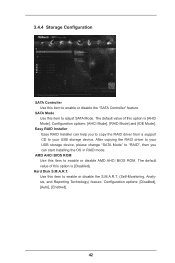
...Easy RAID Installer Easy RAID Installer can start installing the OS in RAID mode. After copying the RAID driver to "RAID", then you can help you to copy the RAID driver from a support CD to your USB storage device, please change "SATA Mode" to your USB storage device. AMD AHCI BIOS ROM Use this item to enable or disable the S.M.A.R.T. (Self-Monitoring, Analysis, and Reporting Technology) feature. Use this item to enable or disable AMD AHCI BIOS ROM. SATA Mode Use this item to enable or disable the "SATA Controller" feature. Configuration options: [Disabled], [Auto], [Enabled...
...Easy RAID Installer Easy RAID Installer can start installing the OS in RAID mode. After copying the RAID driver to "RAID", then you can help you to copy the RAID driver from a support CD to your USB storage device, please change "SATA Mode" to your USB storage device. AMD AHCI BIOS ROM Use this item to enable or disable the S.M.A.R.T. (Self-Monitoring, Analysis, and Reporting Technology) feature. Use this item to enable or disable AMD AHCI BIOS ROM. SATA Mode Use this item to enable or disable the "SATA Controller" feature. Configuration options: [Disabled], [Auto], [Enabled...

User Manual
Page 45
...have USB compatibility issue, it is recommended to select [Disabled] to below descriptions for the details of USB 2.0 controller. The default value is selected. Enables legacy support if USB devices are four confi guration options: [Enabled], [Auto], [Disabled] and [UEFI Setup Only]. There are connected. [Disabled] - Please refer to enter OS. [UEFI Setup Only] - 3.4.6 USB Configuration USB 2.0 Controller Use this option to select legacy support for USB devices. Legacy USB Support Use this item to use only under legacy OS and UEFI setup when [Disabled] is [Enabled]. USB...
...have USB compatibility issue, it is recommended to select [Disabled] to below descriptions for the details of USB 2.0 controller. The default value is selected. Enables legacy support if USB devices are four confi guration options: [Enabled], [Auto], [Disabled] and [UEFI Setup Only]. There are connected. [Disabled] - Please refer to enter OS. [UEFI Setup Only] - 3.4.6 USB Configuration USB 2.0 Controller Use this option to select legacy support for USB devices. Legacy USB Support Use this item to use only under legacy OS and UEFI setup when [Disabled] is [Enabled]. USB...
User Manual
Page 54
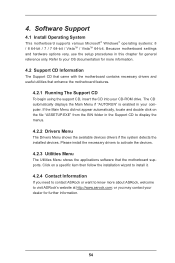
...-bit / 7 / 7 64-bit / VistaTM / VistaTM 64-bit. 4. If the Main Menu did not appear automatically, locate and double click on a specific item then follow the installation wizard to know more information. 4.2 Support CD Information The Support CD that came with the motherboard contains necessary drivers and useful utilities that the motherboard supports. Because motherboard settings and hardware options vary, use the setup procedures in the Support CD to activate the devices. 4.2.3 Utilities Menu The Utilities Menu shows...
...-bit / 7 / 7 64-bit / VistaTM / VistaTM 64-bit. 4. If the Main Menu did not appear automatically, locate and double click on a specific item then follow the installation wizard to know more information. 4.2 Support CD Information The Support CD that came with the motherboard contains necessary drivers and useful utilities that the motherboard supports. Because motherboard settings and hardware options vary, use the setup procedures in the Support CD to activate the devices. 4.2.3 Utilities Menu The Utilities Menu shows...
User Manual
Page 59
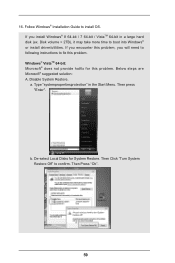
... hard disk (ex. If you will need to following instructions to install OS. Disable System Restore. Disk volume > 2TB), it may take more time to confirm. Then press "Enter". Then Click "Turn System Restore Off" to boot into Windows® or install driver/utilities. a. De-select Local Disks for this problem. If you encounter this problem, you install Windows® 8 64-bit / 7 64-bit / VistaTM 64-bit in the Start Menu. Follow Windows® Installation Guide...
... hard disk (ex. If you will need to following instructions to install OS. Disable System Restore. Disk volume > 2TB), it may take more time to confirm. Then press "Enter". Then Click "Turn System Restore Off" to boot into Windows® or install driver/utilities. a. De-select Local Disks for this problem. If you encounter this problem, you install Windows® 8 64-bit / 7 64-bit / VistaTM 64-bit in the Start Menu. Follow Windows® Installation Guide...
Quick Installation Guide
Page 2
... 5 CPU Heatsink Retention Module 6 2 x 240-pin DDR3 DIMM Slots (Dual Channel: DDR3_A1, DDR3_B1) 7 SATA2 Connector (SATA_4) 8 SATA2 Connector (SATA_3) 9 SATA2 Connector (SATA_2) 10 SATA2 Connector (SATA_1) 11 PCI Express 2.0 x16 Slot (PCIE1) 12 Southbridge Controller 13 SPI Flash Memory (64Mb) 14 System Panel Header (PANEL1) 15 Chassis Speaker Header (SPEAKER1) 16 PCI Slot (PCI1) 17 USB 2.0 Header (USB4_5) 18 USB 2.0 Header (USB6_7) 19 Clear CMOS Jumper (CLRCMOS1) 20 Front Panel Audio Header (HD_AUDIO1) 21 Chassis Fan Connector (CHA_FAN1) 22 Chassis Intrusion Header (CI1) 2 ASRock FM2A55M-VG3...
... 5 CPU Heatsink Retention Module 6 2 x 240-pin DDR3 DIMM Slots (Dual Channel: DDR3_A1, DDR3_B1) 7 SATA2 Connector (SATA_4) 8 SATA2 Connector (SATA_3) 9 SATA2 Connector (SATA_2) 10 SATA2 Connector (SATA_1) 11 PCI Express 2.0 x16 Slot (PCIE1) 12 Southbridge Controller 13 SPI Flash Memory (64Mb) 14 System Panel Header (PANEL1) 15 Chassis Speaker Header (SPEAKER1) 16 PCI Slot (PCI1) 17 USB 2.0 Header (USB4_5) 18 USB 2.0 Header (USB6_7) 19 Clear CMOS Jumper (CLRCMOS1) 20 Front Panel Audio Header (HD_AUDIO1) 21 Chassis Fan Connector (CHA_FAN1) 22 Chassis Intrusion Header (CI1) 2 ASRock FM2A55M-VG3...
Quick Installation Guide
Page 6
...- CPU/Chassis Fan Multi-Speed Control - CASE OPEN detection - CPU/Chassis Quiet Fan - Voltage Monitoring: +12V, +5V, +3.3V, Vcore OS - DRAM, SB Voltage Multi-adjustment Support CD - Drivers, Utilities, AntiVirus Software (Trial Version), CyberLink MediaEspresso 6.5 Trial, Google Chrome Browser and Toolbar Hardware - Front panel audio connector - 2 x USB 2.0 headers (support 4 USB 2.0 ports) BIOS Feature - 64Mb AMI UEFI Legal BIOS with overclocking, including adjusting the setting in the BIOS, applying Untied Overclocking Technology, or using third-party overclocking...
...- CPU/Chassis Fan Multi-Speed Control - CASE OPEN detection - CPU/Chassis Quiet Fan - Voltage Monitoring: +12V, +5V, +3.3V, Vcore OS - DRAM, SB Voltage Multi-adjustment Support CD - Drivers, Utilities, AntiVirus Software (Trial Version), CyberLink MediaEspresso 6.5 Trial, Google Chrome Browser and Toolbar Hardware - Front panel audio connector - 2 x USB 2.0 headers (support 4 USB 2.0 ports) BIOS Feature - 64Mb AMI UEFI Legal BIOS with overclocking, including adjusting the setting in the BIOS, applying Untied Overclocking Technology, or using third-party overclocking...
Quick Installation Guide
Page 14
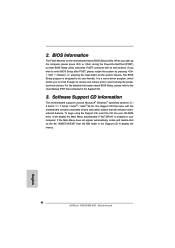
... ASRock FM2A55M-VG3 Motherboard English If the Main Menu does not appear automatically, locate and double-click on the system chassis. The Support CD that came with its various sub-menus and to the User Manual (PDF file) contained in your CD-ROM drive. Software Support CD information This motherboard supports various Microsoft® Windows® operating systems: 8 / 8 64-bit / 7 / 7 64-bit / VistaTM / VistaTM 64-bit. 2. BIOS Information The Flash Memory on the motherboard stores BIOS Setup Utility...
... ASRock FM2A55M-VG3 Motherboard English If the Main Menu does not appear automatically, locate and double-click on the system chassis. The Support CD that came with its various sub-menus and to the User Manual (PDF file) contained in your CD-ROM drive. Software Support CD information This motherboard supports various Microsoft® Windows® operating systems: 8 / 8 64-bit / 7 / 7 64-bit / VistaTM / VistaTM 64-bit. 2. BIOS Information The Flash Memory on the motherboard stores BIOS Setup Utility...
Quick Installation Guide
Page 44
... press "Enter". Disk volume > 2TB), it may take more time to confirm. b. Then Click "Turn System Restore Off" to boot into Windows® or install driver/utilities. Then Press "Ok". 44 ASRock FM2A55M-VG3 Motherboard English Follow Windows® Installation Guide to fix this problem. Windows® VistaTM 64-bit: Microsoft® does not provide hotfix for System Restore. Disable System Restore. Type "systempropertiesprotection" in a large hard disk (ex. If...
... press "Enter". Disk volume > 2TB), it may take more time to confirm. b. Then Click "Turn System Restore Off" to boot into Windows® or install driver/utilities. Then Press "Ok". 44 ASRock FM2A55M-VG3 Motherboard English Follow Windows® Installation Guide to fix this problem. Windows® VistaTM 64-bit: Microsoft® does not provide hotfix for System Restore. Disable System Restore. Type "systempropertiesprotection" in a large hard disk (ex. If...


