
User Manual
Page 4
...2 Chapter 2 Product Overview 4 2.1 Front View 4 2.2 Rear View 5 2.3 Motherboard Layout 6 Chapter 3 Hardware Installation 12 3.1 Begin Installation 12 3.2 Installing the CPU 13 3.3 Installing the CPU Fan and Heatsink 15 3.4 Installing Memory Modules (SO-DIMM) 16 3.5 Installing the WiFi Module 17 3.6 Installing the M.2 SSD (Type 2280) 18 3.7 Installing the 2.5-inch HDD/SSD 19 3.8 Complete 21 3.9 Installing the VESA Bracket (Optional) 22 Chapter 3 Software and Utilities Operation 24 3.1 Installing Drivers 24 3.2 ASRock Live Update & APP Shop 25 3.2.1 UI Overview...
...2 Chapter 2 Product Overview 4 2.1 Front View 4 2.2 Rear View 5 2.3 Motherboard Layout 6 Chapter 3 Hardware Installation 12 3.1 Begin Installation 12 3.2 Installing the CPU 13 3.3 Installing the CPU Fan and Heatsink 15 3.4 Installing Memory Modules (SO-DIMM) 16 3.5 Installing the WiFi Module 17 3.6 Installing the M.2 SSD (Type 2280) 18 3.7 Installing the 2.5-inch HDD/SSD 19 3.8 Complete 21 3.9 Installing the VESA Bracket (Optional) 22 Chapter 3 Software and Utilities Operation 24 3.1 Installing Drivers 24 3.2 ASRock Live Update & APP Shop 25 3.2.1 UI Overview...

User Manual
Page 5
... 3.2.3 BIOS & Drivers 29 3.2.4 Setting 30 3.3 Enabling USB Ports for Windows® 7 Installation 31 Chapter 4 UEFI SETUP UTILITY 34 4.1 Introduction 34 4.2 EZ Mode 35 4.3 Advanced Mode 36 4.3.1 UEFI Menu Bar 36 4.3.2 Navigation Keys 37 4.4 Main Screen 38 4.5 OC Tweaker Screen 39 4.6 Advanced Screen 47 4.6.1 CPU Configuration 48 4.6.2 Chipset Configuration 50 4.6.3 Storage Configuration 52 4.6.4 Super IO Configuration 53 4.6.5 ACPI Configuration 54 4.6.6 USB Configuration 55 4.7 Tools 56 4.8 Hardware Health Event Monitoring Screen 59 4.9 Security Screen...
... 3.2.3 BIOS & Drivers 29 3.2.4 Setting 30 3.3 Enabling USB Ports for Windows® 7 Installation 31 Chapter 4 UEFI SETUP UTILITY 34 4.1 Introduction 34 4.2 EZ Mode 35 4.3 Advanced Mode 36 4.3.1 UEFI Menu Bar 36 4.3.2 Navigation Keys 37 4.4 Main Screen 38 4.5 OC Tweaker Screen 39 4.6 Advanced Screen 47 4.6.1 CPU Configuration 48 4.6.2 Chipset Configuration 50 4.6.3 Storage Configuration 52 4.6.4 Super IO Configuration 53 4.6.5 ACPI Configuration 54 4.6.6 USB Configuration 55 4.7 Tools 56 4.8 Hardware Health Event Monitoring Screen 59 4.9 Security Screen...

User Manual
Page 6
... : DeskMini series Chassis Motherboard (pre-installed) *The barebone system does not include memory, hard drive, WiFi module and M.2 SSD. • 120W/19V Power Adapter & Power Cord • SATA Cable • Screws Package (HDD Screw x 6, M.2 Screw x 2pcs, Rubber Foot x 4pcs) • Support CD • Quick Installation Guide If any modifications of this documentation occur, the updated version will be available on ASRock's website without notice. Because the hardware specifications might be updated, the...
... : DeskMini series Chassis Motherboard (pre-installed) *The barebone system does not include memory, hard drive, WiFi module and M.2 SSD. • 120W/19V Power Adapter & Power Cord • SATA Cable • Screws Package (HDD Screw x 6, M.2 Screw x 2pcs, Rubber Foot x 4pcs) • Support CD • Quick Installation Guide If any modifications of this documentation occur, the updated version will be available on ASRock's website without notice. Because the hardware specifications might be updated, the...

User Manual
Page 7
...1 x M.2 (E key/2230) Slot for WiFi + BT Module, 1 x M.2 SSD Slot (Supports type 2280 M.2 PCIe Gen3 x4) Front I/O • Power Button, Power LED & HDD LED • 1 x USB 3.0, 1 x USB 3.0 (Type-C), 1 x Headphone/Headset Jack , 1 x MIC-In Rear I/O • 1 x VGA , 1 x HDMI, 1 x DP, 1 x USB 3.0, 1 x USB 2.0, 1 x LAN, 1 x DC-In Jack 2 English Intel® Q170 Chipset (Optional); 1.2 Specifications System Model • DeskMini 110 Chassis CPU • 1.92L (155 x 155 x 80mm) • Supports 6th Generation Intel® CoreTM i7/i5/i3/Pentium®/ Celeron® Processors (Max.
...1 x M.2 (E key/2230) Slot for WiFi + BT Module, 1 x M.2 SSD Slot (Supports type 2280 M.2 PCIe Gen3 x4) Front I/O • Power Button, Power LED & HDD LED • 1 x USB 3.0, 1 x USB 3.0 (Type-C), 1 x Headphone/Headset Jack , 1 x MIC-In Rear I/O • 1 x VGA , 1 x HDMI, 1 x DP, 1 x USB 3.0, 1 x USB 2.0, 1 x LAN, 1 x DC-In Jack 2 English Intel® Q170 Chipset (Optional); 1.2 Specifications System Model • DeskMini 110 Chassis CPU • 1.92L (155 x 155 x 80mm) • Supports 6th Generation Intel® CoreTM i7/i5/i3/Pentium®/ Celeron® Processors (Max.

User Manual
Page 8
... done at your system. DeskMini series Onboard Connectors Drive Bays • 2 x USB 2.0 Headers • 1 x COM Port Header (Optional) • 1 x Front Panel Header • 1 x CPU_Fan_1 Connector (4-Pin) • 1 x CPU_Fan_2 Connector (5-Pin) • 1 x DC-In Jack (Supports 19V 120W Power Adapters) • 1 x Internal Speaker Header (4-Pin) • 2 x 2.5" HDD or SSD Power Adapter Operation Temp. • 120W/19V Power Adapter • 0~35°C * For detailed product information, please visit our website: http://www.asrock.com Please realize that...
... done at your system. DeskMini series Onboard Connectors Drive Bays • 2 x USB 2.0 Headers • 1 x COM Port Header (Optional) • 1 x Front Panel Header • 1 x CPU_Fan_1 Connector (4-Pin) • 1 x CPU_Fan_2 Connector (5-Pin) • 1 x DC-In Jack (Supports 19V 120W Power Adapters) • 1 x Internal Speaker Header (4-Pin) • 2 x 2.5" HDD or SSD Power Adapter Operation Temp. • 120W/19V Power Adapter • 0~35°C * For detailed product information, please visit our website: http://www.asrock.com Please realize that...

User Manual
Page 10
Please refer to the table below for the LAN port LED indications. ACT/LINK LED SPEED LED LAN Port Activity / Link LED Status Description Off Blinking On No Link Data Activity Link Speed LED Status Off Orange Green Description 10Mbps connection 100Mbps connection 1Gbps connection 5 English Description 1 DC Jack (Supports 19V 120W Power Adapters) 2 Display Port 3 HDMI Port 4 D-Sub Port 5 USB 3.0 Port 6 LAN RJ-45 Port* 7 Key Lock 8 Kensington Lock 9 USB 2.0 Port * There are two LEDs on the LAN port. 2.2 Rear View DeskMini series 1 2 3 4 6 5 7 8 9 No.
Please refer to the table below for the LAN port LED indications. ACT/LINK LED SPEED LED LAN Port Activity / Link LED Status Description Off Blinking On No Link Data Activity Link Speed LED Status Off Orange Green Description 10Mbps connection 100Mbps connection 1Gbps connection 5 English Description 1 DC Jack (Supports 19V 120W Power Adapters) 2 Display Port 3 HDMI Port 4 D-Sub Port 5 USB 3.0 Port 6 LAN RJ-45 Port* 7 Key Lock 8 Kensington Lock 9 USB 2.0 Port * There are two LEDs on the LAN port. 2.2 Rear View DeskMini series 1 2 3 4 6 5 7 8 9 No.

User Manual
Page 14
... operating. PWRBTN (Power Switch): Connect to the power status indicator on the chassis front panel. PLED (System Power LED): Connect to the power switch on the chassis to this header, make sure the wire assignments and the pin assignments are NOT jumpers. The front panel design may configure the way to the motherboard. DeskMini series Onboard Headers and Connectors Onboard headers and connectors are matched correctly. When connecting your system using the power switch. Press the reset switch...
... operating. PWRBTN (Power Switch): Connect to the power status indicator on the chassis front panel. PLED (System Power LED): Connect to the power switch on the chassis to this header, make sure the wire assignments and the pin assignments are NOT jumpers. The front panel design may configure the way to the motherboard. DeskMini series Onboard Headers and Connectors Onboard headers and connectors are matched correctly. When connecting your system using the power switch. Press the reset switch...
User Manual
Page 15
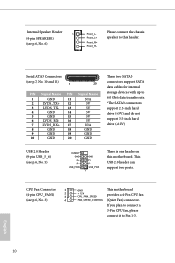
... N/A 5V 5V 5V 5V 5V N/A GND GND GND These two SATA3 connectors support SATA data cables for internal storage devices with up to Pin 1-3. This USB 2.0 header can support two ports. USB_PWR GND P+ PUSB_PWR 1 There is one header on this header. English 10 Internal Speaker Header 1 (4-pin SPEAKER1) (see p.6, No. 3) 4 GN D + 12V CPU_ FAN_SPEED FAN_SPEED_CONTROL This motherboard provides a 4-Pin CPU fan (Quiet Fan) connector. Please connect the chassis speaker to this...
... N/A 5V 5V 5V 5V 5V N/A GND GND GND These two SATA3 connectors support SATA data cables for internal storage devices with up to Pin 1-3. This USB 2.0 header can support two ports. USB_PWR GND P+ PUSB_PWR 1 There is one header on this header. English 10 Internal Speaker Header 1 (4-pin SPEAKER1) (see p.6, No. 3) 4 GN D + 12V CPU_ FAN_SPEED FAN_SPEED_CONTROL This motherboard provides a 4-Pin CPU fan (Quiet Fan) connector. Please connect the chassis speaker to this...
User Manual
Page 16
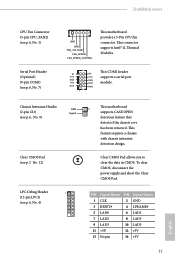
To clear CMOS, disconnect the power supply and short the Clear CMOS Pad. DeskMini series CPU Fan Connector (5-pin CPU_FAN2) (see p.6, No. 1) Serial Port Header (Optional) (9-pin COM1) (see p.6, No. 4) This motherboard 1 supports CASE OPEN detection feature that detects if the chassis cove has been removed. PIN Signal Name PIN Signal Name 1 CLK 2 GND 3 RESET# 4 LFRAME# 5 LAD0 6 LAD1 7 LAD2 8 LAD3 9 LAD3 10 LAD3 11 +3V 12 +3V 13 No pin 14 +3V 11 English RXD Chassis...
To clear CMOS, disconnect the power supply and short the Clear CMOS Pad. DeskMini series CPU Fan Connector (5-pin CPU_FAN2) (see p.6, No. 1) Serial Port Header (Optional) (9-pin COM1) (see p.6, No. 4) This motherboard 1 supports CASE OPEN detection feature that detects if the chassis cove has been removed. PIN Signal Name PIN Signal Name 1 CLK 2 GND 3 RESET# 4 LFRAME# 5 LAD0 6 LAD1 7 LAD2 8 LAD3 9 LAD3 10 LAD3 11 +3V 12 +3V 13 No pin 14 +3V 11 English RXD Chassis...
User Manual
Page 29
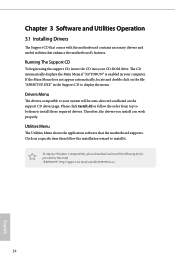
..., locate and double click on the file "ASRSETUP.EXE" in your CD-ROM drive. Utilities Menu The Utilities Menu shows the application software that enhance the motherboard's features. Drivers Menu The drivers compatible to display the menu. Therefore, the drivers you install can work properly. Chapter 3 Software and Utilities Operation 3.1 Installing Drivers The Support CD that comes with the motherboard contains necessary drivers and useful utilities that the motherboard supports. Please click Install All or follow the installation wizard to install those...
..., locate and double click on the file "ASRSETUP.EXE" in your CD-ROM drive. Utilities Menu The Utilities Menu shows the application software that enhance the motherboard's features. Drivers Menu The drivers compatible to display the menu. Therefore, the drivers you install can work properly. Chapter 3 Software and Utilities Operation 3.1 Installing Drivers The Support CD that comes with the motherboard contains necessary drivers and useful utilities that the motherboard supports. Please click Install All or follow the installation wizard to install those...

User Manual
Page 30
... downloading software applications for your desktop to access ASRock Live Update & APP Shop *You need to be connected to the Internet to perform job-related tasks. You can optimize your system and keep your motherboard up to visit the website of the selected news and know more . With ASRock APP Shop, you can quickly and easily install various apps and support utilities, such as USB Key...
... downloading software applications for your desktop to access ASRock Live Update & APP Shop *You need to be connected to the Internet to perform job-related tasks. You can optimize your system and keep your motherboard up to visit the website of the selected news and know more . With ASRock APP Shop, you can quickly and easily install various apps and support utilities, such as USB Key...

User Manual
Page 36
... the ASRock Support CD or downloaded from website) 31 English USB2.0) and only kept the eXtensible Host Controller Interface (XHCI - USB3.0). DeskMini series 3.3 Enabling USB Ports for Windows® 7 Installation Intel® Braswell and Skylake has removed their motherboard won't work. In order for the Enhanced Host Controller Interface (EHCI - Requirements • A Windows® 7 installation disk or USB drive • A Windows® PC • Win7 USB Patcher (included in the Windows 7 inbox drivers, users may...
... the ASRock Support CD or downloaded from website) 31 English USB2.0) and only kept the eXtensible Host Controller Interface (XHCI - USB3.0). DeskMini series 3.3 Enabling USB Ports for Windows® 7 Installation Intel® Braswell and Skylake has removed their motherboard won't work. In order for the Enhanced Host Controller Interface (EHCI - Requirements • A Windows® 7 installation disk or USB drive • A Windows® PC • Win7 USB Patcher (included in the Windows 7 inbox drivers, users may...

User Manual
Page 37
Step 4 Locate your Win7 source folder or your system. Instructions Step 1 Insert the Windows® 7 installation disk or USB drive to your ISO file. 32 English Step 3 Select "Create a Windows 7 installation disk with a USB device". Step 2 Extract the tool (Win7 USB Patcher) and launch it.
Step 4 Locate your Win7 source folder or your system. Instructions Step 1 Insert the Windows® 7 installation disk or USB drive to your ISO file. 32 English Step 3 Select "Create a Windows 7 installation disk with a USB device". Step 2 Extract the tool (Win7 USB Patcher) and launch it.

User Manual
Page 38
Or please use the patched ISO image to make an OS USB drive to begin. DeskMini series Step 5 Select the USB storage, compact disk or destination folder for the new Windows 7 installation file. Step 6 Click "Start" to install the OS. 33 English Step 7 Now you are able to install Windows® 7 on Braswell or Skylake with the new burned CD.
Or please use the patched ISO image to make an OS USB drive to begin. DeskMini series Step 5 Select the USB storage, compact disk or destination folder for the new Windows 7 installation file. Step 6 Click "Start" to install the OS. 33 English Step 7 Now you are able to install Windows® 7 on Braswell or Skylake with the new burned CD.
User Manual
Page 44
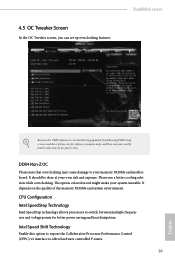
... your memory DIMMs and motherboard. CPU Configuration Intel SpeedStep Technology Intel SpeedStep technology allows processors to your screen. The option colored in red might make your own risk and expense. DeskMini series Because the UEFI software is constantly being updated, the following UEFI setup screens and descriptions are for better power saving and heat dissipation. Intel Speed Shift Technology Enable this option to expose the Collaborative Processor Performance Control (CPPC...
... your memory DIMMs and motherboard. CPU Configuration Intel SpeedStep Technology Intel SpeedStep technology allows processors to your screen. The option colored in red might make your own risk and expense. DeskMini series Because the UEFI software is constantly being updated, the following UEFI setup screens and descriptions are for better power saving and heat dissipation. Intel Speed Shift Technology Enable this option to expose the Collaborative Processor Performance Control (CPPC...

User Manual
Page 56
... enabling Good Night LED, the Power/HDD LEDs will start to the integrated graphics processor when the system boots up when the power recovers. Onboard HD Audio Enable/disable onboard HD audio. Deep Sleep Configure deep sleep mode for all PCH DMI devices. Onboard LAN Enable or disable the onboard network interface controller. It will remain off when the system is on AC/Power Loss Select the power state after a power failure. DeskMini series PCH DMI ASPM Support This option enables/disables the ASPM support...
... enabling Good Night LED, the Power/HDD LEDs will start to the integrated graphics processor when the system boots up when the power recovers. Onboard HD Audio Enable/disable onboard HD audio. Deep Sleep Configure deep sleep mode for all PCH DMI devices. Onboard LAN Enable or disable the onboard network interface controller. It will remain off when the system is on AC/Power Loss Select the power state after a power failure. DeskMini series PCH DMI ASPM Support This option enables/disables the ASPM support...

User Manual
Page 60
XHCI Hand-off support. The XHCI ownership change should be claimed by XHCI driver. 55 English Select UEFI Setup Only to disable legacy USB support. 4.6.6 USB Configuration DeskMini series Legacy USB Support Enable or disable Legacy OS Support for non-USB aware operating system. If you encounter USB compatibility issues it is a workaround for OSes without XHCI hand-off This is recommended to support USB devices under the UEFI setup and Windows/Linux operating systems only. PS/2 Simulator Enable this item for the complete USB keyboard legacy support for USB 2.0 devices.
XHCI Hand-off support. The XHCI ownership change should be claimed by XHCI driver. 55 English Select UEFI Setup Only to disable legacy USB support. 4.6.6 USB Configuration DeskMini series Legacy USB Support Enable or disable Legacy OS Support for non-USB aware operating system. If you encounter USB compatibility issues it is a workaround for OSes without XHCI hand-off This is recommended to support USB devices under the UEFI setup and Windows/Linux operating systems only. PS/2 Simulator Enable this item for the complete USB keyboard legacy support for USB 2.0 devices.
User Manual
Page 61
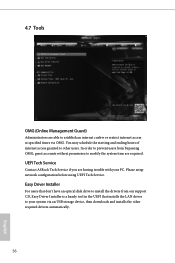
... our support CD, Easy Driver Installer is a handy tool in the UEFI that installs the LAN driver to establish an internet curfew or restrict internet access at specified times via an USB storage device, then downloads and installs the other users. You may schedule the starting and ending hours of internet access granted to modify the system time are having trouble with your system via OMG. Please setup network configuration before using...
... our support CD, Easy Driver Installer is a handy tool in the UEFI that installs the LAN driver to establish an internet curfew or restrict internet access at specified times via an USB storage device, then downloads and installs the other users. You may schedule the starting and ending hours of internet access granted to modify the system time are having trouble with your system via OMG. Please setup network configuration before using...
User Manual
Page 62
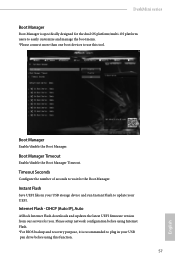
... manage the boot menu. *Please connect more than one boot devices to wait for you. Boot Manager Enable/disable the Boot Manager. Boot Manager Timeout Enable/disable the Boot Manager Timeout. Instant Flash Save UEFI files in your USB storage device and run Instant Flash to plug in your UEFI. DeskMini series Boot Manager Boot Manager is recommended to update your USB pen drive before using this tool. DHCP (Auto IP), Auto ASRock Internet Flash downloads and updates the latest UEFI firmware version from our servers for the Boot Manager. Timeout Seconds Configure the number...
... manage the boot menu. *Please connect more than one boot devices to wait for you. Boot Manager Enable/disable the Boot Manager. Boot Manager Timeout Enable/disable the Boot Manager Timeout. Instant Flash Save UEFI files in your USB storage device and run Instant Flash to plug in your UEFI. DeskMini series Boot Manager Boot Manager is recommended to update your USB pen drive before using this tool. DHCP (Auto IP), Auto ASRock Internet Flash downloads and updates the latest UEFI firmware version from our servers for the Boot Manager. Timeout Seconds Configure the number...
User Manual
Page 66
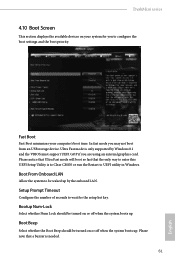
... using an external graphics card. Boot From Onboard LAN Allow the system to be waked up . Please notice that Ultra Fast mode will boot so fast that a buzzer is to Clear CMOS or run the Restart to configure the boot settings and the boot priority. Setup Prompt Timeout Configure the number of seconds to enter this UEFI Setup Utility is needed. 61 English In fast mode you to UEFI utility in Windows. Ultra Fast mode is only supported...
... using an external graphics card. Boot From Onboard LAN Allow the system to be waked up . Please notice that Ultra Fast mode will boot so fast that a buzzer is to Clear CMOS or run the Restart to configure the boot settings and the boot priority. Setup Prompt Timeout Configure the number of seconds to enter this UEFI Setup Utility is needed. 61 English In fast mode you to UEFI utility in Windows. Ultra Fast mode is only supported...


