
User Manual
Page 15
... IN Center: REAR SPK FRONT Top: Center: 1 HD_AUDIO1 Audio CODEC CHA_FAN2 SPDIF1_OUT1 1 CLRCMOS1 1 CMOS Battery PCI Express 3.0 PCIE1 Super I/O COM1 1 1 LPT1 PCI1 RoHS PCI2 B85M Pro4 PCIE2 1 CI1 USB6_7 TPMS1 1 1 USB8_9 1 Intel B85 64Mb BIOS CHA_FAN1 IR1 1 SPEAKER1 1 PLED PWRBTN 1 HDLED RESET PANEL1 Bottom: MIC IN USB10_11 1 Front USB 3.0 SATA_4_5 SATA_2_3 SATA_0_1 English 10
... IN Center: REAR SPK FRONT Top: Center: 1 HD_AUDIO1 Audio CODEC CHA_FAN2 SPDIF1_OUT1 1 CLRCMOS1 1 CMOS Battery PCI Express 3.0 PCIE1 Super I/O COM1 1 1 LPT1 PCI1 RoHS PCI2 B85M Pro4 PCIE2 1 CI1 USB6_7 TPMS1 1 1 USB8_9 1 Intel B85 64Mb BIOS CHA_FAN1 IR1 1 SPEAKER1 1 PLED PWRBTN 1 HDLED RESET PANEL1 Bottom: MIC IN USB10_11 1 Front USB 3.0 SATA_4_5 SATA_2_3 SATA_0_1 English 10

User Manual
Page 27
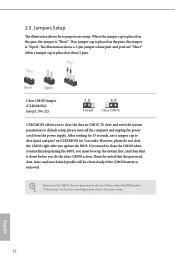
... jumper cap is placed on the pins, the jumper is "Open". Clear CMOS Jumper (CLRCMOS1) (see p.10, No. 22) Default Clear CMOS CLRCMOS1 allows you update the BIOS. However, please do the clear-CMOS action. To clear and reset the system parameters to short pin2 and pin3 on CLRCMOS1 for 5 seconds. If... you need to clear the record of previous chassis intrusion status. If you do not clear the CMOS right after you to clear the data ...
... jumper cap is placed on the pins, the jumper is "Open". Clear CMOS Jumper (CLRCMOS1) (see p.10, No. 22) Default Clear CMOS CLRCMOS1 allows you update the BIOS. However, please do the clear-CMOS action. To clear and reset the system parameters to short pin2 and pin3 on CLRCMOS1 for 5 seconds. If... you need to clear the record of previous chassis intrusion status. If you do not clear the CMOS right after you to clear the data ...

Quick Installation Guide
Page 3
Motherboard Layout B85M Pro4 USB 2.0 T: USB0 B: USB1 PS2 Keyboard DDR3_A1 (64 bit, 240-pin module) DDR3_A2 (64 bit, 240-pin module) DDR3_B1 (64 bit, 240-pin module) DDR3_B2 (64 ... LINE IN Center: REAR SPK FRONT Top: Center: 1 HD_AUDIO1 Audio CODEC CHA_FAN2 SPDIF1_OUT1 1 CLRCMOS1 1 CMOS Battery PCI Express 3.0 PCIE1 Super I/O COM1 1 1 LPT1 PCI1 RoHS PCI2 B85M Pro4 PCIE2 1 CI1 USB6_7 TPMS1 1 1 USB8_9 1 Intel B85 64Mb BIOS CHA_FAN1 IR1 1 SPEAKER1 1 PLED PWRBTN 1 HDLED RESET PANEL1 USB10_11 1 Front USB 3.0 Bottom: MIC IN SATA_4_5 SATA_2_3 SATA_0_1 English 1
Motherboard Layout B85M Pro4 USB 2.0 T: USB0 B: USB1 PS2 Keyboard DDR3_A1 (64 bit, 240-pin module) DDR3_A2 (64 bit, 240-pin module) DDR3_B1 (64 bit, 240-pin module) DDR3_B2 (64 ... LINE IN Center: REAR SPK FRONT Top: Center: 1 HD_AUDIO1 Audio CODEC CHA_FAN2 SPDIF1_OUT1 1 CLRCMOS1 1 CMOS Battery PCI Express 3.0 PCIE1 Super I/O COM1 1 1 LPT1 PCI1 RoHS PCI2 B85M Pro4 PCIE2 1 CI1 USB6_7 TPMS1 1 1 USB8_9 1 Intel B85 64Mb BIOS CHA_FAN1 IR1 1 SPEAKER1 1 PLED PWRBTN 1 HDLED RESET PANEL1 USB10_11 1 Front USB 3.0 Bottom: MIC IN SATA_4_5 SATA_2_3 SATA_0_1 English 1
Quick Installation Guide
Page 24
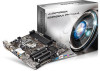
The illustration shows a 3-pin jumper whose pin1 and pin2 are setup. To clear and reset the system parameters to clear the record of previous chassis intrusion status. However, please do the clear-CMOS action. Please adjust the BIOS option "Clear Status" to default setup, please turn off the computer and ...for 5 seconds. Please be noted that the password, date, time, and user default profile will be detected. If you to clear the data in CMOS. English 22 When the jumper cap is placed on these 2 pins. If no jumper cap is placed on CLRCMOS1 for 15 seconds, use a jumper...
The illustration shows a 3-pin jumper whose pin1 and pin2 are setup. To clear and reset the system parameters to clear the record of previous chassis intrusion status. However, please do the clear-CMOS action. Please adjust the BIOS option "Clear Status" to default setup, please turn off the computer and ...for 5 seconds. Please be noted that the password, date, time, and user default profile will be detected. If you to clear the data in CMOS. English 22 When the jumper cap is placed on these 2 pins. If no jumper cap is placed on CLRCMOS1 for 15 seconds, use a jumper...

