
RAID Installation Guide
Page 7
Press 'Tab' key to enter BIOS configuration utility. 2.3 BIOS Configuration Utility 2.3.1 Enter BIOS Configuration Utility After the system powers on, the following information will appear on the screen. The main interface of BIOS configuration utility is as below: 7
Press 'Tab' key to enter BIOS configuration utility. 2.3 BIOS Configuration Utility 2.3.1 Enter BIOS Configuration Utility After the system powers on, the following information will appear on the screen. The main interface of BIOS configuration utility is as below: 7

RAID Installation Guide
Page 8
Just highlight the target array mode that you want to create, and press to call out the list of array modes will appear. 2.3.2 Create Disk Array 1. Highlight the Array Mode and press , then a list of creation steps. 2. Within the main interface, use the up and down arrow key to highlight the Create Array command and press to confirm the selection. 8
Just highlight the target array mode that you want to create, and press to call out the list of array modes will appear. 2.3.2 Create Disk Array 1. Highlight the Array Mode and press , then a list of creation steps. 2. Within the main interface, use the up and down arrow key to highlight the Create Array command and press to confirm the selection. 8
RAID Installation Guide
Page 13
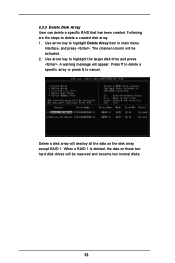
... become two normal disks. 13 Use arrow key to highlight the target disk drive and press . Use arrow key to highlight Delete Array item in main menu interface, and press . 2.3.3 Delete Disk Array User can delete a specific RAID that has been created.
... become two normal disks. 13 Use arrow key to highlight the target disk drive and press . Use arrow key to highlight Delete Array item in main menu interface, and press . 2.3.3 Delete Disk Array User can delete a specific RAID that has been created.
RAID Utility for Windows Guide
Page 1
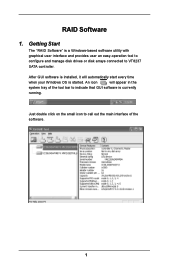
Just double click on the small icon to call out the main interface of the tool bar to indicate that GUI software is a Windows-based software utility with graphical user interface and provides user an easy-operation tool to configure and manage disk drives or disk arrays connected to VT8237 SATA controller. Getting Start The "RAID Software" is currently running. An icon will automatically start every time when your Windows OS is started. After GUI software is installed, it will appear in the system tray of the software. 1 RAID Software 1.
Just double click on the small icon to call out the main interface of the tool bar to indicate that GUI software is a Windows-based software utility with graphical user interface and provides user an easy-operation tool to configure and manage disk drives or disk arrays connected to VT8237 SATA controller. Getting Start The "RAID Software" is currently running. An icon will automatically start every time when your Windows OS is started. After GUI software is installed, it will appear in the system tray of the software. 1 RAID Software 1.

User Manual
Page 3
Contents 1 . BIOS SETUP UTILITY 27 3.1 Introduction 27 3.1.1 BIOS Menu Bar 27 3.1.2 Navigation Keys 28 3.2 Main Screen 28 3.3 Advanced Screen 29 3.3.1 CPU Configuration 30 3.3.2 Chipset Configuration 32 3.3.3 ACPI Configuration 34 3.3.4 IDE Configuration 35 3.3.5 PCIPnP Configuration 37 3.3.6 Floppy Configuration 37 3.3.7 Super IO ...
Contents 1 . BIOS SETUP UTILITY 27 3.1 Introduction 27 3.1.1 BIOS Menu Bar 27 3.1.2 Navigation Keys 28 3.2 Main Screen 28 3.3 Advanced Screen 29 3.3.1 CPU Configuration 30 3.3.2 Chipset Configuration 32 3.3.3 ACPI Configuration 34 3.3.4 IDE Configuration 35 3.3.5 PCIPnP Configuration 37 3.3.6 Floppy Configuration 37 3.3.7 Super IO ...

User Manual
Page 27
... match what you see on the menu bar, and then press to enter the BIOS SETUP UTILITY, otherwise, POST will continue with the following selections: Main To set up the system time/date information Advanced To set up the advanced BIOS features H/W Monitor To display current hardware status Boot To set...
... match what you see on the menu bar, and then press to enter the BIOS SETUP UTILITY, otherwise, POST will continue with the following selections: Main To set up the system time/date information Advanced To set up the advanced BIOS features H/W Monitor To display current hardware status Boot To set...

User Manual
Page 28
... Screen or exit the current screen 3.2 Main Screen When you enter the BIOS SETUP UTILITY, the Main screen will appear and display the system overview Main Advanced BIOS SETUP UTILITY H/W Monitor Boot System Overview System Time System Date [17:00:09] [Tue 05/09/2006] BIOS Version : AM2V890-VSTA BIOS P1.0 Processor Type : AMD Athlon...
... Screen or exit the current screen 3.2 Main Screen When you enter the BIOS SETUP UTILITY, the Main screen will appear and display the system overview Main Advanced BIOS SETUP UTILITY H/W Monitor Boot System Overview System Time System Date [17:00:09] [Tue 05/09/2006] BIOS Version : AM2V890-VSTA BIOS P1.0 Processor Type : AMD Athlon...

User Manual
Page 29
BIOS SETUP UTILITY Main Advanced H/W Monitor Boot Security Exit Advanced Settings WARNING : Setting wrong values in this section, you may cause system to malfunction. Setting wrong values in below ...
BIOS SETUP UTILITY Main Advanced H/W Monitor Boot Security Exit Advanced Settings WARNING : Setting wrong values in this section, you may cause system to malfunction. Setting wrong values in below ...

User Manual
Page 40
...identify the temperature of the CPU temperature, motherboard temperature, CPU fan speed, chassis fan speed, and the critical voltage. BIOS SETUP UTILITY Main Advanced H/W Monitor Boot Security Exit Hardware Health Event Monitoring CPU Temperature M / B Temperature CPU Fan Speed Chassis Fan Speed Vcore + 3.... Screen Select Item General Help Load Defaults Save and Exit Exit v02.54 (C) Copyright 1985-2003, American Megatrends, Inc. Main Advanced BIOS SETUP UTILITY H/W Monitor Boot Security Exit Boot Settings Boot Settings Configuration 1st Boot Device 2nd Boot Device 3rd Boot...
...identify the temperature of the CPU temperature, motherboard temperature, CPU fan speed, chassis fan speed, and the critical voltage. BIOS SETUP UTILITY Main Advanced H/W Monitor Boot Security Exit Hardware Health Event Monitoring CPU Temperature M / B Temperature CPU Fan Speed Chassis Fan Speed Vcore + 3.... Screen Select Item General Help Load Defaults Save and Exit Exit v02.54 (C) Copyright 1985-2003, American Megatrends, Inc. Main Advanced BIOS SETUP UTILITY H/W Monitor Boot Security Exit Boot Settings Boot Settings Configuration 1st Boot Device 2nd Boot Device 3rd Boot...

User Manual
Page 41
... Change F1 General Help F9 Load Defaults F10 Save and Exit ESC Exit v02.54 (C) Copyright 1985-2003, American Megatrends, Inc. 41 BIOS SETUP UTILITY Main Advanced H/W Monitor Boot Security Exit Security Settings Supervisor Password : Not Installed User Password : Not Installed Change Supervisor Password Change User Password Install or Change the...
... Change F1 General Help F9 Load Defaults F10 Save and Exit ESC Exit v02.54 (C) Copyright 1985-2003, American Megatrends, Inc. 41 BIOS SETUP UTILITY Main Advanced H/W Monitor Boot Security Exit Security Settings Supervisor Password : Not Installed User Password : Not Installed Change Supervisor Password Change User Password Install or Change the...

User Manual
Page 42
... optimal defaults?" Load Optimal Defaults When you select this option, it will pop-out the following message, "Save configuration changes and exit setup?" 3.7 Exit Screen Main BIOS SETUP UTILITY Advanced H/W Monitro Boot Security Exit Exit Options Save Changes and Exit Discard Changes and Exit Discard Changes Load Optimal Defaults Exit system...
... optimal defaults?" Load Optimal Defaults When you select this option, it will pop-out the following message, "Save configuration changes and exit setup?" 3.7 Exit Screen Main BIOS SETUP UTILITY Advanced H/W Monitro Boot Security Exit Exit Options Save Changes and Exit Discard Changes and Exit Discard Changes Load Optimal Defaults Exit system...

User Manual
Page 43
...supports various Microsoft® Windows® operating systems: 2000 / XP / XP 64-bit / VistaTM. The CD automatically displays the Main Menu if "AUTORUN" is enabled in this chapter for further information. 43 Because motherboard settings and hardware options vary, use the setup procedures in... your computer. Please install the necessary drivers to visit ASRock's website at http://www.asrock.com; If the Main Menu did not appear automatically, locate and double click on a specific item then follow the installation wizard to...
...supports various Microsoft® Windows® operating systems: 2000 / XP / XP 64-bit / VistaTM. The CD automatically displays the Main Menu if "AUTORUN" is enabled in this chapter for further information. 43 Because motherboard settings and hardware options vary, use the setup procedures in... your computer. Please install the necessary drivers to visit ASRock's website at http://www.asrock.com; If the Main Menu did not appear automatically, locate and double click on a specific item then follow the installation wizard to...

Quick Installation Guide
Page 23
..., which allows you to scroll through its test routines. It is designed to select among the predetermined choices. If the Main Menu does not appear automatically, locate and double-click on the motherboard stores BIOS Setup Utility. Software Support CD information This... the detailed information about BIOS Setup, please refer to display the menus. 23 ASRock AM2V890-VSTA Motherboard English otherwise, POST continues with the motherboard contains necessary drivers and useful utilities that will display the Main Menu automatically if "AUTORUN" is enabled in the Support CD. 4. 3. EXE...
..., which allows you to scroll through its test routines. It is designed to select among the predetermined choices. If the Main Menu does not appear automatically, locate and double-click on the motherboard stores BIOS Setup Utility. Software Support CD information This... the detailed information about BIOS Setup, please refer to display the menus. 23 ASRock AM2V890-VSTA Motherboard English otherwise, POST continues with the motherboard contains necessary drivers and useful utilities that will display the Main Menu automatically if "AUTORUN" is enabled in the Support CD. 4. 3. EXE...