
User Manual
Page 3
... for SATA HDDs 24 2.11 Driver Installation Guide 24 2.12 Installing Windows® 2000 / XP / XP 64-bit / VistaTM With RAID Functions 25 2.13 Installing Windows® 2000 / XP / XP 64-bit / VistaTM Without RAID Functions 26 2.14 Untied Overclocking Technology 26 3 . Contents 1 . BIOS SETUP UTILITY 27 3.1 Introduction 27 3.1.1 BIOS Menu Bar 27 3.1.2 Navigation Keys 28 3.2 Main Screen 28 3.3 Advanced Screen 29 3.3.1 CPU Configuration 30 3.3.2 Chipset Configuration 32 3.3.3 ACPI Configuration 34 3.3.4 IDE Configuration 35 3.3.5 PCIPnP Configuration 37 3.3.6 Floppy Configuration...
... for SATA HDDs 24 2.11 Driver Installation Guide 24 2.12 Installing Windows® 2000 / XP / XP 64-bit / VistaTM With RAID Functions 25 2.13 Installing Windows® 2000 / XP / XP 64-bit / VistaTM Without RAID Functions 26 2.14 Untied Overclocking Technology 26 3 . Contents 1 . BIOS SETUP UTILITY 27 3.1 Introduction 27 3.1.1 BIOS Menu Bar 27 3.1.2 Navigation Keys 28 3.2 Main Screen 28 3.3 Advanced Screen 29 3.3.1 CPU Configuration 30 3.3.2 Chipset Configuration 32 3.3.3 ACPI Configuration 34 3.3.4 IDE Configuration 35 3.3.5 PCIPnP Configuration 37 3.3.6 Floppy Configuration...

User Manual
Page 8
... motherboard supports Dual Channel Memory Technology. Power Management for USB 2.0 works fine under Windows system. ASRock website http://www.asrock.com 8 For audio output, this motherboard supports 2-channel, 4-channel, 6-channel, and 8-channel modes. For power-saving's sake, it to enable AMD's Cool 'n' QuietTM technology under Microsoft® Windows® VistaTM / XP 64-bit / XP SP1 or SP2 / 2000 SP4. 8. See APPENDIX on page 14 for Microsoft® Windows® VistaTM driver and related information. Frequencies other than the recommended CPU bus frequencies...
... motherboard supports Dual Channel Memory Technology. Power Management for USB 2.0 works fine under Windows system. ASRock website http://www.asrock.com 8 For audio output, this motherboard supports 2-channel, 4-channel, 6-channel, and 8-channel modes. For power-saving's sake, it to enable AMD's Cool 'n' QuietTM technology under Microsoft® Windows® VistaTM / XP 64-bit / XP SP1 or SP2 / 2000 SP4. 8. See APPENDIX on page 14 for Microsoft® Windows® VistaTM driver and related information. Frequencies other than the recommended CPU bus frequencies...

User Manual
Page 20
... card, or MPEG card. USB 2.0 Header (9-pin USB67) (see p.10, No. 10) USB_PWR P-7 P+7 GND DUMMY 1 GND P+6 P-6 USB_PWR This HD 8CH I /O provides you 4 ready-to-use USB 2.0 ports on the rear panel. If the rear USB ports are not sufficient, this USB 2.0 header is available to support 2 extra USB 2.0 ports. If the rear USB ports are not sufficient, this USB 2.0 header is available to support 2 extra USB 2.0 ports. Serial ATA (SATA) Power Cable (Optional) connect to the SATA HDD power connector connect to the power supply Please connect...
... card, or MPEG card. USB 2.0 Header (9-pin USB67) (see p.10, No. 10) USB_PWR P-7 P+7 GND DUMMY 1 GND P+6 P-6 USB_PWR This HD 8CH I /O provides you 4 ready-to-use USB 2.0 ports on the rear panel. If the rear USB ports are not sufficient, this USB 2.0 header is available to support 2 extra USB 2.0 ports. If the rear USB ports are not sufficient, this USB 2.0 header is available to support 2 extra USB 2.0 ports. Serial ATA (SATA) Power Cable (Optional) connect to the SATA HDD power connector connect to the power supply Please connect...

User Manual
Page 21
... 4-Pin CPU fan (Quiet Fan) support, the 3-Pin CPU fan still can work successfully even without the fan speed control function. You don't need to Pin 1-3. If you use AC'97 audio panel, please install it to connect them for HD audio panel only. C. Enter Windows system. Though this header. Connect Audio_R (RIN) to OUT2_R and Audio_L (LIN) to install your system. 2. Please follow the instruction in our manual and chassis manual to OUT2_L. E. Enter BIOS Setup Utility. Please connect the chassis speaker to the ground pin. Chassis Fan Connector (3-pin...
... 4-Pin CPU fan (Quiet Fan) support, the 3-Pin CPU fan still can work successfully even without the fan speed control function. You don't need to Pin 1-3. If you use AC'97 audio panel, please install it to connect them for HD audio panel only. C. Enter Windows system. Though this header. Connect Audio_R (RIN) to OUT2_R and Audio_L (LIN) to install your system. 2. Please follow the instruction in our manual and chassis manual to OUT2_L. E. Enter BIOS Setup Utility. Please connect the chassis speaker to the ground pin. Chassis Fan Connector (3-pin...

User Manual
Page 23
... the fan connector of HDMI VGA card, please refer to the installation guide on HDMI_SPDIF cable. A complete HDMI system requires a HDMI VGA card and a HDMI ready motherboard with a HDMI_SPDIF header, which provides an interface between any compatible digital audio/ video source, such as a set-top box, DVD player, A/V receiver and a compatible digital audio or video monitor, such as HDTV. Step 2. Step 5. Step 3. For the proper installation of PCI Express VGA card. Connect the black end (A) of HDTV and HDMI VGA card vendor for connector...
... the fan connector of HDMI VGA card, please refer to the installation guide on HDMI_SPDIF cable. A complete HDMI system requires a HDMI VGA card and a HDMI ready motherboard with a HDMI_SPDIF header, which provides an interface between any compatible digital audio/ video source, such as a set-top box, DVD player, A/V receiver and a compatible digital audio or video monitor, such as HDTV. Step 2. Step 5. Step 3. For the proper installation of PCI Express VGA card. Connect the black end (A) of HDTV and HDMI VGA card vendor for connector...

User Manual
Page 24
... listed on and in working condition. 2.11 Driver Installation Guide To install the drivers to your system, please insert the support CD to your optical drive first. 2.9 Serial ATA (SATA) Hard Disks Installation This motherboard adopts VIA® 8237A southbridge chipset that it is still power-on this motherboard for the action to the SATA hard disk. STEP 2: Connect the SATA power cable to insert and remove the SATA HDDs while the system is called "Hot Swap" for SATA Devices...
... listed on and in working condition. 2.11 Driver Installation Guide To install the drivers to your system, please insert the support CD to your optical drive first. 2.9 Serial ATA (SATA) Hard Disks Installation This motherboard adopts VIA® 8237A southbridge chipset that it is still power-on this motherboard for the action to the SATA hard disk. STEP 2: Connect the SATA power cable to insert and remove the SATA HDDs while the system is called "Hot Swap" for SATA Devices...

User Manual
Page 25
.... C. After making a SATA driver diskette and using "RAID Installation Guide" to set RAID configuration. Please select CD-ROM as the boot device. WARNING! A. Insert the ASRock Support CD into the floppy drive, and press . 2.12 Installing Windows® 2000 / XP / XP 64-bit / VistaTM With RAID Functions The installation procedures for Windows VistaTM are allowed to configure the RAID function, you install. Formatting the floppy diskette will be presented. B. STEP 2: Use "RAID Installation Guide" to generate Serial ATA driver diskette [YN]?", press...
.... C. After making a SATA driver diskette and using "RAID Installation Guide" to set RAID configuration. Please select CD-ROM as the boot device. WARNING! A. Insert the ASRock Support CD into the floppy drive, and press . 2.12 Installing Windows® 2000 / XP / XP 64-bit / VistaTM With RAID Functions The installation procedures for Windows VistaTM are allowed to configure the RAID function, you install. Formatting the floppy diskette will be presented. B. STEP 2: Use "RAID Installation Guide" to generate Serial ATA driver diskette [YN]?", press...

User Manual
Page 26
... to set "CPU Host Frequency" option of SATA HDDs, please follow the below steps. RAID Installation Guide and the document in the support CD, "Guide to VIA RAID Tool", which means during overclocking, but PCI / PCIE buses are subject to change. If you want to use "VIA RAID Tool Information" in Windows® environment, please install SATA drivers from [RAID] to install Windows® 2000 / Windows® XP / Windows® XP-64bit on your IDE HDDs instead of BIOS setup to [Auto...
... to set "CPU Host Frequency" option of SATA HDDs, please follow the below steps. RAID Installation Guide and the document in the support CD, "Guide to VIA RAID Tool", which means during overclocking, but PCI / PCIE buses are subject to change. If you want to use "VIA RAID Tool Information" in Windows® environment, please install SATA drivers from [RAID] to install Windows® 2000 / Windows® XP / Windows® XP-64bit on your IDE HDDs instead of BIOS setup to [Auto...

User Manual
Page 32
... node, or accross nodes, decreasing access contention. Memory Hole Use this to adjust values for video card. The default value is [Auto]. 3.3.2 Chipset Configuration BIOS SETUP UTILITY Advanced Chipset Settings DRAM Voltage Primary Graphics Adapter V-Link Speed PCI Delay Transaction IDE Drive Strength OnBoard LAN [Auto] [PCI] [Normal] [Disabled] [Normal] [Enabled] OnBoard HD Audio Front Panel Control [Auto] [Auto] HT Link Speed HT Link Width [Auto] [Auto] To set to 8 or 4 beats. Primary Graphics Adapter This item will switch the PCI Bus scanning order while searching for MA...
... node, or accross nodes, decreasing access contention. Memory Hole Use this to adjust values for video card. The default value is [Auto]. 3.3.2 Chipset Configuration BIOS SETUP UTILITY Advanced Chipset Settings DRAM Voltage Primary Graphics Adapter V-Link Speed PCI Delay Transaction IDE Drive Strength OnBoard LAN [Auto] [PCI] [Normal] [Disabled] [Normal] [Enabled] OnBoard HD Audio Front Panel Control [Auto] [Auto] HT Link Speed HT Link Width [Auto] [Auto] To set to 8 or 4 beats. Primary Graphics Adapter This item will switch the PCI Bus scanning order while searching for MA...

User Manual
Page 33
... onboard IDE controller. The default value is [Auto]. 33 V-Link Speed Use this to enable or disable the onboard LAN feature. Disable this item to select drive strength of V-Link Bus. OnBoard LAN This allows you select [Auto], the onboard HD Audio will free the PCI Bus when the CPU is plugged. The default value is [Normal]. Configuration options are not PCI 2.1 compliant. PCI Delay Transaction Enable PCI Delay Transaction feature will be disabled when PCI Sound Card is accessing 8-bit ISA cards. IDE Driving Strength Use this feature when using ISA cards...
... onboard IDE controller. The default value is [Auto]. 33 V-Link Speed Use this to enable or disable the onboard LAN feature. Disable this item to select drive strength of V-Link Bus. OnBoard LAN This allows you select [Auto], the onboard HD Audio will free the PCI Bus when the CPU is plugged. The default value is [Normal]. Configuration options are not PCI 2.1 compliant. PCI Delay Transaction Enable PCI Delay Transaction feature will be disabled when PCI Sound Card is accessing 8-bit ISA cards. IDE Driving Strength Use this feature when using ISA cards...

User Manual
Page 35
... IDE Configuration BIOS SETUP UTILITY Advanced IDE Configuration OnBoard IDE Controller SATA Operation Mode VIA SATA Raid Utility Primary IDE Master Primary IDE Slave Secondary IDE Master Secondary IDE Slave SATA1 SATA2 [Enabled] [RAID] [Enabled] [Hard Disk] [Not Detected] [Not Detected] [Not Detected] [Not Detected] [Not Detected] DISABLED: disables the integrated IDE Controller. Configuration options are [Enabled] and [Disabled]. If you specify. ENABLED: enables the integrated IDE Controller. +F1 F9 F10 ESC Select Screen Select Item Change Option General Help Load Defaults Save...
... IDE Configuration BIOS SETUP UTILITY Advanced IDE Configuration OnBoard IDE Controller SATA Operation Mode VIA SATA Raid Utility Primary IDE Master Primary IDE Slave Secondary IDE Master Secondary IDE Slave SATA1 SATA2 [Enabled] [RAID] [Enabled] [Hard Disk] [Not Detected] [Not Detected] [Not Detected] [Not Detected] [Not Detected] DISABLED: disables the integrated IDE Controller. Configuration options are [Enabled] and [Disabled]. If you specify. ENABLED: enables the integrated IDE Controller. +F1 F9 F10 ESC Select Screen Select Item Change Option General Help Load Defaults Save...

User Manual
Page 36
... default value of this item to select the LBA/Large mode for a hard disk > 512 MB under DOS and Windows; S.M.A.R.T. Configuration options: [Not Installed], [Auto], [CD/DVD], and [ARMD]. [Not Installed]: Select [Not Installed] to disable the use a disk utility, such as MO. PIO Mode Use this item to enable 32-bit access to active. [CD/DVD]: This is used for Netware and UNIX user, select [Disabled] to automatically detect the hard disk drive. Configuration options: [Disabled], [Auto], [Enabled]. 32-Bit Data Transfer Use this...
... default value of this item to select the LBA/Large mode for a hard disk > 512 MB under DOS and Windows; S.M.A.R.T. Configuration options: [Not Installed], [Auto], [CD/DVD], and [ARMD]. [Not Installed]: Select [Not Installed] to disable the use a disk utility, such as MO. PIO Mode Use this item to enable 32-bit access to active. [CD/DVD]: This is used for Netware and UNIX user, select [Disabled] to automatically detect the hard disk drive. Configuration options: [Disabled], [Auto], [Enabled]. 32-Bit Data Transfer Use this...

User Manual
Page 41
... Screen In this item is set or change the supervisor/user password for the system. BIOS SETUP UTILITY Main Advanced H/W Monitor Boot Security Exit Security Settings Supervisor Password : Not Installed User Password : Not Installed Change Supervisor Password Change User Password Install or Change the password. 3.5.1 Boot Settings Configuration BIOS SETUP UTILITY Boot Boot Settings Configuration Boot From Network Bootup Num-Lock [Disabled] [On] To enable or disable the boot from network feature. +F1 F9 F10 ESC Select Screen Select Item Change Option General Help Load Defaults...
... Screen In this item is set or change the supervisor/user password for the system. BIOS SETUP UTILITY Main Advanced H/W Monitor Boot Security Exit Security Settings Supervisor Password : Not Installed User Password : Not Installed Change Supervisor Password Change User Password Install or Change the password. 3.5.1 Boot Settings Configuration BIOS SETUP UTILITY Boot Boot Settings Configuration Boot From Network Bootup Num-Lock [Disabled] [On] To enable or disable the boot from network feature. +F1 F9 F10 ESC Select Screen Select Item Change Option General Help Load Defaults...

User Manual
Page 43
...-bit / VistaTM. The CD automatically displays the Main Menu if "AUTORUN" is enabled in the Support CD to display the menus. 4.2.2 Drivers Menu The Drivers Menu shows the available devices drivers including ASRock Express GbL PCI Express LAN card driver if the system detects the installed devices. Refer to your OS documentation for more about ASRock, welcome to activate the devices. 4.2.3 Utilities Menu The Utilities Menu shows the applications software that enhance the motherboard features. 4.2.1 Running The Support CD To begin using...
...-bit / VistaTM. The CD automatically displays the Main Menu if "AUTORUN" is enabled in the Support CD to display the menus. 4.2.2 Drivers Menu The Drivers Menu shows the available devices drivers including ASRock Express GbL PCI Express LAN card driver if the system detects the installed devices. Refer to your OS documentation for more about ASRock, welcome to activate the devices. 4.2.3 Utilities Menu The Utilities Menu shows the applications software that enhance the motherboard features. 4.2.1 Running The Support CD To begin using...

User Manual
Page 44
... the Display icon in the Control Panel then select the Screen Saver tab. 4. Select Settings, then Control Panel. 2. When using Windows® 2000/XP operating system, please follow the instruction below to Classic View. (for Windows® XP only) 3. From the Power schemes combo list box, select Minimal Power Management. 6. APPENDIX: AMD's Cool 'n' QuietTM Technology For power-saving sake, it is strongly recommended to install "AMD Processor Driver" from the "Support CD...
... the Display icon in the Control Panel then select the Screen Saver tab. 4. Select Settings, then Control Panel. 2. When using Windows® 2000/XP operating system, please follow the instruction below to Classic View. (for Windows® XP only) 3. From the Power schemes combo list box, select Minimal Power Management. 6. APPENDIX: AMD's Cool 'n' QuietTM Technology For power-saving sake, it is strongly recommended to install "AMD Processor Driver" from the "Support CD...

Quick Installation Guide
Page 7
... CPU fan on page 22 for USB 2.0 works fine under Windows system. Before you install the PC system. 6. Frequencies other than the recommended CPU bus frequencies may cause the instability of memory modules on page 44 of "User Manual" in the future. To improve heat dissipation, remember to our website in the Support CD to perform over-clocking. Power Management for details. 3. ASRock website http://www.asrock.com 7 ASRock AM2V890-VSTA Motherboard...
... CPU fan on page 22 for USB 2.0 works fine under Windows system. Before you install the PC system. 6. Frequencies other than the recommended CPU bus frequencies may cause the instability of memory modules on page 44 of "User Manual" in the future. To improve heat dissipation, remember to our website in the Support CD to perform over-clocking. Power Management for details. 3. ASRock website http://www.asrock.com 7 ASRock AM2V890-VSTA Motherboard...
Quick Installation Guide
Page 17
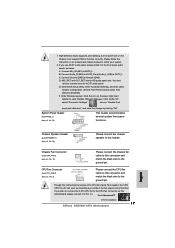
... Control option from [Auto] to MIC2_L. Click the icon on this connector and match the black wire to the ground pin. Chassis Speaker Header (4-pin SPEAKER 1) (see p.2, No. 19) Please connect the chassis fan cable to this motherboard, please connect it to Pin 1-3. Though this header. Connect Mic_IN (MIC) to [Enabled]. B. D. Enter Windows system. If you use AC'97 audio panel, please install it to the front panel audio header as below: A. Connect Ground (GND) to function correctly. Pin 1-3 Connected 3-Pin Fan Installation 17 ASRock AM2V890-VSTA Motherboard...
... Control option from [Auto] to MIC2_L. Click the icon on this connector and match the black wire to the ground pin. Chassis Speaker Header (4-pin SPEAKER 1) (see p.2, No. 19) Please connect the chassis fan cable to this motherboard, please connect it to Pin 1-3. Though this header. Connect Mic_IN (MIC) to [Enabled]. B. D. Enter Windows system. If you use AC'97 audio panel, please install it to the front panel audio header as below: A. Connect Ground (GND) to function correctly. Pin 1-3 Connected 3-Pin Fan Installation 17 ASRock AM2V890-VSTA Motherboard...
Quick Installation Guide
Page 19
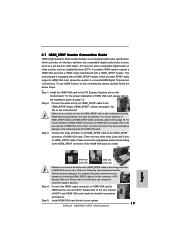
...VGA card user manual for detailed connection procedures. 2.7 HDMI_SPDIF Header Connection Guide HDMI (High-Definition Multi-media Interface) is equipped with a HDMI_SPDIF header. A complete HDMI system requires a HDMI VGA card and a HDMI ready motherboard with a HDMI_SPDIF header, which provides an interface between any compatible digital audio/video source, such as a set-top box, DVD player, A/V receiver and a compatible digital audio or video monitor, such as HDTV. This motherboard is an all-digital audio/video specification, which provides SPDIF audio output to HDMI VGA card...
...VGA card user manual for detailed connection procedures. 2.7 HDMI_SPDIF Header Connection Guide HDMI (High-Definition Multi-media Interface) is equipped with a HDMI_SPDIF header. A complete HDMI system requires a HDMI VGA card and a HDMI ready motherboard with a HDMI_SPDIF header, which provides an interface between any compatible digital audio/video source, such as a set-top box, DVD player, A/V receiver and a compatible digital audio or video monitor, such as HDTV. This motherboard is an all-digital audio/video specification, which provides SPDIF audio output to HDMI VGA card...
Quick Installation Guide
Page 20
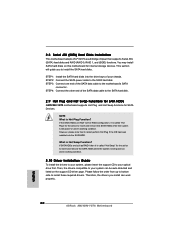
... drivers you to the SATA hard disk. 2.9 Hot Plug and Hot Swap Functions for SATA HDDs AM2V890-VSTA motherboard supports Hot Plug and Hot Swap functions for internal storage devices. This section will guide you install can be auto-detected and listed on this motherboard for SATA Devices. STEP 3: Connect one end of the SATA data cable to install the SATA hard disks. However, please note that supports Serial ATA (SATA) hard disks and RAID (RAID 0, RAID 1, and JBOD) functions. What is Hot Plug Function? STEP 1: Install the SATA hard disks into...
... drivers you to the SATA hard disk. 2.9 Hot Plug and Hot Swap Functions for SATA HDDs AM2V890-VSTA motherboard supports Hot Plug and Hot Swap functions for internal storage devices. This section will guide you install can be auto-detected and listed on this motherboard for SATA Devices. STEP 3: Connect one end of the SATA data cable to install the SATA hard disks. However, please note that supports Serial ATA (SATA) hard disks and RAID (RAID 0, RAID 1, and JBOD) functions. What is Hot Plug Function? STEP 1: Install the SATA hard disks into...

Quick Installation Guide
Page 23
.... 23 ASRock AM2V890-VSTA Motherboard English To begin using the Support CD, insert the CD into your computer. It will enhance motherboard features. For the detailed information about BIOS Setup, please refer to the User Manual (PDF file) contained in the Support CD to enter BIOS Setup after POST, please restart the system by pressing + + , or pressing the reset button on the file "ASSETUP. Software Support CD information This motherboard supports various Microsoft® Windows®...
.... 23 ASRock AM2V890-VSTA Motherboard English To begin using the Support CD, insert the CD into your computer. It will enhance motherboard features. For the detailed information about BIOS Setup, please refer to the User Manual (PDF file) contained in the Support CD to enter BIOS Setup after POST, please restart the system by pressing + + , or pressing the reset button on the file "ASSETUP. Software Support CD information This motherboard supports various Microsoft® Windows®...


