
RAID Installation Guide
Page 1
ATI RAID Installation Guide 1. ATI Windows RAID Installation Guide 8 2.1 Components of WebPAM Installation Software 8 2.2 Browser Support 8 2.3 Installing WebPAM 8 2.4 Log-in WebPAM 12 1 ATI BIOS RAID Installation Guide 2 1.1 Introduction to WebPAM 11 2.5 Create RAID in to RAID 2 1.2 RAID Configurations Precautions 2 1.3 Create Disk Array 3 2.
ATI RAID Installation Guide 1. ATI Windows RAID Installation Guide 8 2.1 Components of WebPAM Installation Software 8 2.2 Browser Support 8 2.3 Installing WebPAM 8 2.4 Log-in WebPAM 12 1 ATI BIOS RAID Installation Guide 2 1.1 Introduction to WebPAM 11 2.5 Create RAID in to RAID 2 1.2 RAID Configurations Precautions 2 1.3 Create Disk Array 3 2.

RAID Installation Guide
Page 8
...issues with ATI SB600 SATA RAID controllers. WebPAM is already running, exit all components in folder _jvm under Windows environment. Please read this private JRE to your Windows-based PC or Server. 1. Java Runtime Environment (in a private folder): The WebPAM installation program installs...to launch it the default browser. Boot up the PC/server and launch Windows. Double-click on a network. The first WebPAM installation dialog box appears. 8 ATI Windows RAID Installation Guide ATI Windows RAID Installation Guide is installed. You must have one of all major events...
...issues with ATI SB600 SATA RAID controllers. WebPAM is already running, exit all components in folder _jvm under Windows environment. Please read this private JRE to your Windows-based PC or Server. 1. Java Runtime Environment (in a private folder): The WebPAM installation program installs...to launch it the default browser. Boot up the PC/server and launch Windows. Double-click on a network. The first WebPAM installation dialog box appears. 8 ATI Windows RAID Installation Guide ATI Windows RAID Installation Guide is installed. You must have one of all major events...

RAID Installation Guide
Page 9
... when you are finished. 9 Follow the prompts in the installation dialog box. The first WebPAM installation dialog box appears as shown below. 6. 5. For example, the Windows default folder is C:\Program Files\ATI\WebPAM. Select an installer language from the dropdown menu and click the OK button. 7. If you select the "I accept...
... when you are finished. 9 Follow the prompts in the installation dialog box. The first WebPAM installation dialog box appears as shown below. 6. 5. For example, the Windows default folder is C:\Program Files\ATI\WebPAM. Select an installer language from the dropdown menu and click the OK button. 7. If you select the "I accept...

RAID Installation Guide
Page 11
... in over a network, enter the Host PC's actual IP address or hostname. Click the Sign in the Login ID field. 2. If you may launch your Windows desktop. 2.4 Log-in to WebPAM Double-click on the WebPAM icon on adding users and changing passwords. 11 Type admin in button.
... in over a network, enter the Host PC's actual IP address or hostname. Click the Sign in the Login ID field. 2. If you may launch your Windows desktop. 2.4 Log-in to WebPAM Double-click on the WebPAM icon on adding users and changing passwords. 11 Type admin in button.

User Manual
Page 3
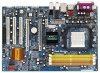
... 34 2.13 Serial ATA (SATA) / Serial ATAII (SATAII) Hard Disks Installation 35 2.14 Hot Plug and Hot Swap Functions for Windows® VistaTM Premium 2007 and Basic Logo 9 1.4 Motherboard Layout 10 1.5 ASRock 8CH_eSATAII I/O 11 2 . Contents 1 . Introduction 5 1.1 Package Contents 5 1.2 Specifications 6 1.3 Minimum Hardware Requirement Table for SATA / SATAII HDDs and eSATAII Devices 35 2.15...
... 34 2.13 Serial ATA (SATA) / Serial ATAII (SATAII) Hard Disks Installation 35 2.14 Hot Plug and Hot Swap Functions for Windows® VistaTM Premium 2007 and Basic Logo 9 1.4 Motherboard Layout 10 1.5 ASRock 8CH_eSATAII I/O 11 2 . Contents 1 . Introduction 5 1.1 Package Contents 5 1.2 Specifications 6 1.3 Minimum Hardware Requirement Table for SATA / SATAII HDDs and eSATAII Devices 35 2.15...

User Manual
Page 6
..., 30.5 cm x 20.8 cm - Supports AMD's Cool 'n' QuietTM Technology - Northbridge: AMD 480X CrossFireTM - Support DDRII800/667/533 - Max. ASRock U-COP (see CAUTION 4) - PCIE x1 Gigabit LAN 10/100/1000 Mb/s - 1.2 Specifications Platform CPU Chipset Memory Hybrid Booster Expansion Slot Audio LAN....5% (see CAUTION 3) - Socket AM2 for ATITM CrossFireTM (see CAUTION 8) - 1 x PCI Express x1 slot - 3 x PCI slots - 7.1 CH Windows® VistaTM Premium Level HD Audio (ALC888 Audio Codec) - CPU Frequency Stepless Control (see CAUTION 5) - Realtek RTL8111B - Supports Wake-On-LAN...
..., 30.5 cm x 20.8 cm - Supports AMD's Cool 'n' QuietTM Technology - Northbridge: AMD 480X CrossFireTM - Support DDRII800/667/533 - Max. ASRock U-COP (see CAUTION 4) - PCIE x1 Gigabit LAN 10/100/1000 Mb/s - 1.2 Specifications Platform CPU Chipset Memory Hybrid Booster Expansion Slot Audio LAN....5% (see CAUTION 3) - Socket AM2 for ATITM CrossFireTM (see CAUTION 8) - 1 x PCI Express x1 slot - 3 x PCI slots - 7.1 CH Windows® VistaTM Premium Level HD Audio (ALC888 Audio Codec) - CPU Frequency Stepless Control (see CAUTION 5) - Realtek RTL8111B - Supports Wake-On-LAN...

User Manual
Page 7
... 8 USB 2.0 ports) (see CAUTION 13) - CPU Fan Tachometer - Connector BIOS Feature Support CD Hardware Monitor OS Certifications - AMI Legal BIOS - Chassis Temperature Sensing - Microsoft® Windows® 2000 / XP / XP Media Center / XP 64-bit / VistaTM / VistaTM 64-bit compliant (see CAUTION 12) - 4Mb AMI BIOS -
... 8 USB 2.0 ports) (see CAUTION 13) - CPU Fan Tachometer - Connector BIOS Feature Support CD Hardware Monitor OS Certifications - AMI Legal BIOS - Chassis Temperature Sensing - Microsoft® Windows® 2000 / XP / XP Media Center / XP 64-bit / VistaTM / VistaTM 64-bit compliant (see CAUTION 12) - 4Mb AMI BIOS -

User Manual
Page 9
...SATAII Hard Disk Setup Guide" on updating now. Please visit our website for proper connection. 10. ASRock website http://www.asrock.com 1.3 Minimum Hardware Requirement Table for Windows® VistaTM Premium 2007 and Basic Logo For system integrators and users who purchase this motherboard and ...plan to qualify for USB 2.0 works fine under Microsoft® Windows® VistaTM 64-bit / VistaTM / XP 64-bit ...
...SATAII Hard Disk Setup Guide" on updating now. Please visit our website for proper connection. 10. ASRock website http://www.asrock.com 1.3 Minimum Hardware Requirement Table for Windows® VistaTM Premium 2007 and Basic Logo For system integrators and users who purchase this motherboard and ...plan to qualify for USB 2.0 works fine under Microsoft® Windows® VistaTM 64-bit / VistaTM / XP 64-bit ...

User Manual
Page 19
..., or two CrossFireTM C Ready cards if they are software enabled. 2.6 Installing CrossFireTM Graphics Cards This motherboard supports CrossFireTM feature. Currently CrossFireTM feature is supported with Windows® XP with CrossFireTM? What graphics cards work with Service Pack 2. CrossFireTM technology offers the most advantageous means available of CrossFireTM. For other CrossFireTM cards...
..., or two CrossFireTM C Ready cards if they are software enabled. 2.6 Installing CrossFireTM Graphics Cards This motherboard supports CrossFireTM feature. Currently CrossFireTM feature is supported with Windows® XP with CrossFireTM? What graphics cards work with Service Pack 2. CrossFireTM technology offers the most advantageous means available of CrossFireTM. For other CrossFireTM cards...

User Manual
Page 22
You must have Windows® XP Service Pack 2 or higher installed in your computer. FamilyId=262D25E3-F589-4842-8157-034D1E7CF3A3&displaylang=en Step 9. Then you have Microsoft .NET Framework ... required drivers to your computer. Click "View", and select "Advanced View". Please visit the websites below for installing the drivers that ATITM recommends: A. ATITM recommends Windows® XP Service Pack 2 or higher to download it again): http://www.microsoft.com/windowsxp/sp2/default.mspx B. Step 11. Double-click "ATI Catalyst Control...
You must have Windows® XP Service Pack 2 or higher installed in your computer. FamilyId=262D25E3-F589-4842-8157-034D1E7CF3A3&displaylang=en Step 9. Then you have Microsoft .NET Framework ... required drivers to your computer. Click "View", and select "Advanced View". Please visit the websites below for installing the drivers that ATITM recommends: A. ATITM recommends Windows® XP Service Pack 2 or higher to download it again): http://www.microsoft.com/windowsxp/sp2/default.mspx B. Step 11. Double-click "ATI Catalyst Control...

User Manual
Page 27
... in our manual and chassis manual to MIC2_L. Set the Front Panel Control option from sound sources such as below: A. F. For Windows® 2000 / XP / XP 64-bit OS: Click "Audio I/O", select "Connector Settings" , choose "Disable front panel jack ...detection", and save the change by clicking "OK". 27 Enter Windows system. Connect Ground (GND) to function correctly. Enter Advanced Settings, and then select Chipset Configuration. E. High Definition Audio supports Jack Sensing...
... in our manual and chassis manual to MIC2_L. Set the Front Panel Control option from sound sources such as below: A. F. For Windows® 2000 / XP / XP 64-bit OS: Click "Audio I/O", select "Connector Settings" , choose "Disable front panel jack ...detection", and save the change by clicking "OK". 27 Enter Windows system. Connect Ground (GND) to function correctly. Enter Advanced Settings, and then select Chipset Configuration. E. High Definition Audio supports Jack Sensing...

User Manual
Page 35
... 37 to the motherboard's SATAII connector. STEP 2: Connect the SATA power cable to RAID Installation Guide in RAID or AHCI mode, this motherboard for ATITM Windows RAID. If you can find the empty SATA / SATAII HDDs information in "Disk Management". STEP 1: Install the SATA / SATAII hard disks into the drive bays...
... 37 to the motherboard's SATAII connector. STEP 2: Connect the SATA power cable to RAID Installation Guide in RAID or AHCI mode, this motherboard for ATITM Windows RAID. If you can find the empty SATA / SATAII HDDs information in "Disk Management". STEP 1: Install the SATA / SATAII hard disks into the drive bays...
User Manual
Page 37
... SP4 disk: http://www.microsoft.com/Windows2000/downloads/servicepacks/sp4/spdeploy. Before installing Windows® 2000 to your system, your Windows® 2000 optical disk is no SP4 included in your system. (There are two ASRock Support CD in the near future. STEP 1: Set up , press key, ...and then a window for the latest version Windows® VistaTM / VistaTM 64-bit RAID driver and related information. 2. STEP 2: Make a SATA / SATAII Driver...
... SP4 disk: http://www.microsoft.com/Windows2000/downloads/servicepacks/sp4/spdeploy. Before installing Windows® 2000 to your system, your Windows® 2000 optical disk is no SP4 included in your system. (There are two ASRock Support CD in the near future. STEP 1: Set up , press key, ...and then a window for the latest version Windows® VistaTM / VistaTM 64-bit RAID driver and related information. 2. STEP 2: Make a SATA / SATAII Driver...

User Manual
Page 38
... to set RAID configuration. After reading the floppy disk, the driver will start to configure RAID function, you need to install Windows® VistaTM or Windows® VistaTM 64-bit on your system, and follow below steps. STEP 3: Use "RAID Installation Guide" to set RAID configuration... set up BIOS. A. Please refer to the BIOS RAID installation guide part of Windows® setup, press F6 to install Windows® VistaTM / 38 If you install Windows® 2000 / Windows® XP / Windows® XP 64-bit on SATA / SATAII HDDs, you install. (Select "...
... to set RAID configuration. After reading the floppy disk, the driver will start to configure RAID function, you need to install Windows® VistaTM or Windows® VistaTM 64-bit on your system, and follow below steps. STEP 3: Use "RAID Installation Guide" to set RAID configuration... set up BIOS. A. Please refer to the BIOS RAID installation guide part of Windows® setup, press F6 to install Windows® VistaTM / 38 If you install Windows® 2000 / Windows® XP / Windows® XP 64-bit on SATA / SATAII HDDs, you install. (Select "...

User Manual
Page 39
... want to set the RAID configuration by using the Windows RAID installation guide in the following path in our Support CD: (There are two ASRock Support CD in the motherboard gift box pack, please choose the one for Windows® VistaTM / VistaTM 64-bit users. htm#...the_integrated_installation_fmay 2.17.1 Installing Windows® 2000 / XP / XP 64-bit Without RAID Functions...
... want to set the RAID configuration by using the Windows RAID installation guide in the following path in our Support CD: (There are two ASRock Support CD in the motherboard gift box pack, please choose the one for Windows® VistaTM / VistaTM 64-bit users. htm#...the_integrated_installation_fmay 2.17.1 Installing Windows® 2000 / XP / XP 64-bit Without RAID Functions...

User Manual
Page 40
... the "SATA Operation Mode" option to [non-RAID]. STEP 4: Install Windows® 2000 / Windows® XP / Windows® XP 64-bit OS on IDE HDD, please skip step 2 and step 3. STEP 2: Install Windows® 2000 / Windows® XP / Windows® XP 64-bit OS on this motherboard is only supported with NCQ....1 step 2 on your system. For the proper operating procedures of creating JBOD, please refer to the BIOS RAID installation guide part of Windows® setup, press F6 to enable Hot Plug function on eSATAII ports but you install. (Select "ATI AHCI Compatible RAID Controller-x86 platform...
... the "SATA Operation Mode" option to [non-RAID]. STEP 4: Install Windows® 2000 / Windows® XP / Windows® XP 64-bit OS on IDE HDD, please skip step 2 and step 3. STEP 2: Install Windows® 2000 / Windows® XP / Windows® XP 64-bit OS on this motherboard is only supported with NCQ....1 step 2 on your system. For the proper operating procedures of creating JBOD, please refer to the BIOS RAID installation guide part of Windows® setup, press F6 to enable Hot Plug function on eSATAII ports but you install. (Select "ATI AHCI Compatible RAID Controller-x86 platform...

User Manual
Page 41
...driver diskette. page, please insert the ASRock Support CD into the optical drive to boot your system, and follow below steps. Using SATA / SATAII HDDs and eSATAII devices without RAID functions, please follow the instruction to install Windows® VistaTM / Windows® VistaTM 64-bit OS on your... Without RAID Functions If you want to install Windows® VistaTM or Windows® VistaTM 64-bit on your SATA / SATAII HDDs without NCQ and Hot Plug functions STEP 1: Set up BIOS. ATITM AHCI drivers are two ASRock Support CD in the following section 2.16.1 step...
...driver diskette. page, please insert the ASRock Support CD into the optical drive to boot your system, and follow below steps. Using SATA / SATAII HDDs and eSATAII devices without RAID functions, please follow the instruction to install Windows® VistaTM / Windows® VistaTM 64-bit OS on your... Without RAID Functions If you want to install Windows® VistaTM or Windows® VistaTM 64-bit on your SATA / SATAII HDDs without NCQ and Hot Plug functions STEP 1: Set up BIOS. ATITM AHCI drivers are two ASRock Support CD in the following section 2.16.1 step...

User Manual
Page 46
... Load Defaults Save and Exit Exit v02.54 (C) Copyright 1985-2003, American Megatrends, Inc. 46 If Manual, multiplier and voltage will show if you install Windows® VistaTM and want to enable this option to adjust CPU frequency. CPU Frequency (MHz) Use this function, please set to [Auto] as default. Configuration...
... Load Defaults Save and Exit Exit v02.54 (C) Copyright 1985-2003, American Megatrends, Inc. 46 If Manual, multiplier and voltage will show if you install Windows® VistaTM and want to enable this option to adjust CPU frequency. CPU Frequency (MHz) Use this function, please set to [Auto] as default. Configuration...

User Manual
Page 48
... Interleaving allows memory accesses to enable or disable CD-In of OnBoard HD Audio. NB Link Speed This feature allows you selecting CPU to submit Windows® VistaTM logo test, please disable this motherboard to NB link width. Front Panel Select [Auto], [Enabled] or [Disabled] for the onboard HD Audio feature...
... Interleaving allows memory accesses to enable or disable CD-In of OnBoard HD Audio. NB Link Speed This feature allows you selecting CPU to submit Windows® VistaTM logo test, please disable this motherboard to NB link width. Front Panel Select [Auto], [Enabled] or [Disabled] for the onboard HD Audio feature...

User Manual
Page 50
... to suspend to RAM.) Away Mode Support Use this item to enable or disable Ring-In signals to enable or disable Away Mode support under Windows® XP Media Center OS. Suspend to RAM Use this item to enable or disable RTC (Real Time Clock) to turn on the system from...
... to suspend to RAM.) Away Mode Support Use this item to enable or disable Ring-In signals to enable or disable Away Mode support under Windows® XP Media Center OS. Suspend to RAM Use this item to enable or disable RTC (Real Time Clock) to turn on the system from...


