RAID Installation Guide
Page 2
... RAID 0, RAID 1, or JBOD function with four SATA / SATAII ports, you may choose to use NVIDIA RAID Utility to set . After you make a SATA / SATAII driver diskette, press to enter BIOS setup to configure RAID. SATAII_2 (port 1.1) --> Means controller 1 's second port. Please refer to read and write data in this section...
... RAID 0, RAID 1, or JBOD function with four SATA / SATAII ports, you may choose to use NVIDIA RAID Utility to set . After you make a SATA / SATAII driver diskette, press to enter BIOS setup to configure RAID. SATAII_2 (port 1.1) --> Means controller 1 's second port. Please refer to read and write data in this section...

RAID Installation Guide
Page 8
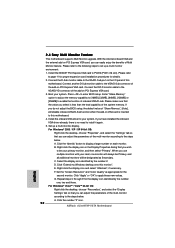
... for Windows 2000 / XP / XP 64-bit Users A. NVIDIA Windows RAID Installation Guide NVIDIA Windows RAID Installation Guide is built in NVIDIA ALL in one driver provided in our support CD. Please read this guide carefully and follow the instructions below screen appears. 8 Please follow the instructions below to configure RAID...
... for Windows 2000 / XP / XP 64-bit Users A. NVIDIA Windows RAID Installation Guide NVIDIA Windows RAID Installation Guide is built in NVIDIA ALL in one driver provided in our support CD. Please read this guide carefully and follow the instructions below screen appears. 8 Please follow the instructions below to configure RAID...

RAID Installation Guide
Page 18
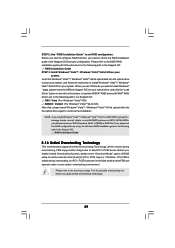
... the array is also a "Storage" shortcut on Start → Programs → NVIDIA Corporation → Storage. (There is synchronizing. C. Enter Storage RAID driver is built in NVIDIA ALL in one driver provided in a short period of time. 2.2 NVIDIA Windows RAID Installation Guide for Windows Vista / Vista 64-bit Users A. The synchronization process will...
... the array is also a "Storage" shortcut on Start → Programs → NVIDIA Corporation → Storage. (There is synchronizing. C. Enter Storage RAID driver is built in NVIDIA ALL in one driver provided in a short period of time. 2.2 NVIDIA Windows RAID Installation Guide for Windows Vista / Vista 64-bit Users A. The synchronization process will...
User Manual
Page 3
...Disks Installation 24 2.11 Hot Plug and Hot Swap Functions for Windows® VistaTM Premium 2007 and Basic Logo 9 1.4 Motherboard Layout 10 1.5 ASRock 6CH I/O Plus 11 2 . BIOS SETUP UTILITY 30 3.1 Introduction 30 3.1.1 BIOS Menu Bar 30 3.1.2 Navigation Keys 30 3.2 Main Screen 31...6 1.3 Minimum Hardware Requirement Table for SATA / SATAII HDDs ....... 24 2.12 SATA / SATAII HDD Hot Plug Feature and Operation Guide ....... 25 2.13 Driver Installation Guide 27 2.14 Installing Windows® 2000 / XP / XP 64-bit / VistaTM / VistaTM 64-bit Without RAID Functions 27 2.15 Installing ...
...Disks Installation 24 2.11 Hot Plug and Hot Swap Functions for Windows® VistaTM Premium 2007 and Basic Logo 9 1.4 Motherboard Layout 10 1.5 ASRock 6CH I/O Plus 11 2 . BIOS SETUP UTILITY 30 3.1 Introduction 30 3.1.1 BIOS Menu Bar 30 3.1.2 Navigation Keys 30 3.2 Main Screen 31...6 1.3 Minimum Hardware Requirement Table for SATA / SATAII HDDs ....... 24 2.12 SATA / SATAII HDD Hot Plug Feature and Operation Guide ....... 25 2.13 Driver Installation Guide 27 2.14 Installing Windows® 2000 / XP / XP 64-bit / VistaTM / VistaTM 64-bit Without RAID Functions 27 2.15 Installing ...

User Manual
Page 4
3.3.2 Chipset Configuration 37 3.3.3 ACPI Configuration 38 3.3.4 IDE Configuration 39 3.3.5 PCIPnP Configuration 41 3.3.6 Floppy Configuration 42 3.3.7 Super IO Configuration 42 3.3.8 USB Configuration 43 3.4 Hardware Health Event Monitoring Screen 44 3.5 Boot Screen 45 3.5.1 Boot Settings Configuration 45 3.6 Security Screen 46 3.7 Exit Screen 47 4 . Software Support 48 4.1 Install Operating System 48 4.2 Support CD Information 48 4.2.1 Running Support CD 48 4.2.2 Drivers Menu 48 4.2.3 Utilities Menu 48 4.2.4 Contact Information 48 4
3.3.2 Chipset Configuration 37 3.3.3 ACPI Configuration 38 3.3.4 IDE Configuration 39 3.3.5 PCIPnP Configuration 41 3.3.6 Floppy Configuration 42 3.3.7 Super IO Configuration 42 3.3.8 USB Configuration 43 3.4 Hardware Health Event Monitoring Screen 44 3.5 Boot Screen 45 3.5.1 Boot Settings Configuration 45 3.6 Security Screen 46 3.7 Exit Screen 47 4 . Software Support 48 4.1 Install Operating System 48 4.2 Support CD Information 48 4.2.1 Running Support CD 48 4.2.2 Drivers Menu 48 4.2.3 Utilities Menu 48 4.2.4 Contact Information 48 4

User Manual
Page 7
... ATAII 3.0Gb/s connectors, support RAID (RAID 0, RAID 1, RAID 0+1, RAID 5 and JBOD), NCQ and "Hot Plug" functions (see CAUTION 10) - 4Mb AMI BIOS - CPU Quiet Fan - Drivers, Utilities, AntiVirus Software (Trial Version) - CPU Temperature Sensing -
... ATAII 3.0Gb/s connectors, support RAID (RAID 0, RAID 1, RAID 0+1, RAID 5 and JBOD), NCQ and "Hot Plug" functions (see CAUTION 10) - 4Mb AMI BIOS - CPU Quiet Fan - Drivers, Utilities, AntiVirus Software (Trial Version) - CPU Temperature Sensing -
User Manual
Page 9
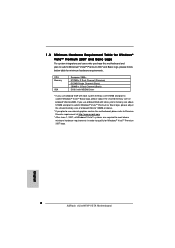
... VistaTM Premium 2007 and Basic Logo For system integrators and users who purchase this motherboard, please refer to Premium Discrete requirement at http://www.asrock.com * After June 1, 2007, all Windows® VistaTM systems are required to meet above 512MB and plan to submit Windows® .... CPU Memory VGA Sempron 2800+ 512MB x 2 Dual Channel (Premium) 512MB Single Channel (Basic) 256MB x 2 Dual Channel (Basic) DX9.0 with WDDM Driver * If you use onboard VGA with total system memory size 512MB and plan to submit Windows® VistaTM Basic logo, please adjust the shared memory...
... VistaTM Premium 2007 and Basic Logo For system integrators and users who purchase this motherboard, please refer to Premium Discrete requirement at http://www.asrock.com * After June 1, 2007, all Windows® VistaTM systems are required to meet above 512MB and plan to submit Windows® .... CPU Memory VGA Sempron 2800+ 512MB x 2 Dual Channel (Premium) 512MB Single Channel (Basic) 256MB x 2 Dual Channel (Basic) DX9.0 with WDDM Driver * If you use onboard VGA with total system memory size 512MB and plan to submit Windows® VistaTM Basic logo, please adjust the shared memory...

User Manual
Page 16
... and select "Attached", if necessary. G. Click the number "2" icon. 16 Connect the DVI-D monitor cable to your system. Install the onboard VGA driver to the VGA/DVI-D connector of the add-on the I/O panel of the system memory. Set up a multi monitor environment: 1. Click the "...bit OS: Right click the desktop, choose "Properties", and select the "Settings" tab so that the value you have installed the onboard VGA driver already, there is inserted to enter BIOS setup. 2.5 Easy Multi Monitor Feature This motherboard supports Multi Monitor upgrade. With the internal onboard VGA...
... and select "Attached", if necessary. G. Click the number "2" icon. 16 Connect the DVI-D monitor cable to your system. Install the onboard VGA driver to the VGA/DVI-D connector of the add-on the I/O panel of the system memory. Set up a multi monitor environment: 1. Click the "...bit OS: Right click the desktop, choose "Properties", and select the "Settings" tab so that the value you have installed the onboard VGA driver already, there is inserted to enter BIOS setup. 2.5 Easy Multi Monitor Feature This motherboard supports Multi Monitor upgrade. With the internal onboard VGA...
User Manual
Page 22
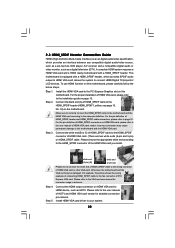
... to your system. 22 For the pin definition of HDMI VGA card or other VGA card. Incorrect connection may be damaged. Install HDMI VGA card driver to the same pin definition. For the pin definition of HDMI_SPDIF connectors on HDMI VGA card, please refer to the HDMI_SPDIF connector of HDMI VGA...
... to your system. 22 For the pin definition of HDMI VGA card or other VGA card. Incorrect connection may be damaged. Install HDMI VGA card driver to the same pin definition. For the pin definition of HDMI_SPDIF connectors on HDMI VGA card, please refer to the HDMI_SPDIF connector of HDMI VGA...

User Manual
Page 25
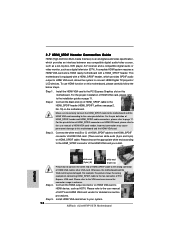
.../ SATAII Hot Plug support information of our motherboard is indicated in the product spec on our support website: www.asrock.com 4. Please make sure the SATA / SATAII driver is installed into system properly. SATA power cable SATA 7-pin connector The SATA 15-pin power connector (Black)...2. Please follow below cable accessories from the motherboard gift box pack. SATA data cable (Red) B. The latest SATA / SATAII driver is available on our website: www.asrock.com 2. Please read below operation guide of SATA / SATAII HDD Hot Plug feature carefully. 2.12 SATA / SATAII HDD Hot ...
.../ SATAII Hot Plug support information of our motherboard is indicated in the product spec on our support website: www.asrock.com 4. Please make sure the SATA / SATAII driver is installed into system properly. SATA power cable SATA 7-pin connector The SATA 15-pin power connector (Black)...2. Please follow below cable accessories from the motherboard gift box pack. SATA data cable (Red) B. The latest SATA / SATAII driver is available on our website: www.asrock.com 2. Please read below operation guide of SATA / SATAII HDD Hot Plug feature carefully. 2.12 SATA / SATAII HDD Hot ...

User Manual
Page 27
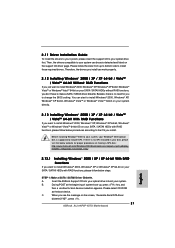
...selection appears. htm#the_integrated_installation_fmay 2.15.1 Installing Windows® 2000 / XP / XP 64-bit With RAID Functions If you install. Insert the ASRock Support CD into your optical drive to boot your Windows® 2000 optical disk is supposed to include SP4. B. During POST at the ...RAID functions, please follow below procedures according to the OS you want to change the BIOS setting. C. STEP 1: Make a SATA / SATAII Driver Diskette. Please select CD- Please follow below steps. If there is no SP4 included in your optical drive first. ROM as the boot device....
...selection appears. htm#the_integrated_installation_fmay 2.15.1 Installing Windows® 2000 / XP / XP 64-bit With RAID Functions If you install. Insert the ASRock Support CD into your optical drive to boot your Windows® 2000 optical disk is supposed to include SP4. B. During POST at the ...RAID functions, please follow below procedures according to the OS you want to change the BIOS setting. C. STEP 1: Make a SATA / SATAII Driver Diskette. Please select CD- Please follow below steps. If there is no SP4 included in your optical drive first. ROM as the boot device....

User Manual
Page 28
...Please insert a floppy diskette into the floppy diskette. The system will start to format the floppy diskette and copy SATA / SATAII drivers into the floppy drive, and press any key to the BIOS RAID installation guide in the following path in the Support CD for... Installation Guide 2.15.2 Installing Windows® VistaTM / VistaTM 64-bit With RAID Functions If you will be presented. ing the NVIDIA® RAID driver. D. Before you start to configure RAID function, you can start to install Windows® 2000 / Windows® XP / Windows® XP 64...
...Please insert a floppy diskette into the floppy diskette. The system will start to format the floppy diskette and copy SATA / SATAII drivers into the floppy drive, and press any key to the BIOS RAID installation guide in the following path in the Support CD for... Installation Guide 2.15.2 Installing Windows® VistaTM / VistaTM 64-bit With RAID Functions If you will be presented. ing the NVIDIA® RAID driver. D. Before you start to configure RAID function, you can start to install Windows® 2000 / Windows® XP / Windows® XP 64...
User Manual
Page 29
... to install Windows? Insert the Windows® VistaTM / Windows® VistaTM 64-bit optical disk into your optical drive, and click the "Load Driver" button on the left on the bottom to check the RAID installation guide in the Support CD: .. \ RAID Installation Guide STEP 3: Install Windows... your system, and follow the instruction to the warning on IDE HDDs and want to continue the installation. " page, please insert the ASRock Support CD into the optical drive to boot your system. Before you start to configure RAID function, you apply Untied Overclocking Technology. 29 Then...
... to install Windows? Insert the Windows® VistaTM / Windows® VistaTM 64-bit optical disk into your optical drive, and click the "Load Driver" button on the left on the bottom to check the RAID installation guide in the Support CD: .. \ RAID Installation Guide STEP 3: Install Windows... your system, and follow the instruction to the warning on IDE HDDs and want to continue the installation. " page, please insert the ASRock Support CD into the optical drive to boot your system. Before you start to configure RAID function, you apply Untied Overclocking Technology. 29 Then...
User Manual
Page 48
... information. 4.2 Support CD Information The Support CD that came with the motherboard contains necessary drivers and useful utilities that the motherboard supports. or you need to contact ASRock or want to activate the devices. 4.2.3 Utilities Menu The Utilities Menu shows the applications software...locate and double click on a specific item then follow the installation wizard to display the menus. 4.2.2 Drivers Menu The Drivers Menu shows the available devices drivers if the system detects the installed devices. Because motherboard settings and hardware options vary, use the setup ...
... information. 4.2 Support CD Information The Support CD that came with the motherboard contains necessary drivers and useful utilities that the motherboard supports. or you need to contact ASRock or want to activate the devices. 4.2.3 Utilities Menu The Utilities Menu shows the applications software...locate and double click on a specific item then follow the installation wizard to display the menus. 4.2.2 Drivers Menu The Drivers Menu shows the available devices drivers if the system detects the installed devices. Because motherboard settings and hardware options vary, use the setup ...
Quick Installation Guide
Page 6
...ATAII 3.0Gb/s connectors, support RAID (RAID 0, RAID 1, RAID 0+1, RAID 5 and JBOD), NCQ and "Hot Plug" functions (see CAUTION 10) - 4Mb AMI BIOS - AMI Legal BIOS - Drivers, Utilities, AntiVirus Software (Trial Version) - CPU Quiet Fan - CPU/Chassis FAN connector - 24 pin ATX power connector - 4 pin 12V power connector - Overclocking may affect your...Hot Plug Detection header - 1 x HDMI_SPDIF header - ACPI 1.1 Compliance Wake Up Events - CPU Fan Tachometer - We are not responsible for possible damage caused by overclocking. English 6 ASRock ALiveNF6P-VSTA Motherboard
...ATAII 3.0Gb/s connectors, support RAID (RAID 0, RAID 1, RAID 0+1, RAID 5 and JBOD), NCQ and "Hot Plug" functions (see CAUTION 10) - 4Mb AMI BIOS - AMI Legal BIOS - Drivers, Utilities, AntiVirus Software (Trial Version) - CPU Quiet Fan - CPU/Chassis FAN connector - 24 pin ATX power connector - 4 pin 12V power connector - Overclocking may affect your...Hot Plug Detection header - 1 x HDMI_SPDIF header - ACPI 1.1 Compliance Wake Up Events - CPU Fan Tachometer - We are not responsible for possible damage caused by overclocking. English 6 ASRock ALiveNF6P-VSTA Motherboard
Quick Installation Guide
Page 8
...Basic Logo For system integrators and users who purchase this motherboard, please refer to Premium Discrete requirement at http://www.asrock.com * After June 1, 2007, all Windows® VistaTM systems are required to meet above . * If ... 512MB x 2 Dual Channel (Premium) 512MB Single Channel (Basic) 256MB x 2 Dual Channel (Basic) DX9.0 with WDDM Driver * If you use onboard VGA with total system memory size above 512MB and plan to submit Windows® VistaTM Premium or Basic... 128MB or above minimum hardware requirements in order to 64MB. English 8 ASRock ALiveNF6P-VSTA Motherboard
...Basic Logo For system integrators and users who purchase this motherboard, please refer to Premium Discrete requirement at http://www.asrock.com * After June 1, 2007, all Windows® VistaTM systems are required to meet above . * If ... 512MB x 2 Dual Channel (Premium) 512MB Single Channel (Basic) 256MB x 2 Dual Channel (Basic) DX9.0 with WDDM Driver * If you use onboard VGA with total system memory size above 512MB and plan to submit Windows® VistaTM Premium or Basic... 128MB or above minimum hardware requirements in order to 64MB. English 8 ASRock ALiveNF6P-VSTA Motherboard
Quick Installation Guide
Page 12
...3. E. Click "Apply" or "OK" to enter BIOS setup. Repeat steps C through E for details. 2. Click the number "2" icon. 12 ASRock ALiveNF6P-VSTA Motherboard English Install the NVIDIA® PCI Express VGA card to set up a multi-monitor display. Connect another D-Sub monitor cable to the VGA/D-Sub...", if necessary. Connect the D-Sub monitor cable to this motherboard. 4. If you wish to your system. Install the onboard VGA driver to be designated as appropriate for the second monitor. G. Connect the DVI-D monitor cable to page 11 for proper expansion card installation...
...3. E. Click "Apply" or "OK" to enter BIOS setup. Repeat steps C through E for details. 2. Click the number "2" icon. 12 ASRock ALiveNF6P-VSTA Motherboard English Install the NVIDIA® PCI Express VGA card to set up a multi-monitor display. Connect another D-Sub monitor cable to the VGA/D-Sub...", if necessary. Connect the D-Sub monitor cable to this motherboard. 4. If you wish to your system. Install the onboard VGA driver to be designated as appropriate for the second monitor. G. Connect the DVI-D monitor cable to page 11 for proper expansion card installation...
Quick Installation Guide
Page 18
... the wrong connector of HDMI_SPDIF connectors on this motherboard and the HDMI VGA card. Step 5. Install HDMI VGA card driver to the fan connector of connecting HDMI_SPDIF cable to your system. 18 ASRock ALiveNF6P-VSTA Motherboard A complete HDMI system requires a HDMI VGA card and a HDMI ready motherboard with a HDMI_SPDIF header, which provides an interface...
... the wrong connector of HDMI_SPDIF connectors on this motherboard and the HDMI VGA card. Step 5. Install HDMI VGA card driver to the fan connector of connecting HDMI_SPDIF cable to your system. 18 ASRock ALiveNF6P-VSTA Motherboard A complete HDMI system requires a HDMI VGA card and a HDMI ready motherboard with a HDMI_SPDIF header, which provides an interface...
Quick Installation Guide
Page 21
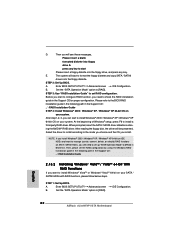
... / XP / XP 64-bit / VistaTM / VistaTM 64-bit Without RAID Functions If you install. STEP 1: Make a SATA / SATAII Driver Diskette. During POST at the beginning of making a SP4 disk: http://www.microsoft.com/Windows2000/downloads/servicepacks/sp4/spdeploy. C. Please follow below ... make a SATA / SATAII driver diskette. Therefore, the drivers you install can be auto-detected and listed on the screen, "Generate Serial ATA driver diskette [YN]?", press . 21 ASRock ALiveNF6P-VSTA Motherboard Please select CD-ROM as the boot device. Insert the ASRock Support CD into your optical ...
... / XP / XP 64-bit / VistaTM / VistaTM 64-bit Without RAID Functions If you install. STEP 1: Make a SATA / SATAII Driver Diskette. During POST at the beginning of making a SP4 disk: http://www.microsoft.com/Windows2000/downloads/servicepacks/sp4/spdeploy. C. Please follow below ... make a SATA / SATAII driver diskette. Therefore, the drivers you install can be auto-detected and listed on the screen, "Generate Serial ATA driver diskette [YN]?", press . 21 ASRock ALiveNF6P-VSTA Motherboard Please select CD-ROM as the boot device. Insert the ASRock Support CD into your optical ...
Quick Installation Guide
Page 22
... B. English 22 ASRock ALiveNF6P-VSTA Motherboard The system will see these messages, Please insert a blank formatted diskette into floppy drive A: press any key. A. After step1, 2, 3, you start Please insert a floppy diskette into the floppy diskette. ing the NVIDIA® RAID driver. Select the driver to install according ..., or rebuild) RAID functions on your system. Set the "SATA Operation Mode" option to [RAID]. After reading the floppy disk, the driver will be presented. If you install Windows® 2000 / Windows® XP / Windows® XP 64-bit on IDE HDDs and want...
... B. English 22 ASRock ALiveNF6P-VSTA Motherboard The system will see these messages, Please insert a blank formatted diskette into floppy drive A: press any key. A. After step1, 2, 3, you start Please insert a floppy diskette into the floppy diskette. ing the NVIDIA® RAID driver. Select the driver to install according ..., or rebuild) RAID functions on your system. Set the "SATA Operation Mode" option to [RAID]. After reading the floppy disk, the driver will be presented. If you install Windows® 2000 / Windows® XP / Windows® XP 64-bit on IDE HDDs and want...


