User Manual
Page 3
... Slots 19 2.5 CrossFireXTM and Quad CrossFireXTM Operation Guide 20 2.6 Dual Graphics Operation Guide 24 2.7 Dual Monitor and Surround Display Features 26 2.8 ASRock Smart Remote Installation Guide 29 2.9 Jumpers Setup 30 2.10 Onboard Headers and Connectors 31 2.11 Smart Switches 36 2.12 Dr. Debug 37...64-bit / XP / XP 64-bit With RAID Functions 44 2.17.1 Installing Windows® XP / XP 64-bit With RAID Functions 44 2.17.2 Installing Windows® 7 / 7 64-bit / VistaTM / VistaTM 64-bit With RAID Functions 45 2.18 Installing Windows® 7 / 7 64-bit / VistaTM / VistaTM 64-bit / XP ...
... Slots 19 2.5 CrossFireXTM and Quad CrossFireXTM Operation Guide 20 2.6 Dual Graphics Operation Guide 24 2.7 Dual Monitor and Surround Display Features 26 2.8 ASRock Smart Remote Installation Guide 29 2.9 Jumpers Setup 30 2.10 Onboard Headers and Connectors 31 2.11 Smart Switches 36 2.12 Dr. Debug 37...64-bit / XP / XP 64-bit With RAID Functions 44 2.17.1 Installing Windows® XP / XP 64-bit With RAID Functions 44 2.17.2 Installing Windows® 7 / 7 64-bit / VistaTM / VistaTM 64-bit With RAID Functions 45 2.18 Installing Windows® 7 / 7 64-bit / VistaTM / VistaTM 64-bit / XP ...

User Manual
Page 5
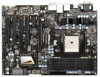
.../index.asp 1.1 Package Contents ASRock A75 Pro4/MVP Motherboard (ATX Form Factor: 12.0-in x 8.8-in our support CD for purchasing ASRock A75 Pro4/MVP motherboard, a reliable motherboard produced under ASRock's consistently stringent quality control. ASRock website http://www.asrock.com If you require technical support related to the "User Manual" in , 30.5 cm x 22.4 cm) ASRock A75 Pro4/MVP Quick Installation Guide ASRock A75 Pro4/MVP Support CD 4 x Serial...
.../index.asp 1.1 Package Contents ASRock A75 Pro4/MVP Motherboard (ATX Form Factor: 12.0-in x 8.8-in our support CD for purchasing ASRock A75 Pro4/MVP motherboard, a reliable motherboard produced under ASRock's consistently stringent quality control. ASRock website http://www.asrock.com If you require technical support related to the "User Manual" in , 30.5 cm x 22.4 cm) ASRock A75 Pro4/MVP Quick Installation Guide ASRock A75 Pro4/MVP Support CD 4 x Serial...

User Manual
Page 8
... Monitoring: +12V, +5V, +3.3V, Vcore OS - Microsoft® Windows® 7 / 7 64-bit / VistaTM / VistaTM 64-bit / XP SP3 / XP 64-bit compliant Certifications - Supports "Plug and Play" - Explorer, AMD Fusion, CyberLink MediaEspresso 6.5 Trial, ASRock MAGIX Multimedia Suite - ASRock Instant Boot - Lucid Virtu Universal MVP (see CAUTION 17) Hardware - CPU/Chassis Fan Multi...
... Monitoring: +12V, +5V, +3.3V, Vcore OS - Microsoft® Windows® 7 / 7 64-bit / VistaTM / VistaTM 64-bit / XP SP3 / XP 64-bit compliant Certifications - Supports "Plug and Play" - Explorer, AMD Fusion, CyberLink MediaEspresso 6.5 Trial, ASRock MAGIX Multimedia Suite - ASRock Instant Boot - Lucid Virtu Universal MVP (see CAUTION 17) Hardware - CPU/Chassis Fan Multi...
User Manual
Page 9
... on page 17 for the compatible memory modules. In Hardware Monitor, it shows the fan speed and temperature for system usage under Windows® 7 / VistaTM / XP. Overclocking may be enabled at your system stability, or even cause damage to use two of...bit / VistaTM. 7. For Windows® 64-bit OS with your system. For audio output, this motherboard supports both stereo and mono modes. We are not responsible for optimal system performance. In Overclocking, you implement Dual Channel Memory Technology, make sure to change. ASRock Extreme Tuning Utility (AXTU)...
... on page 17 for the compatible memory modules. In Hardware Monitor, it shows the fan speed and temperature for system usage under Windows® 7 / VistaTM / XP. Overclocking may be enabled at your system stability, or even cause damage to use two of...bit / VistaTM. 7. For Windows® 64-bit OS with your system. For audio output, this motherboard supports both stereo and mono modes. We are not responsible for optimal system performance. In Overclocking, you implement Dual Channel Memory Technology, make sure to change. ASRock Extreme Tuning Utility (AXTU)...
User Manual
Page 10
... of internet browser, is the smart start page for a more personal Internet experience. ASRock APP Charger. SmartView, a new function of Your Data: With the status window, you can easily enjoy the marvelous charging experience than before. their own system to update... entering operating systems first like MS-DOS or Windows®. ASRock website: http://www.asrock.com 9. This convenient BIOS update tool allows you can reduce the number of ASRock Extreme Tuning Utility (AXTU). ASRock motherboards are idle without sacrificing computing performance. ...
... of internet browser, is the smart start page for a more personal Internet experience. ASRock APP Charger. SmartView, a new function of Your Data: With the status window, you can easily enjoy the marvelous charging experience than before. their own system to update... entering operating systems first like MS-DOS or Windows®. ASRock website: http://www.asrock.com 9. This convenient BIOS update tool allows you can reduce the number of ASRock Extreme Tuning Utility (AXTU). ASRock motherboards are idle without sacrificing computing performance. ...

User Manual
Page 11
...Photoshop 5 times faster. Besides, please be noted that is higher than ever. With the added benefits of HyperFormance technology, VIRTU Universal MVP improves game performance by European Union to your SSDs or HDDs in the flow between the CPU and the heatsink when you ...computing environment. 17. This motherboard also provides a free 3.5mm audio cable (optional) that cannot be under Windows® OS 32-bit CPU. To meet EuP standard, please disable ASRock On/Off Play Technology first. 11 For EuP ready power supply selection, we recommend you install the...
...Photoshop 5 times faster. Besides, please be noted that is higher than ever. With the added benefits of HyperFormance technology, VIRTU Universal MVP improves game performance by European Union to your SSDs or HDDs in the flow between the CPU and the heatsink when you ...computing environment. 17. This motherboard also provides a free 3.5mm audio cable (optional) that cannot be under Windows® OS 32-bit CPU. To meet EuP standard, please disable ASRock On/Off Play Technology first. 11 For EuP ready power supply selection, we recommend you install the...

User Manual
Page 20
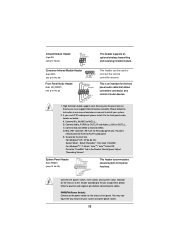
... performance and image quality in the future, please refer to benefit from the CrossFireXTM multi-GPU platform. 2. Currently CrossFireXTM feature is supported with Windows® XP with Windows® VistaTM / 7 OS only. For other Radeon graphics card to enable CrossFireXTM feature. Step 1. If you pair a 12-pipe CrossFireXTM Edition card with...
... performance and image quality in the future, please refer to benefit from the CrossFireXTM multi-GPU platform. 2. Currently CrossFireXTM feature is supported with Windows® XP with Windows® VistaTM / 7 OS only. For other Radeon graphics card to enable CrossFireXTM feature. Step 1. If you pair a 12-pipe CrossFireXTM Edition card with...
User Manual
Page 22
..."ATI Catalyst Control Center" on your computer and boot into OS. Please check Microsoft website for AMD driver updates. Then you have Windows® XP Service Pack 2 or higher installed in your computer. Double-click "ATI Catalyst Control Center". tem. The Catalyst Uninstaller ... your system. Step 3. Remove the AMD driver if you install two Radeon graphics cards). 22 ATI Catalyst Control Center Step 6. Step 4. For Windows® 7 / VistaTM OS: Install the CATALYST Control Center. Select "2 GPUs" and click "Apply" (if you have Microsoft .NET Framework installed...
..."ATI Catalyst Control Center" on your computer and boot into OS. Please check Microsoft website for AMD driver updates. Then you have Windows® XP Service Pack 2 or higher installed in your computer. Double-click "ATI Catalyst Control Center". tem. The Catalyst Uninstaller ... your system. Step 3. Remove the AMD driver if you install two Radeon graphics cards). 22 ATI Catalyst Control Center Step 6. Step 4. For Windows® 7 / VistaTM OS: Install the CATALYST Control Center. Select "2 GPUs" and click "Apply" (if you have Microsoft .NET Framework installed...
User Manual
Page 24
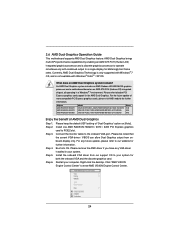
... Connect the monitor cable to below PCI Express graphics card support list for AMD Dual Graphics. For any VGA driver installed in a Windows® 7 environment. Chipset AMD RADEON HD6670 AMD RADEON HD6570 AMD RADEON HD6450 Model ASUS DIS-PCIE2.1-ASUS-HDMI-EAH6670-DI-1GD3/1G...frame rates. Install the onboard VGA driver from onboard display only. AMD Dual Graphics brings multi-GPU performance capabilities by enabling an AMD A75 FCH (Hudson-D3) integrated graphics processor and a discrete graphics processor to a single display for further information. Step 3. What does...
... Connect the monitor cable to below PCI Express graphics card support list for AMD Dual Graphics. For any VGA driver installed in a Windows® 7 environment. Chipset AMD RADEON HD6670 AMD RADEON HD6570 AMD RADEON HD6450 Model ASUS DIS-PCIE2.1-ASUS-HDMI-EAH6670-DI-1GD3/1G...frame rates. Install the onboard VGA driver from onboard display only. AMD Dual Graphics brings multi-GPU performance capabilities by enabling an AMD A75 FCH (Hudson-D3) integrated graphics processor and a discrete graphics processor to a single display for further information. Step 3. What does...

User Manual
Page 25
In AMD VISION Engine Control Center, please choose "Performance". Step 9. Step 10. Reboot your Windows® taskbar to enter AMD VISION Engine Control Center. Then you can also click "AMD VISION Engine Control Center" on your system. AMD VISION Engine ...
In AMD VISION Engine Control Center, please choose "Performance". Step 9. Step 10. Reboot your Windows® taskbar to enter AMD VISION Engine Control Center. Then you can also click "AMD VISION Engine Control Center" on your system. AMD VISION Engine ...

User Manual
Page 27
...the "Screen Resolution" and "Color Quality" as Secondary. Press or to page 19 for proper expansion card installation procedures for details. 2. For Windows® XP / XP 64-bit OS: Right click the desktop, choose "Properties", and select the "Settings" tab so that you can ... Then connect other monitor cables to the corresponding connectors of the multi-monitor according to apply these new values. A. Click "Extend my Windows desktop onto this motherboard. 4. Right-click the display icon and select "Attached", if necessary. B. When you can adjust the parameters ...
...the "Screen Resolution" and "Color Quality" as Secondary. Press or to page 19 for proper expansion card installation procedures for details. 2. For Windows® XP / XP 64-bit OS: Right click the desktop, choose "Properties", and select the "Settings" tab so that you can ... Then connect other monitor cables to the corresponding connectors of the multi-monitor according to apply these new values. A. Click "Extend my Windows desktop onto this motherboard. 4. Right-click the display icon and select "Attached", if necessary. B. When you can adjust the parameters ...

User Manual
Page 28
... recommended that the HDTV or LCD monitor you purchase is being transmitted. To use HDCP function with high-definition HDCP encryption contents. For Windows® 7 / 7 64-bit / VistaTM / VistaTM 64-bit OS: Right click the desktop, choose "Personalize", and select the "Display Settings" tab so that supports HDCP function...
... recommended that the HDTV or LCD monitor you purchase is being transmitted. To use HDCP function with high-definition HDCP encryption contents. For Windows® 7 / 7 64-bit / VistaTM / VistaTM 64-bit OS: Right click the desktop, choose "Personalize", and select the "Display Settings" tab so that supports HDCP function...
User Manual
Page 32
...front panel audio header as below . B. Connect Audio_R (RIN) to OUT2_R and Audio_L (LIN) to connect the remote controller receiver. Select "Recorder". For Windows® 7 / 7 64-bit / VistaTM / VistaTM 64-bit OS: Go to the "FrontMic" Tab in our manual and chassis manual to connect them... control of audio devices. 1. Front Panel Audio Header (9-pin HD_AUDIO1) (see p.12 No. 20) This header accommodates several system front panel functions. For Windows® XP / XP 64-bit OS: Select "Mixer". To activate the front mic. Infrared Module Header (5-pin IR1) (see p.12 No. 23)...
...front panel audio header as below . B. Connect Audio_R (RIN) to OUT2_R and Audio_L (LIN) to connect the remote controller receiver. Select "Recorder". For Windows® 7 / 7 64-bit / VistaTM / VistaTM 64-bit OS: Go to the "FrontMic" Tab in our manual and chassis manual to connect them... control of audio devices. 1. Front Panel Audio Header (9-pin HD_AUDIO1) (see p.12 No. 20) This header accommodates several system front panel functions. For Windows® XP / XP 64-bit OS: Select "Mixer". To activate the front mic. Infrared Module Header (5-pin IR1) (see p.12 No. 23)...
User Manual
Page 44
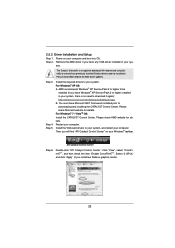
... RAID disk composed of 2 or more SATA3 HDDs with RAID functions, please follow below procedures according to the OS you install. 2.17.1 Installing Windows® XP / XP 64-bit With RAID Functions If you want to install those required drivers. Therefore, the drivers you install can be auto-...detected and listed on the support CD driver page. A. Enter UEFI SETUP UTILITY Advanced screen Storage Configuration. Insert the ASRock Support CD into the floppy drive. B. D. The system will start to format the floppy diskette and copy SATA3 drivers into the...
... RAID disk composed of 2 or more SATA3 HDDs with RAID functions, please follow below procedures according to the OS you install. 2.17.1 Installing Windows® XP / XP 64-bit With RAID Functions If you want to install those required drivers. Therefore, the drivers you install can be auto-...detected and listed on the support CD driver page. A. Enter UEFI SETUP UTILITY Advanced screen Storage Configuration. Insert the ASRock Support CD into the floppy drive. B. D. The system will start to format the floppy diskette and copy SATA3 drivers into the...
User Manual
Page 45
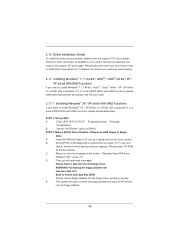
...of 2 or more SATA3 HDDs with RAID functions, please follow below steps. Select the driver to install according to the OS you install. 2.17.2 Installing Windows® 7 / 7 64-bit / VistaTM / VistaTM 64-bit With RAID Functions If you need to check the RAID installation guide in the Support CD...Please refer to set RAID configuration. After reading the floppy disk, the driver will be presented. STEP 1: Set up UEFI. STEP 4: Install Windows® 7 / 7 64-bit / VistaTM / VistaTM 64-bit OS on page 44. Before you start to the BIOS RAID installation guide part of the ...
...of 2 or more SATA3 HDDs with RAID functions, please follow below steps. Select the driver to install according to the OS you install. 2.17.2 Installing Windows® 7 / 7 64-bit / VistaTM / VistaTM 64-bit With RAID Functions If you need to check the RAID installation guide in the Support CD...Please refer to set RAID configuration. After reading the floppy disk, the driver will be presented. STEP 1: Set up UEFI. STEP 4: Install Windows® 7 / 7 64-bit / VistaTM / VistaTM 64-bit OS on page 44. Before you start to the BIOS RAID installation guide part of the ...

User Manual
Page 46
... mode) STEP 1: Set up UEFI. Using SATA3 HDDs without RAID functions, please follow below steps. When prompt- You can start to install Windows® XP / XP 64-bit OS on your SATA3 HDDs without RAID functions, please follow below procedures according to the OS you install. ...2.18.1 Installing Windows® XP / XP 64-bit Without RAID Functions If you install. Enter UEFI SETUP UTILITY Advanced screen Storage Configuration. Set the...
... mode) STEP 1: Set up UEFI. Using SATA3 HDDs without RAID functions, please follow below steps. When prompt- You can start to install Windows® XP / XP 64-bit OS on your SATA3 HDDs without RAID functions, please follow below procedures according to the OS you install. ...2.18.1 Installing Windows® XP / XP 64-bit Without RAID Functions If you install. Enter UEFI SETUP UTILITY Advanced screen Storage Configuration. Set the...
User Manual
Page 47
... Configuration. Using SATA3 HDDs without RAID functions, please follow below steps. B. A. Set the "SATA Mode" option to [AHCI]. STEP 2: Install Windows® 7 / 7 64-bit / VistaTM / VistaTM 64-bit OS on your system. B. Using SATA3 HDDs with NCQ and Hot Plug functions (AHCI mode...) STEP 1: Set up UEFI. STEP 2: Install Windows® 7 / 7 64-bit / VistaTM / VistaTM 64-bit OS on your SATA3 HDDs without NCQ and Hot Plug functions (IDE mode) STEP 1: Set ...
... Configuration. Using SATA3 HDDs without RAID functions, please follow below steps. B. A. Set the "SATA Mode" option to [AHCI]. STEP 2: Install Windows® 7 / 7 64-bit / VistaTM / VistaTM 64-bit OS on your system. B. Using SATA3 HDDs with NCQ and Hot Plug functions (AHCI mode...) STEP 1: Set up UEFI. STEP 2: Install Windows® 7 / 7 64-bit / VistaTM / VistaTM 64-bit OS on your SATA3 HDDs without NCQ and Hot Plug functions (IDE mode) STEP 1: Set ...
User Manual
Page 52
... this item to change RAS# Cycle Time (tRC) Auto/Manual setting. The default is [Auto]. The default is [Auto]. Four Activate Window (tFAW) Use this item to change Four Activate Window (tFAW) Auto/Manual setting. The default value is [Auto]. The default value is [Auto]. Min: 1T. The default is under heavy...
... this item to change RAS# Cycle Time (tRC) Auto/Manual setting. The default is [Auto]. The default is [Auto]. Four Activate Window (tFAW) Use this item to change Four Activate Window (tFAW) Auto/Manual setting. The default value is [Auto]. The default value is [Auto]. Min: 1T. The default is under heavy...

User Manual
Page 53
... completes. 53 Instant Flash Instant Flash is a UEFI flash utility embedded in a few clicks without entering operating systems first like MS-DOS or Windows®. Please be noted that the USB flash drive or hard drive must use FAT32/16/12 file system. Select the proper UEFI...
... completes. 53 Instant Flash Instant Flash is a UEFI flash utility embedded in a few clicks without entering operating systems first like MS-DOS or Windows®. Please be noted that the USB flash drive or hard drive must use FAT32/16/12 file system. Select the proper UEFI...
User Manual
Page 54
If you install Windows® 7 / VistaTM and want to enable this function, please set this item to [Enabled], a VMM (Virtual Machine Architecture) can utilize the additional hardware capabilities provided ...
If you install Windows® 7 / VistaTM and want to enable this function, please set this item to [Enabled], a VMM (Virtual Machine Architecture) can utilize the additional hardware capabilities provided ...


