User Manual
Page 3
...Expansion Slots (PCI and PCI Express Slots 16 2.5 Dual Graphics Operation Guide 17 2.6 Dual Monitor and Surround Display Features 19 2.7 ASRock Smart Remote Installation Guide 22 2.8 Jumpers Setup 23 2.9 Onboard Headers and Connectors 24 2.10 Serial ATA (SATA) / Serial ...-bit / VistaTM / VistaTM 64-bit / XP / XP 64-bit Without RAID Functions 33 2.15.1 Installing Windows® XP / XP 64-bit Without RAID Functions 33 2.15.2 Installing Windows® 7 / 7 64-bit / VistaTM / VistaTM 64-bit Without RAID Functions 34 3 Contents 1. Introduction 5 1.1 Package Contents 5 1.2 Speci cations ...
...Expansion Slots (PCI and PCI Express Slots 16 2.5 Dual Graphics Operation Guide 17 2.6 Dual Monitor and Surround Display Features 19 2.7 ASRock Smart Remote Installation Guide 22 2.8 Jumpers Setup 23 2.9 Onboard Headers and Connectors 24 2.10 Serial ATA (SATA) / Serial ...-bit / VistaTM / VistaTM 64-bit / XP / XP 64-bit Without RAID Functions 33 2.15.1 Installing Windows® XP / XP 64-bit Without RAID Functions 33 2.15.2 Installing Windows® 7 / 7 64-bit / VistaTM / VistaTM 64-bit Without RAID Functions 34 3 Contents 1. Introduction 5 1.1 Package Contents 5 1.2 Speci cations ...

User Manual
Page 7
.../Microphone - 6 x SATA2 3.0 Gb/s connectors, support RAID (RAID 0, RAID 1 and RAID 10), NCQ, AHCI and "Hot Plug" functions - 1 x IR header - 1 x CIR header - 1 x Print port header - 1 x COM port header - CPU/Chassis/Power FAN connector - 24 pin ATX power connector - 8 pin 12V power connector - Drivers, Utilities, AntiVirus Software (Trial Version), AMD Live! ASRock SmartView (see CAUTION 7) - Supports LAN...
.../Microphone - 6 x SATA2 3.0 Gb/s connectors, support RAID (RAID 0, RAID 1 and RAID 10), NCQ, AHCI and "Hot Plug" functions - 1 x IR header - 1 x CIR header - 1 x Print port header - 1 x COM port header - CPU/Chassis/Power FAN connector - 24 pin ATX power connector - 8 pin 12V power connector - Drivers, Utilities, AntiVirus Software (Trial Version), AMD Live! ASRock SmartView (see CAUTION 7) - Supports LAN...

User Manual
Page 28
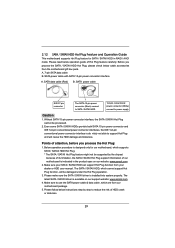
... disk. 2.11 Hot Plug and Hot Swap Functions for SATA / SATAII HDDs This motherboard supports Hot Plug and Hot Swap functions for SATA / SATAII in RAID / AHCI mode. STEP 4: Connect the other end of the SATA data cable to the SATA / SATAII hard disk. NOTE What is Hot Swap Function?... install SATA / SATAII hard disks on and in working condition. However, please note that supports Serial ATA (SATA) / Serial ATAII (SATAII) hard disks and RAID (RAID 0, RAID 1 and RAID 10) functions. This section will guide you to the motherboard's SATAII con- If SATA / SATAII HDDs are NOT set for...
... disk. 2.11 Hot Plug and Hot Swap Functions for SATA / SATAII HDDs This motherboard supports Hot Plug and Hot Swap functions for SATA / SATAII in RAID / AHCI mode. STEP 4: Connect the other end of the SATA data cable to the SATA / SATAII hard disk. NOTE What is Hot Swap Function?... install SATA / SATAII hard disks on and in working condition. However, please note that supports Serial ATA (SATA) / Serial ATAII (SATAII) hard disks and RAID (RAID 0, RAID 1 and RAID 10) functions. This section will guide you to the motherboard's SATAII con- If SATA / SATAII HDDs are NOT set for...
User Manual
Page 29
...power connector and IDE 1x4-pin conventional power connector interfaces, the IDE 1x4-pin conventional power connector interface is available on our website: www.asrock.com 2. Make sure to power supply Caution 1. SATA power cable with SATA 15-pin power connector interface A. Make sure your dealer ...or HDD user manual. Please read below operation guide of our motherboard is indicated in RAID / AHCI mode. Before you process the Hot Plug: 1. A. 7-pin SATA data cable B. Please make sure the SATA / SATAII driver is ...
...power connector and IDE 1x4-pin conventional power connector interfaces, the IDE 1x4-pin conventional power connector interface is available on our website: www.asrock.com 2. Make sure to power supply Caution 1. SATA power cable with SATA 15-pin power connector interface A. Make sure your dealer ...or HDD user manual. Please read below operation guide of our motherboard is indicated in RAID / AHCI mode. Before you process the Hot Plug: 1. A. 7-pin SATA data cable B. Please make sure the SATA / SATAII driver is ...
User Manual
Page 31
...and copy SATA / SATAII drivers into the floppy drive. The system will see the message on the support CD driver page. B. Insert the ASRock Support CD into the oppy drive, and press any key. C. Then you install can be auto-detected and listed on the screen, "Generate Serial...the drivers compatible to your system can work properly. 2.14 Installing Windows® 7 / 7 64-bit / VistaTM / VistaTM 64-bit / XP / XP 64-bit With RAID Functions If you want to [RAID]. Please follow below steps. Set the "SATA Mode" option to install Windows® XP / XP 64-bit on...
...and copy SATA / SATAII drivers into the floppy drive. The system will see the message on the support CD driver page. B. Insert the ASRock Support CD into the oppy drive, and press any key. C. Then you install can be auto-detected and listed on the screen, "Generate Serial...the drivers compatible to your system can work properly. 2.14 Installing Windows® 7 / 7 64-bit / VistaTM / VistaTM 64-bit / XP / XP 64-bit With RAID Functions If you want to [RAID]. Please follow below steps. Set the "SATA Mode" option to install Windows® XP / XP 64-bit on...
User Manual
Page 32
... to the OS you install. 2.14.2 Installing Windows® 7 / 7 64-bit / VistaTM / VistaTM 64-bit With RAID Functions If you need to check the RAID installation guide in the Support CD: .. \ RAID Installation Guide STEP 3: Make a SATA / SATAII Driver Diskette. STEP 1: Set up UEFI. STEP 4: Install Windows® 7...SATA Mode" option to install Windows® XP / XP 64-bit OS on your system. Before you need to check the RAID installation guide in the Support CD: .. \ RAID Installation Guide STEP 4: Install Windows® XP / XP 64-bit OS on your system. 32 After step 1, 2, 3, ...
... to the OS you install. 2.14.2 Installing Windows® 7 / 7 64-bit / VistaTM / VistaTM 64-bit With RAID Functions If you need to check the RAID installation guide in the Support CD: .. \ RAID Installation Guide STEP 3: Make a SATA / SATAII Driver Diskette. STEP 1: Set up UEFI. STEP 4: Install Windows® 7...SATA Mode" option to install Windows® XP / XP 64-bit OS on your system. Before you need to check the RAID installation guide in the Support CD: .. \ RAID Installation Guide STEP 4: Install Windows® XP / XP 64-bit OS on your system. 32 After step 1, 2, 3, ...
User Manual
Page 33
... system. After reading the oppy disk, the driver will be presented. B. STEP 2: Make a SATA / SATAII Driver Diskette. Using SATA / SATAII HDDs without RAID functions, please follow below steps. At the beginning of Windows® setup, press F6 to [IDE]. Set the "SATA Mode" option to install a third-party... 64-bit OS on your system. 33 2.15 Installing Windows® 7 / 7 64-bit / VistaTM / VistaTM 64-bit / XP / XP 64-bit Without RAID Functions If you want to install Windows® 7 / 7 64-bit / VistaTM / VistaTM 64-bit / XP / XP 64bit OS on your SATA / SATAII HDDs without...
... system. After reading the oppy disk, the driver will be presented. B. STEP 2: Make a SATA / SATAII Driver Diskette. Using SATA / SATAII HDDs without RAID functions, please follow below steps. At the beginning of Windows® setup, press F6 to [IDE]. Set the "SATA Mode" option to install a third-party... 64-bit OS on your system. 33 2.15 Installing Windows® 7 / 7 64-bit / VistaTM / VistaTM 64-bit / XP / XP 64-bit Without RAID Functions If you want to install Windows® 7 / 7 64-bit / VistaTM / VistaTM 64-bit / XP / XP 64bit OS on your SATA / SATAII HDDs without...

User Manual
Page 34
... SETUP UTILITY Advanced screen Storage Con guration. A. Set the "SATA Mode" option to [AHCI]. 2.15.2 Installing Windows® 7 / 7 64-bit / VistaTM / VistaTM 64-bit Without RAID Functions If you want to install Windows® 7 / 7 64-bit / VistaTM / VistaTM 64-bit on your system. STEP 2: Install Windows® 7 / 7 64-bit / VistaTM / VistaTM...
... SETUP UTILITY Advanced screen Storage Con guration. A. Set the "SATA Mode" option to [AHCI]. 2.15.2 Installing Windows® 7 / 7 64-bit / VistaTM / VistaTM 64-bit Without RAID Functions If you want to install Windows® 7 / 7 64-bit / VistaTM / VistaTM 64-bit on your system. STEP 2: Install Windows® 7 / 7 64-bit / VistaTM / VistaTM...
User Manual
Page 44
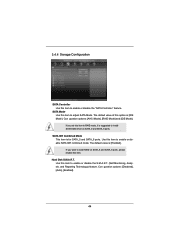
... value is for SATA_5 and SATA_6 ports. Con guration options: [Disabled], [Auto], [Enabled]. 44 Use this item to build RAID on SATA_5 and SATA_6 ports. If you set this item to RAID mode, it is [IDE Mode]. SATA IDE Combined Mode This item is [Enabled]. The default value of this item to... mode. 3.4.4 Storage Configuration SATA Controller Use this item to enable or disable the S.M.A.R.T. (Self-Monitoring, Analysis, and Reporting Technology) feature. Con guration options: [AHCI Mode], [RAID Mode] and [IDE Mode]. Use this option is suggested to adjust SATA Mode.
... value is for SATA_5 and SATA_6 ports. Con guration options: [Disabled], [Auto], [Enabled]. 44 Use this item to build RAID on SATA_5 and SATA_6 ports. If you set this item to RAID mode, it is [IDE Mode]. SATA IDE Combined Mode This item is [Enabled]. The default value of this item to... mode. 3.4.4 Storage Configuration SATA Controller Use this item to enable or disable the S.M.A.R.T. (Self-Monitoring, Analysis, and Reporting Technology) feature. Con guration options: [AHCI Mode], [RAID Mode] and [IDE Mode]. Use this option is suggested to adjust SATA Mode.
User Manual
Page 55
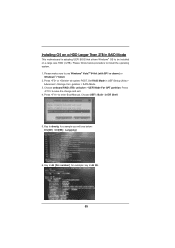
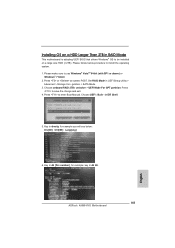
Please follow below : Drv[4E] Ctrl[B5] Lang[eng] 6. Press or at system POST. Set RAID Mode in drvcfg, for example: key in EFI Shell. 5. Key in UEFI Setup Utility > Advanced > Storage Con guration > SATA Mode. 3. in dh 4E. 55 Key ... below procedure to save the change and exit. 4. Press to install the operating system. 1. Choose onboard RAID 3TB+ unlocker > UEFI Mode For GPT partition. Choose UEFI : Built - Installing OS on a HDD Larger Than 2TB in RAID Mode This motherboard is adopting UEFI BIOS that allows Windows® OS to use Windows®...
Please follow below : Drv[4E] Ctrl[B5] Lang[eng] 6. Press or at system POST. Set RAID Mode in drvcfg, for example: key in EFI Shell. 5. Key in UEFI Setup Utility > Advanced > Storage Con guration > SATA Mode. 3. in dh 4E. 55 Key ... below procedure to save the change and exit. 4. Press to install the operating system. 1. Choose onboard RAID 3TB+ unlocker > UEFI Mode For GPT partition. Choose UEFI : Built - Installing OS on a HDD Larger Than 2TB in RAID Mode This motherboard is adopting UEFI BIOS that allows Windows® OS to use Windows®...

User Manual
Page 56
And then key in drvcfg -s 4E B5. 8. 7. For example: key in drvcfg -s [Drv number] [Ctrl number] to select Raid HDD. 56 Choose Logical Drive Main Menu to create a Raid Drive. 10. Choose Logical Drive Create Menu to set up Raid Drive. 9. Choose Usable Physical Drive List to enter Raid Utility.
And then key in drvcfg -s 4E B5. 8. 7. For example: key in drvcfg -s [Drv number] [Ctrl number] to select Raid HDD. 56 Choose Logical Drive Main Menu to create a Raid Drive. 10. Choose Logical Drive Create Menu to set up Raid Drive. 9. Choose Usable Physical Drive List to enter Raid Utility.
User Manual
Page 57
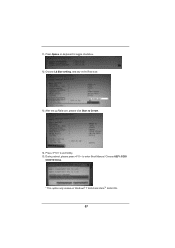
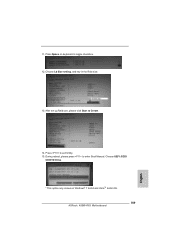
Press Space on Windows® 7 64-bit and VistaTM 64-bit OS. 57 Choose UEFI: SCSI CD/DVD Drive. * This option only shows on keyboard to exit Utility. 15. Press to toggle checkbox. 12. During reboot, please press to Create. 14. 11. Choose Ld Size setting, and key in the Raid size. 13. After set up Raid size, please click Start to enter Boot Manual.
Press Space on Windows® 7 64-bit and VistaTM 64-bit OS. 57 Choose UEFI: SCSI CD/DVD Drive. * This option only shows on keyboard to exit Utility. 15. Press to toggle checkbox. 12. During reboot, please press to Create. 14. 11. Choose Ld Size setting, and key in the Raid size. 13. After set up Raid size, please click Start to enter Boot Manual.

Quick Installation Guide
Page 6
... Support - Explorer, AMD Fusion, CyberLink MediaEspresso 6.5 Trial, ASRock Software Suite (CyberLink DVD Suite - ASRock Extreme Tuning Utility (AXTU) (see CAUTION 12) ASRock A55M-HVS Motherboard Hybrid Booster: - Supports jumperfree - ASRock U-COP (see CAUTION 6) - Front panel audio connector - ... x SATA2 3.0 Gb/s connectors, support RAID (RAID 0, RAID 1 and RAID 10), NCQ, AHCI and "Hot Plug" functions - 1 x IR header - 1 x CIR header - 1 x Print port header - 1 x COM port header - OEM) - ASRock Instant Flash (see CAUTION 11) - ASRock XFast LAN (see CAUTION 7) - English...
... Support - Explorer, AMD Fusion, CyberLink MediaEspresso 6.5 Trial, ASRock Software Suite (CyberLink DVD Suite - ASRock Extreme Tuning Utility (AXTU) (see CAUTION 12) ASRock A55M-HVS Motherboard Hybrid Booster: - Supports jumperfree - ASRock U-COP (see CAUTION 6) - Front panel audio connector - ... x SATA2 3.0 Gb/s connectors, support RAID (RAID 0, RAID 1 and RAID 10), NCQ, AHCI and "Hot Plug" functions - 1 x IR header - 1 x CIR header - 1 x Print port header - 1 x COM port header - OEM) - ASRock Instant Flash (see CAUTION 11) - ASRock XFast LAN (see CAUTION 7) - English...
Quick Installation Guide
Page 25
...Set up to bottom side to your optical drive first. B. STEP 2: Install Windows® XP / XP 64-bit OS on your system. English 25 ASRock A55M-HVS Motherboard Therefore, the drivers you install can be auto-detected and listed on the support CD driver page. Set the "SATA Mode" option to your... system can work properly. 2.11 Installing Windows® 7 / 7 64-bit / VistaTM / VistaTM 64-bit / XP / XP 64-bit With RAID Functions If you want to install Windows® 7 / 7 64-bit / VistaTM / VistaTM 64-bit / XP / XP 64-bit on your SATA / SATAII HDDs with...
...Set up to bottom side to your optical drive first. B. STEP 2: Install Windows® XP / XP 64-bit OS on your system. English 25 ASRock A55M-HVS Motherboard Therefore, the drivers you install can be auto-detected and listed on the support CD driver page. Set the "SATA Mode" option to your... system can work properly. 2.11 Installing Windows® 7 / 7 64-bit / VistaTM / VistaTM 64-bit / XP / XP 64-bit With RAID Functions If you want to install Windows® 7 / 7 64-bit / VistaTM / VistaTM 64-bit / XP / XP 64-bit on your SATA / SATAII HDDs with...

Quick Installation Guide
Page 26
... / VistaTM / VistaTM 64-bit OS on your system. B. Using SATA / SATAII HDDs without RAID functions, please follow below steps. Enter UEFI SETUP UTILITY Advanced screen Storage Configuration. B. A. Set the "SATA Mode" option to [IDE]. English 26 ASRock A55M-HVS Motherboard STEP 2: Install Windows® 7 / 7 64-bit / VistaTM / VistaTM 64-bit OS on...
... / VistaTM / VistaTM 64-bit OS on your system. B. Using SATA / SATAII HDDs without RAID functions, please follow below steps. Enter UEFI SETUP UTILITY Advanced screen Storage Configuration. B. A. Set the "SATA Mode" option to [IDE]. English 26 ASRock A55M-HVS Motherboard STEP 2: Install Windows® 7 / 7 64-bit / VistaTM / VistaTM 64-bit OS on...

Quick Installation Guide
Page 143
... CyberLink DVD Suite - OEM MAGIX OEM) - Hybrid Booster ASRock U-COP 12) 繁體中文 143 ASRock A55M-HVS Motherboard AMI UEFI Legal BIOS ( 支援 GUI Plug and Play,PnP) - ASRock Extreme Tuning Utility (AXTU 6 Instant Flash 7 APP Charger 8...USB 2.0 接口 - 1 個 RJ-45 LED 指示燈 (ACT/LINK LED 和 SPEED LED 6 x SATA2 3.0Gb/s RAID (RAID 0, RAID 1 和 RAID 10), NCQ, AHCI 1 x 1 x 1 x 1 x CPU 24 針 ATX 8 針 12V 3 x USB 2.0 6 USB 2.0 接口 ) - 32Mb AMI BIOS -
... CyberLink DVD Suite - OEM MAGIX OEM) - Hybrid Booster ASRock U-COP 12) 繁體中文 143 ASRock A55M-HVS Motherboard AMI UEFI Legal BIOS ( 支援 GUI Plug and Play,PnP) - ASRock Extreme Tuning Utility (AXTU 6 Instant Flash 7 APP Charger 8...USB 2.0 接口 - 1 個 RJ-45 LED 指示燈 (ACT/LINK LED 和 SPEED LED 6 x SATA2 3.0Gb/s RAID (RAID 0, RAID 1 和 RAID 10), NCQ, AHCI 1 x 1 x 1 x 1 x CPU 24 針 ATX 8 針 12V 3 x USB 2.0 6 USB 2.0 接口 ) - 32Mb AMI BIOS -
Quick Installation Guide
Page 157
...[4E] Ctrl[B5] Lang[eng] 6. Key in drvcfg, for example: key in UEFI Setup Utility > Advanced > Storage Con guration > SATA Mode. 3. Set RAID Mode in dh 4E. 157 ASRock A55M-HVS Motherboard English Please make sure to install the operating system. 1. Key in dh [Drv number], for example you will see below procedure to...
...[4E] Ctrl[B5] Lang[eng] 6. Key in drvcfg, for example: key in UEFI Setup Utility > Advanced > Storage Con guration > SATA Mode. 3. Set RAID Mode in dh 4E. 157 ASRock A55M-HVS Motherboard English Please make sure to install the operating system. 1. Key in dh [Drv number], for example you will see below procedure to...

Quick Installation Guide
Page 158
Choose Logical Drive Create Menu to select Raid HDD. 158 ASRock A55M-HVS Motherboard English And then key in drvcfg -s 4E B5. 8. For example: key in drvcfg -s [Drv number] [Ctrl number] to set up Raid Drive. 9. Choose Usable Physical Drive List to create a Raid Drive. 10. Choose Logical Drive Main Menu to enter Raid Utility. 7.
Choose Logical Drive Create Menu to select Raid HDD. 158 ASRock A55M-HVS Motherboard English And then key in drvcfg -s 4E B5. 8. For example: key in drvcfg -s [Drv number] [Ctrl number] to set up Raid Drive. 9. Choose Usable Physical Drive List to create a Raid Drive. 10. Choose Logical Drive Main Menu to enter Raid Utility. 7.
Quick Installation Guide
Page 159
11. Press to Create. 14. Choose Ld Size setting, and key in the Raid size. 13. After set up Raid size, please click Start to exit Utility. 15. Press Space on Windows® 7 64-bit and VistaTM 64-bit OS. 159 ASRock A55M-HVS Motherboard English Choose UEFI: SCSI CD/DVD Drive. * This option only shows on keyboard to enter Boot Manual. During reboot, please press to toggle checkbox. 12.
11. Press to Create. 14. Choose Ld Size setting, and key in the Raid size. 13. After set up Raid size, please click Start to exit Utility. 15. Press Space on Windows® 7 64-bit and VistaTM 64-bit OS. 159 ASRock A55M-HVS Motherboard English Choose UEFI: SCSI CD/DVD Drive. * This option only shows on keyboard to enter Boot Manual. During reboot, please press to toggle checkbox. 12.

RAID Installation Guide
Page 1
... Precautions 4 1.3 Installing Windows 7 / 7 64-bit / Vista / Vista 64-bit / XP / XP 64-bit With RAID Functions ... 5 1.3.1 Installing Windows XP / XP 64-bit With RAID Funtions 5 1.3.2 Installing Windows 7 / 7 64-bit / Vista / Vista 64-bit With RAID Funtions 6 1.4 Opening Option ROM 7 1.5 Using the Main Menu 8 1.6 Viewing Drive Assignments 9 1.7 Secure Erasing a Physical Drive 10 1.8 Creating a Logical...
... Precautions 4 1.3 Installing Windows 7 / 7 64-bit / Vista / Vista 64-bit / XP / XP 64-bit With RAID Functions ... 5 1.3.1 Installing Windows XP / XP 64-bit With RAID Funtions 5 1.3.2 Installing Windows 7 / 7 64-bit / Vista / Vista 64-bit With RAID Funtions 6 1.4 Opening Option ROM 7 1.5 Using the Main Menu 8 1.6 Viewing Drive Assignments 9 1.7 Secure Erasing a Physical Drive 10 1.8 Creating a Logical...


