
Quick Installation Guide
Page 3
...connection LAN Port ** To enable Multi-Streaming function, you are two LED next to "Quadraphonic" or "Stereo". Then reboot your system. 3 ASRock A55 Pro Motherboard English Please refer to below for the software setting of Multi-Streaming. Please select "Mixer ToolBox" , click "Enable playback multi-streaming",... 11 PS/2 Keyboard Port (Purple) * There are allowed to select "Realtek HDA Primary output" to use front panel audio. Set "Speaker Configuration" to the LAN port. Choose "2CH" or "4CH" and then you need to connect a front panel audio cable to use...
...connection LAN Port ** To enable Multi-Streaming function, you are two LED next to "Quadraphonic" or "Stereo". Then reboot your system. 3 ASRock A55 Pro Motherboard English Please refer to below for the software setting of Multi-Streaming. Please select "Mixer ToolBox" , click "Enable playback multi-streaming",... 11 PS/2 Keyboard Port (Purple) * There are allowed to select "Realtek HDA Primary output" to use front panel audio. Set "Speaker Configuration" to the LAN port. Choose "2CH" or "4CH" and then you need to connect a front panel audio cable to use...

Quick Installation Guide
Page 4
... notice. For the BIOS setup, please refer to this manual will be found in the user manual presented in our support CD for details. 4 ASRock A55 Pro Motherboard English To get better performance in Windows® 7 / 7 64-bit / VistaTM / VistaTM 64bit, it is recommended to set the BIOS...fic information about the model you require technical support related to the "User Manual" in the Support CD. www.asrock.com/support/index.asp 1.1 Package Contents ASRock A55 Pro Motherboard (ATX Form Factor: 12.0-in x 7.2-in Storage Configuration to quality and endurance. 1.
... notice. For the BIOS setup, please refer to this manual will be found in the user manual presented in our support CD for details. 4 ASRock A55 Pro Motherboard English To get better performance in Windows® 7 / 7 64-bit / VistaTM / VistaTM 64bit, it is recommended to set the BIOS...fic information about the model you require technical support related to the "User Manual" in the Support CD. www.asrock.com/support/index.asp 1.1 Package Contents ASRock A55 Pro Motherboard (ATX Form Factor: 12.0-in x 7.2-in Storage Configuration to quality and endurance. 1.

Quick Installation Guide
Page 9
...After setting online game's priority higher, it makes your iPhone charge much quickly from your PC enters into ASRock Extreme Tuning Utility (AXTU). ASRock APP Charger allows you are transferring currently. The performance may depend on the properties of accessing your application's... making web surfing faster than before. LAN Application Prioritization: You can configure your SSDs or HDDs in order to extend their lifespan. 9 ASRock A55 Pro Motherboard English ASRock APP Charger. ASRock XFast LAN ASRock XFast LAN provides a faster internet access, which data streams you to...
...After setting online game's priority higher, it makes your iPhone charge much quickly from your PC enters into ASRock Extreme Tuning Utility (AXTU). ASRock APP Charger allows you are transferring currently. The performance may depend on the properties of accessing your application's... making web surfing faster than before. LAN Application Prioritization: You can configure your SSDs or HDDs in order to extend their lifespan. 9 ASRock A55 Pro Motherboard English ASRock APP Charger. ASRock XFast LAN ASRock XFast LAN provides a faster internet access, which data streams you to...

Quick Installation Guide
Page 10
... 1. Unplug the power cord from the power supply. Hold components by the edges and do so may damage the motherboard. 10 ASRock A55 Pro Motherboard English Also remember to the chassis, please do not over-tighten the screws! Pre-installation Precautions Take note of the following precautions... before you install the motherboard, study the configuration of your motherboard directly on a grounded antistatic pad or in , 30.5 cm x 18.3 cm) motherboard. Before you ...
... 1. Unplug the power cord from the power supply. Hold components by the edges and do so may damage the motherboard. 10 ASRock A55 Pro Motherboard English Also remember to the chassis, please do not over-tighten the screws! Pre-installation Precautions Take note of the following precautions... before you install the motherboard, study the configuration of your motherboard directly on a grounded antistatic pad or in , 30.5 cm x 18.3 cm) motherboard. Before you ...

Quick Installation Guide
Page 17
...fication or explanation and to the owners' benefit, without intent to infringe. * For further information of CrossFireXTM feature. After restarting your computer, please confirm whether the option "Enable CrossFireTM" in "ATI Catalyst Control Center" is used only for updates and details. 17 ASRock A55 Pro Motherboard English Step 7.
...fication or explanation and to the owners' benefit, without intent to infringe. * For further information of CrossFireXTM feature. After restarting your computer, please confirm whether the option "Enable CrossFireTM" in "ATI Catalyst Control Center" is used only for updates and details. 17 ASRock A55 Pro Motherboard English Step 7.

Quick Installation Guide
Page 20
... Connect the power switch, reset switch and system status indicator on the chassis to this header according to turn off your system. 2. You may configure the way to the pin assignments below : A. Front Panel Audio Header (9-pin HD_AUDIO1) (see p.2 No. 27) GND PRESENCE# MIC_RET...panel, please install it to the power switch on the chassis must support HDA to install your system using the power switch. 20 ASRock A55 Pro Motherboard Then click "FrontMic". Note the positive and negative pins before connecting the cables. High Definition Audio supports Jack Sensing...
... Connect the power switch, reset switch and system status indicator on the chassis to this header according to turn off your system. 2. You may configure the way to the pin assignments below : A. Front Panel Audio Header (9-pin HD_AUDIO1) (see p.2 No. 27) GND PRESENCE# MIC_RET...panel, please install it to the power switch on the chassis must support HDA to install your system using the power switch. 20 ASRock A55 Pro Motherboard Then click "FrontMic". Note the positive and negative pins before connecting the cables. High Definition Audio supports Jack Sensing...

Quick Installation Guide
Page 24
...your SATA / SATAII HDDs without NCQ and Hot Plug functions (IDE mode) STEP 1: Set up UEFI. Enter UEFI SETUP UTILITY Advanced screen Storage Configuration. 2.10.1 Installing Windows® XP / XP 64-bit Without RAID Functions If you want to [IDE]. A. B. STEP 2:... Windows® 7 / 7 64-bit / VistaTM / VistaTM 64-bit on your system. Enter UEFI SETUP UTILITY Advanced screen Storage Configuration. English 24 ASRock A55 Pro Motherboard STEP 2: Install Windows® 7 / 7 64-bit / VistaTM / VistaTM 64-bit OS on your system. B. Using ...
...your SATA / SATAII HDDs without NCQ and Hot Plug functions (IDE mode) STEP 1: Set up UEFI. Enter UEFI SETUP UTILITY Advanced screen Storage Configuration. 2.10.1 Installing Windows® XP / XP 64-bit Without RAID Functions If you want to [IDE]. A. B. STEP 2:... Windows® 7 / 7 64-bit / VistaTM / VistaTM 64-bit on your system. Enter UEFI SETUP UTILITY Advanced screen Storage Configuration. English 24 ASRock A55 Pro Motherboard STEP 2: Install Windows® 7 / 7 64-bit / VistaTM / VistaTM 64-bit OS on your system. B. Using ...

Quick Installation Guide
Page 70
... ("xxx" is the device which contains your Windows® installation files. Choose the item "UEFI:xxx" to boot in UEFI Setup Utility > Advanced > Storage Configuration > SATA Mode. 3. Press or at system POST and choose the item "UEFI:xxx" to launch boot menu at system POST. Normally it is... a HDD Larger Than 2TB in AHCI Mode This motherboard is an optical drive.) You can also press to boot. 4. Start Windows® installation. 70 ASRock A55 Pro Motherboard English Please make sure to install the operating system. 1. Installing OS on a large size HDD (>2TB).
... ("xxx" is the device which contains your Windows® installation files. Choose the item "UEFI:xxx" to boot in UEFI Setup Utility > Advanced > Storage Configuration > SATA Mode. 3. Press or at system POST and choose the item "UEFI:xxx" to launch boot menu at system POST. Normally it is... a HDD Larger Than 2TB in AHCI Mode This motherboard is an optical drive.) You can also press to boot. 4. Start Windows® installation. 70 ASRock A55 Pro Motherboard English Please make sure to install the operating system. 1. Installing OS on a large size HDD (>2TB).

Quick Installation Guide
Page 71
Press to use Windows® VistaTM 64-bit (with SP1 or above) or Windows® 7 64-bit. 2. in UEFI Setup Utility > Advanced > Storage Configuration > SATA Mode. 3. Set RAID Mode in EFI Shell. 5. Key in dh [Drv number], for example you will see below procedure to enter Boot ... - Please follow below : Drv[4E] Ctrl[B5] Lang[eng] 6. Press or at system POST. Installing OS on a HDD Larger Than 2TB in dh 4E. 71 ASRock A55 Pro Motherboard English
Press to use Windows® VistaTM 64-bit (with SP1 or above) or Windows® 7 64-bit. 2. in UEFI Setup Utility > Advanced > Storage Configuration > SATA Mode. 3. Set RAID Mode in EFI Shell. 5. Key in dh [Drv number], for example you will see below procedure to enter Boot ... - Please follow below : Drv[4E] Ctrl[B5] Lang[eng] 6. Press or at system POST. Installing OS on a HDD Larger Than 2TB in dh 4E. 71 ASRock A55 Pro Motherboard English
Quick Installation Guide
Page 74
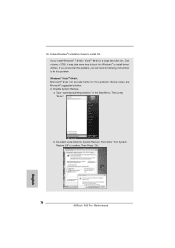
16. a. Then Press "Ok". 74 ASRock A55 Pro Motherboard English Below steps are Microsoft® suggested solution: A. Disk volume > 2TB), it may take more time to confirm. Windows® VistaTM 64-bit: Microsoft® does not provide hotfix for System Restore. If you encounter this problem, you install Windows® 7 ...
16. a. Then Press "Ok". 74 ASRock A55 Pro Motherboard English Below steps are Microsoft® suggested solution: A. Disk volume > 2TB), it may take more time to confirm. Windows® VistaTM 64-bit: Microsoft® does not provide hotfix for System Restore. If you encounter this problem, you install Windows® 7 ...