RAID Installation Guide
Page 5
... floppy drive. After reading the floppy disk, the driver will lose ALL data in this RAID installation guide for boot devices selection appears. B. C. Then you install. 5 The system will see the message on your system. Enter UEFI SETUP UTILITY → Advanced screen →Storage Configuration. During POST at the beginning of system boot-up UEFI. D. At the beginning of Windows setup, press F6 to [RAID]. After step 1, 2, 3, you can start to install Windows XP / XP 64-bit on a RAID disk...
... floppy drive. After reading the floppy disk, the driver will lose ALL data in this RAID installation guide for boot devices selection appears. B. C. Then you install. 5 The system will see the message on your system. Enter UEFI SETUP UTILITY → Advanced screen →Storage Configuration. During POST at the beginning of system boot-up UEFI. D. At the beginning of Windows setup, press F6 to [RAID]. After step 1, 2, 3, you can start to install Windows XP / XP 64-bit on a RAID disk...

RAID Installation Guide
Page 20
... the browsers listed above browsers, install the browser first and make it . 4. 2. Boot the PC or server, launch Windows, and log in again as the Administrator. The first RAIDXpert installation dialog box appears. 5. Double-click the Install CD's icon to work with the AMD SATA RAID Controller (the "Host PC"). 2. RAIDXpert uses this guide carefully and follow the instructions below to your CD-ROM drive. 3. RAIDXpert...
... the browsers listed above browsers, install the browser first and make it . 4. 2. Boot the PC or server, launch Windows, and log in again as the Administrator. The first RAIDXpert installation dialog box appears. 5. Double-click the Install CD's icon to work with the AMD SATA RAID Controller (the "Host PC"). 2. RAIDXpert uses this guide carefully and follow the instructions below to your CD-ROM drive. 3. RAIDXpert...

User Manual
Page 7
... USB 2.0 headers (support 4 USB 2.0 ports) BIOS Feature - 32Mb AMI UEFI Legal BIOS with LED (ACT/LINK LED and SPEED LED) - HD Audio Jack: Line in/Front Speaker/Microphone Connector - 6 x SATA2 3.0 Gb/s connectors, support RAID (RAID 0, RAID 1 and RAID 10), NCQ, AHCI and "Hot Plug" functions - 1 x IR header - 1 x CIR header - 1 x COM port header - 1 x HDMI_SPDIF header - 1 x Power LED header - 1 x CPU Fan connector (4-pin) - 2 x Chassis Fan connectors (2 x 4-pin) - 24 pin ATX power connector - 8 pin 12V power connector - Supports jumperfree - CPU, DRAM, VDDP, SB Voltage Multi...
... USB 2.0 headers (support 4 USB 2.0 ports) BIOS Feature - 32Mb AMI UEFI Legal BIOS with LED (ACT/LINK LED and SPEED LED) - HD Audio Jack: Line in/Front Speaker/Microphone Connector - 6 x SATA2 3.0 Gb/s connectors, support RAID (RAID 0, RAID 1 and RAID 10), NCQ, AHCI and "Hot Plug" functions - 1 x IR header - 1 x CIR header - 1 x COM port header - 1 x HDMI_SPDIF header - 1 x Power LED header - 1 x CPU Fan connector (4-pin) - 2 x Chassis Fan connectors (2 x 4-pin) - 24 pin ATX power connector - 8 pin 12V power connector - Supports jumperfree - CPU, DRAM, VDDP, SB Voltage Multi...

User Manual
Page 9
... be used under Windows® OS 32-bit CPU. In Hardware Monitor, it with your system. ASRock Instant Flash ASRock Instant Flash is an all-in-one tool to ne-tune different system functions in a user-friendly interface, which normally enable the Sleep/Standby and Hibernation modes in Windows® to shorten boot up time. Your friends then can save the new BIOS file to your USB flash drive, floppy disk or hard drive...
... be used under Windows® OS 32-bit CPU. In Hardware Monitor, it with your system. ASRock Instant Flash ASRock Instant Flash is an all-in-one tool to ne-tune different system functions in a user-friendly interface, which normally enable the Sleep/Standby and Hibernation modes in Windows® to shorten boot up time. Your friends then can save the new BIOS file to your USB flash drive, floppy disk or hard drive...

User Manual
Page 11
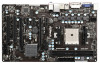
... 3 CPU Heatsink Retention Module 4 CPU Fan Connector (CPU_FAN1) 5 Chassis Fan Connector (CHA_FAN2) 6 2 x 240-pin DDR3 DIMM Slots (Dual Channel: DDR3_A1, DDR3_B1) 7 ATX Power Connector (ATXPWR1) 8 SATA2 Connector (SATA_1) 9 SATA2 Connector (SATA_2) 10 Southbridge Controller 11 SPI Flash Memory (32Mb) 12 Chassis Fan Connector (CHA_FAN1) 13 Clear CMOS Jumper (CLRCMOS1) 14 Chassis Speaker Header (SPEAKER 1) 15 System Panel Header (PANEL1) 16 SATA2 Connector (SATA_3) 17 SATA2 Connector (SATA_4) 18 Power LED Header (PLED1) 19 SATA2 Connector (SATA_6) 20 SATA2 Connector (SATA_5) 21 USB 2.0 Header...
... 3 CPU Heatsink Retention Module 4 CPU Fan Connector (CPU_FAN1) 5 Chassis Fan Connector (CHA_FAN2) 6 2 x 240-pin DDR3 DIMM Slots (Dual Channel: DDR3_A1, DDR3_B1) 7 ATX Power Connector (ATXPWR1) 8 SATA2 Connector (SATA_1) 9 SATA2 Connector (SATA_2) 10 Southbridge Controller 11 SPI Flash Memory (32Mb) 12 Chassis Fan Connector (CHA_FAN1) 13 Clear CMOS Jumper (CLRCMOS1) 14 Chassis Speaker Header (SPEAKER 1) 15 System Panel Header (PANEL1) 16 SATA2 Connector (SATA_3) 17 SATA2 Connector (SATA_4) 18 Power LED Header (PLED1) 19 SATA2 Connector (SATA_6) 20 SATA2 Connector (SATA_5) 21 USB 2.0 Header...

User Manual
Page 19
... an optional download. Install the VGA card drivers to download it again): http://www.microsoft.com/windowsxp/sp2/default.mspx B. Click "View", select "CrossFireXTM", and then check the item "Enable CrossFireXTM". tem. Please check AMD website for details. We recommend using this utility to installation. You must have any previously installed Catalyst drivers prior to uninstall any VGA driver installed in your computer. ATI Catalyst Control Center Step 6. 2.5.2 Driver Installation and Setup...
... an optional download. Install the VGA card drivers to download it again): http://www.microsoft.com/windowsxp/sp2/default.mspx B. Click "View", select "CrossFireXTM", and then check the item "Enable CrossFireXTM". tem. Please check AMD website for details. We recommend using this utility to installation. You must have any previously installed Catalyst drivers prior to uninstall any VGA driver installed in your computer. ATI Catalyst Control Center Step 6. 2.5.2 Driver Installation and Setup...

User Manual
Page 21
... does an AMD Dual Graphics system include? Please remove the AMD driver if you have any future update, please refer to your system for further information. Please keep the default UEFI setting of AMD Dual Graphics Step 1. Connect the monitor cable to enter AMD VISION Engine Control Center. 21 Install the onboard VGA driver from onboard display only. Click "AMD VISION Engine Control Center" to the onboard VGA port. Chipset AMD RADEON HD6670 AMD RADEON HD6570 AMD RADEON HD6450 Model ASUS DIS-PCIE2.1-ASUS-HDMI-EAH6670...
... does an AMD Dual Graphics system include? Please remove the AMD driver if you have any future update, please refer to your system for further information. Please keep the default UEFI setting of AMD Dual Graphics Step 1. Connect the monitor cable to enter AMD VISION Engine Control Center. 21 Install the onboard VGA driver from onboard display only. Click "AMD VISION Engine Control Center" to the onboard VGA port. Chipset AMD RADEON HD6670 AMD RADEON HD6570 AMD RADEON HD6450 Model ASUS DIS-PCIE2.1-ASUS-HDMI-EAH6670...
User Manual
Page 23
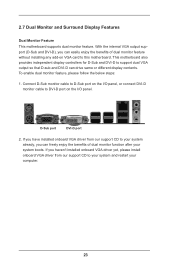
...-on the I /O panel. Connect D-Sub monitor cable to D-Sub port on VGA card to support dual VGA output so that D-sub and DVI-D can easily enjoy the benefits of dual monitor function after your system already, you can drive same or different display contents. If you haven't installed onboard VGA driver yet, please install onboard VGA driver from our support CD to your system boots. D-Sub port DVI-D port 2. This motherboard also provides independent display controllers for D-Sub and...
...-on the I /O panel. Connect D-Sub monitor cable to D-Sub port on VGA card to support dual VGA output so that D-sub and DVI-D can easily enjoy the benefits of dual monitor function after your system already, you can drive same or different display contents. If you haven't installed onboard VGA driver yet, please install onboard VGA driver from our support CD to your system boots. D-Sub port DVI-D port 2. This motherboard also provides independent display controllers for D-Sub and...
User Manual
Page 37
... a window for boot devices selection appears. WARNING! Enter UEFI SETUP UTILITY Advanced screen Storage Configuration. D. The system will see the message on a RAID disk composed of system boot-up UEFI. STEP 2: Make a SATA / SATAII Driver Diskette. (Please use USB floppy or floppy disk.) A. Start to install those required drivers. Insert the ASRock Support CD into the floppy drive, and press any key. During POST at the beginning of 2 or more SATA / SATAII HDDs with RAID functions, please follow below steps. 2.14 Driver Installation Guide To install...
... a window for boot devices selection appears. WARNING! Enter UEFI SETUP UTILITY Advanced screen Storage Configuration. D. The system will see the message on a RAID disk composed of system boot-up UEFI. STEP 2: Make a SATA / SATAII Driver Diskette. (Please use USB floppy or floppy disk.) A. Start to install those required drivers. Insert the ASRock Support CD into the floppy drive, and press any key. During POST at the beginning of 2 or more SATA / SATAII HDDs with RAID functions, please follow below steps. 2.14 Driver Installation Guide To install...

User Manual
Page 49
... enable or disable Dual Graphics feature. 3.4.2 North Bridge Configuration Primary Graphics Adapter This item will be automatically enabled when you install AMD RADEON HD6670 / 6570 / 6450 graphics card. Dual Graphics This item appears only when you install AMD RADEON HD6670 / 6570 / 6450 graphics card on this feature is [PCI Express]. The default value is [Auto]. Use this option, you enable this to select the type of Primary VGA in case of this motherboard. If you can choose onboard VGA or PCIE card VGA...
... enable or disable Dual Graphics feature. 3.4.2 North Bridge Configuration Primary Graphics Adapter This item will be automatically enabled when you install AMD RADEON HD6670 / 6570 / 6450 graphics card. Dual Graphics This item appears only when you install AMD RADEON HD6670 / 6570 / 6450 graphics card on this feature is [PCI Express]. The default value is [Auto]. Use this option, you enable this to select the type of Primary VGA in case of this motherboard. If you can choose onboard VGA or PCIE card VGA...

User Manual
Page 51
... item to RAID mode, it is [Enabled]. Hard Disk S.M.A.R.T. 3.4.4 Storage Configuration SATA Controller Use this item to enable or disable the S.M.A.R.T. (Self-Monitoring, Analysis, and Reporting Technology) feature. Configuration options: [AHCI Mode], [RAID Mode] and [IDE Mode]. If you want to build RAID on SATA_5 and SATA_6 ports. Use this item to install SATA ODD driver on SATA_5 and SATA_6 ports, please disable this option is for SATA_5 and SATA_6 ports. The default value of this item. SATA IDE Combined Mode This item is [AHCI Mode]. Configuration options: [Disabled...
... item to RAID mode, it is [Enabled]. Hard Disk S.M.A.R.T. 3.4.4 Storage Configuration SATA Controller Use this item to enable or disable the S.M.A.R.T. (Self-Monitoring, Analysis, and Reporting Technology) feature. Configuration options: [AHCI Mode], [RAID Mode] and [IDE Mode]. If you want to build RAID on SATA_5 and SATA_6 ports. Use this item to install SATA ODD driver on SATA_5 and SATA_6 ports, please disable this option is for SATA_5 and SATA_6 ports. The default value of this item. SATA IDE Combined Mode This item is [AHCI Mode]. Configuration options: [Disabled...

User Manual
Page 55
... have USB compatibility issue, it is [Enabled]. There are connected. [Disabled] - Enables support for legacy USB. [Auto] - The default value is recommended to select [Disabled] to enter OS. [UEFI Setup Only] - Legacy USB Support Use this item to enable or disable the use of these four options: [Enabled] - USB devices are allowed to use under UEFI setup and Windows / Linux OS. 55 USB devices are not allowed to use only under legacy OS and UEFI setup when [Disabled] is selected. 3.4.7 USB Configuration USB 2.0 Controller Use this option to select legacy support for USB...
... have USB compatibility issue, it is [Enabled]. There are connected. [Disabled] - Enables support for legacy USB. [Auto] - The default value is recommended to select [Disabled] to enter OS. [UEFI Setup Only] - Legacy USB Support Use this item to enable or disable the use of these four options: [Enabled] - USB devices are allowed to use under UEFI setup and Windows / Linux OS. 55 USB devices are not allowed to use only under legacy OS and UEFI setup when [Disabled] is selected. 3.4.7 USB Configuration USB 2.0 Controller Use this option to select legacy support for USB...
User Manual
Page 60
... the motherboard contains necessary drivers and useful utilities that the motherboard supports. Because motherboard settings and hardware options vary, use the setup procedures in your dealer for more about ASRock, welcome to display the menus. 4.2.2 Drivers Menu The Drivers Menu shows the available devices drivers if the system detects the installed devices. The CD automatically displays the Main Menu if "AUTORUN" is enabled in this chapter for general reference only. Please install the necessary drivers to install it...
... the motherboard contains necessary drivers and useful utilities that the motherboard supports. Because motherboard settings and hardware options vary, use the setup procedures in your dealer for more about ASRock, welcome to display the menus. 4.2.2 Drivers Menu The Drivers Menu shows the available devices drivers if the system detects the installed devices. The CD automatically displays the Main Menu if "AUTORUN" is enabled in this chapter for general reference only. Please install the necessary drivers to install it...

User Manual
Page 65
Type "systempropertiesprotection" in a large hard disk (ex. Then press "Enter". Then Click "Turn System Restore Off" to install OS. b. Follow Windows® Installation Guide to confirm. Disk volume > 2TB), it may take more time to fix this problem. Disable System Restore. Below steps are Microsoft® suggested solution: A. a. De-select Local Disks for this problem, you will need to following instructions to boot into Windows® or install driver/ utilities. If...
Type "systempropertiesprotection" in a large hard disk (ex. Then press "Enter". Then Click "Turn System Restore Off" to install OS. b. Follow Windows® Installation Guide to confirm. Disk volume > 2TB), it may take more time to fix this problem. Disable System Restore. Below steps are Microsoft® suggested solution: A. a. De-select Local Disks for this problem, you will need to following instructions to boot into Windows® or install driver/ utilities. If...

Quick Installation Guide
Page 2
... 3 CPU Heatsink Retention Module 4 CPU Fan Connector (CPU_FAN1) 5 Chassis Fan Connector (CHA_FAN2) 6 2 x 240-pin DDR3 DIMM Slots (Dual Channel: DDR3_A1, DDR3_B1) 7 ATX Power Connector (ATXPWR1) 8 SATA2 Connector (SATA_1) 9 SATA2 Connector (SATA_2) 10 Southbridge Controller 11 SPI Flash Memory (32Mb) 12 Chassis Fan Connector (CHA_FAN1) 13 Clear CMOS Jumper (CLRCMOS1) 14 Chassis Speaker Header (SPEAKER 1) 15 System Panel Header (PANEL1) 16 SATA2 Connector (SATA_3) 17 SATA2 Connector (SATA_4) 18 Power LED Header (PLED1) 19 SATA2 Connector (SATA_6) 20 SATA2 Connector (SATA_5) 21 USB 2.0 Header...
... 3 CPU Heatsink Retention Module 4 CPU Fan Connector (CPU_FAN1) 5 Chassis Fan Connector (CHA_FAN2) 6 2 x 240-pin DDR3 DIMM Slots (Dual Channel: DDR3_A1, DDR3_B1) 7 ATX Power Connector (ATXPWR1) 8 SATA2 Connector (SATA_1) 9 SATA2 Connector (SATA_2) 10 Southbridge Controller 11 SPI Flash Memory (32Mb) 12 Chassis Fan Connector (CHA_FAN1) 13 Clear CMOS Jumper (CLRCMOS1) 14 Chassis Speaker Header (SPEAKER 1) 15 System Panel Header (PANEL1) 16 SATA2 Connector (SATA_3) 17 SATA2 Connector (SATA_4) 18 Power LED Header (PLED1) 19 SATA2 Connector (SATA_6) 20 SATA2 Connector (SATA_5) 21 USB 2.0 Header...

Quick Installation Guide
Page 6
...power supply is required) * For detailed product information, please visit our website: http://www.asrock.com 6 ASRock A55 Pro Motherboard ACPI 1.1 Compliance Wake Up Events - CPU, DRAM, VDDP, SB Voltage Multi-adjustment Support CD - SMBIOS 2.3.1 Support - HD Audio Jack: Line in/Front Speaker/Microphone Connector - 6 x SATA2 3.0 Gb/s connectors, support RAID (RAID 0, RAID 1 and RAID 10), NCQ, AHCI and "Hot Plug" functions - 1 x IR header - 1 x CIR header - 1 x COM port header - 1 x HDMI_SPDIF header - 1 x Power LED header - 1 x CPU Fan connector (4-pin) - 2 x Chassis Fan...
...power supply is required) * For detailed product information, please visit our website: http://www.asrock.com 6 ASRock A55 Pro Motherboard ACPI 1.1 Compliance Wake Up Events - CPU, DRAM, VDDP, SB Voltage Multi-adjustment Support CD - SMBIOS 2.3.1 Support - HD Audio Jack: Line in/Front Speaker/Microphone Connector - 6 x SATA2 3.0 Gb/s connectors, support RAID (RAID 0, RAID 1 and RAID 10), NCQ, AHCI and "Hot Plug" functions - 1 x IR header - 1 x CIR header - 1 x COM port header - 1 x HDMI_SPDIF header - 1 x Power LED header - 1 x CPU Fan connector (4-pin) - 2 x Chassis Fan...

Quick Installation Guide
Page 8
... a user-friendly interface, which normally enable the Sleep/Standby and Hibernation modes in Windows® to access ASRock Instant Flash. In Fan Control, it with your Windows® desktop in a few seconds. In XFast RAM, it shows the major readings of output phases to improve efficiency when the CPU cores are allowed to overclock CPU frequency for your USB flash drive, floppy disk or hard drive, then you to turn...
... a user-friendly interface, which normally enable the Sleep/Standby and Hibernation modes in Windows® to access ASRock Instant Flash. In Fan Control, it with your Windows® desktop in a few seconds. In XFast RAM, it shows the major readings of output phases to improve efficiency when the CPU cores are allowed to overclock CPU frequency for your USB flash drive, floppy disk or hard drive, then you to turn...

Quick Installation Guide
Page 16
... find "ATI Catalyst Control Center" on your computer. Please check AMD website for details. Please check Microsoft website for details. Install the VGA card drivers to your system, and restart your computer and boot into OS. Power on your system, there is an optional download. Step 2. For Windows® 7 / VistaTM OS: Install the CATALYST Control Center. Then you install two Radeon graphics cards). English 16 ASRock A55 Pro Motherboard
... find "ATI Catalyst Control Center" on your computer. Please check AMD website for details. Please check Microsoft website for details. Install the VGA card drivers to your system, and restart your computer and boot into OS. Power on your system, there is an optional download. Step 2. For Windows® 7 / VistaTM OS: Install the CATALYST Control Center. Then you install two Radeon graphics cards). English 16 ASRock A55 Pro Motherboard

Quick Installation Guide
Page 25
... to display the menus. 25 ASRock A55 Pro Motherboard English To begin using the Support CD, insert the CD into your computer. It will enhance motherboard features. If you start up the computer, please press or during the Power-On-Self-Test (POST) to enter BIOS Setup after POST, please restart the system by pressing + + , or pressing the reset button on the system chassis. 3. When you wish to enter BIOS Setup utility...
... to display the menus. 25 ASRock A55 Pro Motherboard English To begin using the Support CD, insert the CD into your computer. It will enhance motherboard features. If you start up the computer, please press or during the Power-On-Self-Test (POST) to enter BIOS Setup after POST, please restart the system by pressing + + , or pressing the reset button on the system chassis. 3. When you wish to enter BIOS Setup utility...
Quick Installation Guide
Page 74
...; Installation Guide to fix this problem. If you encounter this problem. Below steps are Microsoft® suggested solution: A. Then press "Enter". If you will need to following instructions to install OS. Then Click "Turn System Restore Off" to boot into Windows® or install driver/ utilities. De-select Local Disks for this problem, you install Windows® 7 64-bit / VistaTM 64-bit in the Start Menu. Then Press "Ok". 74 ASRock A55 Pro Motherboard English Type...
...; Installation Guide to fix this problem. If you encounter this problem. Below steps are Microsoft® suggested solution: A. Then press "Enter". If you will need to following instructions to install OS. Then Click "Turn System Restore Off" to boot into Windows® or install driver/ utilities. De-select Local Disks for this problem, you install Windows® 7 64-bit / VistaTM 64-bit in the Start Menu. Then Press "Ok". 74 ASRock A55 Pro Motherboard English Type...


