RAID Installation Guide
Page 1
NVIDIA Windows RAID Installation Guide 8 2.1 Introduction to RAID 2 1.2 RAID Configurations Precautions 3 1.3 Create Disk Array 4 2. NVIDIA BIOS RAID Installation Guide 2 1.1 Introduction to RAID 8 2.2 RAID Configurations Precautions 9 2.3 Create Disk Array 10 1 RAID Installation Guide 1.
NVIDIA Windows RAID Installation Guide 8 2.1 Introduction to RAID 2 1.2 RAID Configurations Precautions 3 1.3 Create Disk Array 4 2. NVIDIA BIOS RAID Installation Guide 2 1.1 Introduction to RAID 8 2.2 RAID Configurations Precautions 9 2.3 Create Disk Array 10 1 RAID Installation Guide 1.
RAID Installation Guide
Page 2
...and storage since the disk array management software will cause data damage or data loss. This motherboard supports RAID / AHCI function under BIOS environment. It will double the data transfer rate of a single disk alone while the two hard disks perform the same work as... two or more hard disk drives into one logical unit. Although RAID 0 function can start to a second drive. NVIDIA BIOS RAID Installation Guide NVIDIA BIOS RAID Installation Guide is an instruction for "Redundant Array of Independent Disks", which is called data striping that copies and maintains an...
...and storage since the disk array management software will cause data damage or data loss. This motherboard supports RAID / AHCI function under BIOS environment. It will double the data transfer rate of a single disk alone while the two hard disks perform the same work as... two or more hard disk drives into one logical unit. Although RAID 0 function can start to a second drive. NVIDIA BIOS RAID Installation Guide NVIDIA BIOS RAID Installation Guide is an instruction for "Redundant Array of Independent Disks", which is called data striping that copies and maintains an...

RAID Installation Guide
Page 4
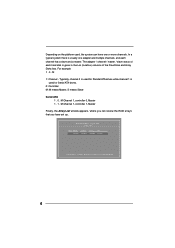
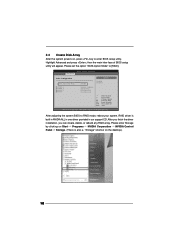
... appears. We take RAID 0 for use as RAID array disk, the operation procedures are available for example to show you how to use MediaShield BIOS to create other RAID array, the Stripe block size is given in the Free Disks block. Then, you want to Mirrored, but the values ... be between 8KB and 128KB (8, 16, 32, 64, and 128KB). 1.3 Create Disk Array After the system powers on the disk. After adjusting the system BIOS to enter BIOS setup utility. After you to assign the disks. You have to press . Detecting storage devices . . . 1 SATA_2 Slimtype DVD A DS8A3S Press F10 to [RAID]....
... appears. We take RAID 0 for use as RAID array disk, the operation procedures are available for example to show you how to use MediaShield BIOS to create other RAID array, the Stripe block size is given in the Free Disks block. Then, you want to Mirrored, but the values ... be between 8KB and 128KB (8, 16, 32, 64, and 128KB). 1.3 Create Disk Array After the system powers on the disk. After adjusting the system BIOS to enter BIOS setup utility. After you to assign the disks. You have to press . Detecting storage devices . . . 1 SATA_2 Slimtype DVD A DS8A3S Press F10 to [RAID]....

RAID Installation Guide
Page 5
... [TAB] Navigate [ ] Select [ENTER] Popup A. Move it from the Free Disks block to use as RAID array disks appear in the list is selected. MediaShield BIOS Aug 18 2008 - The first disk in the Array Disks block. Continue pressing the right-arrow key until all the disks that you want to... [ ] Select [ENTER] Popup After assigning your RAID array disks, press to the Free Disks section. B. Tab to save your changes of RAID array disks. 5 MediaShield BIOS Aug 18 2008 - C. Define a New Array -
... [TAB] Navigate [ ] Select [ENTER] Popup A. Move it from the Free Disks block to use as RAID array disks appear in the list is selected. MediaShield BIOS Aug 18 2008 - The first disk in the Array Disks block. Continue pressing the right-arrow key until all the disks that you want to... [ ] Select [ENTER] Popup After assigning your RAID array disks, press to the Free Disks section. B. Tab to save your changes of RAID array disks. 5 MediaShield BIOS Aug 18 2008 - C. Define a New Array -
RAID Installation Guide
Page 6
... channels. Depending on the platform used, the system can review the RAID arrays that you can have set up. M Channel 1, controller 0, Master 1 . 1 . Array List - MediaShield BIOS Aug 18 2008 -
... channels. Depending on the platform used, the system can review the RAID arrays that you can have set up. M Channel 1, controller 0, Master 1 . 1 . Array List - MediaShield BIOS Aug 18 2008 -
RAID Installation Guide
Page 10
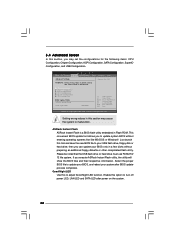
BIOS SETUP UTILITY Advanced SATA Configuration Onboard SATA Controller SATA Operation Mode SATAII_1 SATAII_2 SATAII_3 ESATA [Enabled] [RAID] [ATAPI CDROM] [Hard Disk] [Not Detected] [Not Detected] ... in our support CD. RAID driver is also a "Storage" shortcut on , press key to enter BIOS setup utility. Highlight Advanced and press , then the main inter-face of BIOS setup utility will appear. After adjusting the system BIOS to [RAID]. After you finish the driver installation, you can create, delete, or rebuild any...
BIOS SETUP UTILITY Advanced SATA Configuration Onboard SATA Controller SATA Operation Mode SATAII_1 SATAII_2 SATAII_3 ESATA [Enabled] [RAID] [ATAPI CDROM] [Hard Disk] [Not Detected] [Not Detected] ... in our support CD. RAID driver is also a "Storage" shortcut on , press key to enter BIOS setup utility. Highlight Advanced and press , then the main inter-face of BIOS setup utility will appear. After adjusting the system BIOS to [RAID]. After you finish the driver installation, you can create, delete, or rebuild any...

User Manual
Page 3
... 64-bit Without RAID Functions 25 2.15 Installing Windows® 7 / 7 64-bit / VistaTM / VistaTM 64-bit With RAID Functions 26 2.16 Untied Overclocking Technology 27 3 BIOS SETUP UTILITY 28 3.1 Introduction 28 3.1.1 BIOS Menu Bar 28 3.1.2 Navigation Keys 29 3.2 Main Screen 29 3.3 OC Tweaker Screen 30 3.4 Advanced Screen 32 3.4.1 CPU Configuration 33 3
... 64-bit Without RAID Functions 25 2.15 Installing Windows® 7 / 7 64-bit / VistaTM / VistaTM 64-bit With RAID Functions 26 2.16 Untied Overclocking Technology 27 3 BIOS SETUP UTILITY 28 3.1 Introduction 28 3.1.1 BIOS Menu Bar 28 3.1.2 Navigation Keys 29 3.2 Main Screen 29 3.3 OC Tweaker Screen 30 3.4 Advanced Screen 32 3.4.1 CPU Configuration 33 3
User Manual
Page 5
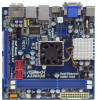
... Bundled Intel® Dual-Core AtomTM Processor 330 ASRock A330ION Quick Installation Guide ASRock A330ION Support CD Two Serial ATA (SATA) Data Cables (Optional) One Serial ATA (SATA) HDD Power Cable (Optional) One I/O Panel Shield 5 It delivers excellent performance with robust design conforming to ASRock's commitment to BIOS setup and information of the Support CD. You...
... Bundled Intel® Dual-Core AtomTM Processor 330 ASRock A330ION Quick Installation Guide ASRock A330ION Support CD Two Serial ATA (SATA) Data Cables (Optional) One Serial ATA (SATA) HDD Power Cable (Optional) One I/O Panel Shield 5 It delivers excellent performance with robust design conforming to ASRock's commitment to BIOS setup and information of the Support CD. You...
User Manual
Page 7
... connector - Front panel audio connector - 2 x USB 2.0 headers (support 4 USB 2.0 ports) (see CAUTION 7) - 1 x IR header - 1 x COM port header - 1 x HDMI_SPDIF header - AMI Legal BIOS - Supports "Plug and Play" - Supports jumperfree - Drivers, Utilities, AntiVirus Software (Trial Version), ASRock Software Suite (CyberLink DVD Suite and Creative Sound Blaster X-Fi MB) (OEM and Trial Version) Unique Feature...
... connector - Front panel audio connector - 2 x USB 2.0 headers (support 4 USB 2.0 ports) (see CAUTION 7) - 1 x IR header - 1 x COM port header - 1 x HDMI_SPDIF header - AMI Legal BIOS - Supports "Plug and Play" - Supports jumperfree - Drivers, Utilities, AntiVirus Software (Trial Version), ASRock Software Suite (CyberLink DVD Suite and Creative Sound Blaster X-Fi MB) (OEM and Trial Version) Unique Feature...

User Manual
Page 8
...possible damage caused by overclocking. It is a BIOS flash utility embedded in the BIOS, applying Untied Overclocking Technology, or using the thirdparty overclocking tools. Please visit our website for proper installation. 4. ASRock Instant Flash is a user-friendly ASRock overclocking tool which allows you can update your hardware... to the components and devices of memory modules on page 27 for the latest information. 6. ASRock website: http://www.asrock.com 10. With this tool and save the new BIOS file to your USB flash drive, floppy disk or hard drive, then you to SATAII mode...
...possible damage caused by overclocking. It is a BIOS flash utility embedded in the BIOS, applying Untied Overclocking Technology, or using the thirdparty overclocking tools. Please visit our website for proper installation. 4. ASRock Instant Flash is a user-friendly ASRock overclocking tool which allows you can update your hardware... to the components and devices of memory modules on page 27 for the latest information. 6. ASRock website: http://www.asrock.com 10. With this tool and save the new BIOS file to your USB flash drive, floppy disk or hard drive, then you to SATAII mode...

User Manual
Page 10
...in) 1 PS2_USB_PWR1 CHA_FAN1 CMOS Battery CLRCMOS1 CPU_FAN1 Dual Channel DDR3 1066 DDR3_2 (64 bit, 240-piFnSmoBd8ul0e)0 DDR3_1 (64 bit, 240-piFnSmoBd8ul0e)0 8Mb BIOS 1 USB6_7 1 USB8_9 Gigabit LAN LAN PHY Super IO 1 HDMI_SPDIF1 1 HD_AUDIO1 RoHS DX10 SATAII_2 SATAII_4 1 COM1 AUDIO CODEC EuP Ready SATAII_1 PCI Express... 2.0 PCIE1 SATAII_3 SPEAKER1 1 A330ION CHA_FAN2 PANEL 1 IR1 1 PLED PWRBTN 1 HDLED RESET 17.0cm (6.7 in) 8 9 10 11 18 17 16 15 14 13 12...
...in) 1 PS2_USB_PWR1 CHA_FAN1 CMOS Battery CLRCMOS1 CPU_FAN1 Dual Channel DDR3 1066 DDR3_2 (64 bit, 240-piFnSmoBd8ul0e)0 DDR3_1 (64 bit, 240-piFnSmoBd8ul0e)0 8Mb BIOS 1 USB6_7 1 USB8_9 Gigabit LAN LAN PHY Super IO 1 HDMI_SPDIF1 1 HD_AUDIO1 RoHS DX10 SATAII_2 SATAII_4 1 COM1 AUDIO CODEC EuP Ready SATAII_1 PCI Express... 2.0 PCIE1 SATAII_3 SPEAKER1 1 A330ION CHA_FAN2 PANEL 1 IR1 1 PLED PWRBTN 1 HDLED RESET 17.0cm (6.7 in) 8 9 10 11 18 17 16 15 14 13 12...

User Manual
Page 15
... hardware settings for later use . Step 4. Step 6. Remove the system unit cover (if your motherboard is 1 PCI Express slot on this situation, please adjust the BIOS option "Share Memory" to PCIE1 (PCIE x16 slot), the onboard VGA will be disabled. Align the card connector with screws. Fasten the card to use...
... hardware settings for later use . Step 4. Step 6. Remove the system unit cover (if your motherboard is 1 PCI Express slot on this situation, please adjust the BIOS option "Share Memory" to PCIE1 (PCIE x16 slot), the onboard VGA will be disabled. Align the card connector with screws. Fasten the card to use...

User Manual
Page 18
... p.10 No. 4) PLED+ PLEDPWRBTN# GND 1 DUMMY RESET# GND HDLEDHDLED+ 1 SPEAKER DUMMY DUMMY +5V GND +12V CHA_FAN_SPEED This header accommodates several system front panel functions. Enter BIOS Setup Utility. Enter Advanced Settings, and then select Chipset Configuration. Connect Audio_R (RIN) to OUT2_R and Audio_L (LIN) to install your system. 2. C. Please follow the...
... p.10 No. 4) PLED+ PLEDPWRBTN# GND 1 DUMMY RESET# GND HDLEDHDLED+ 1 SPEAKER DUMMY DUMMY +5V GND +12V CHA_FAN_SPEED This header accommodates several system front panel functions. Enter BIOS Setup Utility. Enter Advanced Settings, and then select Chipset Configuration. Connect Audio_R (RIN) to OUT2_R and Audio_L (LIN) to install your system. 2. C. Please follow the...

User Manual
Page 25
... steps. Set the option "SATA Operation Mode" to [AHCI]. A. Set the option "SATA Operation Mode" to [IDE]. B. B. Enter BIOS SETUP UTILITY Advanced screen Storage Configuration. Then, the drivers compatible to your SATA / SATAII HDDs without RAID functions, please follow below procedures according ... 64-bit / VistaTM / VistaTM 64-bit OS on your SATA / SATAII HDDs without RAID functions, please follow the order from up BIOS. Therefore, the drivers you install can be auto-detected and listed on your SATA / SATAII HDDs without RAID functions, please follow below steps...
... steps. Set the option "SATA Operation Mode" to [AHCI]. A. Set the option "SATA Operation Mode" to [IDE]. B. B. Enter BIOS SETUP UTILITY Advanced screen Storage Configuration. Then, the drivers compatible to your SATA / SATAII HDDs without RAID functions, please follow below procedures according ... 64-bit / VistaTM / VistaTM 64-bit OS on your SATA / SATAII HDDs without RAID functions, please follow the order from up BIOS. Therefore, the drivers you install can be auto-detected and listed on your SATA / SATAII HDDs without RAID functions, please follow below steps...

User Manual
Page 26
... option "SATA Operation Mode" to [RAID]. Set the "SATA Operation Mode" option to [IDE]. page, please insert the ASRock Support CD into your system. A. Enter BIOS SETUP UTILITY Advanced screen Storage Configuration. B. RAID mode is not supported under Windows® XP / XP 64-bit OS. ... to load the NVIDIA® RAID drivers. Before you start to configure RAID function, you want to install Windows?" B. Please refer to the BIOS RAID installation guide part of the document in the following path in the Support CD: .. \ RAID Installation Guide STEP 3: Install Windows® ...
... option "SATA Operation Mode" to [RAID]. Set the "SATA Operation Mode" option to [IDE]. page, please insert the ASRock Support CD into your system. A. Enter BIOS SETUP UTILITY Advanced screen Storage Configuration. B. RAID mode is not supported under Windows® XP / XP 64-bit OS. ... to load the NVIDIA® RAID drivers. Before you start to configure RAID function, you want to install Windows?" B. Please refer to the BIOS RAID installation guide part of the document in the following path in the Support CD: .. \ RAID Installation Guide STEP 3: Install Windows® ...

User Manual
Page 27
..... \ RAID Installation Guide 2.16 Untied Overclocking Technology This motherboard supports Untied Overclocking Technology, which means during overclocking, but PCI buse is in BIOS first. Please refer to the warning on SATA / SATAII HDDs, you enable Untied Overclocking function, please enter "Overclock Mode" option of... BIOS setup to [RAID] in the fixed mode so that FSB can operate under a more stable overclocking environment. NOTE. Then, please set the...
..... \ RAID Installation Guide 2.16 Untied Overclocking Technology This motherboard supports Untied Overclocking Technology, which means during overclocking, but PCI buse is in BIOS first. Please refer to the warning on SATA / SATAII HDDs, you enable Untied Overclocking function, please enter "Overclock Mode" option of... BIOS setup to [RAID] in the fixed mode so that FSB can operate under a more stable overclocking environment. NOTE. Then, please set the...

User Manual
Page 28
...selections: Main To set up the system time/date information OC Tweaker To set up overclocking features Advanced To set up the advanced BIOS features Boot To set up the default system device to locate and load the Operating System Security To set up the security features...and then press to choose among the selections on . Chapter 3 BIOS SETUP UTILITY 3.1 Introduction This section explains how to use the BIOS SETUP UTILITY to enter the BIOS SETUP UTILITY, otherwise, POST will continue with the following BIOS setup screens and descriptions are for reference purpose only, and they may...
...selections: Main To set up the system time/date information OC Tweaker To set up overclocking features Advanced To set up the advanced BIOS features Boot To set up the default system device to locate and load the Operating System Security To set up the security features...and then press to choose among the selections on . Chapter 3 BIOS SETUP UTILITY 3.1 Introduction This section explains how to use the BIOS SETUP UTILITY to enter the BIOS SETUP UTILITY, otherwise, POST will continue with the following BIOS setup screens and descriptions are for reference purpose only, and they may...
User Manual
Page 29
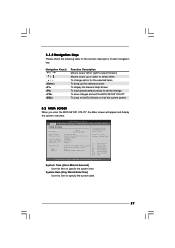
...18/2009] Use [Enter], [TAB] or [SHIFT-TAB] to the Exit Screen or exit the current screen 3.2 Main Screen When you enter the BIOS SETUP UTILITY, the Main screen will appear and display the system overview. Navigation Key(s) / / + / Function Description Moves cursor left or right to... To bring up the selected screen To display the General Help Screen To load optimal default values for the function description of each navigation key. BIOS Version : A330ION P1.00 Processor Type : Intel (R) Atom (TM) CPU 330 @ 1.60GHz (64bit) Processor Speed : 1600MHz Microcode Update : 106C2/219 ...
...18/2009] Use [Enter], [TAB] or [SHIFT-TAB] to the Exit Screen or exit the current screen 3.2 Main Screen When you enter the BIOS SETUP UTILITY, the Main screen will appear and display the system overview. Navigation Key(s) / / + / Function Description Moves cursor left or right to... To bring up the selected screen To display the General Help Screen To load optimal default values for the function description of each navigation key. BIOS Version : A330ION P1.00 Processor Type : Intel (R) Atom (TM) CPU 330 @ 1.60GHz (64bit) Processor Speed : 1600MHz Microcode Update : 106C2/219 ...

User Manual
Page 30
BIOS SETUP UTILITY Main OC Tweaker Advanced H/W Monitor Boot Security Exit OC Tweaker Settings Load Optimized CPU OC Setting [Press Enter] Overclock Mode CPU Frequency (MHz) ...
BIOS SETUP UTILITY Main OC Tweaker Advanced H/W Monitor Boot Security Exit OC Tweaker Settings Load Optimized CPU OC Setting [Press Enter] Overclock Mode CPU Frequency (MHz) ...
User Manual
Page 32
... ACPI Configuration, SATA Configuration, SuperIO Configuration, and USB Configuration. CPU Configuration Chipset Configuration ACPI Configuration SATA Configuration SuperIO Configuration USB Configuration BIOS Update Utility ASRock Instant Flash Good Night LED [Disabled] Select Screen Select Item Enter Go to Sub Screen F1 General Help F9 Load Defaults F10 Save... set the configurations for CPU WARNING : Setting wrong values in below sections may cause the system to malfunction. This convenient BIOS update tool allows you execute ASRock Instant Flash utility, the utility will show the...
... ACPI Configuration, SATA Configuration, SuperIO Configuration, and USB Configuration. CPU Configuration Chipset Configuration ACPI Configuration SATA Configuration SuperIO Configuration USB Configuration BIOS Update Utility ASRock Instant Flash Good Night LED [Disabled] Select Screen Select Item Enter Go to Sub Screen F1 General Help F9 Load Defaults F10 Save... set the configurations for CPU WARNING : Setting wrong values in below sections may cause the system to malfunction. This convenient BIOS update tool allows you execute ASRock Instant Flash utility, the utility will show the...


