

User Manual
Page 4
...1.3 Motherboard Layout 6 1.4 I/O Panel 8 Chapter 2 Installation 10 2.1 Installing the CPU 11 2.2 Installing the CPU Fan and Heatsink 13 2.3 Installing Memory Modules (DIMM) 14 2.4 Expansion Slots (PCI Express Slots) 16 2.5 Jumpers Setup 17 2.6 Onboard Headers and Connectors 18 2.7 SLITM and Quad SLITM Operation Guide 23 2.7.1 Installing Two SLITM-Ready Graphics Cards 23 2.7.2 Driver Installation and Setup 25 2.8 CrossFireXTM, 3-Way CrossFireXTM and Quad CrossFireXTM Operation Guide 26 2.8.1 Installing Two CrossFireXTM-Ready Graphics Cards 26 2.8.2 Installing Three...
...1.3 Motherboard Layout 6 1.4 I/O Panel 8 Chapter 2 Installation 10 2.1 Installing the CPU 11 2.2 Installing the CPU Fan and Heatsink 13 2.3 Installing Memory Modules (DIMM) 14 2.4 Expansion Slots (PCI Express Slots) 16 2.5 Jumpers Setup 17 2.6 Onboard Headers and Connectors 18 2.7 SLITM and Quad SLITM Operation Guide 23 2.7.1 Installing Two SLITM-Ready Graphics Cards 23 2.7.2 Driver Installation and Setup 25 2.8 CrossFireXTM, 3-Way CrossFireXTM and Quad CrossFireXTM Operation Guide 26 2.8.1 Installing Two CrossFireXTM-Ready Graphics Cards 26 2.8.2 Installing Three...
User Manual
Page 6
...contains the operation guide of the BIOS setup. ASRock website http://www.asrock.com. 1.1 Package Contents • ASRock 990FX Extreme6 Motherboard (ATX Form Factor) • ASRock 990FX Extreme6 Quick Installation Guide • ASRock 990FX Extreme6 Support CD • 4 x Serial ATA (SATA) Data Cables (Optional) • 1 x I/O Panel Shield • 1 x ASRock SLI_Bridge_2S Card • 1 x M.2_SSD (NGFF) Socket 3 Screw 1 English Chapter 4 contains the coniguration guide of the sotware and utilities. You may ind the latest VGA cards and CPU support list on ASRock's website without...
...contains the operation guide of the BIOS setup. ASRock website http://www.asrock.com. 1.1 Package Contents • ASRock 990FX Extreme6 Motherboard (ATX Form Factor) • ASRock 990FX Extreme6 Quick Installation Guide • ASRock 990FX Extreme6 Support CD • 4 x Serial ATA (SATA) Data Cables (Optional) • 1 x I/O Panel Shield • 1 x ASRock SLI_Bridge_2S Card • 1 x M.2_SSD (NGFF) Socket 3 Screw 1 English Chapter 4 contains the coniguration guide of the sotware and utilities. You may ind the latest VGA cards and CPU support list on ASRock's website without...
User Manual
Page 10
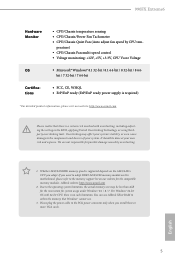
... PCIe power connector only when you adopt. Overclocking may be done at your system. ASRock website: http://www.asrock.com 2. English 5 990FX Extreme6 Hardware Monitor OS Certiications • CPU/Chassis temperature sensing • CPU/Chassis/Power Fan Tachometer • CPU/Chassis Quiet Fan (Auto adjust fan speed by overclocking. 1. Due to the operating system limitation, the actual memory size may afect your system's stability, or even cause damage to the memory support list on the AM3/AM3+ CPU you install...
... PCIe power connector only when you adopt. Overclocking may be done at your system. ASRock website: http://www.asrock.com 2. English 5 990FX Extreme6 Hardware Monitor OS Certiications • CPU/Chassis temperature sensing • CPU/Chassis/Power Fan Tachometer • CPU/Chassis Quiet Fan (Auto adjust fan speed by overclocking. 1. Due to the operating system limitation, the actual memory size may afect your system's stability, or even cause damage to the memory support list on the AM3/AM3+ CPU you install...
User Manual
Page 12
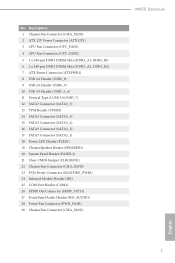
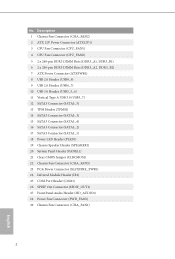
...-pin DDR3 DIMM Slots (DDR3_A1, DDR3_B1) 6 2 x 240-pin DDR3 DIMM Slots (DDR3_A2, DDR3_B2) 7 ATX Power Connector (ATXPWR1) 8 USB 2.0 Header (USB8_9) 9 USB 2.0 Header (USB6_7) 10 USB 3.0 Header (USB3_5_6) 11 Vertical Type A USB 3.0 (USB3_7) 12 SATA3 Connector (SATA3_5) 13 TPM Header (TPMS1) 14 SATA3 Connector (SATA3_3) 15 SATA3 Connector (SATA3_4) 16 SATA3 Connector (SATA3_2) 17 SATA3 Connector (SATA3_1) 18 Power LED Header (PLED1) 19 Chassis Speaker Header (SPEAKER1) 20 System Panel Header (PANEL1) 21 Clear CMOS Jumper (CLRCMOS1) 22 Chassis Fan Connector (CHA_FAN3) 23 PCIe Power Connector (SLI...
...-pin DDR3 DIMM Slots (DDR3_A1, DDR3_B1) 6 2 x 240-pin DDR3 DIMM Slots (DDR3_A2, DDR3_B2) 7 ATX Power Connector (ATXPWR1) 8 USB 2.0 Header (USB8_9) 9 USB 2.0 Header (USB6_7) 10 USB 3.0 Header (USB3_5_6) 11 Vertical Type A USB 3.0 (USB3_7) 12 SATA3 Connector (SATA3_5) 13 TPM Header (TPMS1) 14 SATA3 Connector (SATA3_3) 15 SATA3 Connector (SATA3_4) 16 SATA3 Connector (SATA3_2) 17 SATA3 Connector (SATA3_1) 18 Power LED Header (PLED1) 19 Chassis Speaker Header (SPEAKER1) 20 System Panel Header (PANEL1) 21 Clear CMOS Jumper (CLRCMOS1) 22 Chassis Fan Connector (CHA_FAN3) 23 PCIe Power Connector (SLI...

User Manual
Page 26
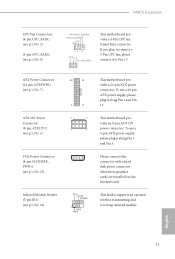
If you plan to connect a 3-Pin CPU fan, please connect it along Pin 1 and Pin 13. Please connect this connector with a hard disk power connector when three graphics cards are installed on this motherboard. To use a 20-pin ATX power supply, please plug it along Pin 1 and Pin 5. his motherboard provides an 8-pin ATX 12V power connector. his header supports an optional wireless transmitting and receiving infrared module. 990FX Extreme6 CPU Fan Connectors (4-pin CPU_FAN1) (see p.6, No. 3) (3-pin CPU_FAN2) (see p.6, No. 24) 12 24 1 13 8 5 4 1 IRTX +5VSB DUMMY 1 GND ...
If you plan to connect a 3-Pin CPU fan, please connect it along Pin 1 and Pin 13. Please connect this connector with a hard disk power connector when three graphics cards are installed on this motherboard. To use a 20-pin ATX power supply, please plug it along Pin 1 and Pin 5. his motherboard provides an 8-pin ATX 12V power connector. his header supports an optional wireless transmitting and receiving infrared module. 990FX Extreme6 CPU Fan Connectors (4-pin CPU_FAN1) (see p.6, No. 3) (3-pin CPU_FAN2) (see p.6, No. 24) 12 24 1 13 8 5 4 1 IRTX +5VSB DUMMY 1 GND ...
User Manual
Page 31
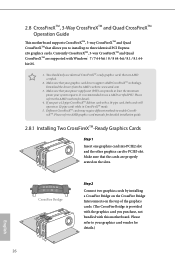
... detailed installation guide. 2.8.1 Installing Two CrossFireXTM-Ready Graphics Cards Step 1 Insert one graphics card into PCIE2 slot and the other graphics card to your graphics card driver supports AMD CrossFireXTM technology. Make sure that allows you to install up to use identical CrossFireXTM-ready graphics cards that the cards are AMD certiied. 2. Make sure that are properly seated on the top of the graphics cards. (he CrossFire Bridge is recommended to three identical PCI Express x16 graphics cards...
... detailed installation guide. 2.8.1 Installing Two CrossFireXTM-Ready Graphics Cards Step 1 Insert one graphics card into PCIE2 slot and the other graphics card to your graphics card driver supports AMD CrossFireXTM technology. Make sure that allows you to install up to use identical CrossFireXTM-ready graphics cards that the cards are AMD certiied. 2. Make sure that are properly seated on the top of the graphics cards. (he CrossFire Bridge is recommended to three identical PCI Express x16 graphics cards...
User Manual
Page 33
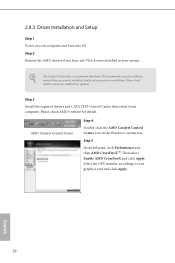
... for AMD driver updates. he Catalyst Uninstaller is an optional download. Step 5 In the let pane, click Performance and then AMD CrossFireXTM. 2.8.3 Driver Installation and Setup Step 1 Power on your graphics card and click Apply. hen select Enable AMD CrossFireX and click Apply. AMD Catalyst Control Center Step 4 Double-click the AMD Catalyst Control Center icon in your computer. Select the GPU number according to your computer and boot...
... for AMD driver updates. he Catalyst Uninstaller is an optional download. Step 5 In the let pane, click Performance and then AMD CrossFireXTM. 2.8.3 Driver Installation and Setup Step 1 Power on your graphics card and click Apply. hen select Enable AMD CrossFireX and click Apply. AMD Catalyst Control Center Step 4 Double-click the AMD Catalyst Control Center icon in your computer. Select the GPU number according to your computer and boot...
User Manual
Page 36
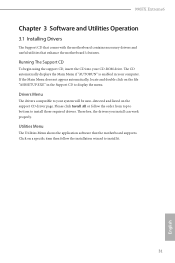
990FX Extreme6 Chapter 3 Software and Utilities Operation 3.1 Installing Drivers he Support CD that comes with the motherboard contains necessary drivers and useful utilities that the motherboard supports. Drivers Menu he drivers compatible to install it. 31 English Click on a speciic item then follow the order from top to bottom to display the menu. If the Main Menu does not appear automatically, locate and double click on the support CD driver page. Utilities Menu he CD automatically displays the Main Menu if...
990FX Extreme6 Chapter 3 Software and Utilities Operation 3.1 Installing Drivers he Support CD that comes with the motherboard contains necessary drivers and useful utilities that the motherboard supports. Drivers Menu he drivers compatible to install it. 31 English Click on a speciic item then follow the order from top to bottom to display the menu. If the Main Menu does not appear automatically, locate and double click on the support CD driver page. Utilities Menu he CD automatically displays the Main Menu if...
User Manual
Page 37
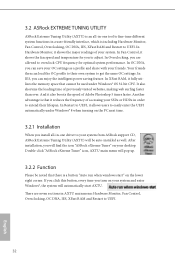
... easily enter the UEFI automatically under Windows® OS 32-bit CPU. Double-click "ASRock eXtreme Tuner" icon, AXTU main menu will pop up. 3.2.2 Function Please be noted that there is a button "Auto run when windows start AXTU. If you click this button, every time you can save your SSDs or HDDs in -one tool to ine-tune diferent system functions in AXTU main menu: Hardware Monitor, Fan Control, Overclocking...
... easily enter the UEFI automatically under Windows® OS 32-bit CPU. Double-click "ASRock eXtreme Tuner" icon, AXTU main menu will pop up. 3.2.2 Function Please be noted that there is a button "Auto run when windows start AXTU. If you click this button, every time you can save your SSDs or HDDs in -one tool to ine-tune diferent system functions in AXTU main menu: Hardware Monitor, Fan Control, Overclocking...

User Manual
Page 58
... value of this item to enable or disable AMD AHCI BIOS ROM. SATA Mode IDE: For better compatibility. RAID: Combine multiple disk drives into a logical unit. he default value is [Disabled]. Use this item to RAID mode, it is for SATA3_5 and eSATA3 ports. 4.4.4 Storage Coniguration 990FX Extreme6 SATA Controller(s) Enable/disable the SATA controllers. If you set this option is [Enabled]. 53 English SATA IDE Combined Mode his item is suggested to enable or disable SATA IDE combined mode. AMD AHCI BIOS ROM Use this item to install SATA ODD driver on SATA3_5 or eSATA3...
... value of this item to enable or disable AMD AHCI BIOS ROM. SATA Mode IDE: For better compatibility. RAID: Combine multiple disk drives into a logical unit. he default value is [Disabled]. Use this item to RAID mode, it is for SATA3_5 and eSATA3 ports. 4.4.4 Storage Coniguration 990FX Extreme6 SATA Controller(s) Enable/disable the SATA controllers. If you set this option is [Enabled]. 53 English SATA IDE Combined Mode his item is suggested to enable or disable SATA IDE combined mode. AMD AHCI BIOS ROM Use this item to install SATA ODD driver on SATA3_5 or eSATA3...
User Manual
Page 65
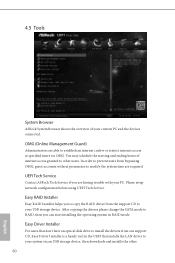
... setup network coniguration before using UEFI Tech Service. You may schedule the starting and ending hours of your PC. Easy RAID Installer Easy RAID Installer helps you to copy the RAID driver from the support CD to other 60 English OMG (Online Management Guard) Administrators are able to your USB storage device. UEFI Tech Service Contact ASRock Tech Service if you can start installing the operating system in RAID mode. Easy Driver Installer For users that installs the LAN driver...
... setup network coniguration before using UEFI Tech Service. You may schedule the starting and ending hours of your PC. Easy RAID Installer Easy RAID Installer helps you to copy the RAID driver from the support CD to other 60 English OMG (Online Management Guard) Administrators are able to your USB storage device. UEFI Tech Service Contact ASRock Tech Service if you can start installing the operating system in RAID mode. Easy Driver Installer For users that installs the LAN driver...
User Manual
Page 66
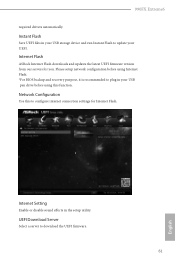
... internet connection settings for you. Please setup network coniguration before using Internet Flash. *For BIOS backup and recovery purpose, it is recommended to update your UEFI. Internet Flash ASRock Internet Flash downloads and updates the latest UEFI irmware version from our servers for Internet Flash. Internet Setting Enable or disable sound efects in your USB storage device and run Instant Flash to plug in the setup utility. 990FX Extreme6 required drivers automatically. Instant Flash Save UEFI iles in your USB pen drive before using this to download the UEFI...
... internet connection settings for you. Please setup network coniguration before using Internet Flash. *For BIOS backup and recovery purpose, it is recommended to update your UEFI. Internet Flash ASRock Internet Flash downloads and updates the latest UEFI irmware version from our servers for Internet Flash. Internet Setting Enable or disable sound efects in your USB storage device and run Instant Flash to plug in the setup utility. 990FX Extreme6 required drivers automatically. Instant Flash Save UEFI iles in your USB pen drive before using this to download the UEFI...
Quick Installation Guide
Page 4
...-pin DDR3 DIMM Slots (DDR3_A1, DDR3_B1) 6 2 x 240-pin DDR3 DIMM Slots (DDR3_A2, DDR3_B2) 7 ATX Power Connector (ATXPWR1) 8 USB 2.0 Header (USB8_9) 9 USB 2.0 Header (USB6_7) 10 USB 3.0 Header (USB3_5_6) 11 Vertical Type A USB 3.0 (USB3_7) 12 SATA3 Connector (SATA3_5) 13 TPM Header (TPMS1) 14 SATA3 Connector (SATA3_3) 15 SATA3 Connector (SATA3_4) 16 SATA3 Connector (SATA3_2) 17 SATA3 Connector (SATA3_1) 18 Power LED Header (PLED1) 19 Chassis Speaker Header (SPEAKER1) 20 System Panel Header (PANEL1) 21 Clear CMOS Jumper (CLRCMOS1) 22 Chassis Fan Connector (CHA_FAN3) 23 PCIe Power Connector (SLI...
...-pin DDR3 DIMM Slots (DDR3_A1, DDR3_B1) 6 2 x 240-pin DDR3 DIMM Slots (DDR3_A2, DDR3_B2) 7 ATX Power Connector (ATXPWR1) 8 USB 2.0 Header (USB8_9) 9 USB 2.0 Header (USB6_7) 10 USB 3.0 Header (USB3_5_6) 11 Vertical Type A USB 3.0 (USB3_7) 12 SATA3 Connector (SATA3_5) 13 TPM Header (TPMS1) 14 SATA3 Connector (SATA3_3) 15 SATA3 Connector (SATA3_4) 16 SATA3 Connector (SATA3_2) 17 SATA3 Connector (SATA3_1) 18 Power LED Header (PLED1) 19 Chassis Speaker Header (SPEAKER1) 20 System Panel Header (PANEL1) 21 Clear CMOS Jumper (CLRCMOS1) 22 Chassis Fan Connector (CHA_FAN3) 23 PCIe Power Connector (SLI...

Quick Installation Guide
Page 11
... that Windows® cannot use ASRock XFast RAM to the memory support list on the AM3/AM3+ CPU you install three or more VGA cards. For Windows® 64-bit OS with overclocking, including adjusting the setting in the BIOS, applying Untied Overclocking Technology, or using thirdparty overclocking tools. It should be less than 4GB for the reservation for system usage under Windows® 8.1 / 8 / 7. You can use . 3. Please plug the power cable to the PCIe power connector only...
... that Windows® cannot use ASRock XFast RAM to the memory support list on the AM3/AM3+ CPU you install three or more VGA cards. For Windows® 64-bit OS with overclocking, including adjusting the setting in the BIOS, applying Untied Overclocking Technology, or using thirdparty overclocking tools. It should be less than 4GB for the reservation for system usage under Windows® 8.1 / 8 / 7. You can use . 3. Please plug the power cable to the PCIe power connector only...
Quick Installation Guide
Page 23
To use a 4-pin ATX power supply, please plug it along Pin 1 and Pin 13. his header supports an optional wireless transmitting and receiving infrared module. his motherboard provides an 8-pin ATX 12V power connector. English 21 To use a 20-pin ATX power supply, please plug it to connect a 3-Pin CPU fan, please connect it along Pin 1 and Pin 5. If you plan to Pin 1-3. Please connect this connector with a hard disk power connector when three graphics cards are installed on this motherboard. 990FX Extreme6 CPU Fan Connectors (4-pin CPU_FAN1) (see p.1, No. 3) (3-pin CPU_FAN2) (...
To use a 4-pin ATX power supply, please plug it along Pin 1 and Pin 13. his header supports an optional wireless transmitting and receiving infrared module. his motherboard provides an 8-pin ATX 12V power connector. English 21 To use a 20-pin ATX power supply, please plug it to connect a 3-Pin CPU fan, please connect it along Pin 1 and Pin 5. If you plan to Pin 1-3. Please connect this connector with a hard disk power connector when three graphics cards are installed on this motherboard. 990FX Extreme6 CPU Fan Connectors (4-pin CPU_FAN1) (see p.1, No. 3) (3-pin CPU_FAN2) (...
RAID Installation Guide
Page 5
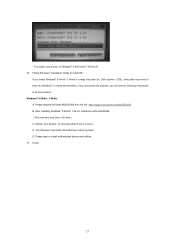
Enter UEFI SETUP UTILITY → Advanced screen → Storage Configuration. B. Before you need to check this document for details. E. C. Click [F10] to [RAID]. STEP 3: Make a SATA3 Driver Diskette. (Please use an USB floppy or a floppy disk.) A. Please select CD-ROM as the boot device. The system will see the message on the screen, "Generate Serial ATA driver diskette [YN]?", press . Set the "SATA Mode" option to save and exit. During POST at the beginning of system...
Enter UEFI SETUP UTILITY → Advanced screen → Storage Configuration. B. Before you need to check this document for details. E. C. Click [F10] to [RAID]. STEP 3: Make a SATA3 Driver Diskette. (Please use an USB floppy or a floppy disk.) A. Please select CD-ROM as the boot device. The system will see the message on the screen, "Generate Serial ATA driver diskette [YN]?", press . Set the "SATA Mode" option to save and exit. During POST at the beginning of system...
RAID Installation Guide
Page 9
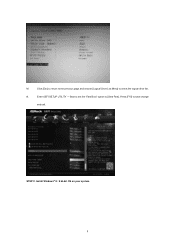
Press [F10] to [Ultra Fast]. Enter UEFI SETUP UTILITY → Boot to set the "Fast Boot" option to save change and exit. STEP 2: Install Windows® 8 / 8 64-bit OS on your system. 9 N. Click [Esc] to return to the previous page and choose [Logical Drive List Menu] to check the logical drive list. M.
Press [F10] to [Ultra Fast]. Enter UEFI SETUP UTILITY → Boot to set the "Fast Boot" option to save change and exit. STEP 2: Install Windows® 8 / 8 64-bit OS on your system. 9 N. Click [Esc] to return to the previous page and choose [Logical Drive List Menu] to check the logical drive list. M.
RAID Installation Guide
Page 10
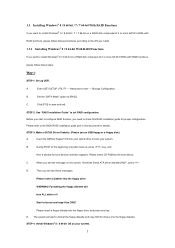
... BIOS RAID installation guide part in this RAID installation guide for details. Before you start to configure RAID function, you want to install Windows® 7 / 7 64-bit on a RAID disk composed of 2 or more SATA3 HDDs with RAID functions, please follow below steps. B. 1.3.2 Installing Windows® 7 / 7 64-bit With RAID Functions If you need to check this document for proper configuration. Enter UEFI SETUP UTILITY → Advanced screen → Storage Configuration. STEP 3: Make a SATA3 Driver Diskette. (Please use an USB floppy or a floppy disk.) Make a SATA3 driver...
... BIOS RAID installation guide part in this RAID installation guide for details. Before you start to configure RAID function, you want to install Windows® 7 / 7 64-bit on a RAID disk composed of 2 or more SATA3 HDDs with RAID functions, please follow below steps. B. 1.3.2 Installing Windows® 7 / 7 64-bit With RAID Functions If you need to check this document for proper configuration. Enter UEFI SETUP UTILITY → Advanced screen → Storage Configuration. STEP 3: Make a SATA3 Driver Diskette. (Please use an USB floppy or a floppy disk.) Make a SATA3 driver...

RAID Installation Guide
Page 15
... access to work with AMD SB950 SATA RAID controllers. If you to configure RAID functions by using RAIDXpert RAID management software under the same directory where RAIDXpert is designed to all programs. If you must use one of all AMD SB950 SATA logical drives that may be present on your CD-ROM drive. 3. When the first installation screen appears, choose an installer language from the dropdown menu. 15 RAIDXpert is installed. RAIDXpert RAID...
... access to work with AMD SB950 SATA RAID controllers. If you to configure RAID functions by using RAIDXpert RAID management software under the same directory where RAIDXpert is designed to all programs. If you must use one of all AMD SB950 SATA logical drives that may be present on your CD-ROM drive. 3. When the first installation screen appears, choose an installer language from the dropdown menu. 15 RAIDXpert is installed. RAIDXpert RAID...
RAID Installation Guide
Page 27
... to boot into Windows® or install driver/utilities. Please start to boot.) D. Reboot your system. (It may take long time; >30 mins.) C. Finish. 27 The Windows® will need to following instructions to install OS. Disk volume > 2TB), it may take about 5 mins to install motherboard drivers and utilities. 17. * This option only shows on Windows® 8 64-bit and 7 64-bit OS. 16. If you encounter this problem. Please...
... to boot into Windows® or install driver/utilities. Please start to boot.) D. Reboot your system. (It may take long time; >30 mins.) C. Finish. 27 The Windows® will need to following instructions to install OS. Disk volume > 2TB), it may take about 5 mins to install motherboard drivers and utilities. 17. * This option only shows on Windows® 8 64-bit and 7 64-bit OS. 16. If you encounter this problem. Please...


