
RAID Installation Guide
Page 4
... to format and copy files [YN]? After step 1, 2, 3, you can start to configure RAID function, you start to check this document for boot devices selection appears. Enter UEFI SETUP UTILITY → Advanced screen → Storage Configuration. 4 Please select CD-ROM as the... 64-bit OS on your optical drive to [RAID]. At the beginning of system boot-up UEFI. Set the "SATA Mode" option to boot your system. C. Please refer to install a third-party RAID driver. Insert the ASRock Support CD into the floppy drive. During POST at the beginning of Windows® ...
... to format and copy files [YN]? After step 1, 2, 3, you can start to configure RAID function, you start to check this document for boot devices selection appears. Enter UEFI SETUP UTILITY → Advanced screen → Storage Configuration. 4 Please select CD-ROM as the... 64-bit OS on your optical drive to [RAID]. At the beginning of system boot-up UEFI. Set the "SATA Mode" option to boot your system. C. Please refer to install a third-party RAID driver. Insert the ASRock Support CD into the floppy drive. During POST at the beginning of Windows® ...

RAID Installation Guide
Page 6
... onboard RAID Option ROM Utility will display the following screen. Diagnosing critical and offline RAID logical drives - If this is the first time you have booted with tools to set up your system. 1.4 Create Disk Array Power on physical drives - Creating RAID logical drives - The RAID Option ROM Utility can perform...
... onboard RAID Option ROM Utility will display the following screen. Diagnosing critical and offline RAID logical drives - If this is the first time you have booted with tools to set up your system. 1.4 Create Disk Array Power on physical drives - Creating RAID logical drives - The RAID Option ROM Utility can perform...

RAID Installation Guide
Page 10
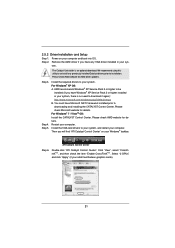
... (in a private folder): The RAIDXpert installation program installs a private JRE in again as the Administrator, log out, then log in folder _jvm under Windows environment. Boot the PC or server, launch Windows, and log in the installation dialog boxes. 6. The first RAIDXpert installation dialog box appears. 5. RAIDXpert uses this guide carefully...
... (in a private folder): The RAIDXpert installation program installs a private JRE in again as the Administrator, log out, then log in folder _jvm under Windows environment. Boot the PC or server, launch Windows, and log in the installation dialog boxes. 6. The first RAIDXpert installation dialog box appears. 5. RAIDXpert uses this guide carefully...

RAID Installation Guide
Page 16
... default. RAID 0, 1 and 5 only. • None - For more information. • None - If there are 64 and 128 KB. RAID 0, 1, and 5. Erases the reserve and master boot sectors of the logical drive down to the logical drive. 10. The Final Settings screen appears. 11.
... default. RAID 0, 1 and 5 only. • None - For more information. • None - If there are 64 and 128 KB. RAID 0, 1, and 5. Erases the reserve and master boot sectors of the logical drive down to the logical drive. 10. The Final Settings screen appears. 11.

User Manual
Page 4
...figuration 49 3.4.5 Super IO Configuration 50 3.4.6 ACPI Configuration 51 3.4.7 USB Configuration 52 3.5 Hardware Health Event Monitoring Screen 53 3.6 Boot Screen 54 3.7 Security Screen 55 3.8 Exit Screen 56 4.
...figuration 49 3.4.5 Super IO Configuration 50 3.4.6 ACPI Configuration 51 3.4.7 USB Configuration 52 3.5 Hardware Health Event Monitoring Screen 53 3.6 Boot Screen 54 3.7 Security Screen 55 3.8 Exit Screen 56 4.

User Manual
Page 8
...16) - ASRock Instant Boot - ASRock SmartView (see CAUTION 14) - ASRock Crashless BIOS (see CAUTION 10) - Hybrid Booster: - Boot Failure Guard (B.F.G.) - CPU/Chassis Fan Multi-Speed Control - Unique Feature - ASRock U-COP (see CAUTION 7) - Voltage Monitoring: +12V, +5V, +3.3V, Vcore OS - ASRock Extreme Tuning Utility...components and devices of your own risk and expense. ASRock Instant Flash (see CAUTION 18) - ASRock XFast USB (see CAUTION 15) - ASRock OMG (Online Management Guard) (see CAUTION 11) - ASRock On/Off Play Technology (see CAUTION 20) Certifi...
...16) - ASRock Instant Boot - ASRock SmartView (see CAUTION 14) - ASRock Crashless BIOS (see CAUTION 10) - Hybrid Booster: - Boot Failure Guard (B.F.G.) - CPU/Chassis Fan Multi-Speed Control - Unique Feature - ASRock U-COP (see CAUTION 7) - Voltage Monitoring: +12V, +5V, +3.3V, Vcore OS - ASRock Extreme Tuning Utility...components and devices of your own risk and expense. ASRock Instant Flash (see CAUTION 18) - ASRock XFast USB (see CAUTION 15) - ASRock OMG (Online Management Guard) (see CAUTION 11) - ASRock On/Off Play Technology (see CAUTION 20) Certifi...
User Manual
Page 21
tem. Install the VGA card drivers to your system, and restart your computer and boot into OS. Step 2. We recommend using this utility to installation. Step 5. Then you have any previously installed Catalyst drivers prior to uninstall any VGA driver ...
tem. Install the VGA card drivers to your system, and restart your computer and boot into OS. Step 2. We recommend using this utility to installation. Step 5. Then you have any previously installed Catalyst drivers prior to uninstall any VGA driver ...

User Manual
Page 23
..., please shut down your system. USB 2.0 header (9-pin, black) CIR header (4-pin, gray) Step2. Boot up your system and install Multi-Angle CIR Receiver to below , pin 1-5) and the CIR header. Enter Windows. 2.7 ASRock Smart Remote Installation Guide ASRock Smart Remote is only used for the quick installation and usage of driver list...
..., please shut down your system. USB 2.0 header (9-pin, black) CIR header (4-pin, gray) Step2. Boot up your system and install Multi-Angle CIR Receiver to below , pin 1-5) and the CIR header. Enter Windows. 2.7 ASRock Smart Remote Installation Guide ASRock Smart Remote is only used for the quick installation and usage of driver list...

User Manual
Page 24
... with most of the chassis on the rear panel. Please install it on the market. 3. Only one of ASRock motherboards. Please refer to connect it before you boot the system. * ASRock Smart Remote is enabled, the other port will remain USB function. 2. Multi-Angle CIR Receiver can support CIR ...multi-direction infrared signals (top, down and front), which is used for the motherboard support list: http://www.asrock.com 24 Please do not use the rear USB bracket to ASRock website for front USB only. The Multi-Angle CIR Receiver does not support Hot-Plug function. 3 CIR ...
... with most of the chassis on the rear panel. Please install it on the market. 3. Only one of ASRock motherboards. Please refer to connect it before you boot the system. * ASRock Smart Remote is enabled, the other port will remain USB function. 2. Multi-Angle CIR Receiver can support CIR ...multi-direction infrared signals (top, down and front), which is used for the motherboard support list: http://www.asrock.com 24 Please do not use the rear USB bracket to ASRock website for front USB only. The Multi-Angle CIR Receiver does not support Hot-Plug function. 3 CIR ...

User Manual
Page 25
... placed on pins, the jumper is removed. 25 If you need to clear the CMOS when you just finish updating the BIOS, you must boot up the system first, and then shut it down before you to clear the data in CMOS. Please be noted that the password, date...
... placed on pins, the jumper is removed. 25 If you need to clear the CMOS when you just finish updating the BIOS, you must boot up the system first, and then shut it down before you to clear the data in CMOS. Please be noted that the password, date...
User Manual
Page 34
...into the floppy diskette. 34 B. WARNING! E. A. Please follow below steps. Insert the ASRock Support CD into the floppy drive, and press any key. During POST at the beginning of system boot-up UEFI. When you install can be auto-detected and listed on the screen, "Generate Serial... drivers to your system, please insert the support CD to your system. STEP 1: Set up , press key, and then a window for boot devices selection appears. The system will start to format the floppy diskette and copy SATA3 drivers into the floppy drive. Then, ...
...into the floppy diskette. 34 B. WARNING! E. A. Please follow below steps. Insert the ASRock Support CD into the floppy drive, and press any key. During POST at the beginning of system boot-up UEFI. When you install can be auto-detected and listed on the screen, "Generate Serial... drivers to your system, please insert the support CD to your system. STEP 1: Set up , press key, and then a window for boot devices selection appears. The system will start to format the floppy diskette and copy SATA3 drivers into the floppy drive. Then, ...

User Manual
Page 38
... system time/date information OC Tweaker To set up overclocking features Advanced To set up the advanced UEFI features H/W Monitor To display current hardware status Boot To set up the default system device to locate and load the Operating System Security To set up the computer. UEFI SETUP UTILITY 3.1 Introduction This...
... system time/date information OC Tweaker To set up overclocking features Advanced To set up the advanced UEFI features H/W Monitor To display current hardware status Boot To set up the default system device to locate and load the Operating System Security To set up the computer. UEFI SETUP UTILITY 3.1 Introduction This...

User Manual
Page 48
... unexpected AC/power loss. The keyboard LED will be disabled. Front Panel Select [Auto] or [Disabled] for the onboard HD Audio feature. If you to boot up when the power recovers. The default value is [Auto]. 48 Good Night LED Enable this item to enable or disable the onboard LAN feature...
... unexpected AC/power loss. The keyboard LED will be disabled. Front Panel Select [Auto] or [Disabled] for the onboard HD Audio feature. If you to boot up when the power recovers. The default value is [Auto]. 48 Good Night LED Enable this item to enable or disable the onboard LAN feature...

User Manual
Page 54
.... Full Screen Logo Use this option to enable or disable OEM Logo. Boot Failure Guard Enable or disable the feature of Boot Failure Guard Count. Boot Failure Guard Count Enable or disable the feature of Boot Failure Guard. Boot From Onboard LAN Use this item is set to enable or disable the.... If you enable the option "Full Screen Logo" but you to see the AddOn ROM information when the system boots, please select [Enabled]. 3.6 Boot Screen In this section, it will display the available devices on your system for setup activation key. 65535(0xFFFF) means indefinite...
.... Full Screen Logo Use this option to enable or disable OEM Logo. Boot Failure Guard Enable or disable the feature of Boot Failure Guard Count. Boot Failure Guard Count Enable or disable the feature of Boot Failure Guard. Boot From Onboard LAN Use this item is set to enable or disable the.... If you enable the option "Full Screen Logo" but you to see the AddOn ROM information when the system boots, please select [Enabled]. 3.6 Boot Screen In this section, it will display the available devices on your system for setup activation key. 65535(0xFFFF) means indefinite...

User Manual
Page 58
Installing OS on a large size HDD (>2TB). Set AHCI Mode in UEFI Setup Utility > Boot > Boot Option #1. ("xxx" is an optical drive.) You can also press to launch boot menu at system POST. Please make sure to be installed on a HDD Larger Than 2TB in AHCI Mode This motherboard is ...OS to use Windows® VistaTM 64-bit (with SP1 or above) or Windows® 7 64-bit. 2. Choose the item "UEFI:xxx" to boot. 4. Normally it is the device which contains your Windows® installation files. Start Windows® installation. 58 Please follow below procedure to install the...
Installing OS on a large size HDD (>2TB). Set AHCI Mode in UEFI Setup Utility > Boot > Boot Option #1. ("xxx" is an optical drive.) You can also press to launch boot menu at system POST. Please make sure to be installed on a HDD Larger Than 2TB in AHCI Mode This motherboard is ...OS to use Windows® VistaTM 64-bit (with SP1 or above) or Windows® 7 64-bit. 2. Choose the item "UEFI:xxx" to boot. 4. Normally it is the device which contains your Windows® installation files. Start Windows® installation. 58 Please follow below procedure to install the...

User Manual
Page 59
... Mode This motherboard is adopting UEFI BIOS that allows Windows® OS to be installed on a large size HDD (>2TB). Please make sure to enter Boot Manual. Press to use Windows® VistaTM 64-bit (with SP1 or above) or Windows® 7 64-bit. 2.
... Mode This motherboard is adopting UEFI BIOS that allows Windows® OS to be installed on a large size HDD (>2TB). Please make sure to enter Boot Manual. Press to use Windows® VistaTM 64-bit (with SP1 or above) or Windows® 7 64-bit. 2.
User Manual
Page 61
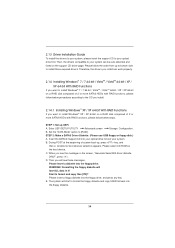
11. Press Space on Windows® 7 64-bit and VistaTM 64-bit OS. 61 Choose UEFI: SCSI CD/DVD Drive. * This option only shows on keyboard to Create. 14. Press to enter Boot Manual. Choose Ld Size setting, and key in the Raid size. 13. During reboot, please press to exit Utility. 15. After set up Raid size, please click Start to toggle checkbox. 12.
11. Press Space on Windows® 7 64-bit and VistaTM 64-bit OS. 61 Choose UEFI: SCSI CD/DVD Drive. * This option only shows on keyboard to Create. 14. Press to enter Boot Manual. Choose Ld Size setting, and key in the Raid size. 13. During reboot, please press to exit Utility. 15. After set up Raid size, please click Start to toggle checkbox. 12.

User Manual
Page 62
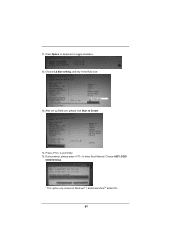
... in the Start Menu. Below steps are Microsoft® suggested solution: A. Then press "Enter". Then Press "Ok". 62 a. Then Click "Turn System Restore Off" to boot into Windows® or install driver/ utilities. Disk volume > 2TB), it may take more time to confirm. Windows® VistaTM 64-bit: Microsoft...
... in the Start Menu. Below steps are Microsoft® suggested solution: A. Then press "Enter". Then Press "Ok". 62 a. Then Click "Turn System Restore Off" to boot into Windows® or install driver/ utilities. Disk volume > 2TB), it may take more time to confirm. Windows® VistaTM 64-bit: Microsoft...

User Manual
Page 64
After reboot, please start to install motherboard drivers and utilities. 17. Windows® 7 64-bit: A. The Windows® will install this link: http://support.microsoft.com/kb/2505454/ B. Finish. 64 Please request the hotfix KB2505454 thru this hotfix then reboot by itself. Reboot your system. (It may take about 5 mins to install motherboard drivers and utilities. D. Please start to boot.) D. C. After installing Windows® 7 64-bit, install the hotfix kb2505454. (This may take long time; >30 mins.) C. Reboot your system. E.
After reboot, please start to install motherboard drivers and utilities. 17. Windows® 7 64-bit: A. The Windows® will install this link: http://support.microsoft.com/kb/2505454/ B. Finish. 64 Please request the hotfix KB2505454 thru this hotfix then reboot by itself. Reboot your system. (It may take about 5 mins to install motherboard drivers and utilities. D. Please start to boot.) D. C. After installing Windows® 7 64-bit, install the hotfix kb2505454. (This may take long time; >30 mins.) C. Reboot your system. E.
Quick Installation Guide
Page 7
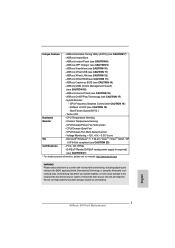
ASRock Instant Boot - ASRock APP Charger (see CAUTION 10) - ASRock SmartView (see CAUTION 9) - ASRock XFast RAM (see CAUTION 19) - ASRock U-COP (see CAUTION 13) - CPU/Chassis/Power Fan Tachometer - Voltage Monitoring: +12V, +5V, +3.3V, Vcore OS -..., applying Untied Overclocking Technology, or using the third-party overclocking tools. English 7 ASRock 970 Pro3 Motherboard ASRock XFast USB (see CAUTION 21) * For detailed product information, please visit our website: http://www.asrock.com WARNING Please realize that there is required) (see CAUTION 11) - Hybrid Booster...
ASRock Instant Boot - ASRock APP Charger (see CAUTION 10) - ASRock SmartView (see CAUTION 9) - ASRock XFast RAM (see CAUTION 19) - ASRock U-COP (see CAUTION 13) - CPU/Chassis/Power Fan Tachometer - Voltage Monitoring: +12V, +5V, +3.3V, Vcore OS -..., applying Untied Overclocking Technology, or using the third-party overclocking tools. English 7 ASRock 970 Pro3 Motherboard ASRock XFast USB (see CAUTION 21) * For detailed product information, please visit our website: http://www.asrock.com WARNING Please realize that there is required) (see CAUTION 11) - Hybrid Booster...


