
User Manual
Page 20
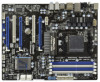
... the same.) Insert one graphics card into PCIE2 slot and the other graphics card to three identical PCI Express x16 graphics cards. Install the identical SLI TM-ready graphics cards that are properly seated on the slots. Requirements 1. Please follow the installation procedures in this section. Make sure that your power...
... the same.) Insert one graphics card into PCIE2 slot and the other graphics card to three identical PCI Express x16 graphics cards. Install the identical SLI TM-ready graphics cards that are properly seated on the slots. Requirements 1. Please follow the installation procedures in this section. Make sure that your power...

User Manual
Page 21
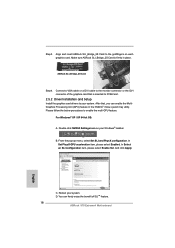
... Enabled. In Select an SLI configuration item, please select Enable SLI. D. For Windows® XP / XP 64-bit OS: A. You can enable the MultiGraphics Processing Unit (GPU) feature in place. Double-click NVIDIA Settings icon on each graphics card. ASRock SLI_Bridge_2S Card Step4. After ...freely enjoy the benef t of the graphics card that is f rmly in the NVIDIA® nView system tray utility. Align and insert ASRock SLI_Bridge_2S Card to your system. C. Please follow the procedures below to the monitor connector or the DVI connector of SLITM feature. 21 Step3...
... Enabled. In Select an SLI configuration item, please select Enable SLI. D. For Windows® XP / XP 64-bit OS: A. You can enable the MultiGraphics Processing Unit (GPU) feature in place. Double-click NVIDIA Settings icon on each graphics card. ASRock SLI_Bridge_2S Card Step4. After ...freely enjoy the benef t of the graphics card that is f rmly in the NVIDIA® nView system tray utility. Align and insert ASRock SLI_Bridge_2S Card to your system. C. Please follow the procedures below to the monitor connector or the DVI connector of SLITM feature. 21 Step3...

User Manual
Page 22
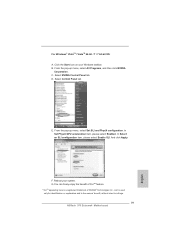
For Windows® VistaTM / VistaTM 64-bit / 7 / 7 64-bit OS: A. From the pop-up menu, select Set SLI and PhysX configuration. Reboot your Windows taskbar. Select NVIDIA Control Panel tab. E. And click Apply. F. Click the Start icon on your system.... C. From the pop-up menu, select All Programs, and then click NVIDIA Corporation. In Select an SLI configuration item, please select Enable SLI. D. G.You can freely enjoy the benef t of SLITM feature. * SLITM appearing here is a registered trademark of NVIDIA® Technologies ...
For Windows® VistaTM / VistaTM 64-bit / 7 / 7 64-bit OS: A. From the pop-up menu, select Set SLI and PhysX configuration. Reboot your Windows taskbar. Select NVIDIA Control Panel tab. E. And click Apply. F. Click the Start icon on your system.... C. From the pop-up menu, select All Programs, and then click NVIDIA Corporation. In Select an SLI configuration item, please select Enable SLI. D. G.You can freely enjoy the benef t of SLITM feature. * SLITM appearing here is a registered trademark of NVIDIA® Technologies ...
Quick Installation Guide
Page 16
... bandwidth while PCIE5 slot will work at x8 bandwidth. 3. Fasten the card to support SLI and CrossFireXTM function. PCI Slots: PCI slots are 2 PCI slots and 5 PCI Express slots on PCIE2 and PCIE4 slots. Therefore, both these two slots will work at x4 bandwidth. 4. Replace the system cover. 16 ASRock 970 Extreme4 Motherboard English
... bandwidth while PCIE5 slot will work at x8 bandwidth. 3. Fasten the card to support SLI and CrossFireXTM function. PCI Slots: PCI slots are 2 PCI slots and 5 PCI Express slots on PCIE2 and PCIE4 slots. Therefore, both these two slots will work at x4 bandwidth. 4. Replace the system cover. 16 ASRock 970 Extreme4 Motherboard English
Quick Installation Guide
Page 18
...that , you can freely enjoy the benefit of SLITM feature. 18 ASRock 970 Extreme4 Motherboard English In Set PhysX GPU acceleration item, please select Enabled. C. In Select an SLI configuration item, please select Enable SLI. D. Please follow the below procedures to your system. For Windows®...) feature in place. From the pop-up menu, select Set SLI and PhysX configuration. After that is firmly in the NVIDIA® nView system tray utility. And click Apply. Step3. ASRock SLI_Bridge_2S Card Step4. Double-click NVIDIA Settings icon on each graphics...
...that , you can freely enjoy the benefit of SLITM feature. 18 ASRock 970 Extreme4 Motherboard English In Set PhysX GPU acceleration item, please select Enabled. C. In Select an SLI configuration item, please select Enable SLI. D. Please follow the below procedures to your system. For Windows®...) feature in place. From the pop-up menu, select Set SLI and PhysX configuration. After that is firmly in the NVIDIA® nView system tray utility. And click Apply. Step3. ASRock SLI_Bridge_2S Card Step4. Double-click NVIDIA Settings icon on each graphics...
Quick Installation Guide
Page 19
... the pop-up menu, select All Programs, and then click NVIDIA Corporation. And click Apply. F. From the pop-up menu, select Set SLI and PhysX configuration. D. E. Reboot your Windows taskbar. Click the Start icon on your system. Select Control Panel tab. G.You can ...Technologies Inc., and is used only for identification or explanation and to the owners' benefit, without intent to infringe. 19 ASRock 970 Extreme4 Motherboard English For Windows® VistaTM / VistaTM 64-bit / 7 / 7 64-bit OS: A. In Set PhysX GPU acceleration item, please select Enabled...
... the pop-up menu, select All Programs, and then click NVIDIA Corporation. And click Apply. F. From the pop-up menu, select Set SLI and PhysX configuration. D. E. Reboot your Windows taskbar. Click the Start icon on your system. Select Control Panel tab. G.You can ...Technologies Inc., and is used only for identification or explanation and to the owners' benefit, without intent to infringe. 19 ASRock 970 Extreme4 Motherboard English For Windows® VistaTM / VistaTM 64-bit / 7 / 7 64-bit OS: A. In Set PhysX GPU acceleration item, please select Enabled...