RAID Installation Guide
Page 1
NVIDIA RAID Installation Guide 1. NVIDIA Windows RAID Installation Guide 11 2.1 NVIDIA Windows RAID Installation Guide for Windows 2000 / XP / XP 64-bit Users 11 2.2 NVIDIA Windows RAID Installation Guide for Windows Vista / Vista 64-bit Users 21 1 NVIDIA BIOS RAID Installation Guide 2 1.1 Introduction to RAID 2 1.2 RAID Configurations Precautions 3 1.3 Installing Windows 2000 / XP / XP 64-bit / Vista / Vista...
NVIDIA RAID Installation Guide 1. NVIDIA Windows RAID Installation Guide 11 2.1 NVIDIA Windows RAID Installation Guide for Windows 2000 / XP / XP 64-bit Users 11 2.2 NVIDIA Windows RAID Installation Guide for Windows Vista / Vista 64-bit Users 21 1 NVIDIA BIOS RAID Installation Guide 2 1.1 Introduction to RAID 2 1.2 RAID Configurations Precautions 3 1.3 Installing Windows 2000 / XP / XP 64-bit / Vista / Vista...

RAID Installation Guide
Page 5
...64-bit With RAID Functions If you want to install Windows® 2000, Windows® XP, Windows® XP 64-bit, Windows® VistaTM or Windows® VistaTM 64-bit on the screen, "Generate Serial ATA driver diskette [YN]?", press . Insert the ASRock Support CD into the floppy drive. During POST at ...; 2000 optical disk is no SP4 included in your system. (There are two ASRock Support CD in the motherboard gift box pack, please choose the one for Windows® 2000 / XP / XP 64-bit.) B. 1.3 Installing Windows® 2000 / XP / XP 64-bit / VistaTM / VistaTM 64-bit With RAID...
...64-bit With RAID Functions If you want to install Windows® 2000, Windows® XP, Windows® XP 64-bit, Windows® VistaTM or Windows® VistaTM 64-bit on the screen, "Generate Serial ATA driver diskette [YN]?", press . Insert the ASRock Support CD into the floppy drive. During POST at ...; 2000 optical disk is no SP4 included in your system. (There are two ASRock Support CD in the motherboard gift box pack, please choose the one for Windows® 2000 / XP / XP 64-bit.) B. 1.3 Installing Windows® 2000 / XP / XP 64-bit / VistaTM / VistaTM 64-bit With RAID...

RAID Installation Guide
Page 6
... check the RAID installation guide in RAID mode. (There are as below: A. NVIDIA nForce Storage Controller (required) Please select A and B for Windows® 2000 / XP / XP 64-bit in the Support CD for proper configuration. At the beginning of the document in the following path in... the Support CD: .. \ RAID Installation Guide STEP 4: Install Windows® 2000 / XP / XP 64-bit OS on your system. NVIDIA RAID Driver (required) B. Before you start to configure RAID function, you...
... check the RAID installation guide in RAID mode. (There are as below: A. NVIDIA nForce Storage Controller (required) Please select A and B for Windows® 2000 / XP / XP 64-bit in the Support CD for proper configuration. At the beginning of the document in the following path in... the Support CD: .. \ RAID Installation Guide STEP 4: Install Windows® 2000 / XP / XP 64-bit OS on your system. NVIDIA RAID Driver (required) B. Before you start to configure RAID function, you...
RAID Installation Guide
Page 7
.../ SATAII HDDs with RAID functions, please follow the instruction to [RAID]. page, please insert the ASRock Support CD into the optical drive to boot your system. NOTE. If you install Windows® VistaTM / Windows® VistaTM 64-bit on IDE HDDs and want to manage (create, convert, delete, or...NVIDIA® RAID drivers are in the following path in our Support CD: (There are two ASRock Support CD in BIOS first. Please refer to set the RAID configuration by using the Windows RAID installation guide in the following path in the Support CD: .. \ RAID Installation Guide 7 ...
.../ SATAII HDDs with RAID functions, please follow the instruction to [RAID]. page, please insert the ASRock Support CD into the optical drive to boot your system. NOTE. If you install Windows® VistaTM / Windows® VistaTM 64-bit on IDE HDDs and want to manage (create, convert, delete, or...NVIDIA® RAID drivers are in the following path in our Support CD: (There are two ASRock Support CD in BIOS first. Please refer to set the RAID configuration by using the Windows RAID installation guide in the following path in the Support CD: .. \ RAID Installation Guide 7 ...
RAID Installation Guide
Page 8
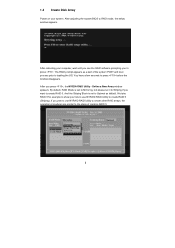
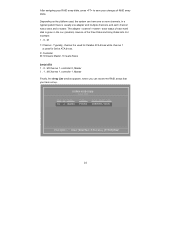
...use NVRAID RAID Utility to create RAID 0 (Striping). If you press , the NVIDIA RAID Utility - After adjusting the system BIOS to press before the window disappears. And the Striping Block is set to Mirroring, but please set to Optimal as a part of creating RAID 0. 8 1.4 Create Disk Array ...similar to the steps of the system POST and boot process prior to loading the OS. Define a New Array window appears. You have a few seconds to RAID mode, the below window appears. We take RAID 0 for example to show you to create RAID 0. After rebooting your system. By default...
...use NVRAID RAID Utility to create RAID 0 (Striping). If you press , the NVIDIA RAID Utility - After adjusting the system BIOS to press before the window disappears. And the Striping Block is set to Mirroring, but please set to Optimal as a part of creating RAID 0. 8 1.4 Create Disk Array ...similar to the steps of the system POST and boot process prior to loading the OS. Define a New Array window appears. You have a few seconds to RAID mode, the below window appears. We take RAID 0 for example to show you to create RAID 0. After rebooting your system. By default...
RAID Installation Guide
Page 10
... the platform used for Parallel ATA drives while channel 1 is usually one or more channels. M Channel 1, controller 0, Master 1 . 1 . M Channel 1, controller 1, Master Finally, the Array List window appears, where you can have set up.
... the platform used for Parallel ATA drives while channel 1 is usually one or more channels. M Channel 1, controller 0, Master 1 . 1 . M Channel 1, controller 1, Master Finally, the Array List window appears, where you can have set up.
RAID Installation Guide
Page 11
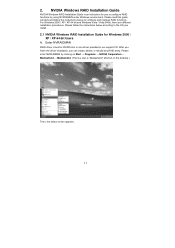
Please follow the instructions below screen appears. 11 After you finish the driver installation, you install. 2.1 NVIDIA Windows RAID Installation Guide for you to configure RAID functions by clicking on the desktop.) Then, the below to the ...our support CD. Please enter NVRAIDMAN by using NVIDIAMAN under Windows environment. 2. NVIDIA Windows RAID Installation Guide NVIDIA Windows RAID Installation Guide is an instruction for Windows 2000 / XP / XP 64-bit Users A. For Windows 2000 / XP / XP 64-bit and Windows Vista / Vista 64-bit, there are different installation ...
Please follow the instructions below screen appears. 11 After you finish the driver installation, you install. 2.1 NVIDIA Windows RAID Installation Guide for you to configure RAID functions by clicking on the desktop.) Then, the below to the ...our support CD. Please enter NVRAIDMAN by using NVIDIAMAN under Windows environment. 2. NVIDIA Windows RAID Installation Guide NVIDIA Windows RAID Installation Guide is an instruction for Windows 2000 / XP / XP 64-bit Users A. For Windows 2000 / XP / XP 64-bit and Windows Vista / Vista 64-bit, there are different installation ...

RAID Installation Guide
Page 12
... 0 for example to show you may choose to create other RAID arrays, 12 If your motherboard is different from NVIDIA utility naming. RAID 5 NOTE: Under Windows XP OS, the connector naming on our motherboard is equipped with two SATA / SATAII ports, you how to use NVRAIDMAN to use RAID 0, RAID 1, or...
... 0 for example to show you may choose to create other RAID arrays, 12 If your motherboard is different from NVIDIA utility naming. RAID 5 NOTE: Under Windows XP OS, the connector naming on our motherboard is equipped with two SATA / SATAII ports, you how to use NVRAIDMAN to use RAID 0, RAID 1, or...

RAID Installation Guide
Page 13
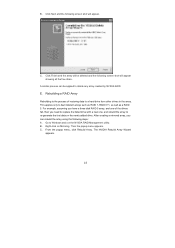
the operation procedures are similar to use are RAID enabled. Go to the system BIOS and make sure that the drives that you want to the steps of creating RAID 0. Click Next and the following screen shot will appear. Boot to Windows and launch the NVRAIDMAN application. Create Array and the following : A. C. D. B. Please do the following screen will appear. 13
the operation procedures are similar to use are RAID enabled. Go to the system BIOS and make sure that the drives that you want to the steps of creating RAID 0. Click Next and the following screen shot will appear. Boot to Windows and launch the NVRAIDMAN application. Create Array and the following : A. C. D. B. Please do the following screen will appear. 13
RAID Installation Guide
Page 18
... process can rebuild the array using the following screen shot will be applied to re-generate the lost data on Mirroring. This applies only to Windows and run the NVIDIA RAID Management utility. C. Click Next and the following steps: A. Right-click on the newly added drive. Then the popup menu appears...
... process can rebuild the array using the following screen shot will be applied to re-generate the lost data on Mirroring. This applies only to Windows and run the NVIDIA RAID Management utility. C. Click Next and the following steps: A. Right-click on the newly added drive. Then the popup menu appears...
RAID Installation Guide
Page 21
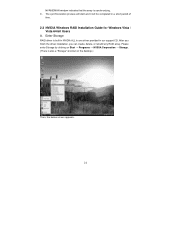
C. Enter Storage RAID driver is built in NVIDIA ALL in one driver provided in a short period of time. 2.2 NVIDIA Windows RAID Installation Guide for Windows Vista / Vista 64-bit Users A. Please enter Storage by clicking on Start → Programs → NVIDIA Corporation → Storage. (There is synchronizing. The ... will be completed in our support CD. After you finish the driver installation, you can create, delete, or rebuild any RAID array. NVRAIDMAN window indicates that the array is also a "Storage" shortcut on the desktop.) Then, the below screen appears. 21
C. Enter Storage RAID driver is built in NVIDIA ALL in one driver provided in a short period of time. 2.2 NVIDIA Windows RAID Installation Guide for Windows Vista / Vista 64-bit Users A. Please enter Storage by clicking on Start → Programs → NVIDIA Corporation → Storage. (There is synchronizing. The ... will be completed in our support CD. After you finish the driver installation, you can create, delete, or rebuild any RAID array. NVRAIDMAN window indicates that the array is also a "Storage" shortcut on the desktop.) Then, the below screen appears. 21

User Manual
Page 3
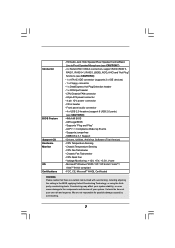
... 26 2.10 Serial ATA (SATA) / Serial ATAII (SATAII) Hard Disks Installation 27 2.11 Hot Plug and Hot Swap Functions for Windows® VistaTM Premium 2007 and Basic Logo 9 1.4 Motherboard Layout 10 1.5 ASRock DVI/H I/O 11 2 . Contents 1 . Introduction 5 1.1 Package Contents 5 1.2 Specifications 6 1.3 Minimum Hardware Requirement Table for SATA / SATAII HDDs ....... 27 2.12 SATA / SATAII HDD...
... 26 2.10 Serial ATA (SATA) / Serial ATAII (SATAII) Hard Disks Installation 27 2.11 Hot Plug and Hot Swap Functions for Windows® VistaTM Premium 2007 and Basic Logo 9 1.4 Motherboard Layout 10 1.5 ASRock DVI/H I/O 11 2 . Contents 1 . Introduction 5 1.1 Package Contents 5 1.2 Specifications 6 1.3 Minimum Hardware Requirement Table for SATA / SATAII HDDs ....... 27 2.12 SATA / SATAII HDD...

User Manual
Page 6
...64FX / 64X2 / 64 processors - NVIDIA® PureVideoTM Ready - 7.1 CH Windows® VistaTM Premium Level HD Audio (ALC888 Audio Codec) - FSB 1000 MHz (2.0 GT/s) - Max. Supports Wake-On-LAN ASRock DVI/H I /O - 1.2 Specifications Platform CPU Chipset Memory Hybrid Booster Expansion ... Ready-to-Use USB 2.0 Ports - 1 x RJ-45 Port 6 Supports AMD's Cool 'n' QuietTM Technology - NVIDIA® GeForce 7050 / nForce 630A MCP - ASRock U-COP (see CAUTION 1) - Micro ATX Form Factor: 9.6-in x 8.6-in, 24.4 cm x 21.8 cm - Supports Untied Overclocking Technology (see CAUTION 5) -...
...64FX / 64X2 / 64 processors - NVIDIA® PureVideoTM Ready - 7.1 CH Windows® VistaTM Premium Level HD Audio (ALC888 Audio Codec) - FSB 1000 MHz (2.0 GT/s) - Max. Supports Wake-On-LAN ASRock DVI/H I /O - 1.2 Specifications Platform CPU Chipset Memory Hybrid Booster Expansion ... Ready-to-Use USB 2.0 Ports - 1 x RJ-45 Port 6 Supports AMD's Cool 'n' QuietTM Technology - NVIDIA® GeForce 7050 / nForce 630A MCP - ASRock U-COP (see CAUTION 1) - Micro ATX Form Factor: 9.6-in x 8.6-in, 24.4 cm x 21.8 cm - Supports Untied Overclocking Technology (see CAUTION 5) -...
User Manual
Page 7
... pin ATX power connector - 4 pin 12V power connector - AMI Legal BIOS - Drivers, Utilities, AntiVirus Software (Trial Version) - CPU Temperature Sensing - CPU Fan Tachometer - Microsoft® Windows® 2000 / XP / XP 64-bit / VistaTM / VistaTM 64-bit compliant - FCC, CE, Microsoft® WHQL Certificated WARNING Please realize that there is a certain risk...
... pin ATX power connector - 4 pin 12V power connector - AMI Legal BIOS - Drivers, Utilities, AntiVirus Software (Trial Version) - CPU Temperature Sensing - CPU Fan Tachometer - Microsoft® Windows® 2000 / XP / XP 64-bit / VistaTM / VistaTM 64-bit compliant - FCC, CE, Microsoft® WHQL Certificated WARNING Please realize that there is a certain risk...
User Manual
Page 8
... mono modes. Before installing SATAII hard disk to the adapter vendor for USB 2.0 works fine under Windows® XP and Windows® VistaTM. Power Management for further information. 7. For Windows® XP 64-bit and Windows® VistaTM 64bit with our product, please refer to SATAII connector, please read the "SATAII Hard...the CPU and the heatsink when you resume the system, please check if the CPU fan on page 34 for system usage under Microsoft® Windows® VistaTM 64-bit / VistaTM / XP 64-bit / XP SP1 or SP2 / 2000 SP4. 8 Frequencies other than 4GB for the reservation ...
... mono modes. Before installing SATAII hard disk to the adapter vendor for USB 2.0 works fine under Windows® XP and Windows® VistaTM. Power Management for further information. 7. For Windows® XP 64-bit and Windows® VistaTM 64bit with our product, please refer to SATAII connector, please read the "SATAII Hard...the CPU and the heatsink when you resume the system, please check if the CPU fan on page 34 for system usage under Microsoft® Windows® VistaTM 64-bit / VistaTM / XP 64-bit / XP SP1 or SP2 / 2000 SP4. 8 Frequencies other than 4GB for the reservation ...

User Manual
Page 9
... who purchase this motherboard, please refer to Premium Discrete requirement at http://www.asrock.com * If the onboard VGA supports DVI, it must also support HDCP function to qualify for Windows® VistaTM Premium 2007 logo. * After June 1, 2007, all Windows® VistaTM systems are required to meet above minimum hardware requirements in...
... who purchase this motherboard, please refer to Premium Discrete requirement at http://www.asrock.com * If the onboard VGA supports DVI, it must also support HDCP function to qualify for Windows® VistaTM Premium 2007 logo. * After June 1, 2007, all Windows® VistaTM systems are required to meet above minimum hardware requirements in...

User Manual
Page 18
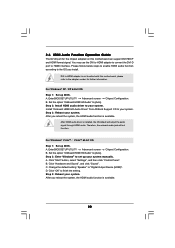
..., the default value of this motherboard. 3. When you use multiple monitors with your primary monitor, and then select "Primary". Click "Extend my Windows desktop onto this motherboard. 4. Repeat steps C through E for the diaplay icon identified by the number 2. Surround Display Feature This motherboard supports surround...already, there is inserted to the steps below. If you can easily enjoy the benefits of the multi-monitor according to this monitor". For Windows® 2000 / XP / XP 64-bit OS: Right click the desktop, choose "Properties", and select the "Settings" tab so ...
..., the default value of this motherboard. 3. When you use multiple monitors with your primary monitor, and then select "Primary". Click "Extend my Windows desktop onto this motherboard. 4. Repeat steps C through E for the diaplay icon identified by the number 2. Surround Display Feature This motherboard supports surround...already, there is inserted to the steps below. If you can easily enjoy the benefits of the multi-monitor according to this monitor". For Windows® 2000 / XP / XP 64-bit OS: Right click the desktop, choose "Properties", and select the "Settings" tab so ...
User Manual
Page 19
... with DVI-D port on this motherboard. Please refer to a compliant display. such as a computer, DVD player or set -top-boxes, as well as well. For Windows® VistaTM / VistaTM 64-bit OS: Right click the desktop, choose "Personalize", and select the "Display Settings" tab so that uses the DVI interface. and...
... with DVI-D port on this motherboard. Please refer to a compliant display. such as a computer, DVD player or set -top-boxes, as well as well. For Windows® VistaTM / VistaTM 64-bit OS: Right click the desktop, choose "Personalize", and select the "Display Settings" tab so that uses the DVI interface. and...
User Manual
Page 20
...Control Panel". Step 3: Reboot your system. Set the option "OnBoard HDMI HD Audio" to your system manually. Install "Onboard HDMI HD Audio Driver" from ASRock Support CD to [Auto]. Set the option "OnBoard HDMI HD Audio" to "Digital Output Device (HDMI)". Change the default setting "Speaker" to [Auto...]. Click "OK" to set up your system. Enter BIOS SETUP UTILITY Advanced screen Chipset Configuration. For Windows® XP / XP 64-bit OS Step 1: Set up BIOS. Enter BIOS SETUP UTILITY Advanced screen Chipset Configuration. Step 2: Enter...
...Control Panel". Step 3: Reboot your system. Set the option "OnBoard HDMI HD Audio" to your system manually. Install "Onboard HDMI HD Audio Driver" from ASRock Support CD to [Auto]. Set the option "OnBoard HDMI HD Audio" to "Digital Output Device (HDMI)". Change the default setting "Speaker" to [Auto...]. Click "OK" to set up your system. Enter BIOS SETUP UTILITY Advanced screen Chipset Configuration. For Windows® XP / XP 64-bit OS Step 1: Set up BIOS. Enter BIOS SETUP UTILITY Advanced screen Chipset Configuration. Step 2: Enter...
User Manual
Page 24
... to enter Realtek HD Audio Manager. B. MIC_RET and OUT_RET are for AC'97 audio panel. Enter BIOS Setup Utility. Enter Windows system. For Windows® VistaTM / VistaTM 64-bit OS: Click the right-top "Folder" icon , choose "Disable front panel jack detection",... and save the change by clicking "OK". D. Connect Mic_IN (MIC) to OUT2_L. E. F. For Windows® 2000 / XP / XP 64-bit OS: Click "Audio I/O", select "Connector Settings" , choose "Disable front panel jack detection", and save the...
... to enter Realtek HD Audio Manager. B. MIC_RET and OUT_RET are for AC'97 audio panel. Enter BIOS Setup Utility. Enter Windows system. For Windows® VistaTM / VistaTM 64-bit OS: Click the right-top "Folder" icon , choose "Disable front panel jack detection",... and save the change by clicking "OK". D. Connect Mic_IN (MIC) to OUT2_L. E. F. For Windows® 2000 / XP / XP 64-bit OS: Click "Audio I/O", select "Connector Settings" , choose "Disable front panel jack detection", and save the...


