
RAID Installation Guide
Page 5
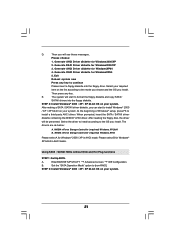
...When you see these messages, Please choose: 1. Generate RAID Driver diskette for Windows2000/XP 3. Generate RAID Driver diskette for WindowsXP64 5. Then you install. Enter BIOS SETUP UTILITY Advanced screen IDE Configuration. htm#the_integrated_installation_fmay 1.3.1 Installing Windows® 2000 / XP / XP 64-bit With RAID...no SP4 included in the motherboard gift box pack, please choose the one for Windows® 2000 / XP / XP 64-bit.) B. Insert the ASRock Support CD into the floppy drive. 1.3 Installing Windows® 2000 / XP / XP 64-bit / VistaTM / VistaTM 64-bit ...
...When you see these messages, Please choose: 1. Generate RAID Driver diskette for Windows2000/XP 3. Generate RAID Driver diskette for WindowsXP64 5. Then you install. Enter BIOS SETUP UTILITY Advanced screen IDE Configuration. htm#the_integrated_installation_fmay 1.3.1 Installing Windows® 2000 / XP / XP 64-bit With RAID...no SP4 included in the motherboard gift box pack, please choose the one for Windows® 2000 / XP / XP 64-bit.) B. Insert the ASRock Support CD into the floppy drive. 1.3 Installing Windows® 2000 / XP / XP 64-bit / VistaTM / VistaTM 64-bit ...

RAID Installation Guide
Page 6
...to set up "SATA Operation Mode" to install Windows® 2000 / Windows® XP / Windows® XP 64-bit OS on your system. After reading the floppy disk, the drivers will start to [RAID] in the Support CD: .. \ RAID Installation Guide STEP 4: Install Windows® 2000 / XP / XP 64-bit ...Then, please set RAID configuration. If you install Windows® 2000 / Windows® XP / Windows® XP 64-bit on IDE HDDs and want to manage (create, convert, delete, or rebuild) RAID functions on your system. The drivers are two RAID drivers needed for RAID mode, you still need to...
...to set up "SATA Operation Mode" to install Windows® 2000 / Windows® XP / Windows® XP 64-bit OS on your system. After reading the floppy disk, the drivers will start to [RAID] in the Support CD: .. \ RAID Installation Guide STEP 4: Install Windows® 2000 / XP / XP 64-bit ...Then, please set RAID configuration. If you install Windows® 2000 / Windows® XP / Windows® XP 64-bit on IDE HDDs and want to manage (create, convert, delete, or rebuild) RAID functions on your system. The drivers are two RAID drivers needed for RAID mode, you still need to...
RAID Installation Guide
Page 7
...bit OS on your system. 1.3.2 Installing Windows® VistaTM / VistaTM 64-bit With RAID Functions If you want to install Windows?" page, please insert the ASRock Support CD into the optical drive again to continue the installation. NVIDIA® RAID drivers are in the following path in our ...Support CD: (There are two ASRock Support CD in the Support CD: .. ...
...bit OS on your system. 1.3.2 Installing Windows® VistaTM / VistaTM 64-bit With RAID Functions If you want to install Windows?" page, please insert the ASRock Support CD into the optical drive again to continue the installation. NVIDIA® RAID drivers are in the following path in our ...Support CD: (There are two ASRock Support CD in the Support CD: .. ...
RAID Installation Guide
Page 11
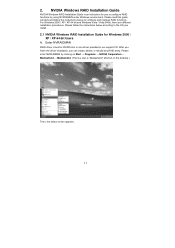
... Please enter NVRAIDMAN by using NVIDIAMAN under Windows environment. For Windows 2000 / XP / XP 64-bit and Windows Vista / Vista 64-bit, there are different installation procedures. Please follow the instructions below screen appears. 11 Enter NVRAIDMAN RAID driver is also a "Mediashield" shortcut on...Then, the below to the OS you can create, delete, or rebuild any RAID array. After you finish the driver installation, you install. 2.1 NVIDIA Windows RAID Installation Guide for you to configure RAID functions by clicking on Start → Programs → NVIDIA Corporation &#...
... Please enter NVRAIDMAN by using NVIDIAMAN under Windows environment. For Windows 2000 / XP / XP 64-bit and Windows Vista / Vista 64-bit, there are different installation procedures. Please follow the instructions below screen appears. 11 Enter NVRAIDMAN RAID driver is also a "Mediashield" shortcut on...Then, the below to the OS you can create, delete, or rebuild any RAID array. After you finish the driver installation, you install. 2.1 NVIDIA Windows RAID Installation Guide for you to configure RAID functions by clicking on Start → Programs → NVIDIA Corporation &#...
RAID Installation Guide
Page 21
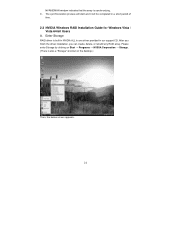
NVRAIDMAN window indicates that the array is also a "Storage" shortcut on the desktop.) Then, the below screen appears. 21 After you finish the driver installation, you can create, delete, or rebuild any RAID array. The synchronization process will start and it will be ...Please enter Storage by clicking on Start → Programs → NVIDIA Corporation → Storage. (There is synchronizing. C. Enter Storage RAID driver is built in NVIDIA ALL in one driver provided in a short period of time. 2.2 NVIDIA Windows RAID Installation Guide for Windows Vista / Vista 64-bit Users A.
NVRAIDMAN window indicates that the array is also a "Storage" shortcut on the desktop.) Then, the below screen appears. 21 After you finish the driver installation, you can create, delete, or rebuild any RAID array. The synchronization process will start and it will be ...Please enter Storage by clicking on Start → Programs → NVIDIA Corporation → Storage. (There is synchronizing. C. Enter Storage RAID driver is built in NVIDIA ALL in one driver provided in a short period of time. 2.2 NVIDIA Windows RAID Installation Guide for Windows Vista / Vista 64-bit Users A.

User Manual
Page 3
... / Serial ATAII (SATAII) Hard Disks Installation 27 2.11 Hot Plug and Hot Swap Functions for Windows® VistaTM Premium 2007 and Basic Logo 9 1.4 Motherboard Layout 10 1.5 ASRock DVI/H I/O 11 2 . Contents 1 . Introduction 5 1.1 Package Contents 5 1.2 Specifications 6 ...1.3 Minimum Hardware Requirement Table for SATA / SATAII HDDs ....... 27 2.12 SATA / SATAII HDD Hot Plug Feature and Operation Guide ....... 28 2.13 Driver Installation Guide 30 2.14 Installing Windows®...
... / Serial ATAII (SATAII) Hard Disks Installation 27 2.11 Hot Plug and Hot Swap Functions for Windows® VistaTM Premium 2007 and Basic Logo 9 1.4 Motherboard Layout 10 1.5 ASRock DVI/H I/O 11 2 . Contents 1 . Introduction 5 1.1 Package Contents 5 1.2 Specifications 6 ...1.3 Minimum Hardware Requirement Table for SATA / SATAII HDDs ....... 27 2.12 SATA / SATAII HDD Hot Plug Feature and Operation Guide ....... 28 2.13 Driver Installation Guide 30 2.14 Installing Windows®...
User Manual
Page 7
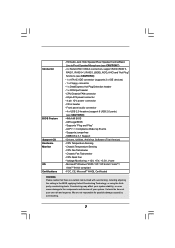
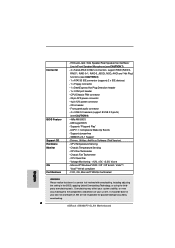
... - CPU Fan Tachometer - HD Audio Jack: Side Speaker/Rear Speaker/Central/Bass/ Line in header - Supports "Plug and Play" - Supports jumperfree - Microsoft® Windows® 2000 / XP / XP 64-bit / VistaTM / VistaTM 64-bit compliant - Chassis Fan Tachometer - Front panel audio connector - 4 x USB 2.0 headers ... your system stability, or even cause damage to the components and devices of your own risk and expense. AMI Legal BIOS - Drivers, Utilities, AntiVirus Software (Trial Version) - FCC, CE, Microsoft® WHQL Certificated WARNING Please realize that there is a certain...
... - CPU Fan Tachometer - HD Audio Jack: Side Speaker/Rear Speaker/Central/Bass/ Line in header - Supports "Plug and Play" - Supports jumperfree - Microsoft® Windows® 2000 / XP / XP 64-bit / VistaTM / VistaTM 64-bit compliant - Chassis Fan Tachometer - Front panel audio connector - 4 x USB 2.0 headers ... your system stability, or even cause damage to the components and devices of your own risk and expense. AMI Legal BIOS - Drivers, Utilities, AntiVirus Software (Trial Version) - FCC, CE, Microsoft® WHQL Certificated WARNING Please realize that there is a certain...

User Manual
Page 9
... (Premium) 512MB Single Channel (Basic) 256MB x 2 Dual Channel (Basic) DX9.0 with WDDM Driver DVI with HDCP * If you use onboard VGA with total system memory size above 512MB and plan to submit Windows® VistaTM Premium or Basic logo, please adjust the shared memory size of onboard VGA to...this motherboard, please refer to Premium Discrete requirement at http://www.asrock.com * If the onboard VGA supports DVI, it must also support HDCP function to qualify for Windows® VistaTM Premium 2007 logo. * After June 1, 2007, all Windows® VistaTM systems are required to meet above . * If...
... (Premium) 512MB Single Channel (Basic) 256MB x 2 Dual Channel (Basic) DX9.0 with WDDM Driver DVI with HDCP * If you use onboard VGA with total system memory size above 512MB and plan to submit Windows® VistaTM Premium or Basic logo, please adjust the shared memory size of onboard VGA to...this motherboard, please refer to Premium Discrete requirement at http://www.asrock.com * If the onboard VGA supports DVI, it must also support HDCP function to qualify for Windows® VistaTM Premium 2007 logo. * After June 1, 2007, all Windows® VistaTM systems are required to meet above . * If...

User Manual
Page 18
... that the value you use multiple monitors with your system. Install the onboard VGA driver and the add-on the I /O panel of the multi-monitor according to install them again. 5. Click "Extend my Windows desktop onto this motherboard. 3. Right-click the display icon and select "Attached", if... necessary. A. E. Connect the DVI-D monitor cable to the VGA/DVI-D port on PCI Express VGA card driver to apply these new values. Select the ...
... that the value you use multiple monitors with your system. Install the onboard VGA driver and the add-on the I /O panel of the multi-monitor according to install them again. 5. Click "Extend my Windows desktop onto this motherboard. 3. Right-click the display icon and select "Attached", if... necessary. A. E. Connect the DVI-D monitor cable to the VGA/DVI-D port on PCI Express VGA card driver to apply these new values. Select the ...
User Manual
Page 20
... Change the default setting "Speaker" to set up your system manually. D. Install "Onboard HDMI HD Audio Driver" from ASRock Support CD to your system. After HDMI audio driver is available. Therefore, the onboard audio jack will output the audio signal through HDMI audio. Step 3: Reboot ...your system. B. Step 2: Install HDMI audio driver to your system. For Windows® VistaTM / VistaTM 64-bit ...
... Change the default setting "Speaker" to set up your system manually. D. Install "Onboard HDMI HD Audio Driver" from ASRock Support CD to your system. After HDMI audio driver is available. Therefore, the onboard audio jack will output the audio signal through HDMI audio. Step 3: Reboot ...your system. B. Step 2: Install HDMI audio driver to your system. For Windows® VistaTM / VistaTM 64-bit ...
User Manual
Page 30
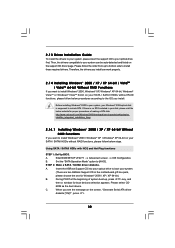
...Please follow below procedures according to install Windows® 2000, Windows® XP, Windows® XP 64-bit, Windows® VistaTM or Windows® VistaTM 64-bit on the support CD driver page. During POST at the beginning of... making a SP4 disk: http://www.microsoft.com/Windows2000/downloads/servicepacks/sp4/spdeploy. Insert the ASRock Support CD into your optical drive to [AHCI]. STEP 2: Make a SATA / SATAII driver...
...Please follow below procedures according to install Windows® 2000, Windows® XP, Windows® XP 64-bit, Windows® VistaTM or Windows® VistaTM 64-bit on the support CD driver page. During POST at the beginning of... making a SP4 disk: http://www.microsoft.com/Windows2000/downloads/servicepacks/sp4/spdeploy. Insert the ASRock Support CD into your optical drive to [AHCI]. STEP 2: Make a SATA / SATAII driver...
User Manual
Page 31
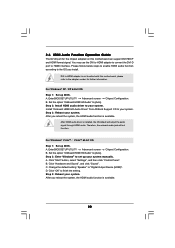
... Windows2000/XP 2. B. Then you install. A. Set the "SATA Operation Mode" option to install a third-party AHCI driver. Generate AHCI Driver diskette for Windows® XP 64-bit in AHCI mode. After reading the floppy disk, the driver will see these messages, Please choose: 1. Using SATA / SATAII HDDs without NCQ and Hot Plug functions STEP...
... Windows2000/XP 2. B. Then you install. A. Set the "SATA Operation Mode" option to install a third-party AHCI driver. Generate AHCI Driver diskette for Windows® XP 64-bit in AHCI mode. After reading the floppy disk, the driver will see these messages, Please choose: 1. Using SATA / SATAII HDDs without NCQ and Hot Plug functions STEP...

User Manual
Page 32
... disk into your optical drive, and click the "Load Driver" button on the left on your system, and follow below procedures according to install Windows?" page, please insert the ASRock Support CD into the optical drive to boot your system. Insert the Windows® VistaTM / Windows® VistaTM 64-bit optical disk into the optical...
... disk into your optical drive, and click the "Load Driver" button on the left on your system, and follow below procedures according to install Windows?" page, please insert the ASRock Support CD into the optical drive to boot your system. Insert the Windows® VistaTM / Windows® VistaTM 64-bit optical disk into the optical...
User Manual
Page 33
... Guide" to select them separately. When prompted, insert the SATA / SATAII driver diskette containing the NVIDIA® RAID driver. htm#the_integrated_installation_fmay 2.15.1 Installing Windows® 2000 / XP / XP 64-bit With RAID Functions If you start to install Windows® 2000 / Windows® XP / Windows® XP 64-bit OS on your SATA / SATAII HDDs with...
... Guide" to select them separately. When prompted, insert the SATA / SATAII driver diskette containing the NVIDIA® RAID driver. htm#the_integrated_installation_fmay 2.15.1 Installing Windows® 2000 / XP / XP 64-bit With RAID Functions If you start to install Windows® 2000 / Windows® XP / Windows® XP 64-bit OS on your SATA / SATAII HDDs with...
User Manual
Page 34
... in the Support CD: .. \ RAID Installation Guide STEP 3: Install Windows® VistaTM / VistaTM 64-bit OS on page 7 for the possible overclocking risk before you need to set RAID configuration. Please refer to load the NVIDIA® RAID drivers. page, please insert the ASRock Support CD into your optical drive, and click the...
... in the Support CD: .. \ RAID Installation Guide STEP 3: Install Windows® VistaTM / VistaTM 64-bit OS on page 7 for the possible overclocking risk before you need to set RAID configuration. Please refer to load the NVIDIA® RAID drivers. page, please insert the ASRock Support CD into your optical drive, and click the...
User Manual
Page 52
...the file "ASSETUP.EXE" from the BIN folder in this chapter for more about ASRock, welcome to display the menus. 4.2.2 Drivers Menu The Drivers Menu shows the available devices drivers if the system detects the installed devices. The CD automatically displays the Main Menu if...supports. Software Support 4.1 Install Operating System This motherboard supports various Microsoft® Windows® operating systems: 2000 / XP / XP 64-bit / VistaTM / VistaTM 64-bit. Please install the necessary drivers to your OS documentation for general reference only. 4. Refer to activate the ...
...the file "ASSETUP.EXE" from the BIN folder in this chapter for more about ASRock, welcome to display the menus. 4.2.2 Drivers Menu The Drivers Menu shows the available devices drivers if the system detects the installed devices. The CD automatically displays the Main Menu if...supports. Software Support 4.1 Install Operating System This motherboard supports various Microsoft® Windows® operating systems: 2000 / XP / XP 64-bit / VistaTM / VistaTM 64-bit. Please install the necessary drivers to your OS documentation for general reference only. 4. Refer to activate the ...
Quick Installation Guide
Page 6
...Windows® 2000 / XP / XP 64-bit / VistaTM / VistaTM 64-bit compliant - Overclocking may affect your system stability, or even cause damage to the components and devices of your own risk and expense. We are not responsible for possible damage caused by overclocking. 6 ASRock 939N68PV-GLAN... Motherboard CD in the BIOS, applying Untied Overclocking Technology, or using the thirdparty overclocking tools. Drivers, Utilities, AntiVirus Software (Trial Version) - CPU Fan Tachometer - Front ...
...Windows® 2000 / XP / XP 64-bit / VistaTM / VistaTM 64-bit compliant - Overclocking may affect your system stability, or even cause damage to the components and devices of your own risk and expense. We are not responsible for possible damage caused by overclocking. 6 ASRock 939N68PV-GLAN... Motherboard CD in the BIOS, applying Untied Overclocking Technology, or using the thirdparty overclocking tools. Drivers, Utilities, AntiVirus Software (Trial Version) - CPU Fan Tachometer - Front ...

Quick Installation Guide
Page 8
... system memory size above 512MB and plan to submit Windows® VistaTM Premium or Basic logo, please adjust the shared memory size of onboard VGA to 64MB. English 8 ASRock 939N68PV-GLAN Motherboard 1 . 3 Minimum Hardware Requirement Table for Windows® VistaTM Premium 2007 and Basic Logo For system...2 Dual Channel (Premium) 512MB Single Channel (Basic) 256MB x 2 Dual Channel (Basic) DX9.0 with WDDM Driver DVI with total system memory size 512MB and plan to submit Windows® VistaTM Basic logo, please adjust the shared memory size of onboard VGA to 128MB or above minimum hardware...
... system memory size above 512MB and plan to submit Windows® VistaTM Premium or Basic logo, please adjust the shared memory size of onboard VGA to 64MB. English 8 ASRock 939N68PV-GLAN Motherboard 1 . 3 Minimum Hardware Requirement Table for Windows® VistaTM Premium 2007 and Basic Logo For system...2 Dual Channel (Premium) 512MB Single Channel (Basic) 256MB x 2 Dual Channel (Basic) DX9.0 with WDDM Driver DVI with total system memory size 512MB and plan to submit Windows® VistaTM Basic logo, please adjust the shared memory size of onboard VGA to 128MB or above minimum hardware...
Quick Installation Guide
Page 15
...capability of this motherboard. Click the "Identify" button to page 13 for proper expansion card installation procedures for details. 2. Click "Extend my Windows desktop onto this motherboard. 4. E. Right-click the display icon and select "Attached", if necessary. F. Please refer to display a large number... to the following steps to your card, one , two, three and four. 15 ASRock 939N68PV-GLAN Motherboard English Connect the D-Sub monitor cable to the steps below. Install the onboard VGA driver and the add-on each monitor. Right-click the display icon in the Display Properties ...
...capability of this motherboard. Click the "Identify" button to page 13 for proper expansion card installation procedures for details. 2. Click "Extend my Windows desktop onto this motherboard. 4. E. Right-click the display icon and select "Attached", if necessary. F. Please refer to display a large number... to the following steps to your card, one , two, three and four. 15 ASRock 939N68PV-GLAN Motherboard English Connect the D-Sub monitor cable to the steps below. Install the onboard VGA driver and the add-on each monitor. Right-click the display icon in the Display Properties ...

Quick Installation Guide
Page 17
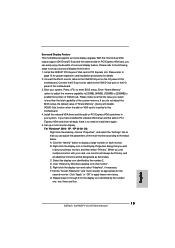
... the system, the HDMI audio function is installed, the OS default will not function. After HDMI audio driver is available. A. Step 2: Enter Windows® to your system. Change the default setting "Speaker" to finish the setting. English 17 ASRock 939N68PV-GLAN Motherboard Enter BIOS SETUP UTILITY Advanced screen Chipset Configuration. Install "Onboard HDMI HD Audio...
... the system, the HDMI audio function is installed, the OS default will not function. After HDMI audio driver is available. A. Step 2: Enter Windows® to your system. Change the default setting "Speaker" to finish the setting. English 17 ASRock 939N68PV-GLAN Motherboard Enter BIOS SETUP UTILITY Advanced screen Chipset Configuration. Install "Onboard HDMI HD Audio...


