RAID Installation Guide
Page 1
...-bit / Vista / Vista 64-bit With RAID Functions 5 1.3.1 Installing Windows 2000 / XP / XP 64-bit With RAID Functions 5 1.3.2 Installing Windows Vista / Vista 64-bit With RAID Functions 7 1.4 Create Disk Array 8 2. NVIDIA RAID Installation Guide 1. NVIDIA Windows RAID Installation Guide 11 2.1 NVIDIA Windows RAID Installation Guide for Windows 2000 / XP / XP 64-bit Users 11 2.2 NVIDIA...
...-bit / Vista / Vista 64-bit With RAID Functions 5 1.3.1 Installing Windows 2000 / XP / XP 64-bit With RAID Functions 5 1.3.2 Installing Windows Vista / Vista 64-bit With RAID Functions 7 1.4 Create Disk Array 8 2. NVIDIA RAID Installation Guide 1. NVIDIA Windows RAID Installation Guide 11 2.1 NVIDIA Windows RAID Installation Guide for Windows 2000 / XP / XP 64-bit Users 11 2.2 NVIDIA...

RAID Installation Guide
Page 5
...motherboard gift box pack, please choose the one for Windows® 2000 / XP / XP 64-bit.) B. Then press any key to continue Please insert a floppy diskette into your optical drive to boot your system. (There are two ASRock Support CD in your SATA / SATAII HDDs with RAID... Please select CD-ROM as the boot device. Generate AHCI Driver diskette for proper procedures of system boot-up, press key, and then a window for Windows2000/XP 3. Exit Reboot system now Press any key. 5 Select your required item on your disk, please visit the below procedures according ...
...motherboard gift box pack, please choose the one for Windows® 2000 / XP / XP 64-bit.) B. Then press any key to continue Please insert a floppy diskette into your optical drive to boot your system. (There are two ASRock Support CD in your SATA / SATAII HDDs with RAID... Please select CD-ROM as the boot device. Generate AHCI Driver diskette for proper procedures of system boot-up, press key, and then a window for Windows2000/XP 3. Exit Reboot system now Press any key. 5 Select your required item on your disk, please visit the below procedures according ...

RAID Installation Guide
Page 6
... of the document in the following path in the Support CD: .. \ RAID Installation Guide 6 NVIDIA RAID Driver (required) B. If you install Windows® 2000 / Windows® XP / Windows® XP 64-bit on IDE HDDs and want to manage (create, convert, delete, or rebuild) RAID functions on SATA / SATAII HDDs, ...; 2000 / XP / XP 64-bit OS on your system. Then, please set up "SATA Operation Mode" to install Windows® 2000 / Windows® XP / Windows® XP 64-bit OS on your system. After reading the floppy disk, the drivers will start to check the RAID installation ...
... of the document in the following path in the Support CD: .. \ RAID Installation Guide 6 NVIDIA RAID Driver (required) B. If you install Windows® 2000 / Windows® XP / Windows® XP 64-bit on IDE HDDs and want to manage (create, convert, delete, or rebuild) RAID functions on SATA / SATAII HDDs, ...; 2000 / XP / XP 64-bit OS on your system. Then, please set up "SATA Operation Mode" to install Windows® 2000 / Windows® XP / Windows® XP 64-bit OS on your system. After reading the floppy disk, the drivers will start to check the RAID installation ...
RAID Installation Guide
Page 7
... BIOS SETUP UTILITY Advanced screen IDE Configuration. NVIDIA® RAID drivers are in the following path in our Support CD: (There are two ASRock Support CD in BIOS first. NOTE. Before you start to configure RAID function, you need to set up "SATA Operation Mode" to [... gift box pack, please choose the one for proper configuration. page, please insert the ASRock Support CD into your SATA / SATAII HDDs with RAID functions, please follow the instruction to install Windows® VistaTM / Windows® VistaTM 64-bit OS on your system. Set the "SATA Operation Mode" option...
... BIOS SETUP UTILITY Advanced screen IDE Configuration. NVIDIA® RAID drivers are in the following path in our Support CD: (There are two ASRock Support CD in BIOS first. NOTE. Before you start to configure RAID function, you need to set up "SATA Operation Mode" to [... gift box pack, please choose the one for proper configuration. page, please insert the ASRock Support CD into your SATA / SATAII HDDs with RAID functions, please follow the instruction to install Windows® VistaTM / Windows® VistaTM 64-bit OS on your system. Set the "SATA Operation Mode" option...
RAID Installation Guide
Page 8
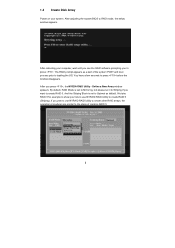
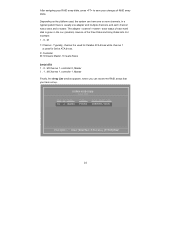
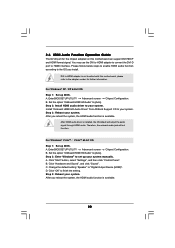
... to the steps of the system POST and boot process prior to loading the OS. Define a New Array window appears. If you plan to use NVRAID RAID Utility to RAID mode, the below window appears. You have a few seconds to press . By default, RAID Mode is set it to Striping if you... to press before the window disappears. And the Striping Block is set to Mirroring, but please set to create RAID 0. After rebooting your system. 1.4 Create Disk Array Power on your ...
... to the steps of the system POST and boot process prior to loading the OS. Define a New Array window appears. If you plan to use NVRAID RAID Utility to RAID mode, the below window appears. You have a few seconds to press . By default, RAID Mode is set it to Striping if you... to press before the window disappears. And the Striping Block is set to Mirroring, but please set to create RAID 0. After rebooting your system. 1.4 Create Disk Array Power on your ...
RAID Installation Guide
Page 10
... hard disk is used for Serial ATA drives. 0: Controller M: M means Master, S means Slave Serial ATA 1 . 0 . M Channel 1, controller 0, Master 1 . 1 . M Channel 1, controller 1, Master Finally, the Array List window appears, where you can have set up. The adapter / channel / master / slave status of RAID array disks. Typically, channel 0 is used for Parallel ATA drives...
... hard disk is used for Serial ATA drives. 0: Controller M: M means Master, S means Slave Serial ATA 1 . 0 . M Channel 1, controller 0, Master 1 . 1 . M Channel 1, controller 1, Master Finally, the Array List window appears, where you can have set up. The adapter / channel / master / slave status of RAID array disks. Typically, channel 0 is used for Parallel ATA drives...
RAID Installation Guide
Page 11
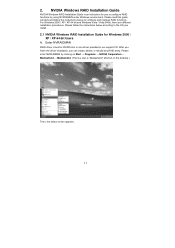
... below screen appears. 11 After you finish the driver installation, you to configure RAID functions by using NVIDIAMAN under Windows environment. Please read this guide carefully and follow the instructions below according to configure and manage RAID functions. Please...Guide for you can create, delete, or rebuild any RAID array. For Windows 2000 / XP / XP 64-bit and Windows Vista / Vista 64-bit, there are different installation procedures. 2. NVIDIA Windows RAID Installation Guide NVIDIA Windows RAID Installation Guide is also a "Mediashield" shortcut on Start → ...
... below screen appears. 11 After you finish the driver installation, you to configure RAID functions by using NVIDIAMAN under Windows environment. Please read this guide carefully and follow the instructions below according to configure and manage RAID functions. Please...Guide for you can create, delete, or rebuild any RAID array. For Windows 2000 / XP / XP 64-bit and Windows Vista / Vista 64-bit, there are different installation procedures. 2. NVIDIA Windows RAID Installation Guide NVIDIA Windows RAID Installation Guide is also a "Mediashield" shortcut on Start → ...

RAID Installation Guide
Page 12
... to the RAID functions your motherboard provides in advance and follow the instruction in this section to create other RAID arrays, 12 RAID 5 NOTE: Under Windows XP OS, the connector naming on our motherboard is equipped with four SATA / SATAII ports, you may choose to the SATA / SATAII HDDs amount you...
... to the RAID functions your motherboard provides in advance and follow the instruction in this section to create other RAID arrays, 12 RAID 5 NOTE: Under Windows XP OS, the connector naming on our motherboard is equipped with four SATA / SATAII ports, you may choose to the SATA / SATAII HDDs amount you...

RAID Installation Guide
Page 13
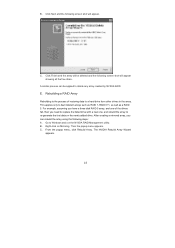
B. D. Please do the following screen will appear. 13 Create Array and the following : A. Click Next and the following screen shot will appear. C. the operation procedures are RAID enabled. Boot to the steps of creating RAID 0. Go to the system BIOS and make sure that the drives that you want to use are similar to Windows and launch the NVRAIDMAN application.
B. D. Please do the following screen will appear. 13 Create Array and the following : A. Click Next and the following screen shot will appear. C. the operation procedures are RAID enabled. Boot to the steps of creating RAID 0. Go to the system BIOS and make sure that the drives that you want to use are similar to Windows and launch the NVRAIDMAN application.
RAID Installation Guide
Page 18
... B. Right-click on the newly added drive. Click Next and the following screen shot will appear showing all the free disks. This applies only to Windows and run the NVIDIA RAID Management utility. A similar process can rebuild the array using the following screen shot will appear. Click Finish and the array...
... B. Right-click on the newly added drive. Click Next and the following screen shot will appear showing all the free disks. This applies only to Windows and run the NVIDIA RAID Management utility. A similar process can rebuild the array using the following screen shot will appear. Click Finish and the array...
RAID Installation Guide
Page 21
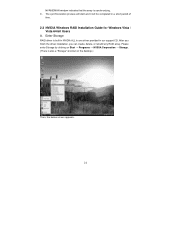
... create, delete, or rebuild any RAID array. Please enter Storage by clicking on Start → Programs → NVIDIA Corporation → Storage. (There is synchronizing. NVRAIDMAN window indicates that the array is also a "Storage" shortcut on the desktop.) Then, the below screen appears. 21 C. The synchronization process will start and it will... be completed in our support CD. Enter Storage RAID driver is built in NVIDIA ALL in one driver provided in a short period of time. 2.2 NVIDIA Windows RAID Installation Guide for Windows Vista / Vista 64-bit Users A.
... create, delete, or rebuild any RAID array. Please enter Storage by clicking on Start → Programs → NVIDIA Corporation → Storage. (There is synchronizing. NVRAIDMAN window indicates that the array is also a "Storage" shortcut on the desktop.) Then, the below screen appears. 21 C. The synchronization process will start and it will... be completed in our support CD. Enter Storage RAID driver is built in NVIDIA ALL in one driver provided in a short period of time. 2.2 NVIDIA Windows RAID Installation Guide for Windows Vista / Vista 64-bit Users A.

User Manual
Page 3
...Windows® 2000 / XP / XP 64-bit / VistaTM / VistaTM 64-bit Without RAID Functions 30 2.14.1 Installing Windows® 2000 / XP / XP 64-bit Without RAID Functions 30 2.14.2 Installing Windows...® VistaTM / VistaTM 64-bit Without RAID Functions 32 2.15 Installing Windows® 2000 / ... VistaTM 64-bit With RAID Functions 32 2.15.1 Installing Windows® 2000 / XP / XP 64-bit With RAID Functions 33 2.15.2 Installing Windows® VistaTM / VistaTM 64-bit With RAID Functions 34 ...
...Windows® 2000 / XP / XP 64-bit / VistaTM / VistaTM 64-bit Without RAID Functions 30 2.14.1 Installing Windows® 2000 / XP / XP 64-bit Without RAID Functions 30 2.14.2 Installing Windows...® VistaTM / VistaTM 64-bit Without RAID Functions 32 2.15 Installing Windows® 2000 / ... VistaTM 64-bit With RAID Functions 32 2.15.1 Installing Windows® 2000 / XP / XP 64-bit With RAID Functions 33 2.15.2 Installing Windows® VistaTM / VistaTM 64-bit With RAID Functions 34 ...

User Manual
Page 6
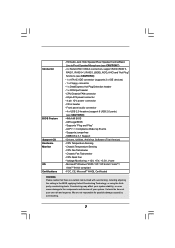
...by independent display controllers - Giga PHY Realtek RTL8211B - Supports Wake-On-LAN ASRock DVI/H I /O - shared memory 256MB - Chipset embedded HDMI Audio - NVIDIA® PureVideoTM Ready - 7.1 CH Windows® VistaTM Premium Level HD Audio (ALC888 Audio Codec) - Micro ATX...- 2 x PCI slots - Supports AMD's Cool 'n' QuietTM Technology - capacity: 4GB (see CAUTION 1) - Gigabit LAN 10/100/1000 Mb/s - Max. ASRock U-COP (see CAUTION 2) - 4 x DDR DIMM slots - DX9.0 VGA, Pixel Shader 3.0 - 1.2 Specifications Platform CPU Chipset Memory Hybrid Booster Expansion Slot ...
...by independent display controllers - Giga PHY Realtek RTL8211B - Supports Wake-On-LAN ASRock DVI/H I /O - shared memory 256MB - Chipset embedded HDMI Audio - NVIDIA® PureVideoTM Ready - 7.1 CH Windows® VistaTM Premium Level HD Audio (ALC888 Audio Codec) - Micro ATX...- 2 x PCI slots - Supports AMD's Cool 'n' QuietTM Technology - capacity: 4GB (see CAUTION 1) - Gigabit LAN 10/100/1000 Mb/s - Max. ASRock U-COP (see CAUTION 2) - 4 x DDR DIMM slots - DX9.0 VGA, Pixel Shader 3.0 - 1.2 Specifications Platform CPU Chipset Memory Hybrid Booster Expansion Slot ...
User Manual
Page 7
... ATAII 3.0Gb/s connectors, support RAID (RAID 0, RAID 1, RAID 0+1, RAID 5, JBOD), NCQ, AHCI and "Hot Plug" functions (see CAUTION 9) - 4Mb AMI BIOS - SMBIOS 2.3.1 Support - Microsoft® Windows® 2000 / XP / XP 64-bit / VistaTM / VistaTM 64-bit compliant -
... ATAII 3.0Gb/s connectors, support RAID (RAID 0, RAID 1, RAID 0+1, RAID 5, JBOD), NCQ, AHCI and "Hot Plug" functions (see CAUTION 9) - 4Mb AMI BIOS - SMBIOS 2.3.1 Support - Microsoft® Windows® 2000 / XP / XP 64-bit / VistaTM / VistaTM 64-bit compliant -
User Manual
Page 8
...Before you implement Dual Channel Memory Technology, make sure to read the installation guide of the system or damage the CPU. 5. For Windows® XP 64-bit and Windows® VistaTM 64bit with our product, please refer to spray thermal grease between the CPU and the heatsink when you resume the ... HDMI format signal. Frequencies other than 4GB for the reservation for details. 2. Please check the table on page 34 for system usage under Microsoft® Windows® VistaTM 64-bit / VistaTM / XP 64-bit / XP SP1 or SP2 / 2000 SP4. 8 DVI to HDMI interface. Although this DVI-D ...
...Before you implement Dual Channel Memory Technology, make sure to read the installation guide of the system or damage the CPU. 5. For Windows® XP 64-bit and Windows® VistaTM 64bit with our product, please refer to spray thermal grease between the CPU and the heatsink when you resume the ... HDMI format signal. Frequencies other than 4GB for the reservation for details. 2. Please check the table on page 34 for system usage under Microsoft® Windows® VistaTM 64-bit / VistaTM / XP 64-bit / XP SP1 or SP2 / 2000 SP4. 8 DVI to HDMI interface. Although this DVI-D ...

User Manual
Page 9
...of onboard VGA to 64MB. 1.3 Minimum Hardware Requirement Table for Windows® VistaTM Premium 2007 and Basic Logo For system integrators and users who purchase this motherboard, please refer to Premium Discrete requirement at http://www.asrock.com * If the onboard VGA supports DVI, it must ...also support HDCP function to qualify for Windows® VistaTM Premium 2007 logo. * After June 1, 2007, all Windows® VistaTM systems are required to meet above . * ...
...of onboard VGA to 64MB. 1.3 Minimum Hardware Requirement Table for Windows® VistaTM Premium 2007 and Basic Logo For system integrators and users who purchase this motherboard, please refer to Premium Discrete requirement at http://www.asrock.com * If the onboard VGA supports DVI, it must ...also support HDCP function to qualify for Windows® VistaTM Premium 2007 logo. * After June 1, 2007, all Windows® VistaTM systems are required to meet above . * ...

User Manual
Page 18
... on PCI Express VGA card, you wish to page 16 for proper expansion card installation procedures for the diaplay icon identified by the number 2. For Windows® 2000 / XP / XP 64-bit OS: Right click the desktop, choose "Properties", and select the "Settings" tab so that the value you have installed... a multi-monitor display. Click the "Identify" button to display a large number on VGA card is no need to apply these new values. Click "Extend my Windows desktop onto this motherboard. 4.
... on PCI Express VGA card, you wish to page 16 for proper expansion card installation procedures for the diaplay icon identified by the number 2. For Windows® 2000 / XP / XP 64-bit OS: Right click the desktop, choose "Properties", and select the "Settings" tab so that the value you have installed... a multi-monitor display. Click the "Identify" button to display a large number on VGA card is no need to apply these new values. Click "Extend my Windows desktop onto this motherboard. 4.
User Manual
Page 19
... in their equipment, it is compatible. 19 such as it is highly recommended that the HDTV or LCD monitor you purchase is being transmitted. For Windows® VistaTM / VistaTM 64-bit OS: Right click the desktop, choose "Personalize", and select the "Display Settings" tab so that you can enjoy the superior...
... in their equipment, it is compatible. 19 such as it is highly recommended that the HDTV or LCD monitor you purchase is being transmitted. For Windows® VistaTM / VistaTM 64-bit OS: Right click the desktop, choose "Personalize", and select the "Display Settings" tab so that you can enjoy the superior...
User Manual
Page 20
... driver is available. Enter BIOS SETUP UTILITY Advanced screen Chipset Configuration. Set the option "OnBoard HDMI HD Audio" to [Auto]. Step 2: Enter Windows® to your system manually. Click "Start" button, select "Settings", and then click "Control Panel". Change the default setting "Speaker" to... HDMI interface. Step 3: Reboot your system. A. Install "Onboard HDMI HD Audio Driver" from ASRock Support CD to HDMI adapter is available. 20 For Windows® VistaTM / VistaTM 64-bit OS Step 1: Set up BIOS. Click "Hardware and Sound", and click "Sound...
... driver is available. Enter BIOS SETUP UTILITY Advanced screen Chipset Configuration. Set the option "OnBoard HDMI HD Audio" to [Auto]. Step 2: Enter Windows® to your system manually. Click "Start" button, select "Settings", and then click "Control Panel". Change the default setting "Speaker" to... HDMI interface. Step 3: Reboot your system. A. Install "Onboard HDMI HD Audio Driver" from ASRock Support CD to HDMI adapter is available. 20 For Windows® VistaTM / VistaTM 64-bit OS Step 1: Set up BIOS. Click "Hardware and Sound", and click "Sound...
User Manual
Page 24
...MIC) to install your system. 2. C. MIC_RET and OUT_RET are for AC'97 audio panel. Enter Advanced Settings, and then select Chipset Configuration. D. For Windows® 2000 / XP / XP 64-bit OS: Click "Audio I/O", select "Connector Settings" , choose "Disable front panel jack detection", and save the ...Auto] to the front panel audio header as below: A. B. If you use AC'97 audio panel, please install it to [Enabled]. For Windows® VistaTM / VistaTM 64-bit OS: Click the right-top "Folder" icon , choose "Disable front panel jack detection", and save the ...
...MIC) to install your system. 2. C. MIC_RET and OUT_RET are for AC'97 audio panel. Enter Advanced Settings, and then select Chipset Configuration. D. For Windows® 2000 / XP / XP 64-bit OS: Click "Audio I/O", select "Connector Settings" , choose "Disable front panel jack detection", and save the ...Auto] to the front panel audio header as below: A. B. If you use AC'97 audio panel, please install it to [Enabled]. For Windows® VistaTM / VistaTM 64-bit OS: Click the right-top "Folder" icon , choose "Disable front panel jack detection", and save the ...


