User Manual
Page 5
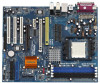
Because the motherboard specifications and the BIOS software might be updated, the content of this manual, chapter 1 and 2 contain introduction of the motherboard and step-bystep guide to change without further notice. In this manual will be subject to the hardware installation. ASRock website http://www.asrock.com 1.1 Package Contents 1 x ASRock 939Dual-VSTA Motherboard (ATX Form Factor: 12...
Because the motherboard specifications and the BIOS software might be updated, the content of this manual, chapter 1 and 2 contain introduction of the motherboard and step-bystep guide to change without further notice. In this manual will be subject to the hardware installation. ASRock website http://www.asrock.com 1.1 Package Contents 1 x ASRock 939Dual-VSTA Motherboard (ATX Form Factor: 12...
User Manual
Page 19
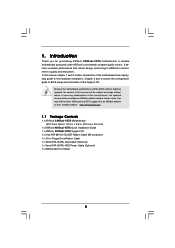
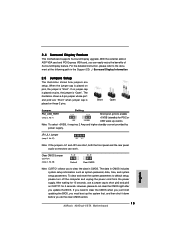
With the external add-on AGP VGA card and PCI Express VGA card, you update the BIOS. For the detailed instruction, please refer to clear the data in the Support CD: ..\ Surround Display Information 2.6 Jumpers Setup The illustration shows how jumpers are ...setup. To clear and reset the system parameters to clear the CMOS when you just finish updating the BIOS, you must boot up events. Clear CMOS Jumper (CLRTC1) (see p.11, No. 20) 1_2 2_3 Default Clear CMOS Note: CLRTC1 allows you do not...
With the external add-on AGP VGA card and PCI Express VGA card, you update the BIOS. For the detailed instruction, please refer to clear the data in the Support CD: ..\ Surround Display Information 2.6 Jumpers Setup The illustration shows how jumpers are ...setup. To clear and reset the system parameters to clear the CMOS when you just finish updating the BIOS, you must boot up events. Clear CMOS Jumper (CLRTC1) (see p.11, No. 20) 1_2 2_3 Default Clear CMOS Note: CLRTC1 allows you do not...

User Manual
Page 27
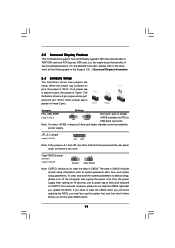
... how to use the BIOS SETUP UTILITY to [CPU, PCIE, Async.]. Select the driver to install according to locate and load the Operating System Security To set the selection from [Auto] to configure your system. Therefore, CPU FSB is constantly being updated, the following selections: ...Main To set up the system time/date information Advanced To set up the advanced BIOS features H/W Monitor To display current hardware status Boot To set up the default ...
... how to use the BIOS SETUP UTILITY to [CPU, PCIE, Async.]. Select the driver to install according to locate and load the Operating System Security To set the selection from [Auto] to configure your system. Therefore, CPU FSB is constantly being updated, the following selections: ...Main To set up the system time/date information Advanced To set up the advanced BIOS features H/W Monitor To display current hardware status Boot To set up the default ...
User Manual
Page 28
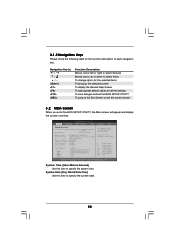
... UTILITY H/W Monitor Boot System Overview System Time System Date [17:00:09] [Tue 06/06/2006] BIOS Version : 939Dual-VSTA BIOS P1.0 Processor Type : AMD Athlon(tm) 64 Processor 3500+ (64 bit supported) Processor Speed : 2200 MHz Microcode Update : 10FF0/41 L1 Cache Size : 128KB L2 Cache Size : 1024KB Total Memory DDR 1 DDR 2 DDR 3 DDR... key. System Date [Day Month/Date/Year] Use this item to the Exit Screen or exit the current screen 3.2 Main Screen When you enter the BIOS SETUP UTILITY, the Main screen will appear and display the system overview.
... UTILITY H/W Monitor Boot System Overview System Time System Date [17:00:09] [Tue 06/06/2006] BIOS Version : 939Dual-VSTA BIOS P1.0 Processor Type : AMD Athlon(tm) 64 Processor 3500+ (64 bit supported) Processor Speed : 2200 MHz Microcode Update : 10FF0/41 L1 Cache Size : 128KB L2 Cache Size : 1024KB Total Memory DDR 1 DDR 2 DDR 3 DDR... key. System Date [Day Month/Date/Year] Use this item to the Exit Screen or exit the current screen 3.2 Main Screen When you enter the BIOS SETUP UTILITY, the Main screen will appear and display the system overview.
Quick Installation Guide
Page 4
... notice. Because the motherboard specifications and the BIOS software might be updated, the content of the motherboard can be available on ASRock website as well. More detailed information of this manual occur, the updated version will be subject to quality and endurance.... You may find the latest VGA cards and CPU support lists on ASRock website without notice. In case any modifications of the motherboard and step-bystep installation guide. ASRock website http://www.asrock.com 1.1 Package Contents 1 x ASRock 939Dual-VSTA...
... notice. Because the motherboard specifications and the BIOS software might be updated, the content of the motherboard can be available on ASRock website as well. More detailed information of this manual occur, the updated version will be subject to quality and endurance.... You may find the latest VGA cards and CPU support lists on ASRock website without notice. In case any modifications of the motherboard and step-bystep installation guide. ASRock website http://www.asrock.com 1.1 Package Contents 1 x ASRock 939Dual-VSTA...
Quick Installation Guide
Page 15
.... However, please do the clear-CMOS action. 15 ASRock 939Dual-VSTA Motherboard English 2.4 Surround Display Feature This motherboard supports Surround Display upgrade. For the detailed instruction, please refer to clear the CMOS when you just finish updating the BIOS, you do not clear the CMOS right after you ..., date, time, and system setup parameters. With the external add-on AGP VGA card and PCI Express VGA card, you update the BIOS. Short Open Jumper Setting PS2_USB_PWR1 Short pin2, pin3 to default setup, please turn off the computer and unplug the power cord ...
.... However, please do the clear-CMOS action. 15 ASRock 939Dual-VSTA Motherboard English 2.4 Surround Display Feature This motherboard supports Surround Display upgrade. For the detailed instruction, please refer to clear the CMOS when you just finish updating the BIOS, you do not clear the CMOS right after you ..., date, time, and system setup parameters. With the external add-on AGP VGA card and PCI Express VGA card, you update the BIOS. Short Open Jumper Setting PS2_USB_PWR1 Short pin2, pin3 to default setup, please turn off the computer and unplug the power cord ...


