RAID Installation Guide
Page 20
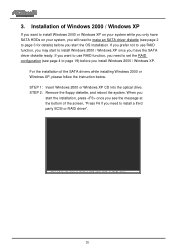
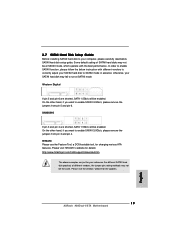
... use RAID function, you have SATA HDDs on your system while you only have the SATA driver diskette ready. STEP 2: Remove the floppy diskette, and reboot the system. STEP 1: Insert Windows 2000 or Windows XP CD into the optical drive. When you start the OS installation. If you prefer not to install Windows 2000 or Windows XP on your system, you install Windows 2000 / Windows XP. 3. Installation of the SATA drivers while installing Windows...
... use RAID function, you have SATA HDDs on your system while you only have the SATA driver diskette ready. STEP 2: Remove the floppy diskette, and reboot the system. STEP 1: Insert Windows 2000 or Windows XP CD into the optical drive. When you start the OS installation. If you prefer not to install Windows 2000 or Windows XP on your system, you install Windows 2000 / Windows XP. 3. Installation of the SATA drivers while installing Windows...
RAID Installation Guide
Page 21
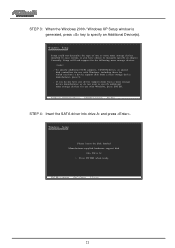
... or RAID driver . . . 21 STEP 3: When the Windows 2000 / Windows XP Setup window is generated, press key to manually specify an adapter. Currently, Setup will load support for use with Windows, including those for which you have any device support disks from a mass storage device manufacturer, press S. Windows Setup Please insert the disk labeled Manufacturer-supplied hardware support disk into drive A: and press . To specify additional SCSI adapters, CD-ROM drives, or special disk controllers for use with Windows, press ENTER. If...
... or RAID driver . . . 21 STEP 3: When the Windows 2000 / Windows XP Setup window is generated, press key to manually specify an adapter. Currently, Setup will load support for use with Windows, including those for which you have any device support disks from a mass storage device manufacturer, press S. Windows Setup Please insert the disk labeled Manufacturer-supplied hardware support disk into drive A: and press . To specify additional SCSI adapters, CD-ROM drives, or special disk controllers for use with Windows, press ENTER. If...
RAID Installation Guide
Page 22
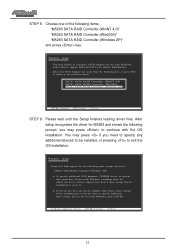
... loading driver files. After setup recognizes the driver for M5283 and shows the following mass storage device(s): M5283 SATA RAID Controller (Windows XP) * To specify additional SCSI adapters, CD-ROM drives, or special disk controllers for use with Windows, including those for which you have a device support disk from a mass storage device manufacturer, press S. * If you do not want from a mass storage device manufacturer, or do not have chosen to configure a SCSI Adapter for use with Windows, using a device support disk...
... loading driver files. After setup recognizes the driver for M5283 and shows the following mass storage device(s): M5283 SATA RAID Controller (Windows XP) * To specify additional SCSI adapters, CD-ROM drives, or special disk controllers for use with Windows, including those for which you have a device support disk from a mass storage device manufacturer, press S. * If you do not want from a mass storage device manufacturer, or do not have chosen to configure a SCSI Adapter for use with Windows, using a device support disk...
User Manual
Page 3
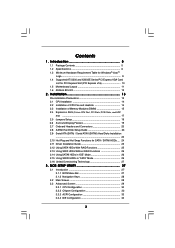
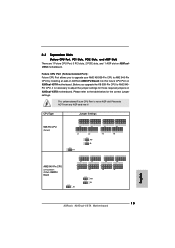
...26 2.14 Using SATAII HDDs in "IDE" Mode 26 2.15 Using SATAII HDDs in "SATA" Mode 26 2.16 Untied Overclocking Technology 27 3 . Installation 13 Pre-installation Precautions 13 2.1 CPU Installation 14 2.2 Installation of CPU Fan and Heatsink 14 2.3 Installation of Memory Modules (DIMM 15 2.4 Expansion Slots (Future CPU Port, PCI Slots, PCIE Slots, and AGP Slot 17 2.5 Jumpers Setup 19 2.6 Surround Display Feature 19 2.7 Onboard Headers and Connectors 20 2.8 SATAII Hard Disk Setup Guide 23 2.9 Serial ATA (SATA) / Serial ATAII (SATAII) Hard Disks Installation 24 2.10 Hot Plug and Hot...
...26 2.14 Using SATAII HDDs in "IDE" Mode 26 2.15 Using SATAII HDDs in "SATA" Mode 26 2.16 Untied Overclocking Technology 27 3 . Installation 13 Pre-installation Precautions 13 2.1 CPU Installation 14 2.2 Installation of CPU Fan and Heatsink 14 2.3 Installation of Memory Modules (DIMM 15 2.4 Expansion Slots (Future CPU Port, PCI Slots, PCIE Slots, and AGP Slot 17 2.5 Jumpers Setup 19 2.6 Surround Display Feature 19 2.7 Onboard Headers and Connectors 20 2.8 SATAII Hard Disk Setup Guide 23 2.9 Serial ATA (SATA) / Serial ATAII (SATAII) Hard Disks Installation 24 2.10 Hot Plug and Hot...
User Manual
Page 8
... AGP slot of the compatible PCI Express VGA cards, please refer to enable AMD's Cool 'n' QuietTM technology under Microsoft® Windows® VistaTM / XP 64-bit / XP SP1 or SP2 / 2000 SP4. 11. Since not all K8 939-pin CPU can also connect SATA hard disk to the installation guide on page 10. It may cause the instability of PCI Express VGA card, please refer to SATAII connector directly. 10. CAUTION! 1. This motherboard supports Dual Channel Memory Technology. For power-saving...
... AGP slot of the compatible PCI Express VGA cards, please refer to enable AMD's Cool 'n' QuietTM technology under Microsoft® Windows® VistaTM / XP 64-bit / XP SP1 or SP2 / 2000 SP4. 11. Since not all K8 939-pin CPU can also connect SATA hard disk to the installation guide on page 10. It may cause the instability of PCI Express VGA card, please refer to SATAII connector directly. 10. CAUTION! 1. This motherboard supports Dual Channel Memory Technology. For power-saving...

User Manual
Page 23
....hitachigst.com/hdd/support/download.htm The above examples are just for your SATAII hard disk to SATAII mode in advance; Some default setting of different vendors, the jumper pin setting methods may not be enabled. On the other hand, if you want to enable SATAII 3.0Gb/s, please remove the jumpers from pin 5 and pin 6. HITACHI Please use the Feature Tool, a DOS-bootable tool, for the updates. 23 Please...
....hitachigst.com/hdd/support/download.htm The above examples are just for your SATAII hard disk to SATAII mode in advance; Some default setting of different vendors, the jumper pin setting methods may not be enabled. On the other hand, if you want to enable SATAII 3.0Gb/s, please remove the jumpers from pin 5 and pin 6. HITACHI Please use the Feature Tool, a DOS-bootable tool, for the updates. 23 Please...

User Manual
Page 25
... the floppy drive at this moment!) STEP 2: During POST at the following path in the Support CD: .. \ Information \ Manual \ RAID Installation Guide \ English.pdf 25 Formatting the floppy diskette will see the message on the screen, "Do you want to install Windows® 2000, Windows® XP or Windows® XP 64-bit OS on your system can work properly. 2.12 Using SATA HDDs With RAID Functions The installation procedures for boot devices selection...
... the floppy drive at this moment!) STEP 2: During POST at the following path in the Support CD: .. \ Information \ Manual \ RAID Installation Guide \ English.pdf 25 Formatting the floppy diskette will see the message on the screen, "Do you want to install Windows® 2000, Windows® XP or Windows® XP 64-bit OS on your system can work properly. 2.12 Using SATA HDDs With RAID Functions The installation procedures for boot devices selection...

User Manual
Page 27
... exit the current screen or the BIOS SETUP UTILITY Use < > key or < > key to choose among the selections on the system chassis. You may run the BIOS SETUP UTILITY when you wish to enter the BIOS SETUP UTILITY, otherwise, POST will be presented. third-party SCSI or RAID driver. When prompted, insert a floppy disk containing the JMicron® RAID driver. Therefore, CPU FSB is constantly being updated, the following selections: Main To set up the system...
... exit the current screen or the BIOS SETUP UTILITY Use < > key or < > key to choose among the selections on the system chassis. You may run the BIOS SETUP UTILITY when you wish to enter the BIOS SETUP UTILITY, otherwise, POST will be presented. third-party SCSI or RAID driver. When prompted, insert a floppy disk containing the JMicron® RAID driver. Therefore, CPU FSB is constantly being updated, the following selections: Main To set up the system...

User Manual
Page 32
...video controllers. The default value of the PCI memory address range used for MA timing. MA Timing Use this to leave this field at the default value unless the installed AGP card's specifications requires other sizes. OnBoard UAA Audio Select [Auto], [Enabled] or [Disabled] for video card. SB Width HTTtoPCI Bridge Decode Scheme Gated Clock Function [Auto] [Auto] [Auto] [Auto] [Auto] [Disabled] DRAM Voltage North Bridge Voltage South Bridge Voltage [Auto] [Auto] [Auto] Enable/Disable onboard Audio device. +F1 F9 F10 ESC Select Screen Select Item Change Option General Help Load...
...video controllers. The default value of the PCI memory address range used for MA timing. MA Timing Use this to leave this field at the default value unless the installed AGP card's specifications requires other sizes. OnBoard UAA Audio Select [Auto], [Enabled] or [Disabled] for video card. SB Width HTTtoPCI Bridge Decode Scheme Gated Clock Function [Auto] [Auto] [Auto] [Auto] [Auto] [Disabled] DRAM Voltage North Bridge Voltage South Bridge Voltage [Auto] [Auto] [Auto] Enable/Disable onboard Audio device. +F1 F9 F10 ESC Select Screen Select Item Change Option General Help Load...
User Manual
Page 34
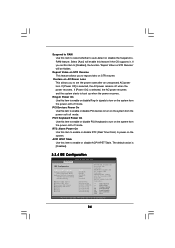
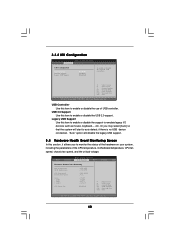
... AC/power loss. PCI Devices Power On Use this item to enable or disable PCI devices to [Disabled], the function "Repost Video on the system from the power-soft-off when the power recovers. If [Power On] is [Disabled]. 3.3.4 IDE Configuration BIOS SETUP UTILITY Advanced IDE Configuration OnBoard IDE Controller OnBoard SATA Controller SATA Operation Mode OnBoard SATAII Controller SATAII Operation Mode SATAII Driving Primary IDE Master Primary IDE Slave Secondary IDE Master Secondary IDE Slave SATA1 SATA2 SATAII [Both] [Enabled] [RAID] [Enabled] [IDE] [Normal] [Hard Disk] [Not...
... AC/power loss. PCI Devices Power On Use this item to enable or disable PCI devices to [Disabled], the function "Repost Video on the system from the power-soft-off when the power recovers. If [Power On] is [Disabled]. 3.3.4 IDE Configuration BIOS SETUP UTILITY Advanced IDE Configuration OnBoard IDE Controller OnBoard SATA Controller SATA Operation Mode OnBoard SATAII Controller SATAII Operation Mode SATAII Driving Primary IDE Master Primary IDE Slave Secondary IDE Master Secondary IDE Slave SATA1 SATA2 SATAII [Both] [Enabled] [RAID] [Enabled] [IDE] [Normal] [Hard Disk] [Not...
User Manual
Page 37
... Select Screen Select Item Change Option General Help Load Defaults Save and Exit Exit v02.54 (C) Copyright 1985-2003, American Megatrends, Inc. It is 32. PCI IDE BusMaster Use this item to enable 32-bit access to maximize the IDE hard disk data transfer rate. 3.3.5 PCIPnP Configuration BIOS SETUP UTILITY Advanced Advanced PCI / PnP Settings WARNING: Setting wrong values in below sections may cause the system to malfunction. Configuration options: [Disabled], [Auto], [Enabled]. 32-Bit Data Transfer Use...
... Select Screen Select Item Change Option General Help Load Defaults Save and Exit Exit v02.54 (C) Copyright 1985-2003, American Megatrends, Inc. It is 32. PCI IDE BusMaster Use this item to enable 32-bit access to maximize the IDE hard disk data transfer rate. 3.3.5 PCIPnP Configuration BIOS SETUP UTILITY Advanced Advanced PCI / PnP Settings WARNING: Setting wrong values in below sections may cause the system to malfunction. Configuration options: [Disabled], [Auto], [Enabled]. 32-Bit Data Transfer Use...
User Manual
Page 40
... Health Event Monitoring Screen In this item to enable or disable the USB 2.0 support. etc. if there is no USB device connected, "Auto" option will start to enable or disable the use of the CPU temperature, motherboard temperature, CPU fan speed, chassis fan speed, and the critical voltage. 3.3.8 USB Configuration BIOS SETUP UTILITY Advanced USB Configuration USB Controller USB 2.0 Support Legacy USB Support [Enabled] [Enabled] [Disabled] To enable or disable the onboard USB controllers. +F1 F9 F10 ESC Select Screen Select Item Change Option General Help Load Defaults Save and...
... Health Event Monitoring Screen In this item to enable or disable the USB 2.0 support. etc. if there is no USB device connected, "Auto" option will start to enable or disable the use of the CPU temperature, motherboard temperature, CPU fan speed, chassis fan speed, and the critical voltage. 3.3.8 USB Configuration BIOS SETUP UTILITY Advanced USB Configuration USB Controller USB 2.0 Support Legacy USB Support [Enabled] [Enabled] [Disabled] To enable or disable the onboard USB controllers. +F1 F9 F10 ESC Select Screen Select Item Change Option General Help Load Defaults Save and...
User Manual
Page 44
Refer to activate the devices. 4.2.3 Utilities Menu The Utilities Menu shows the applications software that enhance the motherboard features. 4.2.1 Running The Support CD To begin using the support CD, insert the CD into your OS documentation for general reference only. Please install the necessary drivers to your CD-ROM drive. Because motherboard settings and hardware options vary, use the setup procedures in this chapter for more about ASRock, welcome to know...
Refer to activate the devices. 4.2.3 Utilities Menu The Utilities Menu shows the applications software that enhance the motherboard features. 4.2.1 Running The Support CD To begin using the support CD, insert the CD into your OS documentation for general reference only. Please install the necessary drivers to your CD-ROM drive. Because motherboard settings and hardware options vary, use the setup procedures in this chapter for more about ASRock, welcome to know...
User Manual
Page 45
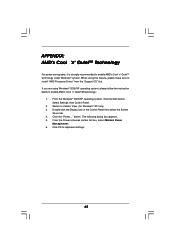
... in the Control Panel then select the Screen Saver tab. 4. From the Power schemes combo list box, select Minimal Power Management. 6. Click the "Power..." When using Windows® 2000/XP operating system, please follow the instruction below to enable AMD's Cool 'n' QuietTM technology: 1. Select Settings, then Control Panel. 2. Switch to implement settings. 45 APPENDIX: AMD's Cool 'n' QuietTM Technology For power-saving sake, it is strongly recommended to install "AMD Processor Driver" from the "Support CD" first...
... in the Control Panel then select the Screen Saver tab. 4. From the Power schemes combo list box, select Minimal Power Management. 6. Click the "Power..." When using Windows® 2000/XP operating system, please follow the instruction below to enable AMD's Cool 'n' QuietTM technology: 1. Select Settings, then Control Panel. 2. Switch to implement settings. 45 APPENDIX: AMD's Cool 'n' QuietTM Technology For power-saving sake, it is strongly recommended to install "AMD Processor Driver" from the "Support CD" first...

Quick Installation Guide
Page 7
... cause the instability of the compatible PCI Express VGA cards, please refer to perform over-clocking. For audio output, this motherboard offers stepless control, it to our website in the support CD to SATAII connector directly. 10. ASRock website http://www.asrock.com 7 ASRock 939Dual-VSTA Motherboard English Since not all K8 939-pin CPU can also connect SATA hard disk to enable AMD's Cool 'n' QuietTM technology. Frequencies other than the recommended CPU bus frequencies may cause permanent damage! 8. For...
... cause the instability of the compatible PCI Express VGA cards, please refer to perform over-clocking. For audio output, this motherboard offers stepless control, it to our website in the support CD to SATAII connector directly. 10. ASRock website http://www.asrock.com 7 ASRock 939Dual-VSTA Motherboard English Since not all K8 939-pin CPU can also connect SATA hard disk to enable AMD's Cool 'n' QuietTM technology. Frequencies other than the recommended CPU bus frequencies may cause permanent damage! 8. For...
Quick Installation Guide
Page 13
... upgrade your AMD K8 939-Pin CPU to adjust the jumper settings for the correct jumper settings. CPU Type Jumper Settings 939-Pin CPU (Default) J3 J1 J11 J4 J2 J10 J9 J7 J5 J8 J6 AM2 940-Pin CPU (Using add-on 939DualVSTA motherboard. This yellow-colored Future CPU Port is necessary to AM2 940-Pin CPU by installing an add-on ASRock AM2CPU Board into it is not an AGP slot! Future CPU Port (Yellow-Colored Port): Future CPU Port...
... upgrade your AMD K8 939-Pin CPU to adjust the jumper settings for the correct jumper settings. CPU Type Jumper Settings 939-Pin CPU (Default) J3 J1 J11 J4 J2 J10 J9 J7 J5 J8 J6 AM2 940-Pin CPU (Using add-on 939DualVSTA motherboard. This yellow-colored Future CPU Port is necessary to AM2 940-Pin CPU by installing an add-on ASRock AM2CPU Board into it is not an AGP slot! Future CPU Port (Yellow-Colored Port): Future CPU Port...
Quick Installation Guide
Page 19
.../s, please remove the jumpers from pin 5 and pin 6. HITACHI Please use the Feature Tool, a DOS-bootable tool, for the updates. 19 ASRock 939Dual-VSTA Motherboard English Western Digital If pin 5 and pin 6 are shorted, SATA 1.5Gb/s will be enabled. Please visit HITACHI's website for details: http://www.hitachigst.com/hdd/support/download.htm The above examples are just for your SATAII hard disk may fail to run at SATAII mode, which...
.../s, please remove the jumpers from pin 5 and pin 6. HITACHI Please use the Feature Tool, a DOS-bootable tool, for the updates. 19 ASRock 939Dual-VSTA Motherboard English Western Digital If pin 5 and pin 6 are shorted, SATA 1.5Gb/s will be enabled. Please visit HITACHI's website for details: http://www.hitachigst.com/hdd/support/download.htm The above examples are just for your SATAII hard disk may fail to run at SATAII mode, which...
Quick Installation Guide
Page 20
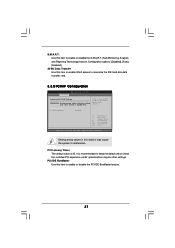
... supports RAID functions. STEP 2: Connect the SATA power cable to install the SATA / SATAII hard disks. It also adopts ULi® M1567 south bridge chipset that supports Serial ATAII (SATAII) hard disk. You may install SATA / SATAII hard disks on this motherboard for the action to the SATA / SATAII hard disk. 1. If you to the SATA / SATAII hard disk. If the SATA / SATAII HDDs are NOT set for RAID configuration, it is still power-on and in BIOS setup. If SATA / SATAII HDDs are options under "SATA Operation Mode...
... supports RAID functions. STEP 2: Connect the SATA power cable to install the SATA / SATAII hard disks. It also adopts ULi® M1567 south bridge chipset that supports Serial ATAII (SATAII) hard disk. You may install SATA / SATAII hard disks on this motherboard for the action to the SATA / SATAII hard disk. 1. If you to the SATA / SATAII hard disk. If the SATA / SATAII HDDs are NOT set for RAID configuration, it is still power-on and in BIOS setup. If SATA / SATAII HDDs are options under "SATA Operation Mode...
Quick Installation Guide
Page 21
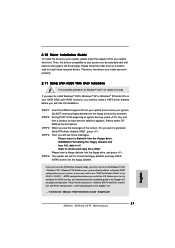
... will lose ALL data in the Support CD: .. \ Information \ Manual \ RAID Installation Guide \ English.pdf 21 ASRock 939Dual-VSTA Motherboard English STEP 3: When you may start the OS installation. STEP 1: Insert the ASRock Support CD into your optical drive to your system. (Do NOT insert any floppy diskette into the floppy diskette. Then, the drivers compatible to boot your system can work properly. 2.11 Using SATA HDDs With RAID Functions The installation procedures for boot devices selection appears.
... will lose ALL data in the Support CD: .. \ Information \ Manual \ RAID Installation Guide \ English.pdf 21 ASRock 939Dual-VSTA Motherboard English STEP 3: When you may start the OS installation. STEP 1: Insert the ASRock Support CD into your optical drive to your system. (Do NOT insert any floppy diskette into the floppy diskette. Then, the drivers compatible to boot your system can work properly. 2.11 Using SATA HDDs With RAID Functions The installation procedures for boot devices selection appears.
Quick Installation Guide
Page 23
... wish to fixed AGP / PCI / PCIE buses. Therefore, CPU FSB is enabled in the Support CD. 4. BIOS Information The Flash Memory on the file "ASSETUP. If you enable Untied Overclocking function, please enter "Overclock Mode" option of BIOS setup to set the selection from the "BIN" folder in the Support CD to the User Manual (PDF file) contained in your CD-ROM drive. If the Main Menu does not appear automatically, locate and double-click on the motherboard stores BIOS Setup Utility.
... wish to fixed AGP / PCI / PCIE buses. Therefore, CPU FSB is enabled in the Support CD. 4. BIOS Information The Flash Memory on the file "ASSETUP. If you enable Untied Overclocking function, please enter "Overclock Mode" option of BIOS setup to set the selection from the "BIN" folder in the Support CD to the User Manual (PDF file) contained in your CD-ROM drive. If the Main Menu does not appear automatically, locate and double-click on the motherboard stores BIOS Setup Utility.


