
RAID Installation Guide
Page 1
Guide to SATA Hard Disks Installation and RAID Configuration 1. Guide to SATA Hard Disks Installation 2 1.1 Serial ATA (SATA) Hard Disks Installation ...... 2 1.2 Making An SATA Driver Diskette 2 2. Guide to RAID Configurations (RAID 0 / RAID 1 / JBOD 4 2.1 Introduction of RAID 4 2.2 RAID Configuration Precautions 5 2.3 RAID 0 Configuraion 6 2.4 RAID 1 Configuration 10 2.5 JBOD Configuration 16 3. Guide to Windows 2000 / Windows XP Installation 20
Guide to SATA Hard Disks Installation and RAID Configuration 1. Guide to SATA Hard Disks Installation 2 1.1 Serial ATA (SATA) Hard Disks Installation ...... 2 1.2 Making An SATA Driver Diskette 2 2. Guide to RAID Configurations (RAID 0 / RAID 1 / JBOD 4 2.1 Introduction of RAID 4 2.2 RAID Configuration Precautions 5 2.3 RAID 0 Configuraion 6 2.4 RAID 1 Configuration 10 2.5 JBOD Configuration 16 3. Guide to Windows 2000 / Windows XP Installation 20
RAID Installation Guide
Page 2
... chassis. STEP 6: Connect the SATA power cable to the SATA hard disk. 1.2 Making An SATA Driver Diskette If you want to the motherboard's secondary SATA connector (SATA2). STEP 1: Insert the ASRock Support CD into your optical drive to boot your system. (Do NOT insert any floppy diskette into... the drive bays of the second SATA data cable to generate Serial ATA driver diskette [YN]?", press . 2 STEP 2: Connect one end ...
... chassis. STEP 6: Connect the SATA power cable to the SATA hard disk. 1.2 Making An SATA Driver Diskette If you want to the motherboard's secondary SATA connector (SATA2). STEP 1: Insert the ASRock Support CD into your optical drive to boot your system. (Do NOT insert any floppy diskette into... the drive bays of the second SATA data cable to generate Serial ATA driver diskette [YN]?", press . 2 STEP 2: Connect one end ...
RAID Installation Guide
Page 3
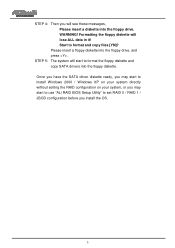
... XP on your system directly without setting the RAID configuration on your system, or you may start to format the floppy diskette and copy SATA drivers into the floppy diskette. STEP 4: Then you install the OS. 3 Please insert a floppy diskette into the floppy drive. Formatting the floppy diskette will see these...
... XP on your system directly without setting the RAID configuration on your system, or you may start to format the floppy diskette and copy SATA drivers into the floppy diskette. STEP 4: Then you install the OS. 3 Please insert a floppy diskette into the floppy drive. Formatting the floppy diskette will see these...
RAID Installation Guide
Page 20
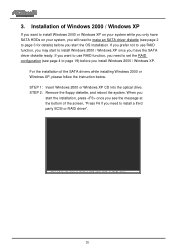
...When you start the installation, press once you see page 2 to install a third party SCSI or RAID driver". Press F6 if you have SATA HDDs on your system while you only have the SATA driver diskette ready. 3. STEP 1: Insert Windows 2000 or Windows XP CD into the optical drive. If you prefer...function, you need to set the RAID configuration (see page 4 to page 19) before you need to make an SATA driver diskette (see the message at the bottom of the SATA drivers while installing Windows 2000 or Windows XP, please follow the instruction below. If you want to install Windows 2000 or...
...When you start the installation, press once you see page 2 to install a third party SCSI or RAID driver". Press F6 if you have SATA HDDs on your system while you only have the SATA driver diskette ready. 3. STEP 1: Insert Windows 2000 or Windows XP CD into the optical drive. If you prefer...function, you need to set the RAID configuration (see page 4 to page 19) before you need to make an SATA driver diskette (see the message at the bottom of the SATA drivers while installing Windows 2000 or Windows XP, please follow the instruction below. If you want to install Windows 2000 or...
RAID Installation Guide
Page 21
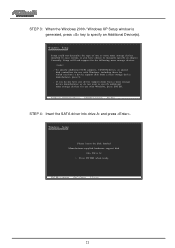
... Setup Please insert the disk labeled Manufacturer-supplied hardware support disk into drive A: and press . STEP 4: Insert the SATA driver into Drive A: Press ENTER when ready. STEP 3: When the Windows 2000 / Windows XP Setup window is generated, press key...devices for use with Windows, press ENTER. PS=reSspsecFi6fy iAf dydoituionnaeledDetvoiceinstalEl NaTEthRi=rdCopnatirntyue SCSFI 3=orExRitAID driver . . . PErNeTssERF=6Coifntiynouue neeEdSCto=Cinanstcaell a Fth3i=rdExpitarty SCSI or RAID driver . . . 21 Windows Setup Setup could not determine the type of one or more mass...
... Setup Please insert the disk labeled Manufacturer-supplied hardware support disk into drive A: and press . STEP 4: Insert the SATA driver into Drive A: Press ENTER when ready. STEP 3: When the Windows 2000 / Windows XP Setup window is generated, press key...devices for use with Windows, press ENTER. PS=reSspsecFi6fy iAf dydoituionnaeledDetvoiceinstalEl NaTEthRi=rdCopnatirntyue SCSFI 3=orExRitAID driver . . . PErNeTssERF=6Coifntiynouue neeEdSCto=Cinanstcaell a Fth3i=rdExpitarty SCSI or RAID driver . . . 21 Windows Setup Setup could not determine the type of one or more mass...
RAID Installation Guide
Page 22
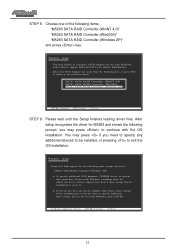
... not want from a mass storage device manufacturer, press S. * If you want to the previous screen. After setup recognizes the driver for use with the OS installation. You may press if you may press to exit the OS installation. Windows Setup You have ...RAID Controller (Win2000) M5283 SATA RAID Controller (Windows XP) EPrNeTssERF=6Coifntiynouue neeEdSCto=Cinanstcaell a Fth3i=rdExpitarty SCSI or RAID driver . . . STEP 6: Please wait until the Setup finishes loading driver files. SP=reSspsecFi6fy iAf dydoituionnaeledDetvoiceinstalEl NaTEthRi=rdCopnatirntyue SCSFI 3=orExRitAID...
... not want from a mass storage device manufacturer, press S. * If you want to the previous screen. After setup recognizes the driver for use with the OS installation. You may press if you may press to exit the OS installation. Windows Setup You have ...RAID Controller (Win2000) M5283 SATA RAID Controller (Windows XP) EPrNeTssERF=6Coifntiynouue neeEdSCto=Cinanstcaell a Fth3i=rdExpitarty SCSI or RAID driver . . . STEP 6: Please wait until the Setup finishes loading driver files. SP=reSspsecFi6fy iAf dydoituionnaeledDetvoiceinstalEl NaTEthRi=rdCopnatirntyue SCSFI 3=orExRitAID...
User Manual
Page 3
... Hardware Requirement Table for Windows® VistaTM Logo 9 1.4 Supported ATi X300 and X300SE Series PCI Express VGA Card List for SATA / SATAII HDDs .... 24 2.11 Driver Installation Guide 25 2.12 Using SATA HDDs With RAID Functions 25 2.13 Using SATA HDDs Without RAID Functions 26 2.14 Using SATAII HDDs in "IDE...) / Serial ATAII (SATAII) Hard Disks Installation 24 2.10 Hot Plug and Hot Swap Functions for PCI Express Slot (PCI Express x16 10 1.5 Motherboard Layout 11 1.6 ASRock 8CH I/O 12 2 .
... Hardware Requirement Table for Windows® VistaTM Logo 9 1.4 Supported ATi X300 and X300SE Series PCI Express VGA Card List for SATA / SATAII HDDs .... 24 2.11 Driver Installation Guide 25 2.12 Using SATA HDDs With RAID Functions 25 2.13 Using SATA HDDs Without RAID Functions 26 2.14 Using SATAII HDDs in "IDE...) / Serial ATAII (SATAII) Hard Disks Installation 24 2.10 Hot Plug and Hot Swap Functions for PCI Express Slot (PCI Express x16 10 1.5 Motherboard Layout 11 1.6 ASRock 8CH I/O 12 2 .

User Manual
Page 4
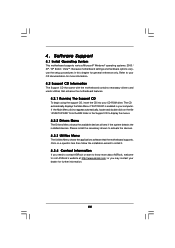
Software Support 44 4.1 Install Operating System 44 4.2 Support CD Information 44 4.2.1 Running Support CD 44 4.2.2 Drivers Menu 44 4.2.3 Utilities Menu 44 4.2.4 Contact Information 44 APPENDIX: AMD's Cool 'n' QuietTM Technology ...... 45 4 3.3.5 PCIPnP Configuration 37 3.3.6 Floppy Configuration 38 3.3.7 Super IO Configuration 38 3.3.8 USB Configuration 40 3.4 Hardware Health Event Monitoring Screen 40 3.5 Boot Screen 41 3.5.1 Boot Settings Configuration 41 3.6 Security Screen 42 3.7 Exit Screen 43 4 .
Software Support 44 4.1 Install Operating System 44 4.2 Support CD Information 44 4.2.1 Running Support CD 44 4.2.2 Drivers Menu 44 4.2.3 Utilities Menu 44 4.2.4 Contact Information 44 APPENDIX: AMD's Cool 'n' QuietTM Technology ...... 45 4 3.3.5 PCIPnP Configuration 37 3.3.6 Floppy Configuration 38 3.3.7 Super IO Configuration 38 3.3.8 USB Configuration 40 3.4 Hardware Health Event Monitoring Screen 40 3.5 Boot Screen 41 3.5.1 Boot Settings Configuration 41 3.6 Security Screen 42 3.7 Exit Screen 43 4 .
User Manual
Page 7
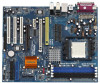
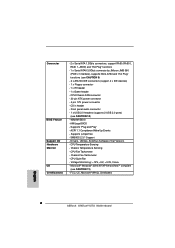
... 9) - 2 x ATA133 IDE connectors (support 4 x IDE devices) - 1 x Floppy connector - 1 x IR header - 1 x Game header - CPU/Chassis FAN connector - 20 pin ATX power connector - 4 pin 12V power connector - Drivers, Utilities, AntiVirus Software (Trial Version) - SMBIOS 2.3.1 Support - Voltage Monitoring: +12V, +5V, +3.3V, Vcore - AMI Legal BIOS - Front panel audio connector - 1 x USB 2.0 headers (supports 2 USB 2.0 ports...
... 9) - 2 x ATA133 IDE connectors (support 4 x IDE devices) - 1 x Floppy connector - 1 x IR header - 1 x Game header - CPU/Chassis FAN connector - 20 pin ATX power connector - 4 pin 12V power connector - Drivers, Utilities, AntiVirus Software (Trial Version) - SMBIOS 2.3.1 Support - Voltage Monitoring: +12V, +5V, +3.3V, Vcore - AMI Legal BIOS - Front panel audio connector - 1 x USB 2.0 headers (supports 2 USB 2.0 ports...
User Manual
Page 8
... instability of the compatible PCI Express VGA cards, please refer to perform over-clocking. Microsoft® Windows® VistaTM driver is detected, the system will update it back again. ASRock website http://www.asrock.com 8 We will automatically shutdown. Before you implement Dual Channel Memory Technology, make sure to SATAII mode. You can...
... instability of the compatible PCI Express VGA cards, please refer to perform over-clocking. Microsoft® Windows® VistaTM driver is detected, the system will update it back again. ASRock website http://www.asrock.com 8 We will automatically shutdown. Before you implement Dual Channel Memory Technology, make sure to SATAII mode. You can...

User Manual
Page 9
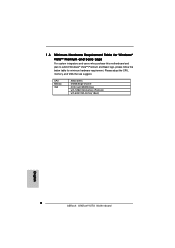
Please adopt the CPU, memory, and VGA that we suggest. CPU Memory VGA Athlon 3000+ 512MB Single Channel DX9.0 with WDDM Driver with 128bit VGA memory (Premium) with 64bit VGA memory (Basic) 9 1.3 Minimum Hardware Requirement Table for Windows® VistaTM Premium and Basic Logo For system integrators and users who purchase this motherboard and plan to submit Windows® VistaTM Premium and Basic logo, please follow the below table for minimum hardware requirement.
Please adopt the CPU, memory, and VGA that we suggest. CPU Memory VGA Athlon 3000+ 512MB Single Channel DX9.0 with WDDM Driver with 128bit VGA memory (Premium) with 64bit VGA memory (Basic) 9 1.3 Minimum Hardware Requirement Table for Windows® VistaTM Premium and Basic Logo For system integrators and users who purchase this motherboard and plan to submit Windows® VistaTM Premium and Basic logo, please follow the below table for minimum hardware requirement.
User Manual
Page 24
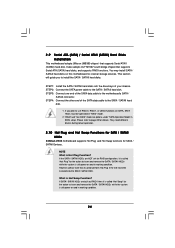
... / SATAII hard disk. 1. "RAID" and "non-RAID" mode are NOT set for SATA / SATAII Devices. They need different drivers during actual operation. 2.10 Hot Plug and Hot Swap Functions for SATA / SATAII HDDs 939Dual-VSTA motherboard supports Hot Plug and Hot Swap functions for RAID configuration, it cannot perform Hot Plug if the...
... / SATAII hard disk. 1. "RAID" and "non-RAID" mode are NOT set for SATA / SATAII Devices. They need different drivers during actual operation. 2.10 Hot Plug and Hot Swap Functions for SATA / SATAII HDDs 939Dual-VSTA motherboard supports Hot Plug and Hot Swap functions for RAID configuration, it cannot perform Hot Plug if the...

User Manual
Page 25
...the OS. Please select CDROM as the boot device. Formatting the floppy diskette will see the message on the support CD driver page. Then, the drivers compatible to check the installation guide in the Support CD for proper configuration. Please insert a floppy diskette into your optical ...these messages, Please insert a diskette into the floppy diskette. STEP 1: Insert the ASRock Support CD into the floppy drive, and press . STEP 3: When you may start to change. Start to install those required drivers. Please follow the order from up , press key, and then a window for ...
...the OS. Please select CDROM as the boot device. Formatting the floppy diskette will see the message on the support CD driver page. Then, the drivers compatible to check the installation guide in the Support CD for proper configuration. Please insert a floppy diskette into your optical ...these messages, Please insert a diskette into the floppy diskette. STEP 1: Insert the ASRock Support CD into the floppy drive, and press . STEP 3: When you may start to change. Start to install those required drivers. Please follow the order from up , press key, and then a window for ...

User Manual
Page 26
... to install a 26 STEP 3: Start Windows® 2000, Windows® XP or Windows® XP 64-bit OS installation. After making a SATA driver diskette, you can start the OS installation. At the beginning of Windows® setup, press F6 to [non-RAID]. Please follow the below procedures.... At the beginning of Windows® setup, press F6 to change . Then make a SATAII driver diskette. STEP 1: Enter "SATA Operation Mode" in "IDE" Mode The installation procedures for Windows® VistaTM are subject to [SATA]. If you want...
... to install a 26 STEP 3: Start Windows® 2000, Windows® XP or Windows® XP 64-bit OS installation. After making a SATA driver diskette, you can start the OS installation. At the beginning of Windows® setup, press F6 to [non-RAID]. Please follow the below procedures.... At the beginning of Windows® setup, press F6 to change . Then make a SATAII driver diskette. STEP 1: Enter "SATA Operation Mode" in "IDE" Mode The installation procedures for Windows® VistaTM are subject to [SATA]. If you want...

User Manual
Page 27
...SETUP UTILITY 3.1 Introduction This section explains how to use the BIOS SETUP UTILITY to fixed AGP / PCI / PCIE buses. Select the driver to install according to the mode you choose and the OS you install. 2.16 Untied Overclocking Technology This motherboard supports Untied Overclocking Technology, ...match what you wish to [CPU, PCIE, Async.]. third-party SCSI or RAID driver. When prompted, insert a floppy disk containing the JMicron® RAID driver. After reading the floppy disk, the driver will continue with the following selections: Main To set up the system time/date information...
...SETUP UTILITY 3.1 Introduction This section explains how to use the BIOS SETUP UTILITY to fixed AGP / PCI / PCIE buses. Select the driver to install according to the mode you choose and the OS you install. 2.16 Untied Overclocking Technology This motherboard supports Untied Overclocking Technology, ...match what you wish to [CPU, PCIE, Async.]. third-party SCSI or RAID driver. When prompted, insert a floppy disk containing the JMicron® RAID driver. After reading the floppy disk, the driver will continue with the following selections: Main To set up the system time/date information...
User Manual
Page 44
... the Support CD to visit ASRock's website at http://www.asrock.com; or you need to contact ASRock or want to know more information. 4.2 Support CD Information The Support CD that came with the motherboard contains necessary drivers and useful utilities that the ...into your dealer for general reference only. Please install the necessary drivers to your OS documentation for more about ASRock, welcome to display the menus. 4.2.2 Drivers Menu The Drivers Menu shows the available devices drivers if the system detects the installed devices. 4. Because motherboard settings...
... the Support CD to visit ASRock's website at http://www.asrock.com; or you need to contact ASRock or want to know more information. 4.2 Support CD Information The Support CD that came with the motherboard contains necessary drivers and useful utilities that the ...into your dealer for general reference only. Please install the necessary drivers to your OS documentation for more about ASRock, welcome to display the menus. 4.2.2 Drivers Menu The Drivers Menu shows the available devices drivers if the system detects the installed devices. 4. Because motherboard settings...
User Manual
Page 45
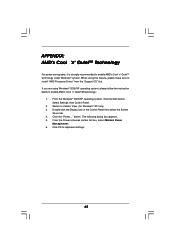
... list box, select Minimal Power Management. 6. From the Windows® 2000/XP operating system, click the Start button. button. Click OK to install "AMD Processor Driver" from the "Support CD" first. Click the "Power..." Select Settings, then Control Panel. 2. The following dialog box appears. 5. Double-click the Display icon in the...
... list box, select Minimal Power Management. 6. From the Windows® 2000/XP operating system, click the Start button. button. Click OK to install "AMD Processor Driver" from the "Support CD" first. Click the "Power..." Select Settings, then Control Panel. 2. The following dialog box appears. 5. Double-click the Display icon in the...
Quick Installation Guide
Page 6
... Up Events - Supports jumperfree - Chassis Temperature Sensing - Voltage Monitoring: +12V, +5V, +3.3V, Vcore - FCC, CE, Microsoft® WHQL Certificated English 6 ASRock 939Dual-VSTA Motherboard AMI Legal BIOS - Supports "Plug and Play" - SMBIOS 2.3.1 Support - Drivers, Utilities, AntiVirus Software (Trial Version) - Connector BIOS Feature Support CD Hardware Monitor OS Certifications - 2 x Serial ATA 1.5Gb/s connectors, support RAID...
... Up Events - Supports jumperfree - Chassis Temperature Sensing - Voltage Monitoring: +12V, +5V, +3.3V, Vcore - FCC, CE, Microsoft® WHQL Certificated English 6 ASRock 939Dual-VSTA Motherboard AMI Legal BIOS - Supports "Plug and Play" - SMBIOS 2.3.1 Support - Drivers, Utilities, AntiVirus Software (Trial Version) - Connector BIOS Feature Support CD Hardware Monitor OS Certifications - 2 x Serial ATA 1.5Gb/s connectors, support RAID...

Quick Installation Guide
Page 7
...slot of the compatible PCI Express VGA cards, please refer to SATAII mode. ASRock website http://www.asrock.com 7 ASRock 939Dual-VSTA Motherboard English Before you implement Dual Channel Memory Technology, make sure to read ...the installation guide of PCI Express VGA card, please refer to enable AMD's Cool 'n' QuietTM technology. Although this motherboard! For the proper installation of memory modules on page 3 for Microsoft® Windows® VistaTM driver...
...slot of the compatible PCI Express VGA cards, please refer to SATAII mode. ASRock website http://www.asrock.com 7 ASRock 939Dual-VSTA Motherboard English Before you implement Dual Channel Memory Technology, make sure to read ...the installation guide of PCI Express VGA card, please refer to enable AMD's Cool 'n' QuietTM technology. Although this motherboard! For the proper installation of memory modules on page 3 for Microsoft® Windows® VistaTM driver...
Quick Installation Guide
Page 8
1.3 Minimum Hardware Requirement Table for Windows® VistaTM Premium and Basic Logo For system integrators and users who purchase this motherboard and plan to submit Windows® VistaTM Premium and Basic logo, please follow the below table for minimum hardware requirement. CPU Memory VGA Athlon 3000+ 512MB Single Channel DX9.0 with WDDM Driver with 128bit VGA memory (Premium) with 64bit VGA memory (Basic) English 8 ASRock 939Dual-VSTA Motherboard Please adopt the CPU, memory, and VGA that we suggest.
1.3 Minimum Hardware Requirement Table for Windows® VistaTM Premium and Basic Logo For system integrators and users who purchase this motherboard and plan to submit Windows® VistaTM Premium and Basic logo, please follow the below table for minimum hardware requirement. CPU Memory VGA Athlon 3000+ 512MB Single Channel DX9.0 with WDDM Driver with 128bit VGA memory (Premium) with 64bit VGA memory (Basic) English 8 ASRock 939Dual-VSTA Motherboard Please adopt the CPU, memory, and VGA that we suggest.


