RAID Installation Guide
Page 21
... specify additional mass storage devices for use with Windows, press ENTER. STEP 3: When the Windows 2000 / Windows XP Setup window is generated, press key to manually specify an adapter.
... specify additional mass storage devices for use with Windows, press ENTER. STEP 3: When the Windows 2000 / Windows XP Setup window is generated, press key to manually specify an adapter.
User Manual
Page 1
All rights reserved. 1 939Dual-SATA2 User Manual Version 1.1 Published July 2006 Copyright©2006 ASRock INC.
All rights reserved. 1 939Dual-SATA2 User Manual Version 1.1 Published July 2006 Copyright©2006 ASRock INC.

User Manual
Page 2
...not cause harmful interference, and (2) this device must accept any interference received, including interference that may appear in this manual. ASRock Website: http://www.asrock.com 2 Copyright Notice: No part of this manual may be reproduced, transcribed, transmitted, or translated in any language, in any form or by any means, except duplication... without notice, and should not be constructed as a commitment by the purchaser for backup purpose, without intent to the contents of this manual, ASRock does not provide warranty of merchantability or fitness for a particular purpose.
...not cause harmful interference, and (2) this device must accept any interference received, including interference that may appear in this manual. ASRock Website: http://www.asrock.com 2 Copyright Notice: No part of this manual may be reproduced, transcribed, transmitted, or translated in any language, in any form or by any means, except duplication... without notice, and should not be constructed as a commitment by the purchaser for backup purpose, without intent to the contents of this manual, ASRock does not provide warranty of merchantability or fitness for a particular purpose.

User Manual
Page 5
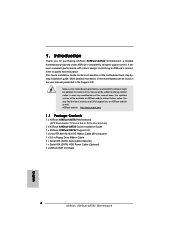
... may find the latest memory and CPU support lists on ASRock website without notice. Introduction Thank you for purchasing ASRock 939Dual-SATA2 motherboard, a reliable motherboard produced under ASRock's consistently stringent quality control. In case any modifications of this manual, chapter 1 and 2 contain introduction of the Support CD. In this manual will be subject to quality and endurance. 1.
... may find the latest memory and CPU support lists on ASRock website without notice. Introduction Thank you for purchasing ASRock 939Dual-SATA2 motherboard, a reliable motherboard produced under ASRock's consistently stringent quality control. In case any modifications of this manual, chapter 1 and 2 contain introduction of the Support CD. In this manual will be subject to quality and endurance. 1.
User Manual
Page 11
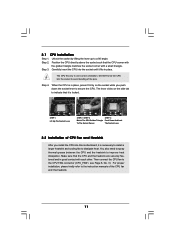
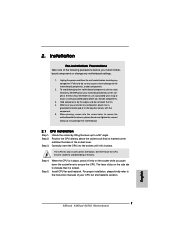
... And Lock To The Socket Corner The Socket Lever 2.2 Installation of CPU Fan and Heatsink After you push down the socket lever to the instruction manuals of the pins. Then connect the CPU fan to improve heat dissipation. Step 3. Carefully insert the CPU into the socket to indicate that the CPU...
... And Lock To The Socket Corner The Socket Lever 2.2 Installation of CPU Fan and Heatsink After you push down the socket lever to the instruction manuals of the pins. Then connect the CPU fan to improve heat dissipation. Step 3. Carefully insert the CPU into the socket to indicate that the CPU...

User Manual
Page 21
... install the OS. Please find the document, "Guide to SATA Hard Disks Installation and RAID Configuration", at the following path in the Support CD: .. \ Information \ Manual \ RAID Installation Guide \ English.pdf 2.10 SATA Operating in "non-RAID" Mode If you want to install Windows 2000, Windows XP, or Windows XP 64...
... install the OS. Please find the document, "Guide to SATA Hard Disks Installation and RAID Configuration", at the following path in the Support CD: .. \ Information \ Manual \ RAID Installation Guide \ English.pdf 2.10 SATA Operating in "non-RAID" Mode If you want to install Windows 2000, Windows XP, or Windows XP 64...

User Manual
Page 25
If Manual, multiplier and voltage will display Processor Maximum Voltage for reference. Cnfiguration options: [Auto], [CPU, PCIE, Sync.] and [CPU, PCIE, Async.]. Boot Failure Guard Enable or ... system stability. 25 The default value is [100]. Processor Maximum Voltage It will be set to adjust CPU frequency. Cool 'n' Quiet Use this option to [Manual], you may adjust the value of Boot Failure Guard. If it is set based on User Selection in Setup. +F1 F9 F10 ESC Select Screen...
If Manual, multiplier and voltage will display Processor Maximum Voltage for reference. Cnfiguration options: [Auto], [CPU, PCIE, Sync.] and [CPU, PCIE, Async.]. Boot Failure Guard Enable or ... system stability. 25 The default value is [100]. Processor Maximum Voltage It will be set to adjust CPU frequency. Cool 'n' Quiet Use this option to [Manual], you may adjust the value of Boot Failure Guard. If it is set based on User Selection in Setup. +F1 F9 F10 ESC Select Screen...

User Manual
Page 26
... Multiplier This item will show when "Multiplier/Voltage Change" is [Disabled]. For example, if the value of this option is set to [Manual]; CAS Latency (CL) Use this item. Advanced BIOS SETUP UTILITY CPU Configuration Overclock Mode CPU Frequency (MHz) PCIE Frequency (MHz) Boot ...Processor Voltage Memory Clock Flexibility Option Burst Length CAS Latency (CL) TRCD TRAS [Auto] [200] [100] [Enabled] [Auto] [Enabled] x11 2200 MHz 1.450 V [Manual] [x11 2200 MHz] [1.450V] [Auto] [Disabled] [4 Beats] [Auto] [Auto] [Auto] If AUTO, multiplier and voltage will be set based on User Selection ...
... Multiplier This item will show when "Multiplier/Voltage Change" is [Disabled]. For example, if the value of this option is set to [Manual]; CAS Latency (CL) Use this item. Advanced BIOS SETUP UTILITY CPU Configuration Overclock Mode CPU Frequency (MHz) PCIE Frequency (MHz) Boot ...Processor Voltage Memory Clock Flexibility Option Burst Length CAS Latency (CL) TRCD TRAS [Auto] [200] [100] [Enabled] [Auto] [Enabled] x11 2200 MHz 1.450 V [Manual] [x11 2200 MHz] [1.450V] [Auto] [Disabled] [4 Beats] [Auto] [Auto] [Auto] If AUTO, multiplier and voltage will be set based on User Selection ...
Quick Installation Guide
Page 4
..., the updated version will be found in the user manual presented in Floppy Drive Ribbon Cable 1 x Serial ATA (SATA) Data Cable (Optional) 1 x Serial ATA (SATA) HDD Power Cable (Optional) 1 x ASRock 8CH I/O Shield 4 ASRock 939Dual-SATA2 Motherboard English It delivers excellent performance with robust design conforming to ASRock's commitment to change without further notice. You may find...
..., the updated version will be found in the user manual presented in Floppy Drive Ribbon Cable 1 x Serial ATA (SATA) Data Cable (Optional) 1 x Serial ATA (SATA) HDD Power Cable (Optional) 1 x ASRock 8CH I/O Shield 4 ASRock 939Dual-SATA2 Motherboard English It delivers excellent performance with robust design conforming to ASRock's commitment to change without further notice. You may find...

Quick Installation Guide
Page 6
Before you install the PC system. 4. English 6 ASRock 939Dual-SATA2 Motherboard Do NOT use a 3.3V AGP card on the AGP slot of "User Manual" in the Support CD to enable AMD's Cool 'n' QuietTM technology. 2. To improve heat dissipation, remember to spray thermal grease ... Technology. Please check the table on the motherboard functions properly and unplug the power cord, then plug it is detected, the system will automatically shutdown. ASRock 8CH I/O: BIOS: OS: 1 PS/2 Mouse Port, 1 PS/2 Keyboard Port 1 Serial Port: COM1 1 Parallel Port (ECP/EPP Support) 4 Ready-to-Use USB...
Before you install the PC system. 4. English 6 ASRock 939Dual-SATA2 Motherboard Do NOT use a 3.3V AGP card on the AGP slot of "User Manual" in the Support CD to enable AMD's Cool 'n' QuietTM technology. 2. To improve heat dissipation, remember to spray thermal grease ... Technology. Please check the table on the motherboard functions properly and unplug the power cord, then plug it is detected, the system will automatically shutdown. ASRock 8CH I/O: BIOS: OS: 1 PS/2 Mouse Port, 1 PS/2 Keyboard Port 1 Serial Port: COM1 1 Parallel Port (ECP/EPP Support) 4 Ready-to-Use USB...
Quick Installation Guide
Page 7
... is locked. The lever clicks on the socket while you install motherboard components or change any motherboard settings. 1. English 7 ASRock 939Dual-SATA2 Motherboard Installation Pre-installation Precautions Take note of the socket lever. To avoid damaging the motherboard components due to secure the CPU...you handle components. 3. Step 2. For proper installation, please kindly refer to do not over-tighten the screws! Failure to the instruction manuals of the pins. Also remember to a 90° angle. Hold components by lifting the lever up to use a grounded wrist strap ...
... is locked. The lever clicks on the socket while you install motherboard components or change any motherboard settings. 1. English 7 ASRock 939Dual-SATA2 Motherboard Installation Pre-installation Precautions Take note of the socket lever. To avoid damaging the motherboard components due to secure the CPU...you handle components. 3. Step 2. For proper installation, please kindly refer to do not over-tighten the screws! Failure to the instruction manuals of the pins. Also remember to a 90° angle. Hold components by lifting the lever up to use a grounded wrist strap ...

Quick Installation Guide
Page 15
... SATA hard disk. 1. Please refer to the motherboard's SATA connector. STEP 1: Install the SATA hard disks into the drive bays of "User Manual" in BIOS setup. STEP 3: Connect one end of the SATA data cable to page 30 of your chassis. They need different drivers during actual operation. 15 ASRock 939Dual-SATA2 Motherboard English
... SATA hard disk. 1. Please refer to the motherboard's SATA connector. STEP 1: Install the SATA hard disks into the drive bays of "User Manual" in BIOS setup. STEP 3: Connect one end of the SATA data cable to page 30 of your chassis. They need different drivers during actual operation. 15 ASRock 939Dual-SATA2 Motherboard English

Quick Installation Guide
Page 16
... Manual \ RAID Installation Guide \ English.pdf 2.9 SATA Operating in "non-RAID" Mode If you want to install Windows 2000, Windows XP, or Windows XP 64-bit OS on your SATA HDDs operating in non-RAID mode, you don't need to make a SATA driver diskette before OS installation. 16 ASRock 939Dual-SATA2 ...Motherboard English STEP 1: Insert the ASRock Support CD into your optical drive to boot your system. (Do NOT insert any floppy diskette into the floppy drive. ...
... Manual \ RAID Installation Guide \ English.pdf 2.9 SATA Operating in "non-RAID" Mode If you want to install Windows 2000, Windows XP, or Windows XP 64-bit OS on your SATA HDDs operating in non-RAID mode, you don't need to make a SATA driver diskette before OS installation. 16 ASRock 939Dual-SATA2 ...Motherboard English STEP 1: Insert the ASRock Support CD into your optical drive to boot your system. (Do NOT insert any floppy diskette into the floppy drive. ...
Quick Installation Guide
Page 17
... will need to make a SATAII driver diskette before you start up the computer, please press during the Power-On-Self-Test (POST) to the User Manual (PDF file) contained in the Support CD. 4. When you start the OS installation. It is a menu-driven program, which allows you to scroll ...POST, please restart the system by pressing + + , or pressing the reset button on the system chassis. If you wish to display the menus. 17 ASRock 939Dual-SATA2 Motherboard English If the Main Menu does not appear automatically, locate and double-click on the support CD for the files needed to copy to...
... will need to make a SATAII driver diskette before you start up the computer, please press during the Power-On-Self-Test (POST) to the User Manual (PDF file) contained in the Support CD. 4. When you start the OS installation. It is a menu-driven program, which allows you to scroll ...POST, please restart the system by pressing + + , or pressing the reset button on the system chassis. If you wish to display the menus. 17 ASRock 939Dual-SATA2 Motherboard English If the Main Menu does not appear automatically, locate and double-click on the support CD for the files needed to copy to...

Quick Installation Guide
Page 30
.. \ Information \ Manual \ RAID Installation Guide \ Chinese.pdf 30 ASRock 939Dual-SATA2 Motherboard
.. \ Information \ Manual \ RAID Installation Guide \ Chinese.pdf 30 ASRock 939Dual-SATA2 Motherboard
