User Manual
Page 4
... 37 3.1 Introduction 37 3.1.1 BIOS Menu Bar 37 3.1.2 Navigation Keys 38 3.2 Main Screen 38 3.3 OC Tweaker Screen 39 3.4 Advanced Screen 43 3.4.1 CPU Configuration 44 3.4.2 Chipset Configuration 45 3.4.3 ACPI Configuration 46 3.4.4 ...
... 37 3.1 Introduction 37 3.1.1 BIOS Menu Bar 37 3.1.2 Navigation Keys 38 3.2 Main Screen 38 3.3 OC Tweaker Screen 39 3.4 Advanced Screen 43 3.4.1 CPU Configuration 44 3.4.2 Chipset Configuration 45 3.4.3 ACPI Configuration 46 3.4.4 ...
User Manual
Page 5
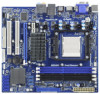
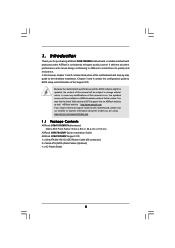
... conforming to ASRock's commitment to BIOS setup and information of the Support CD. In case any modifications of the motherboard and step-by-step guide to the hardware installation. www.asrock.com/support/index.asp 1.1 Package Contents ASRock 939A790GMH Motherboard (Micro ATX Form Factor: 9.6-in x 8.6-in, 24.4 cm x 21.8 cm) ASRock 939A790GMH Quick Installation Guide ASRock 939A790GMH Support CD...
... conforming to ASRock's commitment to BIOS setup and information of the Support CD. In case any modifications of the motherboard and step-by-step guide to the hardware installation. www.asrock.com/support/index.asp 1.1 Package Contents ASRock 939A790GMH Motherboard (Micro ATX Form Factor: 9.6-in x 8.6-in, 24.4 cm x 21.8 cm) ASRock 939A790GMH Quick Installation Guide ASRock 939A790GMH Support CD...
User Manual
Page 7
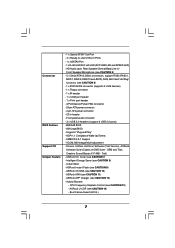
.../Power FAN connector - 24 pin ATX power connector - 4 pin 12V power connector - ACPI 1.1 Compliance Wake Up Events - ASRock U-COP (see CAUTION 11) - Hybrid Booster: - Connector BIOS Feature Support CD Unique Feature - 1 x Optical SPDIF Out Port - 4 x Ready-to-Use USB 2.0 Ports - 1... LED (ACT/LINK LED and SPEED LED) - Front panel audio connector - 3 x USB 2.0 headers (support 6 USB 2.0 ports) - 8Mb AMI BIOS - ASRock OC DNA (see CAUTION 13) - CPU Frequency Stepless Control (see CAUTION 10) - Intelligent Energy Saver (see CAUTION 12) - Boot Failure Guard (B.F.G.) ...
.../Power FAN connector - 24 pin ATX power connector - 4 pin 12V power connector - ACPI 1.1 Compliance Wake Up Events - ASRock U-COP (see CAUTION 11) - Hybrid Booster: - Connector BIOS Feature Support CD Unique Feature - 1 x Optical SPDIF Out Port - 4 x Ready-to-Use USB 2.0 Ports - 1... LED (ACT/LINK LED and SPEED LED) - Front panel audio connector - 3 x USB 2.0 headers (support 6 USB 2.0 ports) - 8Mb AMI BIOS - ASRock OC DNA (see CAUTION 13) - CPU Frequency Stepless Control (see CAUTION 10) - Intelligent Energy Saver (see CAUTION 12) - Boot Failure Guard (B.F.G.) ...

User Manual
Page 8
... actual memory size may affect your system stability, or even cause damage to the components and devices of ASRock OC Tuner. For Windows® OS with overclocking, including adjusting the setting in the BIOS, applying Untied Overclocking Technology, or using the thirdparty overclocking tools. Before you to SATAII mode. For audio output...
... actual memory size may affect your system stability, or even cause damage to the components and devices of ASRock OC Tuner. For Windows® OS with overclocking, including adjusting the setting in the BIOS, applying Untied Overclocking Technology, or using the thirdparty overclocking tools. Before you to SATAII mode. For audio output...
User Manual
Page 9
...DNA literally tells you what it is able to improve efficiency when the CPU cores are idle. OC DNA, an exclusive utility developed by ASRock, provides a convenient way for the operation procedures of overclocking settings. To experience intuitive motion controlled games is a revolutionary technology that the OC....asrock.com 9. Your friends then can update your PC games. With OC DNA, you can load the OC profile to their own system to get the same OC settings as a game joystick to update system BIOS without preparing an additional floppy diskette or other words, it is a BIOS ...
...DNA literally tells you what it is able to improve efficiency when the CPU cores are idle. OC DNA, an exclusive utility developed by ASRock, provides a convenient way for the operation procedures of overclocking settings. To experience intuitive motion controlled games is a revolutionary technology that the OC....asrock.com 9. Your friends then can update your PC games. With OC DNA, you can load the OC profile to their own system to get the same OC settings as a game joystick to update system BIOS without preparing an additional floppy diskette or other words, it is a BIOS ...
User Manual
Page 19
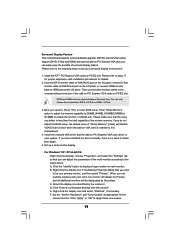
...With the internal VGA output support (DVI-D, D-Sub and HDMI) and external add-on the I /O panel, or connect HDMI monitor cable to enter BIOS setup. Click the "Identify" button to page 17 for proper expansion card installation procedures for the second monitor. If you can only choose the combination.../ XP 64-bit OS: Right click the desktop, choose "Properties", and select the "Settings" tab so that you do not adjust the BIOS setup, the default value of surround display feature. Please refer to display a large number on PCIE2 slot. You can adjust the parameters of the...
...With the internal VGA output support (DVI-D, D-Sub and HDMI) and external add-on the I /O panel, or connect HDMI monitor cable to enter BIOS setup. Click the "Identify" button to page 17 for proper expansion card installation procedures for the second monitor. If you can only choose the combination.../ XP 64-bit OS: Right click the desktop, choose "Properties", and select the "Settings" tab so that you do not adjust the BIOS setup, the default value of surround display feature. Please refer to display a large number on PCIE2 slot. You can adjust the parameters of the...

User Manual
Page 21
... your system. In the future, ATITM Hybrid CrossFireXTM may be supported with Windows® XP OS. Install one compatible PCI Express graphics card to enter BIOS setup. Boot your system. Step 4. Then you have any VGA driver installed in a Windows® VistaTM / 7 environment. ATI Catalyst Control Center 21 2.6 ATITM Hybrid CrossFireXTM...
... your system. In the future, ATITM Hybrid CrossFireXTM may be supported with Windows® XP OS. Install one compatible PCI Express graphics card to enter BIOS setup. Boot your system. Step 4. Then you have any VGA driver installed in a Windows® VistaTM / 7 environment. ATI Catalyst Control Center 21 2.6 ATITM Hybrid CrossFireXTM...
User Manual
Page 23
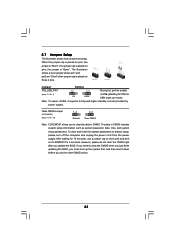
.... After waiting for 15 seconds, use a jumper cap to enable (see p.11, No. 14) 1_2 2_3 Default Clear CMOS Note: CLRCMOS1 allows you update the BIOS. When the jumper cap is placed on CLRCMOS1 for PS/2 or USB wake up the system first, and then shut it requires 2 Amp and higher... off the computer and unplug the power cord from the power supply. If you need to clear the CMOS when you just finish updating the BIOS, you must boot up events.
.... After waiting for 15 seconds, use a jumper cap to enable (see p.11, No. 14) 1_2 2_3 Default Clear CMOS Note: CLRCMOS1 allows you update the BIOS. When the jumper cap is placed on CLRCMOS1 for PS/2 or USB wake up the system first, and then shut it requires 2 Amp and higher... off the computer and unplug the power cord from the power supply. If you need to clear the CMOS when you just finish updating the BIOS, you must boot up events.
User Manual
Page 26
Connect Mic_IN (MIC) to [Enabled]. C. F. D. E. Enter BIOS Setup Utility. For Windows® XP / XP 64-bit OS: Click "Audio I/O", select "Connector Settings" , choose "Disable front panel jack detection", and save the change ...
Connect Mic_IN (MIC) to [Enabled]. C. F. D. E. Enter BIOS Setup Utility. For Windows® XP / XP 64-bit OS: Click "Audio I/O", select "Connector Settings" , choose "Disable front panel jack detection", and save the change ...
User Manual
Page 32
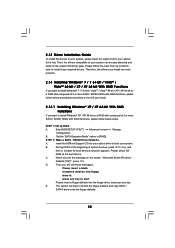
...below steps. STEP 1: Set up to bottom side to install those required drivers. B. Insert the ASRock Support CD into your optical drive to boot your optical drive first. Please select CD- D. Enter BIOS SETUP UTILITY Advanced screen Storage Configuration. A. STEP 2: Make a SATA / SATAII Driver Diskette. ...64-bit on a RAID disk composed of 2 or more SATA / SATAII HDDs with RAID functions, please follow the order from up BIOS. The system will see the message on the support CD driver page. When you install can be auto-detected and listed on the ...
...below steps. STEP 1: Set up to bottom side to install those required drivers. B. Insert the ASRock Support CD into your optical drive to boot your optical drive first. Please select CD- D. Enter BIOS SETUP UTILITY Advanced screen Storage Configuration. A. STEP 2: Make a SATA / SATAII Driver Diskette. ...64-bit on a RAID disk composed of 2 or more SATA / SATAII HDDs with RAID functions, please follow the order from up BIOS. The system will see the message on the support CD driver page. When you install can be auto-detected and listed on the ...
User Manual
Page 33
...Guide STEP 4: Install Windows® XP / XP 64-bit OS on your system. STEP 1: Set up "SATA Operation Mode" to set up BIOS. Before you start to configure RAID function, you want to manage (create, convert, delete, or rebuild) RAID functions on your system. Please refer ...to install a third-party RAID driver. B. Before you start to configure RAID function, you still need to the BIOS RAID installation guide part of the document in the following path in the Support CD: .. \ RAID Installation Guide STEP 3: Install Windows® 7 ...
...Guide STEP 4: Install Windows® XP / XP 64-bit OS on your system. STEP 1: Set up "SATA Operation Mode" to set up BIOS. Before you start to configure RAID function, you want to manage (create, convert, delete, or rebuild) RAID functions on your system. Please refer ...to install a third-party RAID driver. B. Before you start to configure RAID function, you still need to the BIOS RAID installation guide part of the document in the following path in the Support CD: .. \ RAID Installation Guide STEP 3: Install Windows® 7 ...
User Manual
Page 34
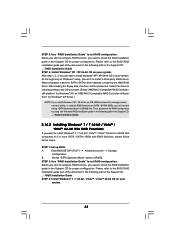
... without RAID functions, please follow below steps. Then, please set the RAID configuration by using the Windows RAID installation guide in the following path in BIOS. 2.15 Installing Windows® 7 / 7 64-bit / VistaTM / VistaTM 64-bit / XP / XP 64-bit Without RAID Functions If you install. (Select...screen Storage Configuration. Using SATA / SATAII HDDs with NCQ and Hot Plug functions (AHCI mode) STEP 1: Set Up BIOS. Select the driver to install according to [RAID] in BIOS first. At the beginning of Windows® setup, press F6 to install Windows® XP / XP 64-bit OS...
... without RAID functions, please follow below steps. Then, please set the RAID configuration by using the Windows RAID installation guide in the following path in BIOS. 2.15 Installing Windows® 7 / 7 64-bit / VistaTM / VistaTM 64-bit / XP / XP 64-bit Without RAID Functions If you install. (Select...screen Storage Configuration. Using SATA / SATAII HDDs with NCQ and Hot Plug functions (AHCI mode) STEP 1: Set Up BIOS. Select the driver to install according to [RAID] in BIOS first. At the beginning of Windows® setup, press F6 to install Windows® XP / XP 64-bit OS...

User Manual
Page 35
... UTILITY Advanced screen Storage Configuration. Using SATA / SATAII HDDs with NCQ and Hot Plug functions (AHCI mode) STEP 1: Set Up BIOS. STEP 2: Install Windows® 7 / 7 64-bit / VistaTM / VistaTM 64-bit OS on your system. STEP 2: Install Windows® 7 / 7... without RAID functions, please follow below steps. Using SATA / SATAII HDDs without NCQ and Hot Plug functions (IDE mode) STEP 1: Set up BIOS. B. A. Enter BIOS SETUP UTILITY Advanced screen Storage Configuration. STEP 2: Install Windows® XP / XP 64-bit OS on your system. 2.15.2 Installing Windows®...
... UTILITY Advanced screen Storage Configuration. Using SATA / SATAII HDDs with NCQ and Hot Plug functions (AHCI mode) STEP 1: Set Up BIOS. STEP 2: Install Windows® 7 / 7 64-bit / VistaTM / VistaTM 64-bit OS on your system. STEP 2: Install Windows® 7 / 7... without RAID functions, please follow below steps. Using SATA / SATAII HDDs without NCQ and Hot Plug functions (IDE mode) STEP 1: Set up BIOS. B. A. Enter BIOS SETUP UTILITY Advanced screen Storage Configuration. STEP 2: Install Windows® XP / XP 64-bit OS on your system. 2.15.2 Installing Windows®...
User Manual
Page 36
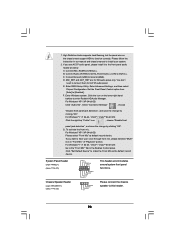
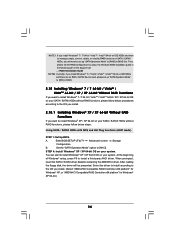
Please refer to [CPU, PCIE, Async.]. Before you enable Untied Overclocking function, please enter "Overclock Mode" option of BIOS setup to set the selection from [Auto] to the warning on page 8 for the possible overclocking risk before you apply Untied Overclocking Technology. 36 Therefore, ...
Please refer to [CPU, PCIE, Async.]. Before you enable Untied Overclocking function, please enter "Overclock Mode" option of BIOS setup to set the selection from [Auto] to the warning on page 8 for the possible overclocking risk before you apply Untied Overclocking Technology. 36 Therefore, ...
User Manual
Page 37
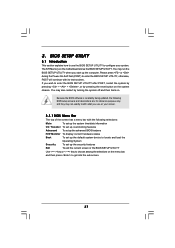
... the Operating System Security To set up the computer. If you see on the system chassis. 3. The SPI Memory on . Because the BIOS software is constantly being updated, the following selections: Main To set up the system time/date information OC Tweaker To set up overclocking features ...Advanced To set up the advanced BIOS features H/W Monitor To display current hardware status Boot To set up the default system device to get into the sub screen. 37 Please ...
... the Operating System Security To set up the computer. If you see on the system chassis. 3. The SPI Memory on . Because the BIOS software is constantly being updated, the following selections: Main To set up the system time/date information OC Tweaker To set up overclocking features ...Advanced To set up the advanced BIOS features H/W Monitor To display current hardware status Boot To set up the default system device to get into the sub screen. 37 Please ...
User Manual
Page 38
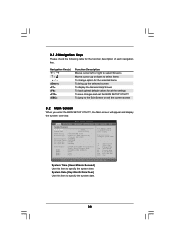
... UTILITY Main OC Tweaker Advanced H/W Monitor Boot Security Exit System Overview System Time System Date [17:00:09] [Fri 07/23/2010] BIOS Version : 939A790GMH P1.00 Processor Type : Dual Core AMD Opteron (tm) Processor 180 (64bit) Processor Speed : 2400MHz Microcode Update : 20F32/4D L1 Cache Size : 256KB L2 Cache ... for the function description of each navigation key. 3.1.2 Navigation Keys Please check the following table for all the settings To save changes and exit the BIOS SETUP UTILITY To jump to the Exit Screen or exit the current screen 3.2 Main Screen When you enter the...
... UTILITY Main OC Tweaker Advanced H/W Monitor Boot Security Exit System Overview System Time System Date [17:00:09] [Fri 07/23/2010] BIOS Version : 939A790GMH P1.00 Processor Type : Dual Core AMD Opteron (tm) Processor 180 (64bit) Processor Speed : 2400MHz Microcode Update : 20F32/4D L1 Cache Size : 256KB L2 Cache ... for the function description of each navigation key. 3.1.2 Navigation Keys Please check the following table for all the settings To save changes and exit the BIOS SETUP UTILITY To jump to the Exit Screen or exit the current screen 3.2 Main Screen When you enter the...

User Manual
Page 39
BIOS SETUP UTILITY Main OC Tweaker Advanced H/W Monitor Boot Security Exit CPU Configuration Overclock Mode CPU Frequency (MHz) PCIE Frequency (MHz) Spread Spectrum Processor Maximum Multiplier ...
BIOS SETUP UTILITY Main OC Tweaker Advanced H/W Monitor Boot Security Exit CPU Configuration Overclock Mode CPU Frequency (MHz) PCIE Frequency (MHz) Spread Spectrum Processor Maximum Multiplier ...
User Manual
Page 40
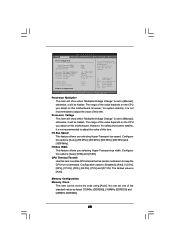
... range of this item to enable CPU internal thermal control mechanism to [Manual]; Configuration options: [Disabled], [Auto], [12.5%], [25%], [37.5%], [50%], [62.5%], [75%] and [87.5%]. BIOS SETUP UTILITY Main OC Tweaker Advanced H/W Monitor Boot Security Exit CPU Configuration Overclock Mode CPU Frequency (MHz) PCIE Frequency (MHz) Spread Spectrum Processor Maximum Multiplier...
... range of this item to enable CPU internal thermal control mechanism to [Manual]; Configuration options: [Disabled], [Auto], [12.5%], [25%], [37.5%], [50%], [62.5%], [75%] and [87.5%]. BIOS SETUP UTILITY Main OC Tweaker Advanced H/W Monitor Boot Security Exit CPU Configuration Overclock Mode CPU Frequency (MHz) PCIE Frequency (MHz) Spread Spectrum Processor Maximum Multiplier...
User Manual
Page 41
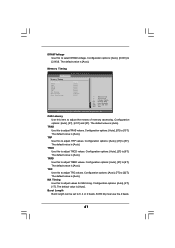
... values. The default value is [Auto]. TRC Use this to adjust values for MA timing. MA Timing Use this to adjust TRC values. Memory Timing BIOS SETUP UTILITY OC Tweaker Memory Timing CAS Latency TRAS TRP TRCD TRRD TRC MA Timing Burst Length Bank Interleaving [Auto] [Auto] [Auto] [Auto] [Auto] [Auto...
... values. The default value is [Auto]. TRC Use this to adjust values for MA timing. MA Timing Use this to adjust TRC values. Memory Timing BIOS SETUP UTILITY OC Tweaker Memory Timing CAS Latency TRAS TRP TRCD TRRD TRC MA Timing Burst Length Bank Interleaving [Auto] [Auto] [Auto] [Auto] [Auto] [Auto...
User Manual
Page 43
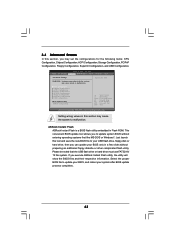
... Chipset Configuration, ACPI Configuration, Storage Configuration, PCIPnP Configuration, Floppy Configuration, SuperIO Configuration, and USB Configuration. ASRock Instant Flash ASRock Instant Flash is a BIOS flash utility embedded in below sections may cause system to malfunction. Please be noted that the USB flash.... Just launch this section may cause the system to malfunction. This convenient BIOS update tool allows you execute ASRock Instant Flash utility, the utility will show the BIOS files and their respective information. Setting wrong values in a few clicks without...
... Chipset Configuration, ACPI Configuration, Storage Configuration, PCIPnP Configuration, Floppy Configuration, SuperIO Configuration, and USB Configuration. ASRock Instant Flash ASRock Instant Flash is a BIOS flash utility embedded in below sections may cause system to malfunction. Please be noted that the USB flash.... Just launch this section may cause the system to malfunction. This convenient BIOS update tool allows you execute ASRock Instant Flash utility, the utility will show the BIOS files and their respective information. Setting wrong values in a few clicks without...


