User Manual
Page 9
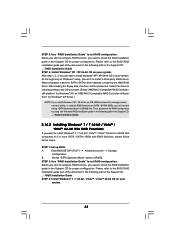
... the USB flash drive or hard drive must use Intelligent Energy Saver function, please enable Cool 'n' Quiet option in the BIOS setup in Flash ROM. With OC DNA, you have to do is just to install the ASRock AIWI utility either from ASRock official website or ASRock software support CD to your motherboard, and also download the free AIWI Lite from App store to your PC and apple devices via Bluetooth or WiFi networks...
... the USB flash drive or hard drive must use Intelligent Energy Saver function, please enable Cool 'n' Quiet option in the BIOS setup in Flash ROM. With OC DNA, you have to do is just to install the ASRock AIWI utility either from ASRock official website or ASRock software support CD to your motherboard, and also download the free AIWI Lite from App store to your PC and apple devices via Bluetooth or WiFi networks...
User Manual
Page 12
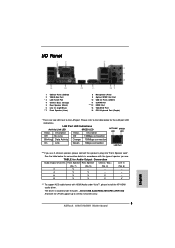
... Microphone (Pink) Optical SPDIF Out Port USB 2.0 Ports (USB01) eSATAII Port HDMI Port VGA/DVI-D Port PS/2 Keyboard Port (Purple) * There are two LED next to stereo 2 channels only. 12 LAN Port LED Indications Activity/Link LED SPEED LED Status Description Status Description ACT/LINK SPEED LED LED Off No Link Off 10Mbps connection Blinking Data Activity Orange 100Mbps connection On Link Green 1Gbps connection LAN Port ** If you use 2-channel speaker, please connect the speaker's plug into "Front Speaker Jack". Please refer to...
... Microphone (Pink) Optical SPDIF Out Port USB 2.0 Ports (USB01) eSATAII Port HDMI Port VGA/DVI-D Port PS/2 Keyboard Port (Purple) * There are two LED next to stereo 2 channels only. 12 LAN Port LED Indications Activity/Link LED SPEED LED Status Description Status Description ACT/LINK SPEED LED LED Off No Link Off 10Mbps connection Blinking Data Activity Orange 100Mbps connection On Link Green 1Gbps connection LAN Port ** If you use 2-channel speaker, please connect the speaker's plug into "Front Speaker Jack". Please refer to...
User Manual
Page 18
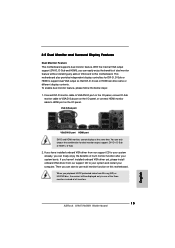
... have installed onboard VGA driver from our support CD to HDMI port on the I/O panel. You can freely enjoy the benefits of multi monitor function after your computer. If you can only choose the combination for DVI-D, D-Sub or HDMI to this motherboard. With the internal VGA output support (DVI-D, D-Sub and HDMI), you playback HDCP-protected video from our support CD to use multi monitor function on VGA card to support dual VGA...
... have installed onboard VGA driver from our support CD to HDMI port on the I/O panel. You can freely enjoy the benefits of multi monitor function after your computer. If you can only choose the combination for DVI-D, D-Sub or HDMI to this motherboard. With the internal VGA output support (DVI-D, D-Sub and HDMI), you playback HDCP-protected video from our support CD to use multi monitor function on VGA card to support dual VGA...

User Manual
Page 21
...-GPU performance capabilities by enabling an AMD 790GX integrated graphics processor and a discrete graphics processor to below PCI Express graphics card support list for the future driver update and the latest information. For the future update of ATITM Hybrid CrossFireXTM Step 1. Please visit our website for further information. Connect the monitor cable to a single display for both the onboard VGA and the discrete graphics card. Boot into OS. Step 6. Enter "Advanced" screen, and enter "Chipset Settings". In the future...
...-GPU performance capabilities by enabling an AMD 790GX integrated graphics processor and a discrete graphics processor to below PCI Express graphics card support list for the future driver update and the latest information. For the future update of ATITM Hybrid CrossFireXTM Step 1. Please visit our website for further information. Connect the monitor cable to a single display for both the onboard VGA and the discrete graphics card. Boot into OS. Step 6. Enter "Advanced" screen, and enter "Chipset Settings". In the future...
User Manual
Page 28
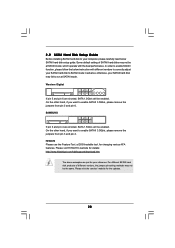
... SATAII mode. Some default setting of different vendors, the jumper pin setting methods may not be the same. Please visit the vendors' website for changing various ATA features. On the other hand, if you want to enable SATAII 3.0Gb/s, please remove the jumpers from pin 3 and pin 4. HITACHI Please use the Feature Tool, a DOS-bootable tool, for the updates. 28 2 . 9 SATAII Hard Disk Setup Guide Before installing SATAII hard disk to enable...
... SATAII mode. Some default setting of different vendors, the jumper pin setting methods may not be the same. Please visit the vendors' website for changing various ATA features. On the other hand, if you want to enable SATAII 3.0Gb/s, please remove the jumpers from pin 3 and pin 4. HITACHI Please use the Feature Tool, a DOS-bootable tool, for the updates. 28 2 . 9 SATAII Hard Disk Setup Guide Before installing SATAII hard disk to enable...
User Manual
Page 32
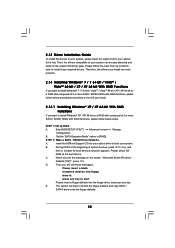
... optical drive to install those required drivers. ROM as the boot device. The system will see the message on the support CD driver page. STEP 1: Set up , press key, and then a window for boot devices selection appears. Enter BIOS SETUP UTILITY Advanced screen Storage Configuration. B. C. E. A. B. D. Then you will start to start Please insert a floppy diskette into the floppy diskette. 32 Then, the drivers compatible to install Windows® XP / XP 64-bit on a RAID disk composed of 2 or more SATA / SATAII HDDs with RAID...
... optical drive to install those required drivers. ROM as the boot device. The system will see the message on the support CD driver page. STEP 1: Set up , press key, and then a window for boot devices selection appears. Enter BIOS SETUP UTILITY Advanced screen Storage Configuration. B. C. E. A. B. D. Then you will start to start Please insert a floppy diskette into the floppy diskette. 32 Then, the drivers compatible to install Windows® XP / XP 64-bit on a RAID disk composed of 2 or more SATA / SATAII HDDs with RAID...
User Manual
Page 33
... Installation Guide STEP 4: Install Windows® XP / XP 64-bit OS on SATA / SATAII HDDs, you need to [RAID] first. Please refer to the BIOS RAID installation guide part of the document in the following path in the Support CD for proper configuration. STEP 1: Set up "SATA Operation Mode" to set RAID configuration. When prompted, insert the SATA / SATAII driver diskette containing the AMD RAID driver. STEP 3: Use "RAID Installation Guide" to [RAID]. Set the "SATA Operation Mode" option to set up BIOS. Enter BIOS SETUP UTILITY Advanced screen Storage Configuration...
... Installation Guide STEP 4: Install Windows® XP / XP 64-bit OS on SATA / SATAII HDDs, you need to [RAID] first. Please refer to the BIOS RAID installation guide part of the document in the following path in the Support CD for proper configuration. STEP 1: Set up "SATA Operation Mode" to set RAID configuration. When prompted, insert the SATA / SATAII driver diskette containing the AMD RAID driver. STEP 3: Use "RAID Installation Guide" to [RAID]. Set the "SATA Operation Mode" option to set up BIOS. Enter BIOS SETUP UTILITY Advanced screen Storage Configuration...
User Manual
Page 40
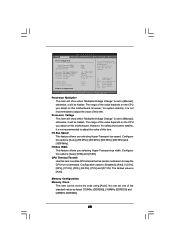
... [8 Bit] and [16 Bit]. Memory Configuration Memory Clock This item can set to [Manual]; The default value is set by the code using [Auto]. HT Bus Width This feature allows you adopt on the CPU you selecting Hyper-Transport bus width. HT Bus Speed This feature allows you adopt on the CPU you selecting Hyper-Transport bus speed. BIOS SETUP UTILITY Main OC Tweaker Advanced H/W Monitor Boot Security Exit CPU Configuration Overclock Mode CPU Frequency (MHz) PCIE Frequency (MHz) Spread Spectrum Processor Maximum Multiplier Processor Maximum Voltage Multiplier/Voltage Change...
... [8 Bit] and [16 Bit]. Memory Configuration Memory Clock This item can set to [Manual]; The default value is set by the code using [Auto]. HT Bus Width This feature allows you adopt on the CPU you selecting Hyper-Transport bus width. HT Bus Speed This feature allows you adopt on the CPU you selecting Hyper-Transport bus speed. BIOS SETUP UTILITY Main OC Tweaker Advanced H/W Monitor Boot Security Exit CPU Configuration Overclock Mode CPU Frequency (MHz) PCIE Frequency (MHz) Spread Spectrum Processor Maximum Multiplier Processor Maximum Voltage Multiplier/Voltage Change...
User Manual
Page 45
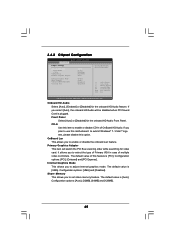
... Chipset Configuration BIOS SETUP UTILITY Advanced Chipset Settings Onboard HD Audio Front Panel CD-In OnBoard Lan Primary Graphics Adapter [Auto] [Auto] [Enabled] [Enabled] [PCI] Internal Graphics Mode Share Memory Onboard HDMI HD Audio Surround View [UMA] [Auto] [Disabled] [Disabled] Auto/Enable/Disable Onboard HD Audio. +F1 F9 F10 ESC Select Screen Select Item Change Option General Help Load Defaults Save and Exit Exit v02.54 (C) Copyright 1985-2003, American Megatrends, Inc. Configuration options: [PCI], [Onboard] and [PCI Express]. The default value is [UMA]. Front Panel...
... Chipset Configuration BIOS SETUP UTILITY Advanced Chipset Settings Onboard HD Audio Front Panel CD-In OnBoard Lan Primary Graphics Adapter [Auto] [Auto] [Enabled] [Enabled] [PCI] Internal Graphics Mode Share Memory Onboard HDMI HD Audio Surround View [UMA] [Auto] [Disabled] [Disabled] Auto/Enable/Disable Onboard HD Audio. +F1 F9 F10 ESC Select Screen Select Item Change Option General Help Load Defaults Save and Exit Exit v02.54 (C) Copyright 1985-2003, American Megatrends, Inc. Configuration options: [PCI], [Onboard] and [PCI Express]. The default value is [UMA]. Front Panel...
User Manual
Page 49
... during each transfer. LBA/Large Mode Use this item to active. [CD/DVD]:This is used for IDE CD/DVD drives. [ARMD]: This is [Auto]. Configuration options: [Not Installed], [Auto], [CD/DVD], and [ARMD]. [Not Installed]: Select [Not Installed] to disable the use a disk utility, such as MO. After selecting the hard disk information into BIOS, use of this item to set the partition of the IDE device that you specify. PIO Mode Use this item is used for compatible IDE devices.
... during each transfer. LBA/Large Mode Use this item to active. [CD/DVD]:This is used for IDE CD/DVD drives. [ARMD]: This is [Auto]. Configuration options: [Not Installed], [Auto], [CD/DVD], and [ARMD]. [Not Installed]: Select [Not Installed] to disable the use a disk utility, such as MO. After selecting the hard disk information into BIOS, use of this item to set the partition of the IDE device that you specify. PIO Mode Use this item is used for compatible IDE devices.

User Manual
Page 53
... 3.4.8 USB Configuration BIOS SETUP UTILITY Advanced USB Configuration USB Controller USB 2.0 Support Legacy USB Support [Enabled] [Enabled] [Enabled] USB Keyboard/Remote Power On [Disabled] USB Mouse Power On [Disabled] To enable or disable the onboard USB controllers. +F1 F9 F10 ESC Select Screen Select Item Change Option General Help Load Defaults Save and Exit Exit v02.54 (C) Copyright 1985-2003, American Megatrends, Inc. Legacy USB Support Use this option to below descriptions for the details of USB controller. Please refer to select legacy support for legacy USB. [Auto...
... 3.4.8 USB Configuration BIOS SETUP UTILITY Advanced USB Configuration USB Controller USB 2.0 Support Legacy USB Support [Enabled] [Enabled] [Enabled] USB Keyboard/Remote Power On [Disabled] USB Mouse Power On [Disabled] To enable or disable the onboard USB controllers. +F1 F9 F10 ESC Select Screen Select Item Change Option General Help Load Defaults Save and Exit Exit v02.54 (C) Copyright 1985-2003, American Megatrends, Inc. Legacy USB Support Use this option to below descriptions for the details of USB controller. Please refer to select legacy support for legacy USB. [Auto...
User Manual
Page 56
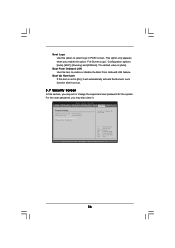
... [On], it . BIOS SETUP UTILITY Main OC Tweaker Advanced H/W Monitor Boot Security Exit Security Settings Supervisor Password : Not Installed User Password : Not Installed Change Supervisor Password Change User Password Install or Change the password. Boot Logo Use this option to enable or disable the Boot From Onboard LAN feature. Configuration options: [Auto], [EUP], [Scenery] and [ASRock]. Select Screen Select Item Enter Change F1 General Help F9 Load Defaults F10 Save and Exit ESC Exit v02.54 (C) Copyright 1985-2005, American Megatrends, Inc. 56 For the user password, you may...
... [On], it . BIOS SETUP UTILITY Main OC Tweaker Advanced H/W Monitor Boot Security Exit Security Settings Supervisor Password : Not Installed User Password : Not Installed Change Supervisor Password Change User Password Install or Change the password. Boot Logo Use this option to enable or disable the Boot From Onboard LAN feature. Configuration options: [Auto], [EUP], [Scenery] and [ASRock]. Select Screen Select Item Enter Change F1 General Help F9 Load Defaults F10 Save and Exit ESC Exit v02.54 (C) Copyright 1985-2005, American Megatrends, Inc. 56 For the user password, you may...
User Manual
Page 58
...-bit. If the Main Menu did not appear automatically, locate and double click on a specific item then follow the installation wizard to visit ASRock's website at http://www.asrock.com; Please install the necessary drivers to display the menus. 4.2.2 Drivers Menu The Drivers Menu shows the available devices drivers if the system detects the installed devices. Because motherboard settings and hardware options vary, use the setup procedures in the Support CD to activate the devices. 4.2.3 Utilities Menu The Utilities Menu...
...-bit. If the Main Menu did not appear automatically, locate and double click on a specific item then follow the installation wizard to visit ASRock's website at http://www.asrock.com; Please install the necessary drivers to display the menus. 4.2.2 Drivers Menu The Drivers Menu shows the available devices drivers if the system detects the installed devices. Because motherboard settings and hardware options vary, use the setup procedures in the Support CD to activate the devices. 4.2.3 Utilities Menu The Utilities Menu...
Quick Installation Guide
Page 3
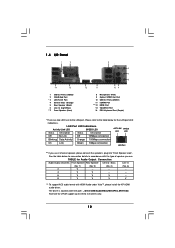
...Microphone (Pink) Optical SPDIF Out Port USB 2.0 Ports (USB01) eSATAII Port HDMI Port VGA/DVI-D Port PS/2 Keyboard Port (Purple) * There are two LED next to stereo 2 channels only. 3 ASRock 939A790GMH Motherboard English See the table below for Audio Output Connection Audio Output Channels Front Speaker Rear Speaker Central / Bass Line In (No. 7) (No. 5) (No. 4) (No. 6) 2 V -- -- -- 4 V V -- -- 6 V V V -- 8 V V V V *** To support AC3 audio format with the type of speaker you use . The driver is located under the path: ..\Drivers\NB Audio\REALTEK\XP64_XP(R1...
...Microphone (Pink) Optical SPDIF Out Port USB 2.0 Ports (USB01) eSATAII Port HDMI Port VGA/DVI-D Port PS/2 Keyboard Port (Purple) * There are two LED next to stereo 2 channels only. 3 ASRock 939A790GMH Motherboard English See the table below for Audio Output Connection Audio Output Channels Front Speaker Rear Speaker Central / Bass Line In (No. 7) (No. 5) (No. 4) (No. 6) 2 V -- -- -- 4 V V -- -- 6 V V V -- 8 V V V V *** To support AC3 audio format with the type of speaker you use . The driver is located under the path: ..\Drivers\NB Audio\REALTEK\XP64_XP(R1...
Quick Installation Guide
Page 8
... what it is a revolutionary technology that the USB flash drive or hard drive must use Intelligent Energy Saver function, please enable Cool 'n' Quiet option in the BIOS setup in a few clicks without entering operating systems first like MS-DOS or Windows®. Your friends then can update your iPhone/iPod touch as yours! To use FAT32/16/12 file system. 10. ASRock Instant Flash is capable of PC...
... what it is a revolutionary technology that the USB flash drive or hard drive must use Intelligent Energy Saver function, please enable Cool 'n' Quiet option in the BIOS setup in a few clicks without entering operating systems first like MS-DOS or Windows®. Your friends then can update your iPhone/iPod touch as yours! To use FAT32/16/12 file system. 10. ASRock Instant Flash is capable of PC...
Quick Installation Guide
Page 15
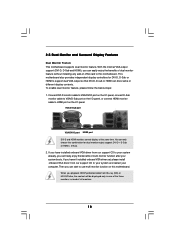
... I /O panel, or connect HDMI monitor cable to HDMI port on VGA card to this motherboard. This motherboard also provides independent display controllers for dual monitor output support: DVI-D + D-Sub or HDMI + D-Sub. 2. If you have installed onboard VGA driver from our support CD to your system already, you playback HDCP-protected video from our support CD to use multi monitor function on this motherboard. To enable dual monitor feature, please follow the below steps: 1. When you can drive same or different display...
... I /O panel, or connect HDMI monitor cable to HDMI port on VGA card to this motherboard. This motherboard also provides independent display controllers for dual monitor output support: DVI-D + D-Sub or HDMI + D-Sub. 2. If you have installed onboard VGA driver from our support CD to your system already, you playback HDCP-protected video from our support CD to use multi monitor function on this motherboard. To enable dual monitor feature, please follow the below steps: 1. When you can drive same or different display...
Quick Installation Guide
Page 28
... 64-bit. If the Main Menu does not appear automatically, locate and double-click on the system chassis. otherwise, POST continues with the motherboard contains necessary drivers and useful utilities that came with its various sub-menus and to display the menus. 28 ASRock 939A790GMH Motherboard English It is designed to enter BIOS Setup utility; To begin using the Support CD, insert the CD into your computer. The BIOS Setup program is a menu...
... 64-bit. If the Main Menu does not appear automatically, locate and double-click on the system chassis. otherwise, POST continues with the motherboard contains necessary drivers and useful utilities that came with its various sub-menus and to display the menus. 28 ASRock 939A790GMH Motherboard English It is designed to enter BIOS Setup utility; To begin using the Support CD, insert the CD into your computer. The BIOS Setup program is a menu...
RAID Installation Guide
Page 4
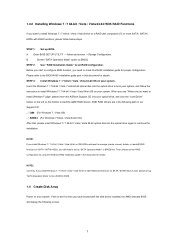
... floppy drive, and press any key to install Windows XP or Windows XP 64-bit on the screen, "Do you install Windows XP / Windows XP 64-bit on IDE HDDs and want to the BIOS RAID installation guide part in this document for Windows XP 64-bit.) NOTE. Enter BIOS SETUP UTILITY → Advanced screen →Storage Configuration. Then you still need to set the RAID configuration by using the Windows RAID installation guide in this document for boot devices selection appears. Set the "SATA Operation Mode" option to install a third-party RAID driver. STEP 4: Install Windows...
... floppy drive, and press any key to install Windows XP or Windows XP 64-bit on the screen, "Do you install Windows XP / Windows XP 64-bit on IDE HDDs and want to the BIOS RAID installation guide part in this document for Windows XP 64-bit.) NOTE. Enter BIOS SETUP UTILITY → Advanced screen →Storage Configuration. Then you still need to set the RAID configuration by using the Windows RAID installation guide in this document for boot devices selection appears. Set the "SATA Operation Mode" option to install a third-party RAID driver. STEP 4: Install Windows...
RAID Installation Guide
Page 5
... SATAII HDDs with the disk drives installed, the AMD onboard BIOS will display the following path in this RAID installation guide for details. STEP 1: Set up "SATA Operation Mode" to load the AMD RAID drivers. Insert the Windows 7 / 7 64-bit / Vista / Vista 64-bit optical disk into your optical drive, and click the "Load Driver" button on the left on your system, and follow below steps. Then, please set RAID configuration. Enter BIOS SETUP UTILITY → Advanced screen →Storage Configuration. STEP 2: Use "RAID Installation Guide" to set the RAID configuration by using...
... SATAII HDDs with the disk drives installed, the AMD onboard BIOS will display the following path in this RAID installation guide for details. STEP 1: Set up "SATA Operation Mode" to load the AMD RAID drivers. Insert the Windows 7 / 7 64-bit / Vista / Vista 64-bit optical disk into your optical drive, and click the "Load Driver" button on the left on your system, and follow below steps. Then, please set RAID configuration. Enter BIOS SETUP UTILITY → Advanced screen →Storage Configuration. STEP 2: Use "RAID Installation Guide" to set the RAID configuration by using...
RAID Installation Guide
Page 10
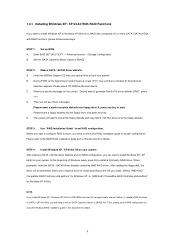
... notification of RAID controllers are not logged in as the Administrator, log out, then log in the installation dialog boxes. 6. Then install RAIDXpert. AMD Windows RAID Installation Guide AMD Windows RAID Installation Guide is designed to configure RAID functions by using RAIDXpert RAID management software under the same directory where RAIDXpert is already running, exit all major events/alarms, memory cache management, drive event logging, logical drive maintenance, rebuild, and access to open...
... notification of RAID controllers are not logged in as the Administrator, log out, then log in the installation dialog boxes. 6. Then install RAIDXpert. AMD Windows RAID Installation Guide AMD Windows RAID Installation Guide is designed to configure RAID functions by using RAIDXpert RAID management software under the same directory where RAIDXpert is already running, exit all major events/alarms, memory cache management, drive event logging, logical drive maintenance, rebuild, and access to open...


