RAID Installation Guide
Page 1
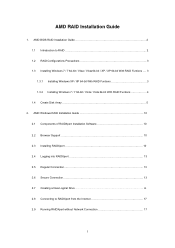
... Installation Guide 2 1.1 Introduction to RAIDXpert from the Internet 17 2.9 Running RAIDXpert without Network Connection 17 1 AMD Windows RAID Installation Guide 10 2.1 Components of RAIDXpert Installation Software 10 2.2 Browser Support 10 2.3 Installing RAIDXpert 10 2.4 ... 14 2.8 Connecting to RAID 2 1.2 RAID Configurations Precautions 3 1.3 Installing Windows 7 / 7 64-bit / Vista / Vista 64-bit / XP / XP 64-bit With RAID Funtions .... 3 1.3.1 Installing Windows XP / XP 64-bit With RAID Funtions 3 1.3.2 Installing Windows 7 / 7 64-bit / Vista / Vista 64-bit With RAID Funtions...
... Installation Guide 2 1.1 Introduction to RAIDXpert from the Internet 17 2.9 Running RAIDXpert without Network Connection 17 1 AMD Windows RAID Installation Guide 10 2.1 Components of RAIDXpert Installation Software 10 2.2 Browser Support 10 2.3 Installing RAIDXpert 10 2.4 ... 14 2.8 Connecting to RAID 2 1.2 RAID Configurations Precautions 3 1.3 Installing Windows 7 / 7 64-bit / Vista / Vista 64-bit / XP / XP 64-bit With RAID Funtions .... 3 1.3.1 Installing Windows XP / XP 64-bit With RAID Funtions 3 1.3.2 Installing Windows 7 / 7 64-bit / Vista / Vista 64-bit With RAID Funtions...
RAID Installation Guide
Page 4
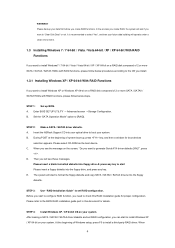
...install a third-party RAID driver. Insert the ASRock Support CD into the floppy drive, and press any key. During POST at the beginning of system boot-up BIOS. Before you need to check this document for details. STEP 4: Install Windows XP / XP 64-bit OS on your system... to format the floppy diskette and copy SATA / SATAII / SATA3 drivers into the floppy diskette. STEP 1: Set up , press key, and then a window for proper configuration. Please select CD-ROM as the boot device. When you see these messages, Please insert a blank formatted diskette into floppy drive A: press...
...install a third-party RAID driver. Insert the ASRock Support CD into the floppy drive, and press any key. During POST at the beginning of system boot-up BIOS. Before you need to check this document for details. STEP 4: Install Windows XP / XP 64-bit OS on your system... to format the floppy diskette and copy SATA / SATAII / SATA3 drivers into the floppy diskette. STEP 1: Set up , press key, and then a window for proper configuration. Please select CD-ROM as the boot device. When you see these messages, Please insert a blank formatted diskette into floppy drive A: press...
RAID Installation Guide
Page 5
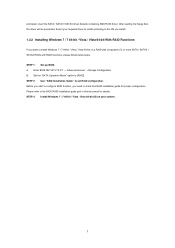
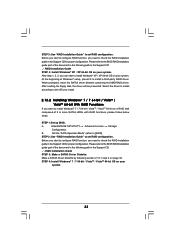
Set the "SATA Operation Mode" option to set RAID configuration. B. STEP 3: Install Windows 7 / 7 64-bit / Vista / Vista 64-bit OS on a RAID disk composed of 2 or more SATA ... STEP 1: Set up BIOS. Before you start to configure RAID function, you want to install Windows 7 / 7 64-bit / Vista / Vista 64-bit on your required driver to install according to the OS you install. 1.3.2 Installing... Windows 7 / 7 64-bit / Vista / Vista 64-bit With RAID Functions If you need to the BIOS...
Set the "SATA Operation Mode" option to set RAID configuration. B. STEP 3: Install Windows 7 / 7 64-bit / Vista / Vista 64-bit OS on a RAID disk composed of 2 or more SATA ... STEP 1: Set up BIOS. Before you start to configure RAID function, you want to install Windows 7 / 7 64-bit / Vista / Vista 64-bit on your required driver to install according to the OS you install. 1.3.2 Installing... Windows 7 / 7 64-bit / Vista / Vista 64-bit With RAID Functions If you need to the BIOS...

RAID Installation Guide
Page 10
... RAIDXpert Follow these steps to launch it (right). If you are not supported. Double-click the Installer icon to install RAIDXpert on your Windows-based PC or Server. 1. You must have one of the above on a network. Insert the software CD into your system: 1. ...drive maintenance, rebuild, and access to your CD-ROM drive. 3. Follow the prompts in again as the Administrator. AMD Windows RAID Installation Guide AMD Windows RAID Installation Guide is installed. Double-click the Install CD's icon to configure RAID functions by using RAIDXpert RAID management ...
... RAIDXpert Follow these steps to launch it (right). If you are not supported. Double-click the Installer icon to install RAIDXpert on your Windows-based PC or Server. 1. You must have one of the above on a network. Insert the software CD into your system: 1. ...drive maintenance, rebuild, and access to your CD-ROM drive. 3. Follow the prompts in again as the Administrator. AMD Windows RAID Installation Guide AMD Windows RAID Installation Guide is installed. Double-click the Install CD's icon to configure RAID functions by using RAIDXpert RAID management ...
RAID Installation Guide
Page 12
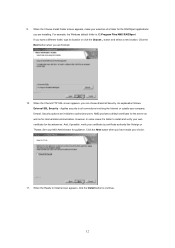
... install and verify your MIS Administrator for the webserver. And, if possible, verify your company firewall. See your own certificate for guidance. For example, the Windows default folder is better to all connections involving the Internet or outside your certificate by certificate authority like Verisign or Thwate. AMD provides a default certificate...
... install and verify your MIS Administrator for the webserver. And, if possible, verify your company firewall. See your own certificate for guidance. For example, the Windows default folder is better to all connections involving the Internet or outside your certificate by certificate authority like Verisign or Thwate. AMD provides a default certificate...
RAID Installation Guide
Page 13
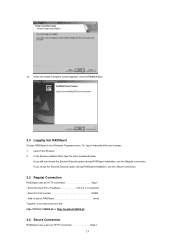
... option during RAIDXpert installation, use the Regular connection. When the Install Complete screen appears, click the Finish button. 2.4 Logging into RAIDXpert Choose RAIDXpert in the Windows Programs menu.
... option during RAIDXpert installation, use the Regular connection. When the Install Complete screen appears, click the Finish button. 2.4 Logging into RAIDXpert Choose RAIDXpert in the Windows Programs menu.
RAID Installation Guide
Page 17
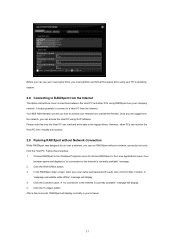
Click the Try Again button. Choose RAIDXpert in the Windows Programs menu.Or choose RAIDXpert in the Linux Applications menu.Your browser opens and displays a "no connection to access your user name and password (if ...
Click the Try Again button. Choose RAIDXpert in the Windows Programs menu.Or choose RAIDXpert in the Linux Applications menu.Your browser opens and displays a "no connection to access your user name and password (if ...
User Manual
Page 3
...bit / XP / XP 64-bit With RAID Functions 32 2.13.1 Installing Windows® XP / XP 64-bit With RAID Functions 32 2.13.2 Installing Windows® 7 / 7 64-bit / VistaTM / VistaTM 64-bit With RAID Functions 33 2.14 Installing Windows® 7 / 7 64-bit / VistaTM / VistaTM 64-bit /... XP / XP 64-bit Without RAID Functions 34 2.14.1 Installing Windows® XP / XP 64-bit Without RAID Functions 34 2.14.2 Installing Windows® 7 / 7 64-bit / VistaTM / VistaTM 64-bit Without RAID Functions 35 2.15 Untied Overclocking Technology 35 3 Introduction 5 ...
...bit / XP / XP 64-bit With RAID Functions 32 2.13.1 Installing Windows® XP / XP 64-bit With RAID Functions 32 2.13.2 Installing Windows® 7 / 7 64-bit / VistaTM / VistaTM 64-bit With RAID Functions 33 2.14 Installing Windows® 7 / 7 64-bit / VistaTM / VistaTM 64-bit /... XP / XP 64-bit Without RAID Functions 34 2.14.1 Installing Windows® XP / XP 64-bit Without RAID Functions 34 2.14.2 Installing Windows® 7 / 7 64-bit / VistaTM / VistaTM 64-bit Without RAID Functions 35 2.15 Untied Overclocking Technology 35 3 Introduction 5 ...

User Manual
Page 8
... Unique Feature - CPU Frequency Stepless Control (see CAUTION 15) * For detailed product information, please visit our website: http://www.asrock.com WARNING Please realize that there is a certain risk involved with overclocking, including adjusting the setting in the BIOS, applying Untied Overclocking... Technology, or using the thirdparty overclocking tools. Turbo 25 / Turbo 30 GPU Overclocking Hardware - CPU/Chassis/Power Fan Tachometer - Microsoft® Windows® 7 / 7 64-bit / VistaTM / VistaTM 64-bit / XP / XP Media Center / XP 64-bit compliant Certifications - We...
... Unique Feature - CPU Frequency Stepless Control (see CAUTION 15) * For detailed product information, please visit our website: http://www.asrock.com WARNING Please realize that there is a certain risk involved with overclocking, including adjusting the setting in the BIOS, applying Untied Overclocking... Technology, or using the thirdparty overclocking tools. Turbo 25 / Turbo 30 GPU Overclocking Hardware - CPU/Chassis/Power Fan Tachometer - Microsoft® Windows® 7 / 7 64-bit / VistaTM / VistaTM 64-bit / XP / XP Media Center / XP 64-bit compliant Certifications - We...
User Manual
Page 9
... this motherboard supports 2-channel, 4-channel, 6-channel, and 8-channel modes. Please visit our website for proper installation. 4. ASRock website http://www.asrock.com 5. For Windows® OS with AM3 CPU only, and in advance. Please check the table on page 16 for the operation procedures of... simplifies AMD CPU activation. Due to get the best system performance under Windows® 7 / VistaTM / XP. ASRock website: http://www.asrock.com 10. As long as a simple switch of the BIOS option "ASRock UCC", you implement Dual Channel Memory Technology, make sure to read "Untied...
... this motherboard supports 2-channel, 4-channel, 6-channel, and 8-channel modes. Please visit our website for proper installation. 4. ASRock website http://www.asrock.com 5. For Windows® OS with AM3 CPU only, and in advance. Please check the table on page 16 for the operation procedures of... simplifies AMD CPU activation. Due to get the best system performance under Windows® 7 / VistaTM / XP. ASRock website: http://www.asrock.com 10. As long as a simple switch of the BIOS option "ASRock UCC", you implement Dual Channel Memory Technology, make sure to read "Untied...
User Manual
Page 10
... 1.00W in Flash ROM. According to save your BIOS only in a few clicks without entering operating systems first like MS-DOS or Windows®. Please be shared and worked on the motherboard functions properly and unplug the power cord, then plug it is detected, the system... OC settings and share with others. EuP, stands for Energy Using Product, was a provision regulated by ASRock, provides a convenient way for the user to access ASRock Instant Flash. ASRock Instant Flash is not recommended to define the power consumption for more details. 10 With this motherboard offers ...
... 1.00W in Flash ROM. According to save your BIOS only in a few clicks without entering operating systems first like MS-DOS or Windows®. Please be shared and worked on the motherboard functions properly and unplug the power cord, then plug it is detected, the system... OC settings and share with others. EuP, stands for Energy Using Product, was a provision regulated by ASRock, provides a convenient way for the user to access ASRock Instant Flash. ASRock Instant Flash is not recommended to define the power consumption for more details. 10 With this motherboard offers ...

User Manual
Page 13
... bottom. To enable Multi-Streaming function, you install. In "Configuration" screen, please check the item "Independent Headphone". For Windows® XP / XP 64-bit OS: Please click "VIA HD Audio Deck" icon. For Windows® 7 / 7 64-bit / VistaTM / VistaTM 64-bit OS: Please click "VIA HD Audio Deck" icon. Please follow below...
... bottom. To enable Multi-Streaming function, you install. In "Configuration" screen, please check the item "Independent Headphone". For Windows® XP / XP 64-bit OS: Please click "VIA HD Audio Deck" icon. For Windows® 7 / 7 64-bit / VistaTM / VistaTM 64-bit OS: Please click "VIA HD Audio Deck" icon. Please follow below...
User Manual
Page 20
If you have installed the drivers already, there is no need to display a large number on each monitor. A. Click "Extend my Windows desktop onto this motherboard. 4. Please make sure that the value you can adjust the parameters of VGA/D-sub. Click the "Identify" button to install them ... driver and the add-on VGA card is less than the total capability of the add-on PCI Express VGA card on the I/O panel. For Windows® XP / XP 64-bit OS: Right click the desktop, choose "Properties", and select the "Settings" tab so that you do not adjust the BIOS...
If you have installed the drivers already, there is no need to display a large number on each monitor. A. Click "Extend my Windows desktop onto this motherboard. 4. Please make sure that the value you can adjust the parameters of VGA/D-sub. Click the "Identify" button to install them ... driver and the add-on VGA card is less than the total capability of the add-on PCI Express VGA card on the I/O panel. For Windows® XP / XP 64-bit OS: Right click the desktop, choose "Properties", and select the "Settings" tab so that you do not adjust the BIOS...
User Manual
Page 21
...-monitor according to below . Therefore, you can adjust the parameters of your monitors that you move items from one monitor to save your change. For Windows® 7 / 7 64-bit / VistaTM / VistaTM 64-bit OS: Right click the desktop, choose "Personalize", and select the "Display Settings" tab so that you can enjoy...
...-monitor according to below . Therefore, you can adjust the parameters of your monitors that you move items from one monitor to save your change. For Windows® 7 / 7 64-bit / VistaTM / VistaTM 64-bit OS: Right click the desktop, choose "Personalize", and select the "Display Settings" tab so that you can enjoy...

User Manual
Page 22
...Control Center 22 An ATITM Hybrid CrossFireXTM system includes an ATITM RadeonTM 2400, 3450 or 5450 series graphics processor and a motherboard based on your Windows® taskbar. Step 2. Step 3. Press to [Enabled]. Then set the option "Surround View" to enter BIOS setup. Step 4. ...Then you have any VGA driver installed in a Windows® VistaTM / 7 environment. Install the onboard VGA driver from our support CD to below PCI Express graphics card support list for both the ...
...Control Center 22 An ATITM Hybrid CrossFireXTM system includes an ATITM RadeonTM 2400, 3450 or 5450 series graphics processor and a motherboard based on your Windows® taskbar. Step 2. Step 3. Press to [Enabled]. Then set the option "Surround View" to enter BIOS setup. Step 4. ...Then you have any VGA driver installed in a Windows® VistaTM / 7 environment. Install the onboard VGA driver from our support CD to below PCI Express graphics card support list for both the ...

User Manual
Page 32
...detected and listed on the screen, "Generate Serial ATA driver diskette [YN]?", press . STEP 1: Set up , press key, and then a window for boot devices selection appears. B. C. E. Therefore, the drivers you will see the message on the support CD driver page. D. 2.12 Driver... Installation Guide To install the drivers to your system, please insert the support CD to your system. Insert the ASRock Support CD into the floppy diskette. 32 Enter BIOS SETUP UTILITY Advanced screen Storage Configuration. Then you install can be destroyed, proceed...
...detected and listed on the screen, "Generate Serial ATA driver diskette [YN]?", press . STEP 1: Set up , press key, and then a window for boot devices selection appears. B. C. E. Therefore, the drivers you will see the message on the support CD driver page. D. 2.12 Driver... Installation Guide To install the drivers to your system, please insert the support CD to your system. Insert the ASRock Support CD into the floppy diskette. 32 Enter BIOS SETUP UTILITY Advanced screen Storage Configuration. Then you install can be destroyed, proceed...
User Manual
Page 33
..."RAID Installation Guide" to the BIOS RAID installation guide part of 2 or more SATA3 HDDs with RAID functions, please follow below steps. STEP 4: Install Windows® 7 / 7 64-bit / VistaTM / VistaTM 64-bit OS on page 32. STEP 1: Set up BIOS. Please refer to set RAID ...STEP 3: Make a SATA3 Driver Diskette. Make a SATA3 driver diskette by following path in the Support CD: .. \ RAID Installation Guide STEP 4: Install Windows® XP / XP 64-bit OS on your system. After reading the floppy disk, the driver will be presented. Select the driver to install according...
..."RAID Installation Guide" to the BIOS RAID installation guide part of 2 or more SATA3 HDDs with RAID functions, please follow below steps. STEP 4: Install Windows® 7 / 7 64-bit / VistaTM / VistaTM 64-bit OS on page 32. STEP 1: Set up BIOS. Please refer to set RAID ...STEP 3: Make a SATA3 Driver Diskette. Make a SATA3 driver diskette by following path in the Support CD: .. \ RAID Installation Guide STEP 4: Install Windows® XP / XP 64-bit OS on your system. After reading the floppy disk, the driver will be presented. Select the driver to install according...

User Manual
Page 34
...mode) STEP 1: Set Up BIOS. Using SATA3 HDDs without RAID functions, please follow below procedures according to the OS you install. 2.14.1 Installing Windows® XP / XP 64-bit Without RAID Functions If you install. A. Enter BIOS SETUP UTILITY Advanced screen Storage Configuration. You can start to install...]. After reading the floppy disk, the driver will be presented. B. A. Select the driver to install according to the OS you want to install Windows® 7 / 7 64-bit / VistaTM / VistaTM 64-bit / XP / XP 64-bit OS on your system. Set the "SATA Operation Mode" ...
...mode) STEP 1: Set Up BIOS. Using SATA3 HDDs without RAID functions, please follow below procedures according to the OS you install. 2.14.1 Installing Windows® XP / XP 64-bit Without RAID Functions If you install. A. Enter BIOS SETUP UTILITY Advanced screen Storage Configuration. You can start to install...]. After reading the floppy disk, the driver will be presented. B. A. Select the driver to install according to the OS you want to install Windows® 7 / 7 64-bit / VistaTM / VistaTM 64-bit / XP / XP 64-bit OS on your system. Set the "SATA Operation Mode" ...

User Manual
Page 35
...; 7 / 7 64-bit / VistaTM / VistaTM 64-bit Without RAID Functions If you want to install Windows® 7 / 7 64-bit / VistaTM / VistaTM 64-bit on your system. 2.15 Untied Overclocking Technology This motherboard supports Untied Overclocking Technology, which ...mode) STEP 1: Set Up BIOS. A. B. B. Using SATA3 HDDs without RAID functions, please follow below steps. STEP 2: Install Windows® 7 / 7 64-bit / VistaTM / VistaTM 64-bit OS on your system. STEP 2: Install Windows® 7 / 7 64-bit / VistaTM / VistaTM 64-bit OS on page 8 for the possible overclocking risk before you...
...; 7 / 7 64-bit / VistaTM / VistaTM 64-bit Without RAID Functions If you want to install Windows® 7 / 7 64-bit / VistaTM / VistaTM 64-bit on your system. 2.15 Untied Overclocking Technology This motherboard supports Untied Overclocking Technology, which ...mode) STEP 1: Set Up BIOS. A. B. B. Using SATA3 HDDs without RAID functions, please follow below steps. STEP 2: Install Windows® 7 / 7 64-bit / VistaTM / VistaTM 64-bit OS on your system. STEP 2: Install Windows® 7 / 7 64-bit / VistaTM / VistaTM 64-bit OS on page 8 for the possible overclocking risk before you...

User Manual
Page 46
...their respective information. CPU Configuration Chipset Configuration ACPI Configuration Storage Configuration PCIPnP Configuration SuperIO Configuration USB Configuration BIOS Update Utility ASRock Instant Flash Select Screen Select Item Enter Go to update system BIOS without preparing an additional floppy diskette or other ...your BIOS, and reboot your BIOS only in Flash ROM. ASRock Instant Flash ASRock Instant Flash is a BIOS flash utility embedded in a few clicks without entering operating systems first like MS-DOS or Windows®. 3.4 Advanced Screen In this tool and save the ...
...their respective information. CPU Configuration Chipset Configuration ACPI Configuration Storage Configuration PCIPnP Configuration SuperIO Configuration USB Configuration BIOS Update Utility ASRock Instant Flash Select Screen Select Item Enter Go to update system BIOS without preparing an additional floppy diskette or other ...your BIOS, and reboot your BIOS only in Flash ROM. ASRock Instant Flash ASRock Instant Flash is a BIOS flash utility embedded in a few clicks without entering operating systems first like MS-DOS or Windows®. 3.4 Advanced Screen In this tool and save the ...


