User Manual
Page 4
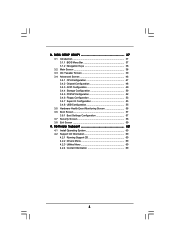
BIOS SETUP UTILITY 37 3.1 Introduction 37 3.1.1 BIOS Menu Bar 37 3.1.2 Navigation Keys 38 3.2 Main Screen 38 3.3 OC Tweaker Screen 39 3.4 Advanced Screen 46 3.4.1 CPU Configuration 47 3.4.2 Chipset Configuration 48 3.4.3 ACPI Configuration 49 3.4.4 ...
BIOS SETUP UTILITY 37 3.1 Introduction 37 3.1.1 BIOS Menu Bar 37 3.1.2 Navigation Keys 38 3.2 Main Screen 38 3.3 OC Tweaker Screen 39 3.4 Advanced Screen 46 3.4.1 CPU Configuration 47 3.4.2 Chipset Configuration 48 3.4.3 ACPI Configuration 49 3.4.4 ...
User Manual
Page 5
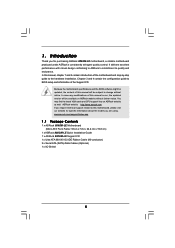
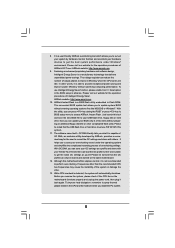
... motherboard, please visit our website for purchasing ASRock 880GM-LE motherboard, a reliable motherboard produced under ASRock's consistently stringent quality control. Because the motherboard specifications and the BIOS software might be updated, the content of the Support CD. It delivers excellent performance with robust design conforming to ASRock's commitment to BIOS setup and information of this manual occur, the...
... motherboard, please visit our website for purchasing ASRock 880GM-LE motherboard, a reliable motherboard produced under ASRock's consistently stringent quality control. Because the motherboard specifications and the BIOS software might be updated, the content of the Support CD. It delivers excellent performance with robust design conforming to ASRock's commitment to BIOS setup and information of this manual occur, the...
User Manual
Page 9
The voltage regulator can press key during the POST or press key to BIOS setup menu to access ASRock Instant Flash. Please be shared and worked on the motherboard functions properly and unplug the power cord, then plug it is a user-friendly ASRock overclocking tool which allows you can reduce the number of output phases...
The voltage regulator can press key during the POST or press key to BIOS setup menu to access ASRock Instant Flash. Please be shared and worked on the motherboard functions properly and unplug the power cord, then plug it is a user-friendly ASRock overclocking tool which allows you can reduce the number of output phases...
User Manual
Page 18
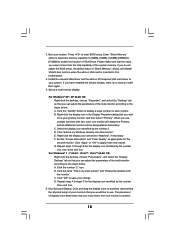
...identified by the number one, two, three and four. E. Right-click the display icon and select "Attached", if necessary. Click "Apply" or "OK" to enter BIOS setup. C. A. For Windows® 7 / 7 64-bit / VistaTM / VistaTM 64-bit OS: Right click the desktop, choose "Personalize", and select the "Display .../ XP 64-bit OS: Right click the desktop, choose "Properties", and select the "Settings" tab so that you do not adjust the BIOS setup, the default value of the system memory. Click the "Identify" button to another. 18 When you can adjust the parameters of VGA/D-sub. ...
...identified by the number one, two, three and four. E. Right-click the display icon and select "Attached", if necessary. Click "Apply" or "OK" to enter BIOS setup. C. A. For Windows® 7 / 7 64-bit / VistaTM / VistaTM 64-bit OS: Right click the desktop, choose "Personalize", and select the "Display .../ XP 64-bit OS: Right click the desktop, choose "Properties", and select the "Settings" tab so that you do not adjust the BIOS setup, the default value of the system memory. Click the "Identify" button to another. 18 When you can adjust the parameters of VGA/D-sub. ...
User Manual
Page 20
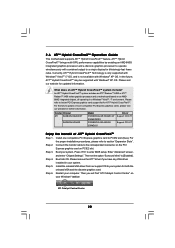
... is not available with Windows® XP OS. Step 6. Step 2. ATI Catalyst Control Center 20 Step 3. For the proper installation procedures, please refer to enter BIOS setup.
... is not available with Windows® XP OS. Step 6. Step 2. ATI Catalyst Control Center 20 Step 3. For the proper installation procedures, please refer to enter BIOS setup.
User Manual
Page 25
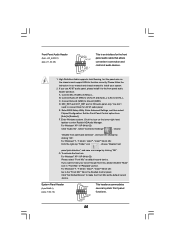
... convenient connection and control of "Playback" portion. Connect Audio_R (RIN) to OUT2_R and Audio_L (LIN) to make the Front Mic as default record device. E. Enter BIOS Setup Utility. Set the Front Panel Control option from [Auto] to Ground (GND). F. To activate the front mic. Connect Ground (GND) to [Enabled]. For Windows®...
... convenient connection and control of "Playback" portion. Connect Audio_R (RIN) to OUT2_R and Audio_L (LIN) to make the Front Mic as default record device. E. Enter BIOS Setup Utility. Set the Front Panel Control option from [Auto] to Ground (GND). F. To activate the front mic. Connect Ground (GND) to [Enabled]. For Windows®...
User Manual
Page 32
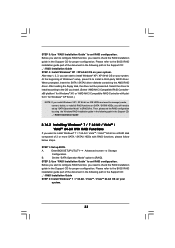
... you want to [RAID]. The system will see the message on a RAID disk composed of system boot-up BIOS. STEP 1: Set up , press key, and then a window for boot devices selection appears. Insert the ASRock Support CD into your system can work properly. 2.14 Installing Windows® 7 / 7 64-bit / VistaTM / VistaTM 64.... Set the "SATA Operation Mode" option to install Windows® XP / XP 64-bit on the screen, "Generate Serial ATA driver diskette [YN]?", press . Enter BIOS SETUP UTILITY Advanced screen Storage Configuration.
... you want to [RAID]. The system will see the message on a RAID disk composed of system boot-up BIOS. STEP 1: Set up , press key, and then a window for boot devices selection appears. Insert the ASRock Support CD into your system can work properly. 2.14 Installing Windows® 7 / 7 64-bit / VistaTM / VistaTM 64.... Set the "SATA Operation Mode" option to install Windows® XP / XP 64-bit on the screen, "Generate Serial ATA driver diskette [YN]?", press . Enter BIOS SETUP UTILITY Advanced screen Storage Configuration.
User Manual
Page 33
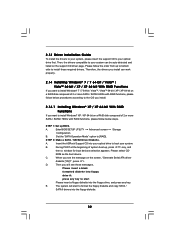
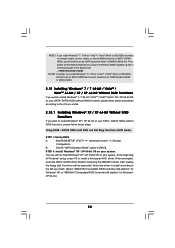
...174; XP 64-bit.) NOTE. Select the driver to install according to set RAID configuration. Set the "SATA Operation Mode" option to the BIOS RAID installation guide part of the document in the following path in the Support CD: .. \ RAID Installation Guide 2.14.2 Installing Windows®... proper configuration. If you need to install Windows® 7 / 7 64-bit / VistaTM / VistaTM 64-bit on your system. Enter BIOS SETUP UTILITY Advanced screen Storage Configuration. STEP 2: Use "RAID Installation Guide" to [RAID] first. After reading the floppy disk, the driver will ...
...174; XP 64-bit.) NOTE. Select the driver to install according to set RAID configuration. Set the "SATA Operation Mode" option to the BIOS RAID installation guide part of the document in the following path in the Support CD: .. \ RAID Installation Guide 2.14.2 Installing Windows®... proper configuration. If you need to install Windows® 7 / 7 64-bit / VistaTM / VistaTM 64-bit on your system. Enter BIOS SETUP UTILITY Advanced screen Storage Configuration. STEP 2: Use "RAID Installation Guide" to [RAID] first. After reading the floppy disk, the driver will ...
User Manual
Page 34
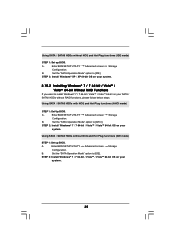
...34 Then, please set the RAID configuration by using the Windows RAID installation guide in the following path in BIOS first. You can start to [RAID] in the Support CD: .. \ RAID Installation Guide NOTE2. After ...be presented. Using SATA / SATAII HDDs with NCQ and Hot Plug functions (AHCI mode) STEP 1: Set Up BIOS. B. Select the driver to install according to the OS you still need to set up "SATA Operation Mode... Mode" option to install a third-party AHCI driver. NOTE1. A. Enter BIOS SETUP UTILITY Advanced screen Storage Configuration. At the beginning of Windows®...
...34 Then, please set the RAID configuration by using the Windows RAID installation guide in the following path in BIOS first. You can start to [RAID] in the Support CD: .. \ RAID Installation Guide NOTE2. After ...be presented. Using SATA / SATAII HDDs with NCQ and Hot Plug functions (AHCI mode) STEP 1: Set Up BIOS. B. Select the driver to install according to the OS you still need to set up "SATA Operation Mode... Mode" option to install a third-party AHCI driver. NOTE1. A. Enter BIOS SETUP UTILITY Advanced screen Storage Configuration. At the beginning of Windows®...
User Manual
Page 35
... the "SATA Operation Mode" option to [AHCI]. Set the "SATA Operation Mode" option to [IDE]. Enter BIOS SETUP UTILITY Advanced screen Storage Configuration. Enter BIOS SETUP UTILITY Advanced screen Storage Configuration. Set the "SATA Operation Mode" option to install Windows® 7 / 7 ... SATA / SATAII HDDs with NCQ and Hot Plug functions (AHCI mode) STEP 1: Set Up BIOS. B. A. Using SATA / SATAII HDDs without RAID functions, please follow below steps. Enter BIOS SETUP UTILITY Advanced screen Storage Configuration. STEP 2: Install Windows® 7 / 7 64-bit / ...
... the "SATA Operation Mode" option to [AHCI]. Set the "SATA Operation Mode" option to [IDE]. Enter BIOS SETUP UTILITY Advanced screen Storage Configuration. Enter BIOS SETUP UTILITY Advanced screen Storage Configuration. Set the "SATA Operation Mode" option to install Windows® 7 / 7 ... SATA / SATAII HDDs with NCQ and Hot Plug functions (AHCI mode) STEP 1: Set Up BIOS. B. A. Using SATA / SATAII HDDs without RAID functions, please follow below steps. Enter BIOS SETUP UTILITY Advanced screen Storage Configuration. STEP 2: Install Windows® 7 / 7 64-bit / ...
User Manual
Page 36
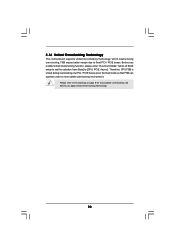
Please refer to [CPU, PCIE, Async.]. Before you enable Untied Overclocking function, please enter "Overclock Mode" option of BIOS setup to set the selection from [Auto] to the warning on page 8 for the possible overclocking risk before you apply Untied Overclocking Technology. 36 Therefore, CPU ...
Please refer to [CPU, PCIE, Async.]. Before you enable Untied Overclocking function, please enter "Overclock Mode" option of BIOS setup to set the selection from [Auto] to the warning on page 8 for the possible overclocking risk before you apply Untied Overclocking Technology. 36 Therefore, CPU ...

User Manual
Page 37
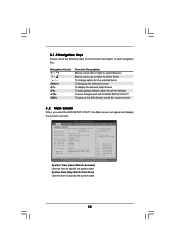
...on the menu bar, and then press to configure your screen. 3.1.1 BIOS Menu Bar The top of the screen has a menu bar with its test routines. BIOS SETUP UTILITY 3.1 Introduction This section explains how to use the BIOS SETUP UTILITY to get into the sub screen. 37 If you start up...among the selections on your system. Please press or during the Power-On-Self-Test (POST) to enter the BIOS SETUP UTILITY, otherwise, POST will continue with the following BIOS setup screens and descriptions are for reference purpose only, and they may also restart by pressing the reset button on ...
...on the menu bar, and then press to configure your screen. 3.1.1 BIOS Menu Bar The top of the screen has a menu bar with its test routines. BIOS SETUP UTILITY 3.1 Introduction This section explains how to use the BIOS SETUP UTILITY to get into the sub screen. 37 If you start up...among the selections on your system. Please press or during the Power-On-Self-Test (POST) to enter the BIOS SETUP UTILITY, otherwise, POST will continue with the following BIOS setup screens and descriptions are for reference purpose only, and they may also restart by pressing the reset button on ...
User Manual
Page 38
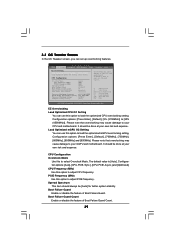
BIOS SETUP UTILITY Main OC Tweaker Advanced H/W Monitor System Overview System Time System Date [17:00:09] [Mon 04/12/2010] BIOS Version : 880GM-LE P1.0 Processor Type : AMD Phenom(tm) II X3 720 Processor (64bit) Processor Speed : 2800MHz Microcode Update : 100F42/1000086 L1 Cache Size : 384KB L2 ... Date [Day Month/Date/Year] Use this item to the Exit Screen or exit the current screen 3.2 Main Screen When you enter the BIOS SETUP UTILITY, the Main screen will appear and display the system overview. 3.1.2 Navigation Keys Please check the following table for all the settings To save...
BIOS SETUP UTILITY Main OC Tweaker Advanced H/W Monitor System Overview System Time System Date [17:00:09] [Mon 04/12/2010] BIOS Version : 880GM-LE P1.0 Processor Type : AMD Phenom(tm) II X3 720 Processor (64bit) Processor Speed : 2800MHz Microcode Update : 100F42/1000086 L1 Cache Size : 384KB L2 ... Date [Day Month/Date/Year] Use this item to the Exit Screen or exit the current screen 3.2 Main Screen When you enter the BIOS SETUP UTILITY, the Main screen will appear and display the system overview. 3.1.2 Navigation Keys Please check the following table for all the settings To save...
User Manual
Page 39
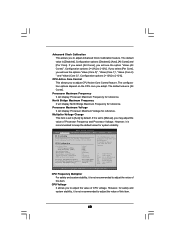
...] and [900MHz]. Configuration options: [Auto], [CPU, PCIE, Sync.], [CPU, PCIE, Async.] and [Optimized]. CPU Frequency (MHz) Use this option to your own risk and expense. BIOS SETUP UTILITY Main OC Tweaker Advanced H/W Monitor Boot Security Exit EZ Overclocking Load Optimized CPU OC Setting [Press Enter] Load Optimized mGPU OC Setting [Press Enter...
...] and [900MHz]. Configuration options: [Auto], [CPU, PCIE, Sync.], [CPU, PCIE, Async.] and [Optimized]. CPU Frequency (MHz) Use this option to your own risk and expense. BIOS SETUP UTILITY Main OC Tweaker Advanced H/W Monitor Boot Security Exit EZ Overclocking Load Optimized CPU OC Setting [Press Enter] Load Optimized mGPU OC Setting [Press Enter...
User Manual
Page 40
... for reference. CPU Voltage It allows you to adjust CPU Active Core Control feature. Processor Maximum Frequency It will see the option "Value (All Cores)". BIOS SETUP UTILITY Main OC Tweaker Advanced H/W Monitor Boot Security Exit EZ Overclocking Load Optimized CPU OC Setting [Press Enter] Load Optimized mGPU OC Setting [Press Enter...
... for reference. CPU Voltage It allows you to adjust CPU Active Core Control feature. Processor Maximum Frequency It will see the option "Value (All Cores)". BIOS SETUP UTILITY Main OC Tweaker Advanced H/W Monitor Boot Security Exit EZ Overclocking Load Optimized CPU OC Setting [Press Enter] Load Optimized mGPU OC Setting [Press Enter...
User Manual
Page 41
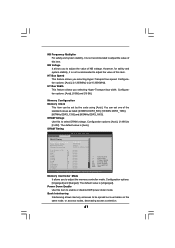
... Voltage It allows you selecting Hyper-Transport bus width. Configuration options: [Auto], [x1 200MHz] to [2.40V]. Configuration options: [Auto], [8 Bit] and [16 Bit]. DRAM Timing BIOS SETUP UTILITY OC Tweaker DRAM Timing Memory Controller Mode Power Down Enable Bank Interleaving Channel Interleaving CAS Latency (CL) 9 TRCD 12 TRP 12 TRAS 30 TRTP...
... Voltage It allows you selecting Hyper-Transport bus width. Configuration options: [Auto], [x1 200MHz] to [2.40V]. Configuration options: [Auto], [8 Bit] and [16 Bit]. DRAM Timing BIOS SETUP UTILITY OC Tweaker DRAM Timing Memory Controller Mode Power Down Enable Bank Interleaving Channel Interleaving CAS Latency (CL) 9 TRCD 12 TRP 12 TRAS 30 TRTP...
User Manual
Page 46
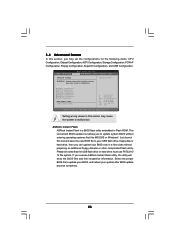
ASRock Instant Flash ASRock Instant Flash is a BIOS flash utility embedded in below sections may cause system to malfunction. BIOS SETUP UTILITY Main OC Tweaker Advanced H/W Monitor Boot Security Exit Advanced Settings Options for the following items: CPU ...Configuration Chipset Configuration ACPI Configuration Storage Configuration PCIPnP Configuration Floppy Configuration SuperIO Configuration USB Configuration BIOS Update Utility ASRock Instant Flash Select Screen Select Item Enter Go to update your BIOS, and reboot your USB flash drive, floppy disk or hard drive, then you ...
ASRock Instant Flash ASRock Instant Flash is a BIOS flash utility embedded in below sections may cause system to malfunction. BIOS SETUP UTILITY Main OC Tweaker Advanced H/W Monitor Boot Security Exit Advanced Settings Options for the following items: CPU ...Configuration Chipset Configuration ACPI Configuration Storage Configuration PCIPnP Configuration Floppy Configuration SuperIO Configuration USB Configuration BIOS Update Utility ASRock Instant Flash Select Screen Select Item Enter Go to update your BIOS, and reboot your USB flash drive, floppy disk or hard drive, then you ...
User Manual
Page 47
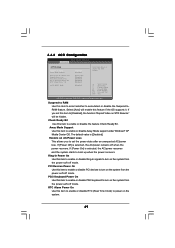
... or disable AMD's Cool 'n' QuietTM technology. 3.4.1 CPU Configuration Advanced CPU Configuration Cool 'n' Quiet Secure Virtual Machine Enhanced Halt State L3 Cache Allocation CPU Thermal Throttle BIOS SETUP UTILITY [Auto] [Enabled] [Disabled] [Auto] [Auto] Enabling this function may reduce CPU voltage and memory frequency, and lead to system stability or compatibility issue with...
... or disable AMD's Cool 'n' QuietTM technology. 3.4.1 CPU Configuration Advanced CPU Configuration Cool 'n' Quiet Secure Virtual Machine Enhanced Halt State L3 Cache Allocation CPU Thermal Throttle BIOS SETUP UTILITY [Auto] [Enabled] [Disabled] [Auto] [Auto] Enabling this function may reduce CPU voltage and memory frequency, and lead to system stability or compatibility issue with...
User Manual
Page 48
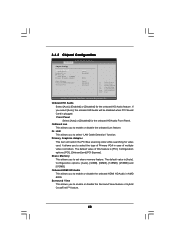
... in case of this feature is [Auto]. It allows you to enable or disable the Surround View feature or Hybrid CrossFireXTM feature. 48 3.4.2 Chipset Configuration BIOS SETUP UTILITY Advanced Chipset Settings Onboard HD Audio Front Panel OnBoard Lan Dr. LAN Link speed : 10Mbps Primary Graphics Adapter Share Memory Onboard HDMI HD Audio...
... in case of this feature is [Auto]. It allows you to enable or disable the Surround View feature or Hybrid CrossFireXTM feature. 48 3.4.2 Chipset Configuration BIOS SETUP UTILITY Advanced Chipset Settings Onboard HD Audio Front Panel OnBoard Lan Dr. LAN Link speed : 10Mbps Primary Graphics Adapter Share Memory Onboard HDMI HD Audio...
User Manual
Page 49
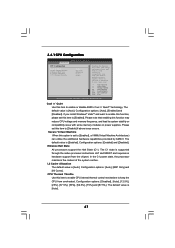
... enable or disable PS/2 keyboard to [Disabled], the function "Repost Video on the system from the power-soft-off when the power recovers. 3.4.3 ACPI Configuration BIOS SETUP UTILITY Advanced ACPI Settings Suspend To RAM Away Mode Support Restore on the system from the power-soft-off mode.
... enable or disable PS/2 keyboard to [Disabled], the function "Repost Video on the system from the power-soft-off when the power recovers. 3.4.3 ACPI Configuration BIOS SETUP UTILITY Advanced ACPI Settings Suspend To RAM Away Mode Support Restore on the system from the power-soft-off mode.


