
User Manual
Page 3
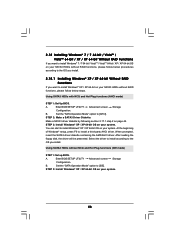
... Disks Installation 41 2.14 Hot Plug and Hot Swap Functions for SATA3 HDDs 41 2.15 SATA3 HDD Hot Plug Feature and Operation Guide 42 2.16 Driver Installation Guide 44 2.17 Installing Windows® 7 / 7 64-bit / VistaTM / VistaTM 64-bit / XP / XP 64-bit With RAID Functions 44 2.17.1 Installing Windows®...
... Disks Installation 41 2.14 Hot Plug and Hot Swap Functions for SATA3 HDDs 41 2.15 SATA3 HDD Hot Plug Feature and Operation Guide 42 2.16 Driver Installation Guide 44 2.17 Installing Windows® 7 / 7 64-bit / VistaTM / VistaTM 64-bit / XP / XP 64-bit With RAID Functions 44 2.17.1 Installing Windows®...
User Manual
Page 4
Software Support 72 4.1 Install Operating System 72 4.2 Support CD Information 72 4.2.1 Running Support CD 72 4.2.2 Drivers Menu 72 4.2.3 Utilities Menu 72 4.2.4 Contact Information 72 4 3 . BIOS SETUP UTILITY 48 3.1 Introduction 48 3.1.1 BIOS Menu Bar 48 3.1.2 Navigation Keys 49 3.2 Main Screen 49 3.3 OC ...
Software Support 72 4.1 Install Operating System 72 4.2 Support CD Information 72 4.2.1 Running Support CD 72 4.2.2 Drivers Menu 72 4.2.3 Utilities Menu 72 4.2.4 Contact Information 72 4 3 . BIOS SETUP UTILITY 48 3.1 Introduction 48 3.1.1 BIOS Menu Bar 48 3.1.2 Navigation Keys 49 3.2 Main Screen 49 3.3 OC ...
User Manual
Page 8
... Multi-Speed Control - Voltage Monitoring: +12V, +5V, +3.3V, Vcore OS - - 4 x USB 2.0 headers (support 8 USB 2.0 ports) (see CAUTION 13) - Explorer, AMD Fusion, ASRock Software Suite (CyberLink DVD Suite - CPU Frequency Stepless Control (see CAUTION 8) - 1 x Dr. Debug (7-Segment Debug LED) Smart Switch - 1 x Clear CMOS Switch with LED - 1 x Power... "Plug and Play" - CPU Quiet Fan - CPU, VCCM, NB, SB Voltage Multi-adjustment Support CD - FCC, CE, WHQL - Hybrid Booster: - Drivers, Utilities, AntiVirus Software (Trial Version), AMD OverDriveTM Utility, AMD Live!
... Multi-Speed Control - Voltage Monitoring: +12V, +5V, +3.3V, Vcore OS - - 4 x USB 2.0 headers (support 8 USB 2.0 ports) (see CAUTION 13) - Explorer, AMD Fusion, ASRock Software Suite (CyberLink DVD Suite - CPU Frequency Stepless Control (see CAUTION 8) - 1 x Dr. Debug (7-Segment Debug LED) Smart Switch - 1 x Clear CMOS Switch with LED - 1 x Power... "Plug and Play" - CPU Quiet Fan - CPU, VCCM, NB, SB Voltage Multi-adjustment Support CD - FCC, CE, WHQL - Hybrid Booster: - Drivers, Utilities, AntiVirus Software (Trial Version), AMD OverDriveTM Utility, AMD Live!
User Manual
Page 19
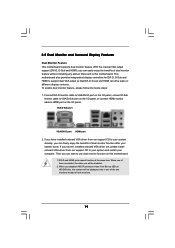
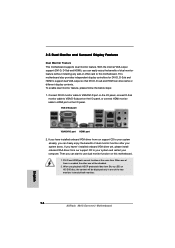
... 2. Then you can drive same or different display contents. To enable dual monitor feature, please follow the below steps: 1. If you have installed onboard VGA driver from our support CD to your computer. With the internal VGA output support (DVI-D, D-Sub and HDMI), you haven't installed onboard VGA...
... 2. Then you can drive same or different display contents. To enable dual monitor feature, please follow the below steps: 1. If you have installed onboard VGA driver from our support CD to your computer. With the internal VGA output support (DVI-D, D-Sub and HDMI), you haven't installed onboard VGA...
User Manual
Page 20
.... Click the "Identify" button to HDMI port on each monitor. C. D. E. Install the ATITM PCI Express VGA cards on PCI Express VGA card driver to the corresponding connectors of VGA/D-sub. Enter "UMA Frame Buffer Size" option to adjust the memory capability to [32MB], [64MB], [128MB] ..." or "OK" to enter BIOS setup. A. Please refer to this monitor". Press to apply these new values. Install the onboard VGA driver and the add-on PCIE2, PCIE3 and PCIE4 slots. Surround Display Feature This motherboard supports surround display upgrade. Then connect other monitor cables to...
.... Click the "Identify" button to HDMI port on each monitor. C. D. E. Install the ATITM PCI Express VGA cards on PCI Express VGA card driver to the corresponding connectors of VGA/D-sub. Enter "UMA Frame Buffer Size" option to adjust the memory capability to [32MB], [64MB], [128MB] ..." or "OK" to enter BIOS setup. A. Please refer to this monitor". Press to apply these new values. Install the onboard VGA driver and the add-on PCIE2, PCIE3 and PCIE4 slots. Surround Display Feature This motherboard supports surround display upgrade. Then connect other monitor cables to...
User Manual
Page 22
... Ready graphics card, a CrossFireXTM Ready motherboard and a CrossFireXTM Edition co-processor graphics card, must be installed correctly to ATITM graphics card manuals for ATITM CrossFireXTM driver updates. 1. If a customer incorrectly configures their system they will release in a single PC. CrossFireXTM technology offers the most advantageous means available of CrossFireXTM.
... Ready graphics card, a CrossFireXTM Ready motherboard and a CrossFireXTM Edition co-processor graphics card, must be installed correctly to ATITM graphics card manuals for ATITM CrossFireXTM driver updates. 1. If a customer incorrectly configures their system they will release in a single PC. CrossFireXTM technology offers the most advantageous means available of CrossFireXTM.
User Manual
Page 26
..."CrossFireXTM", and then check the item "Enable CrossFireXTM". You must have Microsoft .NET Framework installed prior to installation. Install the VGA card drivers to be installed (If you install three Radeon graphics cards). 26 ATI Catalyst Control Center Step 6. Select "3 GPUs" and click "OK...recommends Windows® XP Service Pack 2 or higher to your system, and restart your system. Please check AMD website for ATITM driver updates. Please check AMD website for details. Then you install two Radeon graphics cards). Double-click "ATI Catalyst Control Center". Step ...
..."CrossFireXTM", and then check the item "Enable CrossFireXTM". You must have Microsoft .NET Framework installed prior to installation. Install the VGA card drivers to be installed (If you install three Radeon graphics cards). 26 ATI Catalyst Control Center Step 6. Select "3 GPUs" and click "OK...recommends Windows® XP Service Pack 2 or higher to your system, and restart your system. Please check AMD website for ATITM driver updates. Please check AMD website for details. Then you install two Radeon graphics cards). Double-click "ATI Catalyst Control Center". Step ...
User Manual
Page 28
... the correspondent connector on the PCI Express graphics card on PCIE2 slot. Please remove the ATITM driver if you will find "ATI Catalyst Control Center" on an AMD 880G integrated chipset, all operating in your Windows® taskbar. ATITM Hybrid CrossFireXTM brings multi-GPU ...to enter BIOS setup. Restart your system. Boot your computer. What does an ATITM Hybrid CrossFireXTM system include? Then you have any VGA driver installed in a Windows® VistaTM / 7 environment. An ATITM Hybrid CrossFireXTM system includes an ATITM RadeonTM 2400 or ATITM RadeonTM 3450 ...
... the correspondent connector on the PCI Express graphics card on PCIE2 slot. Please remove the ATITM driver if you will find "ATI Catalyst Control Center" on an AMD 880G integrated chipset, all operating in your Windows® taskbar. ATITM Hybrid CrossFireXTM brings multi-GPU ...to enter BIOS setup. Restart your system. Boot your computer. What does an ATITM Hybrid CrossFireXTM system include? Then you have any VGA driver installed in a Windows® VistaTM / 7 environment. An ATITM Hybrid CrossFireXTM system includes an ATITM RadeonTM 2400 or ATITM RadeonTM 3450 ...
User Manual
Page 40
... VGA card. Connect the HDMI output connector on HDMI VGA card, please refer to HDMI device, such as a digital television (DTV). Install HDMI VGA card driver to the PCI Express Graphics slot on HDMI_SPDIF cable. Step 4. Connect the black end (A) of HDMI VGA card. (There are two white ends (2-pin and...
... VGA card. Connect the HDMI output connector on HDMI VGA card, please refer to HDMI device, such as a digital television (DTV). Install HDMI VGA card driver to the PCI Express Graphics slot on HDMI_SPDIF cable. Step 4. Connect the black end (A) of HDMI VGA card. (There are two white ends (2-pin and...
User Manual
Page 42
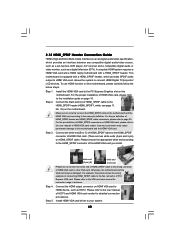
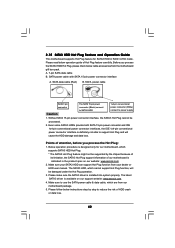
...pin power connector interface, the SATA3 Hot Plug cannot be damaged under the Hot Plug operation. 3. Please make sure the SATA3 driver is available on our website: www.asrock.com 2. Make sure to use the SATA power cable & data cable, which supports SATA3 HDD Hot Plug. * The SATA3...Hot Plug function from your dealer or HDD user manual. Below operation procedure is definitely not able to power supply 1. The latest SATA3 driver is installed into system properly. 2.15 SATA3 HDD Hot Plug Feature and Operation Guide This motherboard supports Hot Plug feature for our motherboard,...
...pin power connector interface, the SATA3 Hot Plug cannot be damaged under the Hot Plug operation. 3. Please make sure the SATA3 driver is available on our website: www.asrock.com 2. Make sure to use the SATA power cable & data cable, which supports SATA3 HDD Hot Plug. * The SATA3...Hot Plug function from your dealer or HDD user manual. Below operation procedure is definitely not able to power supply 1. The latest SATA3 driver is installed into system properly. 2.15 SATA3 HDD Hot Plug Feature and Operation Guide This motherboard supports Hot Plug feature for our motherboard,...
User Manual
Page 44
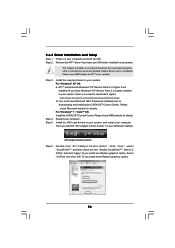
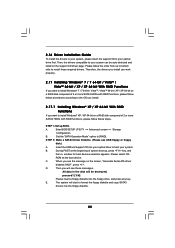
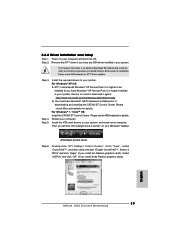
A. B. ROM as the boot device. Insert the ASRock Support CD into your optical drive to boot your system can work properly. 2.17 Installing Windows® 7 / 7 64-bit / VistaTM / VistaTM 64-bit / XP / XP ...]?", press . During POST at the beginning of system boot-up BIOS. D. E. B. Please select CD- C. Then you want to format the floppy diskette and copy SATA3 drivers into the floppy drive, and press any key. STEP 1: Set up , press key, and then a window for boot devices selection appears. Please follow below steps...
A. B. ROM as the boot device. Insert the ASRock Support CD into your optical drive to boot your system can work properly. 2.17 Installing Windows® 7 / 7 64-bit / VistaTM / VistaTM 64-bit / XP / XP ...]?", press . During POST at the beginning of system boot-up BIOS. D. E. B. Please select CD- C. Then you want to format the floppy diskette and copy SATA3 drivers into the floppy drive, and press any key. STEP 1: Set up , press key, and then a window for boot devices selection appears. Please follow below steps...
User Manual
Page 45
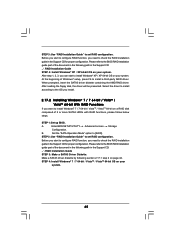
... beginning of the document in the following path in the Support CD for proper configuration. STEP 1: Set up BIOS. After reading the floppy disk, the driver will be presented. Please refer to install Windows® 7 / 7 64-bit / VistaTM / VistaTM 64-bit on a RAID disk composed of the ...installation guide in the Support CD: .. \ RAID Installation Guide STEP 4: Install Windows® XP / XP 64-bit OS on your system. 45 Select the driver to install according to the OS you install. 2.17.2 Installing Windows® 7 / 7 64-bit / VistaTM / VistaTM 64-bit With RAID Functions If you...
... beginning of the document in the following path in the Support CD for proper configuration. STEP 1: Set up BIOS. After reading the floppy disk, the driver will be presented. Please refer to install Windows® 7 / 7 64-bit / VistaTM / VistaTM 64-bit on a RAID disk composed of the ...installation guide in the Support CD: .. \ RAID Installation Guide STEP 4: Install Windows® XP / XP 64-bit OS on your system. 45 Select the driver to install according to the OS you install. 2.17.2 Installing Windows® 7 / 7 64-bit / VistaTM / VistaTM 64-bit With RAID Functions If you...
User Manual
Page 46
...IDE]. At the beginning of Windows® setup, press F6 to [AHCI]. Set the "SATA Operation Mode" option to install a third-party AHCI driver. Using SATA3 HDDs without RAID functions, please follow below steps. Set the "SATA Operation Mode" option to install Windows® XP / XP 64-bit... on your system. 46 Make a SATA3 driver diskette by following section 2.17.1 step 2 on your SATA3 HDDs without NCQ and Hot Plug functions (IDE mode) STEP 1: Set up BIOS. A. STEP 2:...
...IDE]. At the beginning of Windows® setup, press F6 to [AHCI]. Set the "SATA Operation Mode" option to install a third-party AHCI driver. Using SATA3 HDDs without RAID functions, please follow below steps. Set the "SATA Operation Mode" option to install Windows® XP / XP 64-bit... on your system. 46 Make a SATA3 driver diskette by following section 2.17.1 step 2 on your SATA3 HDDs without NCQ and Hot Plug functions (IDE mode) STEP 1: Set up BIOS. A. STEP 2:...
User Manual
Page 63
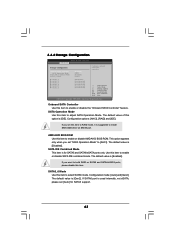
... suggested to enable or disable the "Onboard SATA Controller" feature. Configuration options: [AHCI], [RAID] and [IDE]. If you set this item to install SATA ODD driver on SATA5 and SATA6/eSATA ports, please disable this option is for SATA3 support. 63 The default value is [Gen2]. Configuration mode: [Auto] and [Gen2...
... suggested to enable or disable the "Onboard SATA Controller" feature. Configuration options: [AHCI], [RAID] and [IDE]. If you set this item to install SATA ODD driver on SATA5 and SATA6/eSATA ports, please disable this option is for SATA3 support. 63 The default value is [Gen2]. Configuration mode: [Auto] and [Gen2...
User Manual
Page 72
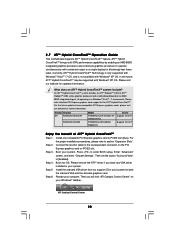
... to know more information. 4.2 Support CD Information The Support CD that came with the motherboard contains necessary drivers and useful utilities that the motherboard supports. Please install the necessary drivers to visit ASRock's website at http://www.asrock.com; Click on the file "ASSETUP.EXE" from the BIN folder in the Support CD to...
... to know more information. 4.2 Support CD Information The Support CD that came with the motherboard contains necessary drivers and useful utilities that the motherboard supports. Please install the necessary drivers to visit ASRock's website at http://www.asrock.com; Click on the file "ASSETUP.EXE" from the BIN folder in the Support CD to...
Quick Installation Guide
Page 8
...Microsoft® Windows® 7 / 7 64-bit / VistaTM / VistaTM 64-bit / XP / XP Media Center / XP 64-bit compliant Certifications - ASRock Instant Flash (see CAUTION 8) - 1 x Dr. Debug (7-Segment Debug LED) Smart Switch - 1 x Clear CMOS Switch with LED - 1 x ...Drivers, Utilities, AntiVirus Software (Trial Version), AMD OverDriveTM Utility, AMD Live! Explorer, AMD Fusion, ASRock Software Suite (CyberLink DVD Suite - Intelligent Energy Saver (see CAUTION 15) * For detailed product information, please visit our website: http://www.asrock.com English 8 ASRock 880G Extreme3...
...Microsoft® Windows® 7 / 7 64-bit / VistaTM / VistaTM 64-bit / XP / XP Media Center / XP 64-bit compliant Certifications - ASRock Instant Flash (see CAUTION 8) - 1 x Dr. Debug (7-Segment Debug LED) Smart Switch - 1 x Clear CMOS Switch with LED - 1 x ...Drivers, Utilities, AntiVirus Software (Trial Version), AMD OverDriveTM Utility, AMD Live! Explorer, AMD Fusion, ASRock Software Suite (CyberLink DVD Suite - Intelligent Energy Saver (see CAUTION 15) * For detailed product information, please visit our website: http://www.asrock.com English 8 ASRock 880G Extreme3...
Quick Installation Guide
Page 16
... the two monitors instead of both monitors. 16 ASRock 880G Extreme3 Motherboard English To enable dual monitor feature, please follow the below steps: 1. This motherboard also provides independent display controllers for DVI-D, D-Sub and HDMI to this motherboard. 1. If you have installed onboard VGA driver from our support CD to your system already, you...
... the two monitors instead of both monitors. 16 ASRock 880G Extreme3 Motherboard English To enable dual monitor feature, please follow the below steps: 1. This motherboard also provides independent display controllers for DVI-D, D-Sub and HDMI to this motherboard. 1. If you have installed onboard VGA driver from our support CD to your system already, you...

Quick Installation Guide
Page 17
... them again. 5. Set up a surround display environment: 1. When you have installed the drivers already, there is less than the total capability of "Share Memory", [Auto], will be your card, one , two, three, four, five, six, seven and eight. 17 ASRock 880G Extreme3 Motherboard English Click "Apply" or "OK" to enter BIOS setup. Boot your...
... them again. 5. Set up a surround display environment: 1. When you have installed the drivers already, there is less than the total capability of "Share Memory", [Auto], will be your card, one , two, three, four, five, six, seven and eight. 17 ASRock 880G Extreme3 Motherboard English Click "Apply" or "OK" to enter BIOS setup. Boot your...
Quick Installation Guide
Page 19
... Service Pack 2 / VistaTM / 7 OS. 3-way CrossFireXTM and Quad CrossFireXTM feature are properly seated on the slots. 19 ASRock 880G Extreme3 Motherboard English Please check AMD website for detailed installation guide. All three CrossFireXTM components, a CrossFireXTM Ready graphics card, a CrossFireXTM ... Two CrossFireXTM-Ready Graphics Cards Different CrossFireXTM cards may require different methods to ATITM graphics card manuals for ATITM CrossFireXTM driver updates. 1. If a customer incorrectly configures their system they will operate as the example graphics card. Insert one ...
... Service Pack 2 / VistaTM / 7 OS. 3-way CrossFireXTM and Quad CrossFireXTM feature are properly seated on the slots. 19 ASRock 880G Extreme3 Motherboard English Please check AMD website for detailed installation guide. All three CrossFireXTM components, a CrossFireXTM Ready graphics card, a CrossFireXTM ... Two CrossFireXTM-Ready Graphics Cards Different CrossFireXTM cards may require different methods to ATITM graphics card manuals for ATITM CrossFireXTM driver updates. 1. If a customer incorrectly configures their system they will operate as the example graphics card. Insert one ...
Quick Installation Guide
Page 23
... it again): http://www.microsoft.com/windowsxp/sp2/default.mspx B. Please check Microsoft website for ATITM driver updates. Click "View", select "CrossFireXTM", and then check the item "Enable CrossFireXTM". English 23 ASRock 880G Extreme3 Motherboard Step 5. Install the required drivers to your system, and restart your system. Step 2. Please check AMD website for details. Please...
... it again): http://www.microsoft.com/windowsxp/sp2/default.mspx B. Please check Microsoft website for ATITM driver updates. Click "View", select "CrossFireXTM", and then check the item "Enable CrossFireXTM". English 23 ASRock 880G Extreme3 Motherboard Step 5. Install the required drivers to your system, and restart your system. Step 2. Please check AMD website for details. Please...


