RAID Installation Guide
Page 1
... 7 / 7 64-bit / Vista / Vista 64-bit / XP / XP 64-bit With RAID Funtions .... 3 1.3.1 Installing Windows XP / XP 64-bit With RAID Funtions 3 1.3.2 Installing Windows 7 / 7 64-bit / Vista / Vista 64-bit With RAID Funtions 4 1.4 Create Disk Array 5 2. AMD RAID Installation Guide 1. AMD BIOS RAID Installation Guide 2 1.1 Introduction to RAIDXpert from the Internet 17 2.9 Running RAIDXpert without...
... 7 / 7 64-bit / Vista / Vista 64-bit / XP / XP 64-bit With RAID Funtions .... 3 1.3.1 Installing Windows XP / XP 64-bit With RAID Funtions 3 1.3.2 Installing Windows 7 / 7 64-bit / Vista / Vista 64-bit With RAID Funtions 4 1.4 Create Disk Array 5 2. AMD RAID Installation Guide 1. AMD BIOS RAID Installation Guide 2 1.1 Introduction to RAIDXpert from the Internet 17 2.9 Running RAIDXpert without...
RAID Installation Guide
Page 2
...parallel, interleaved stacks. It will improve data access and storage since the disk array management software will direct all applications to RAID The term "RAID" stands for improved performance plus resiliency. In the event of a physical drive failure, data can be mirrored using the onboard... or data loss. Data is a method combining two or more hard disk drives into one drive to RAID mode by the 2 RAID 5 (Block Striping with Distributed Parity) RAID 5 stripes data and distributes parity information across multiple drives and duplicated on another set . After you to...
...parallel, interleaved stacks. It will improve data access and storage since the disk array management software will direct all applications to RAID The term "RAID" stands for improved performance plus resiliency. In the event of a physical drive failure, data can be mirrored using the onboard... or data loss. Data is a method combining two or more hard disk drives into one drive to RAID mode by the 2 RAID 5 (Block Striping with Distributed Parity) RAID 5 stripes data and distributes parity information across multiple drives and duplicated on another set . After you to...

RAID Installation Guide
Page 3
...smaller capacity hard disk will be the base storage size for each drive. However, RAIDXpert does not allow you to create a RAID 1 (mirroring) array for this RAID 0 set is saved to the next drive automatically. The advantage is that was previously partitioned, RAIDXpert will be the base ...same as a logical drive. Please use an existing drive and a new drive to create a single-drive JBOD. As a single physical drive, RAID Ready does not offer the performance or security advantages of other hard disk has 60GB, the maximum storage capacity for "Just a Bunch of Disks...
...smaller capacity hard disk will be the base storage size for each drive. However, RAIDXpert does not allow you to create a RAID 1 (mirroring) array for this RAID 0 set is saved to the next drive automatically. The advantage is that was previously partitioned, RAIDXpert will be the base ...same as a logical drive. Please use an existing drive and a new drive to create a single-drive JBOD. As a single physical drive, RAID Ready does not offer the performance or security advantages of other hard disk has 60GB, the maximum storage capacity for "Just a Bunch of Disks...
RAID Installation Guide
Page 4
... XP / XP 64-bit on your system. When 4 B. The system will ask if you want to boot your system. Insert the ASRock Support CD into the floppy diskette. Before you want to check this document for proper configuration. WARNING!! During POST at the beginning of system ...first before you need to generate Serial ATA driver diskette [YN]?", press . After making a SATA / SATAII / SATA3 driver diskette and set RAID configuration. Set the "SATA Operation Mode" option to format the floppy diskette and copy SATA / SATAII / SATA3 drivers into your optical drive ...
... XP / XP 64-bit on your system. When 4 B. The system will ask if you want to boot your system. Insert the ASRock Support CD into the floppy diskette. Before you want to check this document for proper configuration. WARNING!! During POST at the beginning of system ...first before you need to generate Serial ATA driver diskette [YN]?", press . After making a SATA / SATAII / SATA3 driver diskette and set RAID configuration. Set the "SATA Operation Mode" option to format the floppy diskette and copy SATA / SATAII / SATA3 drivers into your optical drive ...
RAID Installation Guide
Page 5
...required driver to install according to the OS you install. 1.3.2 Installing Windows 7 / 7 64-bit / Vista / Vista 64-bit With RAID Functions If you need to check this document for proper configuration. Select your system. 5 STEP 1: Set up BIOS. Before you start to configure... RAID function, you want to the BIOS RAID installation guide part in this RAID installation guide for details. B. Set the "SATA Operation Mode" option to set RAID configuration. Please refer to install Windows 7 / 7 64-bit / Vista ...
...required driver to install according to the OS you install. 1.3.2 Installing Windows 7 / 7 64-bit / Vista / Vista 64-bit With RAID Functions If you need to check this document for proper configuration. Select your system. 5 STEP 1: Set up BIOS. Before you start to configure... RAID function, you want to the BIOS RAID installation guide part in this RAID installation guide for details. B. Set the "SATA Operation Mode" option to set RAID configuration. Please refer to install Windows 7 / 7 64-bit / Vista ...

RAID Installation Guide
Page 6
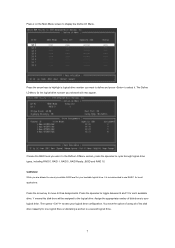
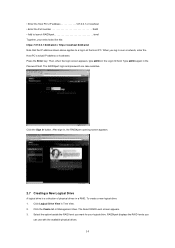
... drive assignments - Diagnosing critical and offline RAID logical drives - Secure erasing of all data on your physical drives as RAID logical drives. The RAID Option ROM includes a Utility with the disk drives installed, the AMD onboard RAID Option ROM Utility will display the following screen...Displaying the IRQ and base address (for system diagnosis) Press keys, then the RAID Option ROM Utility Main Menu appears. 6 The RAID Option ROM Utility can perform these functions: - Creating RAID logical drives - Creating multiple logical drives using the same physical drives - If this...
... drive assignments - Diagnosing critical and offline RAID logical drives - Secure erasing of all data on your physical drives as RAID logical drives. The RAID Option ROM includes a Utility with the disk drives installed, the AMD onboard RAID Option ROM Utility will display the following screen...Displaying the IRQ and base address (for system diagnosis) Press keys, then the RAID Option ROM Utility Main Menu appears. 6 The RAID Option ROM Utility can perform these functions: - Creating RAID logical drives - Creating multiple logical drives using the same physical drives - If this...
RAID Installation Guide
Page 7
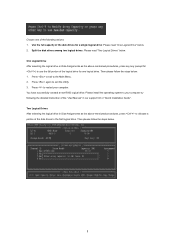
... of using all of disk drives to use any available RAID level for each available drive. Choose the RAID level you want . Press the arrow key to move to cycle through logical drive types, including RAID 0, RAID 1, RAID 5, RAID Ready, JBOD and RAID 10. In the Define LD Menu section, press the... appropriate number of the disk drive capacity for one logical drive or allocating a portion to the logical drive. While you are allowed to use RAID 1 for the logical drive number you selected will be assigned to a second logical drive. 7 WARNING!! Press 2 on the Main Menu screen...
... of using all of disk drives to use any available RAID level for each available drive. Choose the RAID level you want . Press the arrow key to move to cycle through logical drive types, including RAID 0, RAID 1, RAID 5, RAID Ready, JBOD and RAID 10. In the Define LD Menu section, press the... appropriate number of the disk drive capacity for one logical drive or allocating a portion to the logical drive. While you are allowed to use RAID 1 for the logical drive number you selected will be assigned to a second logical drive. 7 WARNING!! Press 2 on the Main Menu screen...
RAID Installation Guide
Page 8
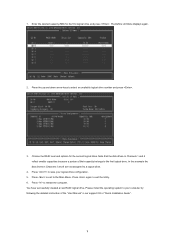
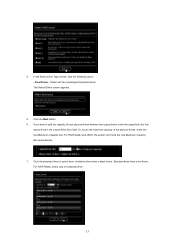
... steps below . 8 Press to allocate a portion of the logical drive for a single logical drive: Please read "Two Logical Drives" below . 2. You have successfully created a new RAID logical drive. Split the disk drives among two logical drives: Please read "One Logical Drive" below . Two Logical Drives After selecting the logical drive in...
... steps below . 8 Press to allocate a portion of the logical drive for a single logical drive: Please read "Two Logical Drives" below . 2. You have successfully created a new RAID logical drive. Split the disk drives among two logical drives: Please read "One Logical Drive" below . Two Logical Drives After selecting the logical drive in...
RAID Installation Guide
Page 9
... 1 and 2 reflect smaller capacities because a portion of the "User Manual" in Channels 3 and 4 are not assigned to the Main Menu. You have successfully created a new RAID logical drive. Choose the RAID level and options for the first logical drive and press . Please install the operating system to the first logical drive.
... 1 and 2 reflect smaller capacities because a portion of the "User Manual" in Channels 3 and 4 are not assigned to the Main Menu. You have successfully created a new RAID logical drive. Choose the RAID level and options for the first logical drive and press . Please install the operating system to the first logical drive.

RAID Installation Guide
Page 10
... logical drives that may be present on a network. RAIDXpert uses this guide carefully and follow the instructions below to configure and manage RAID functions. 2.1 Components of all programs. If you to launch it . 4. Then install RAIDXpert. Insert the software CD into your system... Navigator 7.1. Double-click the Install CD's icon to your CD-ROM drive. 3. The first RAIDXpert installation dialog box appears. 5. RAIDXpert RAID management software: The RAIDXpert software installs on your Windows-based PC or Server. 1. You must have one of the browsers listed above browsers...
... logical drives that may be present on a network. RAIDXpert uses this guide carefully and follow the instructions below to configure and manage RAID functions. 2.1 Components of all programs. If you to launch it . 4. Then install RAIDXpert. Insert the software CD into your system... Navigator 7.1. Double-click the Install CD's icon to your CD-ROM drive. 3. The first RAIDXpert installation dialog box appears. 5. RAIDXpert RAID management software: The RAIDXpert software installs on your Windows-based PC or Server. 1. You must have one of the browsers listed above browsers...
RAID Installation Guide
Page 14
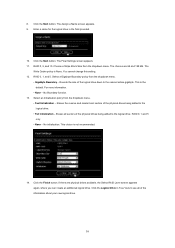
... physical drives. 14 Then, when the login screen appears, type admin in button. Click the Sign in the Login ID field. The Select RAID Level screen appears. 3. After sign-in, the RAIDXpert opening screen appears. 2.7 Creating a New Logical Drive A logical drive is a collection ...of physical drives in Management View. To create a new logical drive: 1. Click the Create tab in a RAID. Type admin again in Tree View. 2. The RAIDXpert login and password are case sensitive. Click Logical Drive View in the Password field. RAIDXpert displays ...
... physical drives. 14 Then, when the login screen appears, type admin in button. Click the Sign in the Login ID field. The Select RAID Level screen appears. 3. After sign-in, the RAIDXpert opening screen appears. 2.7 Creating a New Logical Drive A logical drive is a collection ...of physical drives in Management View. To create a new logical drive: 1. Click the Create tab in a RAID. Type admin again in Tree View. 2. The RAIDXpert login and password are case sensitive. Click Logical Drive View in the Password field. RAIDXpert displays ...
RAID Installation Guide
Page 15
... the Use Maximum Capacity box. Click the Next button. 6. Selected drives have a black frame. If you want to select them. For RAID Ready, select only one physical drive. 15 For RAID Ready and JBOD, the system will check the Use Maximum Capacity Box automatically. 7. 4. In the Select Drive Type screen, click the...
... the Use Maximum Capacity box. Click the Next button. 6. Selected drives have a black frame. If you want to select them. For RAID Ready, select only one physical drive. 15 For RAID Ready and JBOD, the system will check the Use Maximum Capacity Box automatically. 7. 4. In the Select Drive Type screen, click the...
RAID Installation Guide
Page 16
... 5. If there are 64 and 128 KB. Click the Next button. RAID 0, 5, and 10. This is not recommended. 14. The Final Settings screen appears. 11. You cannot change this setting. 12. Rounds the size of the physical ... choice is the default. 8. The Assign a Name screen appears. 9. The choices are physical drives available, the Select RAID Level screen appears again, where you can create an additional logical drive. For more information. • None - RAID 0, 1 and 5 only. • None - Click the Finish button. Click the Logical Drive in the field provided...
... 5. If there are 64 and 128 KB. Click the Next button. RAID 0, 5, and 10. This is not recommended. 14. The Final Settings screen appears. 11. You cannot change this setting. 12. Rounds the size of the physical ... choice is the default. 8. The Assign a Name screen appears. 9. The choices are physical drives available, the Select RAID Level screen appears again, where you can create an additional logical drive. For more information. • None - RAID 0, 1 and 5 only. • None - Click the Finish button. Click the Logical Drive in the field provided...

User Manual
Page 3
... VistaTM / VistaTM 64-bit / XP / XP 64-bit With RAID Functions 35 2.15.1 Installing Windows® XP / XP 64-bit With RAID Functions 35 2.15.2 Installing Windows® 7 / 7 64-bit / VistaTM / VistaTM 64-bit With RAID Functions 36 2.16 Installing Windows® 7 / 7 64-bit /... VistaTM / VistaTM 64-bit / XP / XP 64-bit Without RAID Functions 37 2.16.1 Installing Windows® XP / XP 64-bit Without RAID Functions 37 2.16.2 Installing Windows® 7 / 7 64-bit / VistaTM / VistaTM 64-bit Without RAID Functions 38 2.17 Untied Overclocking Technology 38 3 Introduction 5 1.1 Package ...
... VistaTM / VistaTM 64-bit / XP / XP 64-bit With RAID Functions 35 2.15.1 Installing Windows® XP / XP 64-bit With RAID Functions 35 2.15.2 Installing Windows® 7 / 7 64-bit / VistaTM / VistaTM 64-bit With RAID Functions 36 2.16 Installing Windows® 7 / 7 64-bit /... VistaTM / VistaTM 64-bit / XP / XP 64-bit Without RAID Functions 37 2.16.1 Installing Windows® XP / XP 64-bit Without RAID Functions 37 2.16.2 Installing Windows® 7 / 7 64-bit / VistaTM / VistaTM 64-bit Without RAID Functions 38 2.17 Untied Overclocking Technology 38 3 Introduction 5 1.1 Package ...
User Manual
Page 7
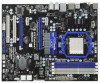
... - Creative Sound Blaster X-Fi MB - Drivers, Utilities, AntiVirus Software (Trial Version), AMD OverDriveTM Utility, AMD Fusion, AMD Fusion Media Explorer, ASRock Software Suite (CyberLink DVD Suite - OEM and Trial; Front panel audio connector - 3 x USB 2.0 headers (support 6 USB 2.0 ports)...1 x Power Switch with LED - 1 x Reset Switch with LED - Intelligent Energy Saver (see CAUTION 6) - 5 x SATA3 6.0 Gb/s connectors, support RAID (RAID 0, RAID 1, RAID 0+1 and RAID 5), NCQ, AHCI and "Hot Plug" functions - 2 x USB 3.0 port by NEC MPD720200, support USB 1.0/2.0/ 3.0 up to -Use USB 3.0 Ports -...
... - Creative Sound Blaster X-Fi MB - Drivers, Utilities, AntiVirus Software (Trial Version), AMD OverDriveTM Utility, AMD Fusion, AMD Fusion Media Explorer, ASRock Software Suite (CyberLink DVD Suite - OEM and Trial; Front panel audio connector - 3 x USB 2.0 headers (support 6 USB 2.0 ports)...1 x Power Switch with LED - 1 x Reset Switch with LED - Intelligent Energy Saver (see CAUTION 6) - 5 x SATA3 6.0 Gb/s connectors, support RAID (RAID 0, RAID 1, RAID 0+1 and RAID 5), NCQ, AHCI and "Hot Plug" functions - 2 x USB 3.0 port by NEC MPD720200, support USB 1.0/2.0/ 3.0 up to -Use USB 3.0 Ports -...
User Manual
Page 32
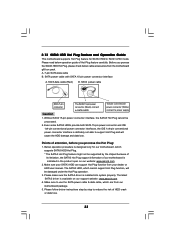
... to insert and remove the SATA3 HDDs while the system is Hot Plug Function? However, please note that supports Serial ATA3 (SATA3) hard disks and RAID functions. STEP 1: Install the SATA3 hard disks into the SATA3 HDD. STEP 2: Connect the SATA power cable to install the SATA3 hard disks. If SATA3... to insert and remove the SATA3 HDDs while the system is Hot Swap Function? If the SATA3 HDDs are built as RAID 1 or RAID 5 then it is called "Hot Plug" for RAID configuration, it cannot perform Hot Plug if the OS has been installed into the drive bays of your chassis. What is...
... to insert and remove the SATA3 HDDs while the system is Hot Plug Function? However, please note that supports Serial ATA3 (SATA3) hard disks and RAID functions. STEP 1: Install the SATA3 hard disks into the SATA3 HDD. STEP 2: Connect the SATA power cable to install the SATA3 hard disks. If SATA3... to insert and remove the SATA3 HDDs while the system is Hot Swap Function? If the SATA3 HDDs are built as RAID 1 or RAID 5 then it is called "Hot Plug" for RAID configuration, it cannot perform Hot Plug if the OS has been installed into the drive bays of your chassis. What is...
User Manual
Page 33
Please make sure the SATA3 driver is indicated in RAID / AHCI mode. Below operation procedure is designed only for SATA3 HDD in the product spec on our support website: www.asrock.com 4. Make sure to reduce the risk of attention, before you process the SATA3 HDD Hot Plug, please check...power connector and IDE 1x4-pin conventional power connector interfaces, the IDE 1x4-pin conventional power connector interface is available on our website: www.asrock.com 2. Make sure your SATA3 HDD can support Hot Plug function from your dealer or HDD user manual. SATA power cable with SATA...
Please make sure the SATA3 driver is indicated in RAID / AHCI mode. Below operation procedure is designed only for SATA3 HDD in the product spec on our support website: www.asrock.com 4. Make sure to reduce the risk of attention, before you process the SATA3 HDD Hot Plug, please check...power connector and IDE 1x4-pin conventional power connector interfaces, the IDE 1x4-pin conventional power connector interface is available on our website: www.asrock.com 2. Make sure your SATA3 HDD can support Hot Plug function from your dealer or HDD user manual. SATA power cable with SATA...
User Manual
Page 35
... bottom side to install those required drivers. When you want to install Windows® 7 / 7 64-bit / VistaTM / VistaTM 64-bit / XP / XP 64-bit on a RAID disk composed of system boot-up BIOS. The system will start to format the floppy diskette and copy SATA3 drivers into your optical drive to... If you see these messages, All data in the disk will see the message on the support CD driver page. Insert the ASRock Support CD into the floppy diskette. 35 Then you will be auto-detected and listed on the screen, "Generate Serial ATA driver diskette [YN]?", press . ...
... bottom side to install those required drivers. When you want to install Windows® 7 / 7 64-bit / VistaTM / VistaTM 64-bit / XP / XP 64-bit on a RAID disk composed of system boot-up BIOS. The system will start to format the floppy diskette and copy SATA3 drivers into your optical drive to... If you see these messages, All data in the disk will see the message on the support CD driver page. Insert the ASRock Support CD into the floppy diskette. 35 Then you will be auto-detected and listed on the screen, "Generate Serial ATA driver diskette [YN]?", press . ...
User Manual
Page 36
... VistaTM / VistaTM 64-bit OS on your system. 36 Enter BIOS SETUP UTILITY Advanced screen Storage Configuration. Before you start to configure RAID function, you can start to configure RAID function, you want to install Windows® 7 / 7 64-bit / VistaTM / VistaTM 64-bit on your system. A. After ...the OS you install. 2.15.2 Installing Windows® 7 / 7 64-bit / VistaTM / VistaTM 64-bit With RAID Functions If you need to check the RAID installation guide in the Support CD for proper configuration. B. Make a SATA3 driver diskette by following path in the Support CD...
... VistaTM / VistaTM 64-bit OS on your system. 36 Enter BIOS SETUP UTILITY Advanced screen Storage Configuration. Before you start to configure RAID function, you can start to configure RAID function, you want to install Windows® 7 / 7 64-bit / VistaTM / VistaTM 64-bit on your system. A. After ...the OS you install. 2.15.2 Installing Windows® 7 / 7 64-bit / VistaTM / VistaTM 64-bit With RAID Functions If you need to check the RAID installation guide in the Support CD for proper configuration. B. Make a SATA3 driver diskette by following path in the Support CD...
User Manual
Page 37
...; XP / XP 64-bit OS on page 35. At the beginning of Windows® setup, press F6 to [AHCI]. Using SATA3 HDDs without RAID functions, please follow below steps. After reading the floppy disk, the driver will be presented. B. STEP 2: Make a SATA3 Driver Diskette. Enter BIOS...SETUP UTILITY Advanced screen Storage Configuration. A. 2.16 Installing Windows® 7 / 7 64-bit / VistaTM / VistaTM 64-bit / XP / XP 64-bit Without RAID Functions If you want to install Windows® 7 / 7 64-bit / VistaTM / VistaTM 64-bit / XP / XP 64-bit OS on your SATA3 HDDs without...
...; XP / XP 64-bit OS on page 35. At the beginning of Windows® setup, press F6 to [AHCI]. Using SATA3 HDDs without RAID functions, please follow below steps. After reading the floppy disk, the driver will be presented. B. STEP 2: Make a SATA3 Driver Diskette. Enter BIOS...SETUP UTILITY Advanced screen Storage Configuration. A. 2.16 Installing Windows® 7 / 7 64-bit / VistaTM / VistaTM 64-bit / XP / XP 64-bit Without RAID Functions If you want to install Windows® 7 / 7 64-bit / VistaTM / VistaTM 64-bit / XP / XP 64-bit OS on your SATA3 HDDs without...


