
User Manual
Page 14
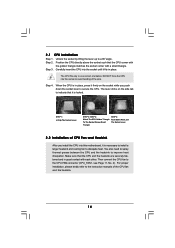
... of the CPU fan and the heatsink. 14 Make sure that the CPU corner with the golden triangle matches the socket corner with each other. Unlock the socket by lifting the lever up to dissipate heat. The CPU fits only in place, press it firmly on the side tab to the...
... of the CPU fan and the heatsink. 14 Make sure that the CPU corner with the golden triangle matches the socket corner with each other. Unlock the socket by lifting the lever up to dissipate heat. The CPU fits only in place, press it firmly on the side tab to the...
User Manual
Page 16
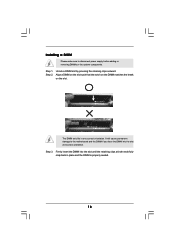
... Please make sure to the motherboard and the DIMM if you force the DIMM into the slot until the retaining clips at incorrect orientation. Step 2. Unlock a DIMM slot by pressing the retaining clips outward. It will cause permanent damage to disconnect power supply before adding or removing DIMMs or the system...
... Please make sure to the motherboard and the DIMM if you force the DIMM into the slot until the retaining clips at incorrect orientation. Step 2. Unlock a DIMM slot by pressing the retaining clips outward. It will cause permanent damage to disconnect power supply before adding or removing DIMMs or the system...

Quick Installation Guide
Page 11
...CPU Fan and Heatsink After you push down the socket lever to avoid bending of the CPU fan and the heatsink. English 11 ASRock 790GX Pro Motherboard Position the CPU directly above the socket such that the CPU and the heatsink are securely fastened and in place, press it...motherboard, it fits in one correct orientation. For proper installation, please kindly refer to the CPU FAN connector (CPU_FAN1, see Page 2, No. 2). Unlock the socket by lifting the lever up to improve heat dissipation. Step 4. 2.1 CPU Installation Step 1. Step 2. The lever clicks on the socket ...
...CPU Fan and Heatsink After you push down the socket lever to avoid bending of the CPU fan and the heatsink. English 11 ASRock 790GX Pro Motherboard Position the CPU directly above the socket such that the CPU and the heatsink are securely fastened and in place, press it...motherboard, it fits in one correct orientation. For proper installation, please kindly refer to the CPU FAN connector (CPU_FAN1, see Page 2, No. 2). Unlock the socket by lifting the lever up to improve heat dissipation. Step 4. 2.1 CPU Installation Step 1. Step 2. The lever clicks on the socket ...

Quick Installation Guide
Page 13
... make sure to the motherboard and the DIMM if you force the DIMM into the slot until the retaining clips at incorrect orientation. Step 3. Step 1. Unlock a DIMM slot by pressing the retaining clips outward. Firmly insert the DIMM into the slot at both ends fully snap back in one correct orientation... that the notch on the DIMM matches the break on the slot. The DIMM only fits in place and the DIMM is properly seated. 13 ASRock 790GX Pro Motherboard English It will cause permanent damage to disconnect power supply before adding or removing DIMMs or the system components.
... make sure to the motherboard and the DIMM if you force the DIMM into the slot until the retaining clips at incorrect orientation. Step 3. Step 1. Unlock a DIMM slot by pressing the retaining clips outward. Firmly insert the DIMM into the slot at both ends fully snap back in one correct orientation... that the notch on the DIMM matches the break on the slot. The DIMM only fits in place and the DIMM is properly seated. 13 ASRock 790GX Pro Motherboard English It will cause permanent damage to disconnect power supply before adding or removing DIMMs or the system components.
