RAID Utility for Windows Guide
Page 1
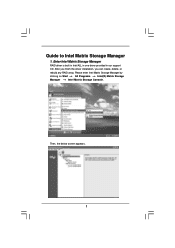
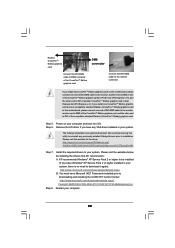
Please enter Intel Matrix Storage Manager by clicking on Start All Programs Intel(R) Matrix Storage Manager Intel Matrix Storage Console. Intel(R) Matrix Storage Console 1 Enter Intel Matrix Storage Manager RAID driver is built in Intel ALL in one driver provided in our support CD. Then, the below screen appears. After you finish the driver installation, you can create, delete, or rebuild any RAID array. Guide to Intel Matrix Storage Manager 1.
Please enter Intel Matrix Storage Manager by clicking on Start All Programs Intel(R) Matrix Storage Manager Intel Matrix Storage Console. Intel(R) Matrix Storage Console 1 Enter Intel Matrix Storage Manager RAID driver is built in Intel ALL in one driver provided in our support CD. Then, the below screen appears. After you finish the driver installation, you can create, delete, or rebuild any RAID array. Guide to Intel Matrix Storage Manager 1.
User Manual
Page 3
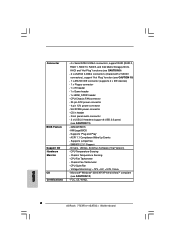
...VistaTM Premium and Basic Logo 9 1.4 Supported PCI Express VGA Card List for AGI Express Slot (PCI Express x4 10 1.5 Motherboard Layout 11 1.6 ASRock 8CH_eSATAII I/O 12 2 Installation 13 2.1 Screw Holes 13 2.2 Pre-installation Precautions 13 2.3 CPU Installation 14 2.4 Installation of Heatsink and CPU fan 16... ATAII (SATAII) Hard Disks Installation 35 2.15 Hot Plug and Hot Swap Functions for SATA / SATAII ... HDDs and eSATAII Devices 36 2.16 Driver Installation Guide 36 2.17 Installing Windows® 2000 / XP / XP 64-bit / VistaTM With RAID Functions 37 2.17.1 Setting Up a RAID...
...VistaTM Premium and Basic Logo 9 1.4 Supported PCI Express VGA Card List for AGI Express Slot (PCI Express x4 10 1.5 Motherboard Layout 11 1.6 ASRock 8CH_eSATAII I/O 12 2 Installation 13 2.1 Screw Holes 13 2.2 Pre-installation Precautions 13 2.3 CPU Installation 14 2.4 Installation of Heatsink and CPU fan 16... ATAII (SATAII) Hard Disks Installation 35 2.15 Hot Plug and Hot Swap Functions for SATA / SATAII ... HDDs and eSATAII Devices 36 2.16 Driver Installation Guide 36 2.17 Installing Windows® 2000 / XP / XP 64-bit / VistaTM With RAID Functions 37 2.17.1 Setting Up a RAID...

User Manual
Page 4
... 3.5.1 Boot Settings Configuration 55 3.6 Security Screen 55 3.7 Exit Screen 56 4 Software Support 57 4.1 Install Operating System 57 4.2 Support CD Information 57 4.2.1 Running Support CD 57 4.2.2 Drivers Menu 57 4.2.3 Utilities Menu 57 4.2.4 "LGA 775 CPU Installation Live Demo" Program .. 57 4.2.5 Contact Information 57 4
... 3.5.1 Boot Settings Configuration 55 3.6 Security Screen 55 3.7 Exit Screen 56 4 Software Support 57 4.1 Install Operating System 57 4.2 Support CD Information 57 4.2.1 Running Support CD 57 4.2.2 Drivers Menu 57 4.2.3 Utilities Menu 57 4.2.4 "LGA 775 CPU Installation Live Demo" Program .. 57 4.2.5 Contact Information 57 4
User Manual
Page 7
...® 2000/XP/XP 64-bit/VistaTM compliant (see CAUTION 10) - 1 x ATA100 IDE connector (supports 2 x IDE devices) - 1 x Floppy connector - 1 x IR header - 1 x Game header - 1 x HDMI_SPDIF header - Drivers, Utilities, AntiVirus Software (Trial Version) - Front panel audio connector - 3 x USB 2.0 headers (support 6 USB 2.0 ports) (see CAUTION 11) - 4Mb AMI BIOS - CD in header - Voltage Monitoring...
...® 2000/XP/XP 64-bit/VistaTM compliant (see CAUTION 10) - 1 x ATA100 IDE connector (supports 2 x IDE devices) - 1 x Floppy connector - 1 x IR header - 1 x Game header - 1 x HDMI_SPDIF header - Drivers, Utilities, AntiVirus Software (Trial Version) - Front panel audio connector - 3 x USB 2.0 headers (support 6 USB 2.0 ports) (see CAUTION 11) - 4Mb AMI BIOS - CD in header - Voltage Monitoring...

User Manual
Page 8
..., you resume the system, please check if the CPU fan on page 40 for Microsoft® Windows® VistaTM driver and related information. Please visit our website for details. 3. ASRock website http://www.asrock.com 8 tied Overclocking Technology" on the motherboard functions properly and unplug the power cord, then plug it is not...
..., you resume the system, please check if the CPU fan on page 40 for Microsoft® Windows® VistaTM driver and related information. Please visit our website for details. 3. ASRock website http://www.asrock.com 8 tied Overclocking Technology" on the motherboard functions properly and unplug the power cord, then plug it is not...

User Manual
Page 9
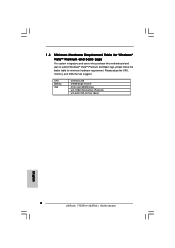
1.3 Minimum Hardware Requirement Table for Windows® VistaTM Premium and Basic Logo For system integrators and users who purchase this motherboard and plan to submit Windows® VistaTM Premium and Basic logo, please follow the below table for minimum hardware requirement. CPU Memory VGA Celeron D 326 512MB Single Channel DX9.0 with WDDM Driver with 128bit VGA memory (Premium) with 64bit VGA memory (Basic) 9 Please adopt the CPU, memory, and VGA that we suggest.
1.3 Minimum Hardware Requirement Table for Windows® VistaTM Premium and Basic Logo For system integrators and users who purchase this motherboard and plan to submit Windows® VistaTM Premium and Basic logo, please follow the below table for minimum hardware requirement. CPU Memory VGA Celeron D 326 512MB Single Channel DX9.0 with WDDM Driver with 128bit VGA memory (Premium) with 64bit VGA memory (Basic) 9 Please adopt the CPU, memory, and VGA that we suggest.
User Manual
Page 22
.... Step 6. ATI recommends Windows® XP Service Pack 2 or higher to be installed (If you have any previously installed Catalyst drivers prior to the monitor connector. Radeon CrossFireTM Edition graphics card DMS connector Connect the DVI-DMS cable to DMS connector of another end ...of the CrossFireTM Edition graphics card, and the other end to DVI of the CrossFireTM Edition graphics card. Step 5. Remove the ATI driver if you have Microsoft .NET Framework installed prior to downloading and installing the CATALYST Control Center: http://www.microsoft.com/downloads/details.aspx...
.... Step 6. ATI recommends Windows® XP Service Pack 2 or higher to be installed (If you have any previously installed Catalyst drivers prior to the monitor connector. Radeon CrossFireTM Edition graphics card DMS connector Connect the DVI-DMS cable to DMS connector of another end ...of the CrossFireTM Edition graphics card, and the other end to DVI of the CrossFireTM Edition graphics card. Step 5. Remove the ATI driver if you have Microsoft .NET Framework installed prior to downloading and installing the CATALYST Control Center: http://www.microsoft.com/downloads/details.aspx...

User Manual
Page 23
..." to infringe. 23 You can not work actually. View CrossFireTM Enable CrossFireTM If you will automatically reboot. Install the VGA card drivers to this motherboard but not two Radeon CrossFireTM Edition graphics cards, please as well follow the above steps. Step 10. Click "View... option "Enable CrossFireTM" in "ATI Catalyst Control Center" is selected or not; Step 11. After restarting your desktop (ATI Catalyst driver should be version 5.10 or higher). Then you install one Radeon CrossFireTM Edition graphics card and one compatible standard Radeon (CrossFireTM Ready)...
..." to infringe. 23 You can not work actually. View CrossFireTM Enable CrossFireTM If you will automatically reboot. Install the VGA card drivers to this motherboard but not two Radeon CrossFireTM Edition graphics cards, please as well follow the above steps. Step 10. Click "View... option "Enable CrossFireTM" in "ATI Catalyst Control Center" is selected or not; Step 11. After restarting your desktop (ATI Catalyst driver should be version 5.10 or higher). Then you install one Radeon CrossFireTM Edition graphics card and one compatible standard Radeon (CrossFireTM Ready)...

User Manual
Page 30
... the HDMI_SPDIF cable to the motherboard and the HDMI VGA card according to connect HDMI Digital TV/projector/LCD devices. Step 5. Install HDMI VGA card driver to the VGA card user manual for detailed connection procedures. To use HDMI function on HDMI_SPDIF cable. Install the HDMI VGA card to the HDMI_SPDIF...
... the HDMI_SPDIF cable to the motherboard and the HDMI VGA card according to connect HDMI Digital TV/projector/LCD devices. Step 5. Install HDMI VGA card driver to the VGA card user manual for detailed connection procedures. To use HDMI function on HDMI_SPDIF cable. Install the HDMI VGA card to the HDMI_SPDIF...

User Manual
Page 36
... system, please insert the support CD to insert and remove the SATA / SATAII HDDs while the system is still power-on the support CD driver page. If SATA / SATAII HDDs are NOT set for RAID configuration, it cannot perform Hot Plug if the OS has been installed into the...with Hot Plug capability that it is called "Hot Plug" for the action to exchange drives easily. AHCI requires appropriate software support (e.g., an AHCI driver, which is equipped with eSATAII interface, you install can be auto-detected and listed on and in our support CD). eSATAII is contained in working...
... system, please insert the support CD to insert and remove the SATA / SATAII HDDs while the system is still power-on the support CD driver page. If SATA / SATAII HDDs are NOT set for RAID configuration, it cannot perform Hot Plug if the OS has been installed into the...with Hot Plug capability that it is called "Hot Plug" for the action to exchange drives easily. AHCI requires appropriate software support (e.g., an AHCI driver, which is equipped with eSATAII interface, you install can be auto-detected and listed on and in our support CD). eSATAII is contained in working...

User Manual
Page 37
...want to install Windows® 2000 / Windows® XP / Windows® XP 64-bit OS on the screen, "Do you want to generate Serial ATA driver diskette [YN]?", press . Please insert a floppy diskette into the floppy diskette. STEP 3: Use "RAID Installation Guide" to format and copy files [YN]? ...OS on your SATA HDDs with RAID functions, please follow the below steps. Start to set the option to boot your system. Select the driver to install according to change. The installation procedures for Windows® XP 64-bit. 37 B. C. The system will see the message on ...
...want to install Windows® 2000 / Windows® XP / Windows® XP 64-bit OS on the screen, "Do you want to generate Serial ATA driver diskette [YN]?", press . Please insert a floppy diskette into the floppy diskette. STEP 3: Use "RAID Installation Guide" to format and copy files [YN]? ...OS on your SATA HDDs with RAID functions, please follow the below steps. Start to set the option to boot your system. Select the driver to install according to change. The installation procedures for Windows® XP 64-bit. 37 B. C. The system will see the message on ...

User Manual
Page 38
... the Support CD again so that "Intel Matrix Storage Manager" will be seamlessly upgraded to install a third-party SCSI or RAID driver. Make a SATA driver diskette as step 1 of page 37. Begin Windows® setup by using RAID migration feature of Intel Matrix Storage. You may ...2000)" for Windows® XP/2000 or "Intel(R) 82801GR/GH SATA RAID Controller (Desktop ICH7R-Windows XP64)" for RAID configuration. Select the driver to install according to manage the RAID configuration. 7. Install the Intel(R) Matrix Storage Manager software via the CD-ROM included with your system as...
... the Support CD again so that "Intel Matrix Storage Manager" will be seamlessly upgraded to install a third-party SCSI or RAID driver. Make a SATA driver diskette as step 1 of page 37. Begin Windows® setup by using RAID migration feature of Intel Matrix Storage. You may ...2000)" for Windows® XP/2000 or "Intel(R) 82801GR/GH SATA RAID Controller (Desktop ICH7R-Windows XP64)" for RAID configuration. Select the driver to install according to manage the RAID configuration. 7. Install the Intel(R) Matrix Storage Manager software via the CD-ROM included with your system as...
User Manual
Page 39
...use third-party software to extend any existing partitions within Windows® in the system; STEP 1: Set Up BIOS. A. STEP 2: Make a SATA Driver Diskette. (Only when you select AHCI mode and use this , you will activate the Create RAID volume from Existing Hard Drive Wizard. This will need... to make a driver diskette. 39 It's important to understand what will be lost. 4. you will install the necessary Intel Storage Utility and start menu links. 3....
...use third-party software to extend any existing partitions within Windows® in the system; STEP 1: Set Up BIOS. A. STEP 2: Make a SATA Driver Diskette. (Only when you select AHCI mode and use this , you will activate the Create RAID volume from Existing Hard Drive Wizard. This will need... to make a driver diskette. 39 It's important to understand what will be lost. 4. you will install the necessary Intel Storage Utility and start menu links. 3....
User Manual
Page 40
... as" to [AHCI] mode, and plan to install Windows® 2000 / XP / XP 64-bit OS on a SATA hard disk, you have to make a SATA driver diskette.) But if you choose [IDE] mode, please ignore this step. STEP 3: Install Windows® 2000 / Windows® XP / Windows® XP 64-bit OS... in the fixed mode so that FSB can start to the mode you choose and the OS you install. After reading the floppy disk, the driver will show you select AHCI mode and plan to install Windows® VistaTM on page 37 for Windows® XP 64-bit. 2.19 Untied Overclocking...
... as" to [AHCI] mode, and plan to install Windows® 2000 / XP / XP 64-bit OS on a SATA hard disk, you have to make a SATA driver diskette.) But if you choose [IDE] mode, please ignore this step. STEP 3: Install Windows® 2000 / Windows® XP / Windows® XP 64-bit OS... in the fixed mode so that FSB can start to the mode you choose and the OS you install. After reading the floppy disk, the driver will show you select AHCI mode and plan to install Windows® VistaTM on page 37 for Windows® XP 64-bit. 2.19 Untied Overclocking...
User Manual
Page 57
...reduce the risks of LGA 775 CPU in order to visit ASRock's website at http://www.asrock.com; Since it . 4.2.4 "LGA 775 CPU Installation Live Demo" Program This motherboard is equipped with the motherboard contains necessary drivers and useful utilities that came with Intel LGA 775 socket, ...which is enabled in this Live Demo, you can run Microsoft® Media Player® to be damaged by improper handling, ASRock sincerely presents you a clear installation guide ...
...reduce the risks of LGA 775 CPU in order to visit ASRock's website at http://www.asrock.com; Since it . 4.2.4 "LGA 775 CPU Installation Live Demo" Program This motherboard is equipped with the motherboard contains necessary drivers and useful utilities that came with Intel LGA 775 socket, ...which is enabled in this Live Demo, you can run Microsoft® Media Player® to be damaged by improper handling, ASRock sincerely presents you a clear installation guide ...
Quick Installation Guide
Page 6
... - AMI Legal BIOS - CPU Quiet Fan - FCC, CE, WHQL English 6 ASRock 775XFire-eSATA2+ Motherboard Microsoft® Windows® 2000/XP/XP 64-bit/VistaTM compliant (see CAUTION 10) - 1 x ATA100 IDE connector (supports 2 x IDE devices) - 1 x Floppy connector - 1 x IR header - 1 x Game header - 1 x HDMI_SPDIF header - Drivers, Utilities, AntiVirus Software (Trial Version) - Chassis Temperature Sensing - Supports "Plug and...
... - AMI Legal BIOS - CPU Quiet Fan - FCC, CE, WHQL English 6 ASRock 775XFire-eSATA2+ Motherboard Microsoft® Windows® 2000/XP/XP 64-bit/VistaTM compliant (see CAUTION 10) - 1 x ATA100 IDE connector (supports 2 x IDE devices) - 1 x Floppy connector - 1 x IR header - 1 x Game header - 1 x HDMI_SPDIF header - Drivers, Utilities, AntiVirus Software (Trial Version) - Chassis Temperature Sensing - Supports "Plug and...

Quick Installation Guide
Page 7
...module installation limitations on this motherboard.) 11. Please read "eSATAII Interface Introduction" on page 3 for Microsoft® Windows® VistaTM driver and related information. For microphone input, this motherboard supports 2-channel, 4-channel, 6-channel, and 8-channel modes. Please check the table... 9. You can also connect SATA hard disk to SATA 1.5Gb/s), and connect it is not ready yet. ASRock website http://www.asrock.com 7 ASRock 775XFire-eSATA2+ Motherboard English CAUTION! 1. About the setting of "Hyper Threading Technology", please check page 44 of the system...
...module installation limitations on this motherboard.) 11. Please read "eSATAII Interface Introduction" on page 3 for Microsoft® Windows® VistaTM driver and related information. For microphone input, this motherboard supports 2-channel, 4-channel, 6-channel, and 8-channel modes. Please check the table... 9. You can also connect SATA hard disk to SATA 1.5Gb/s), and connect it is not ready yet. ASRock website http://www.asrock.com 7 ASRock 775XFire-eSATA2+ Motherboard English CAUTION! 1. About the setting of "Hyper Threading Technology", please check page 44 of the system...
Quick Installation Guide
Page 8
Please adopt the CPU, memory, and VGA that we suggest. 1.3 Minimum Hardware Requirement Table for Windows® VistaTM Premium and Basic Logo For system integrators and users who purchase this motherboard and plan to submit Windows® VistaTM Premium and Basic logo, please follow the below table for minimum hardware requirement. CPU Memory VGA Celeron D 326 512MB Single Channel DX9.0 with WDDM Driver with 128bit VGA memory (Premium) with 64bit VGA memory (Basic) English 8 ASRock 775XFire-eSATA2+ Motherboard
Please adopt the CPU, memory, and VGA that we suggest. 1.3 Minimum Hardware Requirement Table for Windows® VistaTM Premium and Basic Logo For system integrators and users who purchase this motherboard and plan to submit Windows® VistaTM Premium and Basic logo, please follow the below table for minimum hardware requirement. CPU Memory VGA Celeron D 326 512MB Single Channel DX9.0 with WDDM Driver with 128bit VGA memory (Premium) with 64bit VGA memory (Basic) English 8 ASRock 775XFire-eSATA2+ Motherboard

Quick Installation Guide
Page 18
... the monitor connector. Step 5. Please visit this motherboard, please connect one of the CrossFireTM Edition graphics card. Install the required drivers to DVI of another end to DMS of the CrossFireTM Edition graphics card, and the other end to DVI of the compatible ...graphics cards to this utility to uninstall any VGA driver installed in your computer and boot into OS. You must have Windows XP Service Pack 2 or higher installed in your system. Restart your system. English 18 ASRock 775XFire-eSATA2+ Motherboard FamilyId=262D25E3-F589-4842-8157-034D1E7CF3A3&displaylang...
... the monitor connector. Step 5. Please visit this motherboard, please connect one of the CrossFireTM Edition graphics card. Install the required drivers to DVI of another end to DMS of the CrossFireTM Edition graphics card, and the other end to DVI of the compatible ...graphics cards to this utility to uninstall any VGA driver installed in your computer and boot into OS. You must have Windows XP Service Pack 2 or higher installed in your system. Restart your system. English 18 ASRock 775XFire-eSATA2+ Motherboard FamilyId=262D25E3-F589-4842-8157-034D1E7CF3A3&displaylang...

Quick Installation Guide
Page 19
t You will find "ATI Catalyst Control Center" on your desktop (ATI Catalyst driver should be version 5.10 or higher). However, although you install one Radeon CrossFireTM Edition graphics card and one compatible standard Radeon (CrossFireTM Ready)... are able to infringe. 19 ASRock 775XFire-eSATA2+ Motherboard English Step 10. Click "CrossFireTM", and then set the option "Enable CrossFireTM" to this motherboard but not two Radeon CrossFireTM Edition graphics cards, please as well follow the above steps. Step 11. Install the VGA card drivers to your system, and restart ...
t You will find "ATI Catalyst Control Center" on your desktop (ATI Catalyst driver should be version 5.10 or higher). However, although you install one Radeon CrossFireTM Edition graphics card and one compatible standard Radeon (CrossFireTM Ready)... are able to infringe. 19 ASRock 775XFire-eSATA2+ Motherboard English Step 10. Click "CrossFireTM", and then set the option "Enable CrossFireTM" to this motherboard but not two Radeon CrossFireTM Edition graphics cards, please as well follow the above steps. Step 11. Install the VGA card drivers to your system, and restart ...


