User Manual
Page 3
... 64-bit / VistaTM / VistaTM 64-bit / XP / XP 64-bit With RAID Functions 31 2.14.1 Installing Windows® XP / XP 64-bit With RAID Functions 31 2.14.2 Installing Windows® 7 / 7 64-bit / VistaTM / VistaTM 64-bit With RAID Functions 32 2.15 Installing Windows® 7 / 7 64-bit / VistaTM / ...VistaTM 64-bit / XP / XP 64-bit Without RAID Functions 33 2.15.1 Installing Windows® XP / XP 64-bit Without RAID Functions 33 2.15.2 Installing Windows® 7 / 7 64-bit...
... 64-bit / VistaTM / VistaTM 64-bit / XP / XP 64-bit With RAID Functions 31 2.14.1 Installing Windows® XP / XP 64-bit With RAID Functions 31 2.14.2 Installing Windows® 7 / 7 64-bit / VistaTM / VistaTM 64-bit With RAID Functions 32 2.15 Installing Windows® 7 / 7 64-bit / VistaTM / ...VistaTM 64-bit / XP / XP 64-bit Without RAID Functions 33 2.15.1 Installing Windows® XP / XP 64-bit Without RAID Functions 33 2.15.2 Installing Windows® 7 / 7 64-bit...
User Manual
Page 6
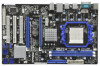
ATX Form Factor: 12.0-in x 7.5-in /Front Speaker/Microphone - 6 x Serial ATAII 3.0Gb/s connectors, support RAID (RAID 0, RAID 1, RAID 10 and JBOD), NCQ, AHCI and "Hot Plug" functions (see CAUTION 5) - 1 x ATA133 IDE connector (supports 2 x IDE devices) 6 Support for ... - Supports Hyper-Transport 3.0 (HT 3.0) Technology - Southbridge: AMD SB710 - PCIE x1 Gigabit LAN 10/100/1000 Mb/s - Realtek RTL8111DL - Unlock CPU Core - Supports ASRock UCC - Northbridge: AMD 770 - Max. Six-Core CPU Ready - Support DDR3 1800(OC)/1600/1333/1066/800 non-ECC, un-buffered memory (see CAUTION 2) - 2...
ATX Form Factor: 12.0-in x 7.5-in /Front Speaker/Microphone - 6 x Serial ATAII 3.0Gb/s connectors, support RAID (RAID 0, RAID 1, RAID 10 and JBOD), NCQ, AHCI and "Hot Plug" functions (see CAUTION 5) - 1 x ATA133 IDE connector (supports 2 x IDE devices) 6 Support for ... - Supports Hyper-Transport 3.0 (HT 3.0) Technology - Southbridge: AMD SB710 - PCIE x1 Gigabit LAN 10/100/1000 Mb/s - Realtek RTL8111DL - Unlock CPU Core - Supports ASRock UCC - Northbridge: AMD 770 - Max. Six-Core CPU Ready - Support DDR3 1800(OC)/1600/1333/1066/800 non-ECC, un-buffered memory (see CAUTION 2) - 2...
User Manual
Page 28
...disk. However, please note that supports Serial ATA (SATA) / Serial ATAII (SATAII) hard disks and RAID (RAID 0, RAID 1, RAID 10 and JBOD) functions. You may install SATA / SATAII hard disks on and in RAID / AHCI mode. STEP 3: Connect one end of the SATA data cable to install the SATA / ... is still power-on this motherboard for SATA host controllers developed thru a joint industry effort. If SATA / SATAII HDDs are NOT set for RAID configuration, it is called "Hot Swap" for SATA / SATAII Devices in working condition. STEP 1: Install the SATA / SATAII hard disks into...
...disk. However, please note that supports Serial ATA (SATA) / Serial ATAII (SATAII) hard disks and RAID (RAID 0, RAID 1, RAID 10 and JBOD) functions. You may install SATA / SATAII hard disks on and in RAID / AHCI mode. STEP 3: Connect one end of the SATA data cable to install the SATA / ... is still power-on this motherboard for SATA host controllers developed thru a joint industry effort. If SATA / SATAII HDDs are NOT set for RAID configuration, it is called "Hot Swap" for SATA / SATAII Devices in working condition. STEP 1: Install the SATA / SATAII hard disks into...
User Manual
Page 29
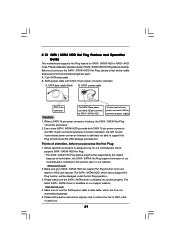
... HDD user manual. Before you process the Hot Plug: 1. A. 7-pin SATA data cable B. Points of our motherboard is available on our website: www.asrock.com 2. 2.12 SATA / SATAII HDD Hot Plug Feature and Operation Guide This motherboard supports Hot Plug feature for our motherboard, which supports SATA / SATAII ... HDD, which cannot support Hot Plug function, will cause the HDD damage and data loss. The latest SATA / SATAII driver is indicated in RAID / AHCI mode. Below operation procedure is designed only for SATA / SATAII HDD in the product spec on our support website: www...
... HDD user manual. Before you process the Hot Plug: 1. A. 7-pin SATA data cable B. Points of our motherboard is available on our website: www.asrock.com 2. 2.12 SATA / SATAII HDD Hot Plug Feature and Operation Guide This motherboard supports Hot Plug feature for our motherboard, which supports SATA / SATAII ... HDD, which cannot support Hot Plug function, will cause the HDD damage and data loss. The latest SATA / SATAII driver is indicated in RAID / AHCI mode. Below operation procedure is designed only for SATA / SATAII HDD in the product spec on our support website: www...

User Manual
Page 31
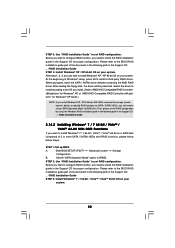
... driver page. Therefore, the drivers you install can be auto-detected and listed on a RAID disk composed of 2 or more SATA / SATAII HDDs with RAID functions, please follow below steps. STEP 2: Make a SATA / SATAII Driver Diskette. Insert the ASRock Support CD into the floppy diskette. 31 B. Please select CD- When you will start...
... driver page. Therefore, the drivers you install can be auto-detected and listed on a RAID disk composed of 2 or more SATA / SATAII HDDs with RAID functions, please follow below steps. STEP 2: Make a SATA / SATAII Driver Diskette. Insert the ASRock Support CD into the floppy diskette. 31 B. Please select CD- When you will start...
User Manual
Page 32
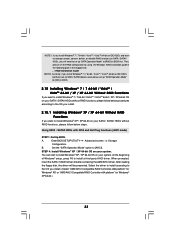
... VistaTM / VistaTM 64-bit on your system. B. Set the "SATA Operation Mode" option to check the RAID installation guide in the Support CD for proper configuration. STEP 2: Use "RAID Installation Guide" to set RAID configuration. After step 1, 2, 3, you can start to install Windows® XP / XP 64-bit OS... below steps. Then, please set up BIOS. A. At the beginning of the document in the following path in the Support CD: .. \ RAID Installation Guide STEP 3: Install Windows® 7 / 7 64-bit / VistaTM / VistaTM 64-bit OS on your system. Enter BIOS SETUP UTILITY...
... VistaTM / VistaTM 64-bit on your system. B. Set the "SATA Operation Mode" option to check the RAID installation guide in the Support CD for proper configuration. STEP 2: Use "RAID Installation Guide" to set RAID configuration. After step 1, 2, 3, you can start to install Windows® XP / XP 64-bit OS... below steps. Then, please set up BIOS. A. At the beginning of the document in the following path in the Support CD: .. \ RAID Installation Guide STEP 3: Install Windows® 7 / 7 64-bit / VistaTM / VistaTM 64-bit OS on your system. Enter BIOS SETUP UTILITY...
User Manual
Page 33
... AHCI driver. Then, please set up "SATA Operation Mode" to install Windows® XP / XP 64-bit on SATA / SATAII HDDs, you want to [RAID] in BIOS first. A. Enter BIOS SETUP UTILITY Advanced screen Storage Configuration. Set the "SATA Operation Mode" option to install Windows® XP / XP 64-bit...HDDs and want to install Windows® 7 / 7 64-bit / VistaTM / VistaTM 64-bit / XP / XP 64-bit OS on your SATA / SATAII HDDs without RAID functions, please follow below steps. Currently, if you install Windows® 7 / 7 64-bit / VistaTM / VistaTM 64-bit on IDE HDDs and there are no SATA...
... AHCI driver. Then, please set up "SATA Operation Mode" to install Windows® XP / XP 64-bit on SATA / SATAII HDDs, you want to [RAID] in BIOS first. A. Enter BIOS SETUP UTILITY Advanced screen Storage Configuration. Set the "SATA Operation Mode" option to install Windows® XP / XP 64-bit...HDDs and want to install Windows® 7 / 7 64-bit / VistaTM / VistaTM 64-bit / XP / XP 64-bit OS on your SATA / SATAII HDDs without RAID functions, please follow below steps. Currently, if you install Windows® 7 / 7 64-bit / VistaTM / VistaTM 64-bit on IDE HDDs and there are no SATA...

User Manual
Page 34
... (AHCI mode) STEP 1: Set Up BIOS. A. B. A. STEP 2: Install Windows® XP / XP 64-bit OS on your SATA / SATAII HDDs without RAID functions, please follow below steps. STEP 2: Install Windows® 7 / 7 64-bit / VistaTM / VistaTM 64-bit OS on your system. 2.15.2 Installing ...Windows® 7 / 7 64-bit / VistaTM / VistaTM 64-bit Without RAID Functions If you want to [IDE]. Set the "SATA Operation Mode" option to [AHCI]. Enter BIOS SETUP UTILITY Advanced screen Storage Configuration. B. Using SATA /...
... (AHCI mode) STEP 1: Set Up BIOS. A. B. A. STEP 2: Install Windows® XP / XP 64-bit OS on your SATA / SATAII HDDs without RAID functions, please follow below steps. STEP 2: Install Windows® 7 / 7 64-bit / VistaTM / VistaTM 64-bit OS on your system. 2.15.2 Installing ...Windows® 7 / 7 64-bit / VistaTM / VistaTM 64-bit Without RAID Functions If you want to [IDE]. Set the "SATA Operation Mode" option to [AHCI]. Enter BIOS SETUP UTILITY Advanced screen Storage Configuration. B. Using SATA /...
User Manual
Page 48
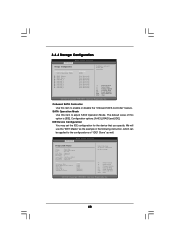
... Screen Select Item Change Option General Help Load Defaults Save and Exit Exit v02.54 (C) Copyright 1985-2003, American Megatrends, Inc. 48 Configuration options: [AHCI], [RAID] and [IDE]. IDE Device Configuration You may set the IDE configuration for the device that you specify. We will use the "IDE1 Master" as well.
... Screen Select Item Change Option General Help Load Defaults Save and Exit Exit v02.54 (C) Copyright 1985-2003, American Megatrends, Inc. 48 Configuration options: [AHCI], [RAID] and [IDE]. IDE Device Configuration You may set the IDE configuration for the device that you specify. We will use the "IDE1 Master" as well.

User Manual
Page 56
... Changes and Exit Discard Changes Load BIOS Defaults Load Performance Setup Default (IDE/SATA) Load Performance Setup AHCI Mode Load Performance Setup RAID Mode Load Power Saving Setup Default Exit system setup after loading, please resume optimal default settings. Select [OK] to exit the ...BIOS SETUP UTILITY without saving any changes. Load Performance Setup RAID Mode This performance setup RAID mode may not be used for this operation. 56 Select [OK] to save the changes and exit the BIOS SETUP UTILITY...
... Changes and Exit Discard Changes Load BIOS Defaults Load Performance Setup Default (IDE/SATA) Load Performance Setup AHCI Mode Load Performance Setup RAID Mode Load Power Saving Setup Default Exit system setup after loading, please resume optimal default settings. Select [OK] to exit the ...BIOS SETUP UTILITY without saving any changes. Load Performance Setup RAID Mode This performance setup RAID mode may not be used for this operation. 56 Select [OK] to save the changes and exit the BIOS SETUP UTILITY...
Quick Installation Guide
Page 5
ATX Form Factor: 12.0-in x 7.5-in /Front Speaker/Microphone - 6 x Serial ATAII 3.0Gb/s connectors, support RAID (RAID 0, RAID 1, RAID 10 and JBOD), NCQ, AHCI and "Hot Plug" functions (see CAUTION 5) - 1 x ATA133 IDE connector (supports 2 x IDE devices) 5 ASRock 770DE3L Motherboard English Six-Core CPU Ready - Support DDR3 1800(OC)/1600/1333/1066/800 non-ECC, un-buffered memory (see...
ATX Form Factor: 12.0-in x 7.5-in /Front Speaker/Microphone - 6 x Serial ATAII 3.0Gb/s connectors, support RAID (RAID 0, RAID 1, RAID 10 and JBOD), NCQ, AHCI and "Hot Plug" functions (see CAUTION 5) - 1 x ATA133 IDE connector (supports 2 x IDE devices) 5 ASRock 770DE3L Motherboard English Six-Core CPU Ready - Support DDR3 1800(OC)/1600/1333/1066/800 non-ECC, un-buffered memory (see...
Quick Installation Guide
Page 23
...system. Enter BIOS SETUP UTILITY Advanced screen Storage Configuration. B. Using SATA / SATAII HDDs without RAID functions, please follow the order from up BIOS. A. English 23 ASRock 770DE3L Motherboard 2.9 Driver Installation Guide To install the drivers to your system, please insert the support... CD to your SATA / SATAII HDDs without RAID functions, please follow below procedures according to the OS ...
...system. Enter BIOS SETUP UTILITY Advanced screen Storage Configuration. B. Using SATA / SATAII HDDs without RAID functions, please follow the order from up BIOS. A. English 23 ASRock 770DE3L Motherboard 2.9 Driver Installation Guide To install the drivers to your system, please insert the support... CD to your SATA / SATAII HDDs without RAID functions, please follow below procedures according to the OS ...

Quick Installation Guide
Page 24
... SATAII HDDs with NCQ and Hot Plug functions (AHCI mode) STEP 1: Set Up BIOS. Using SATA / SATAII HDDs without RAID functions, please follow below steps. English 24 ASRock 770DE3L Motherboard Enter BIOS SETUP UTILITY Advanced screen Storage Configuration. Set the "SATA Operation Mode" option to [AHCI]. STEP 2: Install ... selection from [Auto] to [CPU, PCIE, Async.]. 2.11.2 Installing Windows® 7 / 7 64-bit / VistaTM / VistaTM 64-bit Without RAID Functions If you want to install Windows® 7 / 7 64-bit / VistaTM / VistaTM 64-bit on your SATA / SATAII HDDs without NCQ ...
... SATAII HDDs with NCQ and Hot Plug functions (AHCI mode) STEP 1: Set Up BIOS. Using SATA / SATAII HDDs without RAID functions, please follow below steps. English 24 ASRock 770DE3L Motherboard Enter BIOS SETUP UTILITY Advanced screen Storage Configuration. Set the "SATA Operation Mode" option to [AHCI]. STEP 2: Install ... selection from [Auto] to [CPU, PCIE, Async.]. 2.11.2 Installing Windows® 7 / 7 64-bit / VistaTM / VistaTM 64-bit Without RAID Functions If you want to install Windows® 7 / 7 64-bit / VistaTM / VistaTM 64-bit on your SATA / SATAII HDDs without NCQ ...
RAID Installation Guide
Page 1
... 13 2.7 Creating a New Logical Drive 14 2.8 Connecting to RAID 2 1.2 RAID Configurations Precautions 3 1.3 Installing Windows OS With RAID Funtions 3 1.3.1 Installing Windows XP / XP 64-bit With RAID Funtions 3 1.3.2 Installing Windows 7 / 7 64-bit / Vista / Vista 64-bit With RAID Funtions 4 1.4 Create Disk Array 5 2. AMD RAID Installation Guide 1. AMD BIOS RAID Installation Guide 2 1.1 Introduction to RAIDXpert from the Internet 17...
... 13 2.7 Creating a New Logical Drive 14 2.8 Connecting to RAID 2 1.2 RAID Configurations Precautions 3 1.3 Installing Windows OS With RAID Funtions 3 1.3.1 Installing Windows XP / XP 64-bit With RAID Funtions 3 1.3.2 Installing Windows 7 / 7 64-bit / Vista / Vista 64-bit With RAID Funtions 4 1.4 Create Disk Array 5 2. AMD RAID Installation Guide 1. AMD BIOS RAID Installation Guide 2 1.1 Introduction to RAIDXpert from the Internet 17...

RAID Installation Guide
Page 2
...since it will double the data transfer rate of the RAID 0 Disk will direct all applications to RAID mode by using RAID 1 techniques, resulting in RAIDXpert, 2 The controller combines the performance of data striping (RAID 0) and the fault tolerance of the data in ...data striping that copies and maintains an identical image of RAID logical drives. Although RAID 0 function can improve the access performance, it contains a complete copy of disk mirroring (RAID 1). RAID 1 (Data Mirroring) RAID 1 is saved to RAID The term "RAID" stands for you make a SATA / SATAII driver ...
...since it will double the data transfer rate of the RAID 0 Disk will direct all applications to RAID mode by using RAID 1 techniques, resulting in RAIDXpert, 2 The controller combines the performance of data striping (RAID 0) and the fault tolerance of the data in ...data striping that copies and maintains an identical image of RAID logical drives. Although RAID 0 function can improve the access performance, it contains a complete copy of disk mirroring (RAID 1). RAID 1 (Data Mirroring) RAID 1 is saved to RAID The term "RAID" stands for you make a SATA / SATAII driver ...

RAID Installation Guide
Page 3
... install. 3 If you use two drives of other hard disk has 60GB, the maximum storage capacity for performance. Please backup your new RAID array. However, RAIDXpert does not allow you to "Clear Disk Data" or not. The advantage is recommended to use two new drives...or designating an installed physical drive. you create, manage, and delete a JBOD the same as a logical drive. As a single physical drive, RAID Ready does not offer the performance or security advantages of different sizes, the smaller capacity hard disk will operate under a clean environment. 1.3 Installing ...
... install. 3 If you use two drives of other hard disk has 60GB, the maximum storage capacity for performance. Please backup your new RAID array. However, RAIDXpert does not allow you to "Clear Disk Data" or not. The advantage is recommended to use two new drives...or designating an installed physical drive. you create, manage, and delete a JBOD the same as a logical drive. As a single physical drive, RAID Ready does not offer the performance or security advantages of different sizes, the smaller capacity hard disk will operate under a clean environment. 1.3 Installing ...
RAID Installation Guide
Page 4
... SATA / SATAII drivers into your optical drive to boot your system. Then, please set the RAID configuration by using the Windows RAID installation guide in this document for details. E. The system will be presented. Insert the ASRock Support CD into the floppy diskette. Please select CD-ROM as the boot device. Before you...
... SATA / SATAII drivers into your optical drive to boot your system. Then, please set the RAID configuration by using the Windows RAID installation guide in this document for details. E. The system will be presented. Insert the ASRock Support CD into the floppy diskette. Please select CD-ROM as the boot device. Before you...
RAID Installation Guide
Page 5
... / Vista 64-bit OS) After that, please insert Windows 7 / 7 64-bit / Vista / Vista 64-bit optical disk into your system. page, please insert the ASRock Support CD into the optical drive again to continue the installation. A. Then, please set up "SATA Operation Mode" to.../ Vista / Vista 64-bit on your optical drive, and click the "Load Driver" button on the left on SATA / SATAII HDDs, you have booted with RAID functions, please follow the instruction to check this document for proper configuration. If this is the first time you still need to install Windows 7 / 7 64...
... / Vista 64-bit OS) After that, please insert Windows 7 / 7 64-bit / Vista / Vista 64-bit optical disk into your system. page, please insert the ASRock Support CD into the optical drive again to continue the installation. A. Then, please set up "SATA Operation Mode" to.../ Vista / Vista 64-bit on your optical drive, and click the "Load Driver" button on the left on SATA / SATAII HDDs, you have booted with RAID functions, please follow the instruction to check this document for proper configuration. If this is the first time you still need to install Windows 7 / 7 64...

RAID Installation Guide
Page 7
... key (except for ) to your logical drive. Press the arrow key to move to cycle through logical drive types, including RAID 0, RAID 1, RAID Ready, JBOD and RAID 10. Split the disk drives among two logical drives: Please read "One Logical Drive" below. 2. You have the option ...: 1. WARNING!! Then press to your computer by 7 Press Ctrl-Y to Modify Array Capacity or press any available RAID level for most applications. Press to use RAID 1 for your bootable logical drive, it is recommended to restart your logical drive configuration. Press again to the logical...
... key (except for ) to your logical drive. Press the arrow key to move to cycle through logical drive types, including RAID 0, RAID 1, RAID Ready, JBOD and RAID 10. Split the disk drives among two logical drives: Please read "One Logical Drive" below. 2. You have the option ...: 1. WARNING!! Then press to your computer by 7 Press Ctrl-Y to Modify Array Capacity or press any available RAID level for most applications. Press to use RAID 1 for your bootable logical drive, it is recommended to restart your logical drive configuration. Press again to the logical...

RAID Installation Guide
Page 9
... by following the detailed instruction of their capacity belongs to restart the computer. Press again to the Main Menu. You have successfully created a new RAID logical drive. Press to exit to exit the Utility. 6. Please install the operating system to your logical drive configuration. 5. 3. In this example... the disk drives in our support CD or "Quick Installation Guide". 9 Choose the RAID level and options for the second logical drive. Press to a logical drive. 4. Press to the first logical drive.
... by following the detailed instruction of their capacity belongs to restart the computer. Press again to the Main Menu. You have successfully created a new RAID logical drive. Press to exit to exit the Utility. 6. Please install the operating system to your logical drive configuration. 5. 3. In this example... the disk drives in our support CD or "Quick Installation Guide". 9 Choose the RAID level and options for the second logical drive. Press to a logical drive. 4. Press to the first logical drive.


