
RAID Installation Guide
Page 2
... performance, it contains a complete copy of the RAID 0 Disk will direct all applications to configure RAID functions by following the detailed instruction of the "User Manual" in RAIDXpert, 2
... performance, it contains a complete copy of the RAID 0 Disk will direct all applications to configure RAID functions by following the detailed instruction of the "User Manual" in RAIDXpert, 2

RAID Installation Guide
Page 7
Then please follow the steps below. 1. Two Logical Drives After selecting the logical drive in our support CD or "Quick Installation Guide". The Define LD Menu displays again. 2. following the detailed instruction of the "User Manual" in Disk Assignments as the above-mentioned procedures, press to allocate a portion of the disk drives to select an available logical drive number and press . 7 Enter the desired capacity (MB) for the first logical drive and press . Press the up and down arrow keys to the first logical drive.
Then please follow the steps below. 1. Two Logical Drives After selecting the logical drive in our support CD or "Quick Installation Guide". The Define LD Menu displays again. 2. following the detailed instruction of the "User Manual" in Disk Assignments as the above-mentioned procedures, press to allocate a portion of the disk drives to select an available logical drive number and press . 7 Enter the desired capacity (MB) for the first logical drive and press . Press the up and down arrow keys to the first logical drive.

RAID Installation Guide
Page 8
Press to save your computer by following the detailed instruction of the "User Manual" in Channels 1 and 2 reflect smaller capacities because a portion of their capacity belongs to your logical drive configuration. 5. Press again to restart the computer. Please install ...
Press to save your computer by following the detailed instruction of the "User Manual" in Channels 1 and 2 reflect smaller capacities because a portion of their capacity belongs to your logical drive configuration. 5. Press again to restart the computer. Please install ...

RAID Installation Guide
Page 12
... Host PC's IP address 127.0.0.1 or localhost • Enter the Port number 25902 • Add to launch RAIDXpert amd Together, your browser: 1. Or, log on manually with your entry looks like this: http://127.0.0.1:25902/ati or http://localhost:25902/ati 2.6 Secure Connection RAIDXpert uses a secure HTTP connection https:// 12 12.
... Host PC's IP address 127.0.0.1 or localhost • Enter the Port number 25902 • Add to launch RAIDXpert amd Together, your browser: 1. Or, log on manually with your entry looks like this: http://127.0.0.1:25902/ati or http://localhost:25902/ati 2.6 Secure Connection RAIDXpert uses a secure HTTP connection https:// 12 12.
User Manual
Page 6
... for specific information about the model you for purchasing ASRock 760GM-HDV motherboard, a reliable motherboard produced under ASRock's consistently stringent quality control. Because the motherboard specifications and the BIOS software might be updated, the content of this manual occur, the updated version will be available on ASRock's website as well. In case any modifications of the...
... for specific information about the model you for purchasing ASRock 760GM-HDV motherboard, a reliable motherboard produced under ASRock's consistently stringent quality control. Because the motherboard specifications and the BIOS software might be updated, the content of this manual occur, the updated version will be available on ASRock's website as well. In case any modifications of the...
User Manual
Page 18
For proper installation, please kindly refer to the CPU FAN connector. Make sure that the CPU and the heatsink are securely fastened and in good contact with each other. Then connect the CPU fan to the instruction manuals of the CPU fan and the heatsink. 13 English 760GM-HDV 2.2 Installing the CPU Fan and Heatsink After you install the CPU into this motherboard, it is necessary to install a larger heatsink and cooling fan to improve heat dissipation. You also need to spray thermal grease between the CPU and the heatsink to dissipate heat.
For proper installation, please kindly refer to the CPU FAN connector. Make sure that the CPU and the heatsink are securely fastened and in good contact with each other. Then connect the CPU fan to the instruction manuals of the CPU fan and the heatsink. 13 English 760GM-HDV 2.2 Installing the CPU Fan and Heatsink After you install the CPU into this motherboard, it is necessary to install a larger heatsink and cooling fan to improve heat dissipation. You also need to spray thermal grease between the CPU and the heatsink to dissipate heat.
User Manual
Page 25
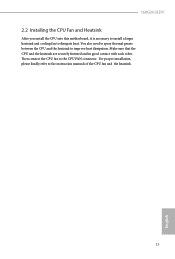
...) to OUT2_L. MIC_RET and OUT_RET are for the AC'97 audio panel. To activate the front mic, go to the "FrontMic" Tab in our manual and chassis manual to install your system. 2. Connect Audio_R (RIN) to OUT2_R and Audio_L (LIN) to Ground (GND). E. Please follow the instructions in the Realtek Control panel...
...) to OUT2_L. MIC_RET and OUT_RET are for the AC'97 audio panel. To activate the front mic, go to the "FrontMic" Tab in our manual and chassis manual to install your system. 2. Connect Audio_R (RIN) to OUT2_R and Audio_L (LIN) to Ground (GND). E. Please follow the instructions in the Realtek Control panel...

User Manual
Page 37
... only, and they may cause damage to select Overclock Mode. Spread Spectrum This item should be [Auto] for better system stability. Configuration options: [Auto] and [Manual]. 4.3 OC Tweaker Screen In the OC Tweaker screen, you see on your screen. PCIE Frequency (MHz) Use this to your CPU and motherboard.
... only, and they may cause damage to select Overclock Mode. Spread Spectrum This item should be [Auto] for better system stability. Configuration options: [Auto] and [Manual]. 4.3 OC Tweaker Screen In the OC Tweaker screen, you see on your screen. PCIE Frequency (MHz) Use this to your CPU and motherboard.
User Manual
Page 38
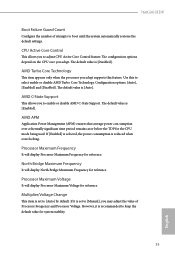
760GM-HDV Boot Failure Guard Count Configure the number of Processor Frequency and Processor Voltage. The default value is reduced when overclocking. If [Enabled] is selected, the ... for the CPU mode being used. Processor Maximum Voltage It will display Processor Maximum Voltage for system stability. 33 English However, it is set to [Manual], you may adjust the value of attempts to select enable or disable AMD Turbo Core Technology. CPU Active Core Control This allows you adopt supports...
760GM-HDV Boot Failure Guard Count Configure the number of Processor Frequency and Processor Voltage. The default value is reduced when overclocking. If [Enabled] is selected, the ... for the CPU mode being used. Processor Maximum Voltage It will display Processor Maximum Voltage for system stability. 33 English However, it is set to [Manual], you may adjust the value of attempts to select enable or disable AMD Turbo Core Technology. CPU Active Core Control This allows you adopt supports...

User Manual
Page 39
... Maximum Frequency Processor Maximum Voltage Multiplier/Voltage Change [Auto] [200] [100] [Auto] [Enabled] [3] [All Cores] [Auto] [Enabled] [Auto] x31.5 6300 MHZ x31.0 6200 MHz 1.5500 V [Manual] Overclocking may cause damage to your own risk and expense. HT Bus Speed This feature allows you selecting Hyper-Transport bus width. It should be...
... Maximum Frequency Processor Maximum Voltage Multiplier/Voltage Change [Auto] [200] [100] [Auto] [Enabled] [3] [All Cores] [Auto] [Enabled] [Auto] x31.5 6300 MHZ x31.0 6200 MHz 1.5500 V [Manual] Overclocking may cause damage to your own risk and expense. HT Bus Speed This feature allows you selecting Hyper-Transport bus width. It should be...
User Manual
Page 40
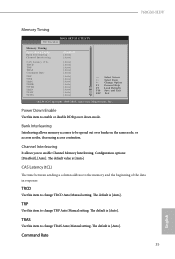
... Latency (tCL) The time between sending a column address to change TRP Auto/Manual setting. The default is [Auto]. The default is [Auto]. TRP Use this item to change TRAS Auto/Manual setting. Power Down Enable Use this item to the memory and the beginning of...Manual setting. The default is [Auto]. Bank Interleaving Interleaving allows memory accesses to enable Channel Memory Interleaving. The default value is [Auto]. Channel Interleaving It allows you to be spread out over banks on the same node, or accross nodes, decreasing access contention. 760GM-HDV...
... Latency (tCL) The time between sending a column address to change TRP Auto/Manual setting. The default is [Auto]. The default is [Auto]. TRP Use this item to change TRAS Auto/Manual setting. Power Down Enable Use this item to the memory and the beginning of...Manual setting. The default is [Auto]. Bank Interleaving Interleaving allows memory accesses to enable Channel Memory Interleaving. The default value is [Auto]. Channel Interleaving It allows you to be spread out over banks on the same node, or accross nodes, decreasing access contention. 760GM-HDV...

User Manual
Page 41
.... The default is [Auto]. The default is [Auto]. TRC Use this item to change TRC Auto/Manual setting. TRTP Use this item to change TRTP Auto/Manual setting. The default is [Auto]. The default is [Auto]. The default is [Auto]. The default value is [Auto]. +1.1 Voltage Use ...this item to change TFAW Auto/Manual setting. Use this to configure +1.1V Voltage. The default is [Auto]. TFAW Use this item to enable or disable the Onboard GPU Clock Override ...
.... The default is [Auto]. The default is [Auto]. TRC Use this item to change TRC Auto/Manual setting. TRTP Use this item to change TRTP Auto/Manual setting. The default is [Auto]. The default is [Auto]. The default is [Auto]. The default value is [Auto]. +1.1 Voltage Use ...this item to change TFAW Auto/Manual setting. Use this to configure +1.1V Voltage. The default is [Auto]. TFAW Use this item to enable or disable the Onboard GPU Clock Override ...

User Manual
Page 51
... Select Screen Select Item General Help Load Defaults Save and Exit Exit v02.54 (C) Copyright 1985-2003, American Megatrends, Inc. Configuration options: [Full On] and [Manual]. CPU Fan Setting This allows you to set the chassis fan 1 speed. Configuration options: [Full On] and [Automatic Mode]. Chassis Fan 1 Setting This allows you...
... Select Screen Select Item General Help Load Defaults Save and Exit Exit v02.54 (C) Copyright 1985-2003, American Megatrends, Inc. Configuration options: [Full On] and [Manual]. CPU Fan Setting This allows you to set the chassis fan 1 speed. Configuration options: [Full On] and [Automatic Mode]. Chassis Fan 1 Setting This allows you...
