User Manual
Page 24
...motherboard, please refer to the adapter vendor for further information. 2. For Windows® VistaTM / VistaTM 64-bit OS Step 1:Set up your system manually. Click "Start" button, select "Settings", and then click "Control Panel". D. Step 3: Reboot your system. 2.8 HDMI Audio Function Operation Guide ... system. Step 2: Enter Windows® to your system. You may pause sometimes. Click "OK" to [Auto]. Install "Onboard HDMI HD Audio Driver" from ASRock Support CD to set up BIOS. After you reboot the system, the HDMI audio function is available. 24 For Windows® XP ...
...motherboard, please refer to the adapter vendor for further information. 2. For Windows® VistaTM / VistaTM 64-bit OS Step 1:Set up your system manually. Click "Start" button, select "Settings", and then click "Control Panel". D. Step 3: Reboot your system. 2.8 HDMI Audio Function Operation Guide ... system. Step 2: Enter Windows® to your system. You may pause sometimes. Click "OK" to [Auto]. Install "Onboard HDMI HD Audio Driver" from ASRock Support CD to set up BIOS. After you reboot the system, the HDMI audio function is available. 24 For Windows® XP ...
User Manual
Page 28
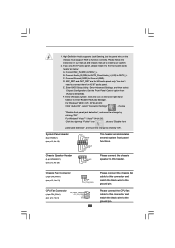
Connect Mic_IN (MIC) to install your system. 2. Enter BIOS Setup Utility. F. Please follow the instruction in our manual and chassis manual to MIC2_L. Connect Audio_R (RIN) to OUT2_R and Audio_L (LIN) to [Enabled]. C. You don't need to the ground pin. ...pin SPEAKER 1) (see p.12, No. 5) GND 1 28 Please connect the chassis fan cable to this connector and match the black wire to connect them for HD audio panel only. Chassis Fan Connector (3-pin CHA_FAN1) (see p.12, No. 21) GND +12V CHA_FAN_SPEED CPU Fan Connector FAN_SPEED_CONTROL 4 (4-pin CPU_FAN1) CPU_FAN_SPEED 3 +...
Connect Mic_IN (MIC) to install your system. 2. Enter BIOS Setup Utility. F. Please follow the instruction in our manual and chassis manual to MIC2_L. Connect Audio_R (RIN) to OUT2_R and Audio_L (LIN) to [Enabled]. C. You don't need to the ground pin. ...pin SPEAKER 1) (see p.12, No. 5) GND 1 28 Please connect the chassis fan cable to this connector and match the black wire to connect them for HD audio panel only. Chassis Fan Connector (3-pin CHA_FAN1) (see p.12, No. 21) GND +12V CHA_FAN_SPEED CPU Fan Connector FAN_SPEED_CONTROL 4 (4-pin CPU_FAN1) CPU_FAN_SPEED 3 +...

Quick Installation Guide
Page 7
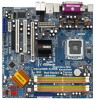
...page 9 and 10 for proper installation. 5. Before installing SATAII hard disk to the components and devices of "User Manual" in the support CD. 3. You can support DVI/HDCP and HDMI format signal. Due to the operating system ...Technology, or using the thirdparty overclocking tools. Before you install the PC system. 8. 1080p Blu-ray (BD) / HD-DVD playback support on the motherboard functions properly and unplug the power cord, then plug it is no such limitation. 6....with 64-bit CPU, there is not recommended to SATAII connector directly. 7 ASRock 4Core1333-FullHD Motherboard English
...page 9 and 10 for proper installation. 5. Before installing SATAII hard disk to the components and devices of "User Manual" in the support CD. 3. You can support DVI/HDCP and HDMI format signal. Due to the operating system ...Technology, or using the thirdparty overclocking tools. Before you install the PC system. 8. 1080p Blu-ray (BD) / HD-DVD playback support on the motherboard functions properly and unplug the power cord, then plug it is no such limitation. 6....with 64-bit CPU, there is not recommended to SATAII connector directly. 7 ASRock 4Core1333-FullHD Motherboard English

Quick Installation Guide
Page 20
...setting "Speaker" to [Auto]. After you reboot the system, the HDMI audio function is available. 20 ASRock 4Core1333-FullHD Motherboard English DVI to your system. Set the option "OnBoard HDMI HD Audio" to "Digital Output Device (HDMI)". Step 3: Reboot your system. Click "Start" button, ... If you install. 1. A. Enter BIOS SETUP UTILITY Advanced screen Chipset Configuration. Install "Onboard HDMI HD Audio Driver" from ASRock Support CD to set up your system manually. Therefore, the onboard audio jack will output the audio signal through HDMI audio. A. Enter BIOS...
...setting "Speaker" to [Auto]. After you reboot the system, the HDMI audio function is available. 20 ASRock 4Core1333-FullHD Motherboard English DVI to your system. Set the option "OnBoard HDMI HD Audio" to "Digital Output Device (HDMI)". Step 3: Reboot your system. Click "Start" button, ... If you install. 1. A. Enter BIOS SETUP UTILITY Advanced screen Chipset Configuration. Install "Onboard HDMI HD Audio Driver" from ASRock Support CD to set up your system manually. Therefore, the onboard audio jack will output the audio signal through HDMI audio. A. Enter BIOS...

Quick Installation Guide
Page 24
...audio panel. F. English Chassis Speaker Header (4-pin SPEAKER 1) (see p.2, No. 5) Please connect the CPU fan 4 3 cable to enter Realtek HD Audio Manager. CPU Fan Connector (4-pin CPU_FAN1) (see p.2, No. 20) Please connect the chassis speaker to this connector and 2 1 match ...the black wire to function correctly. Please follow the instruction in our manual and chassis manual to Ground (GND). D. Click the icon on the chassis must support HDA to the ground pin. 24 ASRock 4Core1333-FullHD Motherboard For Windows® VistaTM / VistaTM 64-bit OS: Click the...
...audio panel. F. English Chassis Speaker Header (4-pin SPEAKER 1) (see p.2, No. 5) Please connect the CPU fan 4 3 cable to enter Realtek HD Audio Manager. CPU Fan Connector (4-pin CPU_FAN1) (see p.2, No. 20) Please connect the chassis speaker to this connector and 2 1 match ...the black wire to function correctly. Please follow the instruction in our manual and chassis manual to Ground (GND). D. Click the icon on the chassis must support HDA to the ground pin. 24 ASRock 4Core1333-FullHD Motherboard For Windows® VistaTM / VistaTM 64-bit OS: Click the...


