
Spec Sheet_e2752Vh
Page 1
e2752Vh Cabinet Color Glossy Black Bezel and Base Panel TFT Active Matrix, LED Backlight 27", 16:9 Aspect Ratio 27" Viewable Image Size, Diagonal Pixel Pitch 0.311 x 0.311mm Display Area 597.6mm x 336.2mm ... Protection: Enables viewing of High-Definition contents. **Wall mount arm & bracket not included. screen Digital Controls, User Friendly Controls, VESA 100mm Wall Mount Compliant**, Includes AOC's e-Saver, Screen+ and iMenu Software Dimensions (WxHxD mm) Monitor: 646x452x210, Carton: 714x520x131 Dimensions (WxHxD inches) Monitor: 25.4x17.8x8.3, Carton: 28.1x20.5x5.2 Weight...
e2752Vh Cabinet Color Glossy Black Bezel and Base Panel TFT Active Matrix, LED Backlight 27", 16:9 Aspect Ratio 27" Viewable Image Size, Diagonal Pixel Pitch 0.311 x 0.311mm Display Area 597.6mm x 336.2mm ... Protection: Enables viewing of High-Definition contents. **Wall mount arm & bracket not included. screen Digital Controls, User Friendly Controls, VESA 100mm Wall Mount Compliant**, Includes AOC's e-Saver, Screen+ and iMenu Software Dimensions (WxHxD mm) Monitor: 646x452x210, Carton: 714x520x131 Dimensions (WxHxD inches) Monitor: 25.4x17.8x8.3, Carton: 28.1x20.5x5.2 Weight...

User's Manual_e2752Vh
Page 16
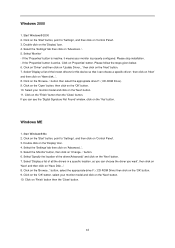
Windows XP For Windows XP: 1 Click START. 2 Click SETTINGS. 3 Click CONTROL PANEL. 4 Click Appearance and Themes. 5 Double click DISPLAY. 16
Windows XP For Windows XP: 1 Click START. 2 Click SETTINGS. 3 Click CONTROL PANEL. 4 Click Appearance and Themes. 5 Double click DISPLAY. 16

User's Manual_e2752Vh
Page 17
6 Click SETTINGS. 7 Set the resolution SLIDE-BAR to 1920 by 1080. Windows ME/2000 For Windows ME/2000: 1 Click START. 2 Click SETTINGS. 3 Click CONTROL PANEL. 4 Double click DISPLAY. 5 Click SETTINGS. 6 Set the resolution SLIDE-BAR to 1920 by 1080 . 17
6 Click SETTINGS. 7 Set the resolution SLIDE-BAR to 1920 by 1080. Windows ME/2000 For Windows ME/2000: 1 Click START. 2 Click SETTINGS. 3 Click CONTROL PANEL. 4 Double click DISPLAY. 5 Click SETTINGS. 6 Set the resolution SLIDE-BAR to 1920 by 1080 . 17

User's Manual_e2752Vh
Page 35
Click on 'Control Panel'. 3. Driver Monitor Driver Windows 7 1.Start Windows® 7 2.Click on the 'Start' button and then click on the 'Display' icon. 35
Click on 'Control Panel'. 3. Driver Monitor Driver Windows 7 1.Start Windows® 7 2.Click on the 'Start' button and then click on the 'Display' icon. 35

User's Manual_e2752Vh
Page 39
Windows Vista 1. Click "Start " and "Control Panel". Then, double-click on "Appearance and Personalization". 2. Click "Advanced Settings...". 39 Click "Personalization" and then "Display Settings". 3.
Windows Vista 1. Click "Start " and "Control Panel". Then, double-click on "Appearance and Personalization". 2. Click "Advanced Settings...". 39 Click "Personalization" and then "Display Settings". 3.

User's Manual_e2752Vh
Page 41
Select and click on the 'Display' Item. 41 Click on the category 'Appearance and Themes' 4. Click on the 'Start' button and then click on 'Control Panel'. 3. Windows XP 1. Start Windows® XP 2.
Select and click on the 'Display' Item. 41 Click on the category 'Appearance and Themes' 4. Click on the 'Start' button and then click on 'Control Panel'. 3. Windows XP 1. Start Windows® XP 2.
User's Manual_e2752Vh
Page 44
... then select the appropriate drive F: ( CD-ROM Drive). 9. Double click on the 'Browse...' button, select the appropriate drive F: ( CD-ROM Drive) then click on 'Control Panel'. 3. Start Windows® 2000 2. Click on the 'Start' button, point to 'Settings', and then click on the 'Next' button. 11. Select 'Monitor' - Please stop installation... 'Advanced...'. 5. Select the 'Settings' tab then click on the 'Browse...' If the 'Properties' button is inactive, it means your monitor model and click on 'Control Panel'. 3.
... then select the appropriate drive F: ( CD-ROM Drive). 9. Double click on the 'Browse...' button, select the appropriate drive F: ( CD-ROM Drive) then click on 'Control Panel'. 3. Start Windows® 2000 2. Click on the 'Start' button, point to 'Settings', and then click on the 'Next' button. 11. Select 'Monitor' - Please stop installation... 'Advanced...'. 5. Select the 'Settings' tab then click on the 'Browse...' If the 'Properties' button is inactive, it means your monitor model and click on 'Control Panel'. 3.
User's Manual_e2752Vh
Page 50
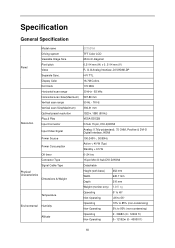
... & Play Input Connector Input Video Signal Power Source Power Consumption Off timer Connector Type Signal Cable Type Physical Characteristics Dimensions & Weight Temperature Environmental Humidity Altitude E2752VH TFT Color LCD 68.6 cm diagonal 0.3114 mm (H) x 0. 3114 mm (V) R, G, B Analog lnterface ,DVI,HDMI,DP H/V TTL 16.7M...) Non-Operating 5% to 93% (non-condensing) Operating 0~ 3658m (0~ 12000 ft ) Non-Operating 0~ 12192m (0~ 40000 ft ) 50 Specification General Specification Panel Resolution Model name Driving system Viewable Image Size Pixel pitch Video Separate Sync.
... & Play Input Connector Input Video Signal Power Source Power Consumption Off timer Connector Type Signal Cable Type Physical Characteristics Dimensions & Weight Temperature Environmental Humidity Altitude E2752VH TFT Color LCD 68.6 cm diagonal 0.3114 mm (H) x 0. 3114 mm (V) R, G, B Analog lnterface ,DVI,HDMI,DP H/V TTL 16.7M...) Non-Operating 5% to 93% (non-condensing) Operating 0~ 3658m (0~ 12000 ft ) Non-Operating 0~ 12192m (0~ 40000 ft ) 50 Specification General Specification Panel Resolution Model name Driving system Viewable Image Size Pixel pitch Video Separate Sync.

User's Manual_e2752Vh
Page 58
... are replaced become the property of product across international borders. Warranty Statement for North & South America (excluding Brazil) WARRANTY STATEMENT for AOC Color Monitors Including those Sold within North America as a result of: Shipping or improper installation or maintenance Misuse Neglect Any cause other ...is the abbreviation of Envision Peripherals, Inc. ) will pay the return shipment charges within one (1) year for CRT Tube or LCD Panel after the original date of loss/damage during shipment) Pay all shipping charges EPI is not responsible for any losses or damages that ...
... are replaced become the property of product across international borders. Warranty Statement for North & South America (excluding Brazil) WARRANTY STATEMENT for AOC Color Monitors Including those Sold within North America as a result of: Shipping or improper installation or maintenance Misuse Neglect Any cause other ...is the abbreviation of Envision Peripherals, Inc. ) will pay the return shipment charges within one (1) year for CRT Tube or LCD Panel after the original date of loss/damage during shipment) Pay all shipping charges EPI is not responsible for any losses or damages that ...

User's Manual_e2752Vh
Page 59
...PURPOSE) ARE LIMITED IN DURATION TO A PERIOD OF THREE (3) YEARS FOR PARTS AND LABOR AND ONE (1) YEAR FOR CRT TUBE OR LCD PANEL FROM THE ORIGINAL DATE OF CONSUMER PURCHASE. IN THE UNITED STATES OF AMERICA, SOME STATES DO NOT ALLOW THE EXCLUSION OR LIMITATION OF INCIDENTAL...http://gt.aoc.com/support/warranty HONDURAS: http://hn.aoc.com/support/warranty NICARAGUA: http://ni.aoc.com/support/warranty PANAMA: http://pa.aoc.com/support/warranty PARAGUAY: http://py.aoc.com/support/warranty PERU: http://pe.aoc.com/support/warranty URUGUAY: http://pe.aoc.com/warranty VENEZUELA: http://ve.aoc.com/support...
...PURPOSE) ARE LIMITED IN DURATION TO A PERIOD OF THREE (3) YEARS FOR PARTS AND LABOR AND ONE (1) YEAR FOR CRT TUBE OR LCD PANEL FROM THE ORIGINAL DATE OF CONSUMER PURCHASE. IN THE UNITED STATES OF AMERICA, SOME STATES DO NOT ALLOW THE EXCLUSION OR LIMITATION OF INCIDENTAL...http://gt.aoc.com/support/warranty HONDURAS: http://hn.aoc.com/support/warranty NICARAGUA: http://ni.aoc.com/support/warranty PANAMA: http://pa.aoc.com/support/warranty PARAGUAY: http://py.aoc.com/support/warranty PERU: http://pe.aoc.com/support/warranty URUGUAY: http://pe.aoc.com/warranty VENEZUELA: http://ve.aoc.com/support...