

User's Manual_e2043Fk
Page 1
... Power ...5 Installation...6 Cleaning ...7 Other...8 Setup ...9 Contents in Box ...9 Setup Stand & Base...10 Adjusting Viewing Angle...11 Connecting the Monitor...12 Wall Mounting ...13 Adjusting ...14 Setting Optimal Resolution ...14 Windows Vista ...14 Windows XP ...16 Windows ME/2000...17 Hotkeys ... ...22 Color Temperature ...24 Color Boost...26 Picture Boost ...28 OSD Setup ...30 Extra ...32 Reset ...34 Exit ...36 LED Indicator ...37 Driver ...38 Monitor Driver ...38 Windows 7 ...38 Windows Vista ...42 Windows XP ...44 Windows 2000 ...47 Windows ME...47 i-Menu ...48 e-saver ...49 Screen+ ...
... Power ...5 Installation...6 Cleaning ...7 Other...8 Setup ...9 Contents in Box ...9 Setup Stand & Base...10 Adjusting Viewing Angle...11 Connecting the Monitor...12 Wall Mounting ...13 Adjusting ...14 Setting Optimal Resolution ...14 Windows Vista ...14 Windows XP ...16 Windows ME/2000...17 Hotkeys ... ...22 Color Temperature ...24 Color Boost...26 Picture Boost ...28 OSD Setup ...30 Extra ...32 Reset ...34 Exit ...36 LED Indicator ...37 Driver ...38 Monitor Driver ...38 Windows 7 ...38 Windows Vista ...42 Windows XP ...44 Windows 2000 ...47 Windows ME...47 i-Menu ...48 e-saver ...49 Screen+ ...
User's Manual_e2043Fk
Page 37
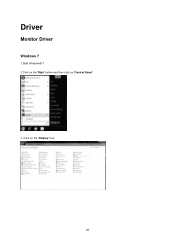
Click on 'Control Panel'. 3. Driver Monitor Driver Windows 7 1.Start Windows® 7 2.Click on the 'Start' button and then click on the 'Display' icon. 38
Click on 'Control Panel'. 3. Driver Monitor Driver Windows 7 1.Start Windows® 7 2.Click on the 'Start' button and then click on the 'Display' icon. 38

User's Manual_e2043Fk
Page 39
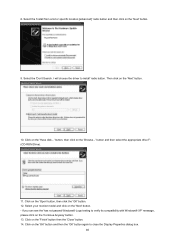
Select "Let me pick from a list of device drivers on "Update Driver... Open the "Update Driver Software-Generic PnP Monitor" window by clicking on my computer". 40 "and then click the "Browse my computer for driver software" button. 9. 7.Click the "Driver" tab. 8.
Select "Let me pick from a list of device drivers on "Update Driver... Open the "Update Driver Software-Generic PnP Monitor" window by clicking on my computer". 40 "and then click the "Browse my computer for driver software" button. 9. 7.Click the "Driver" tab. 8.

User's Manual_e2043Fk
Page 40
Click on the "Browse" button and navigate to your monitor model and click the "Next" button. The files will automatically select the maximum refresh rate and corresponding Color Matching Profiles. 41 The system will be copied from the CD to the following directory: X:\Driver\module name (where X is the drive letter designator for the CD-ROM drive). 11. Select your hard disk drive. 13. Close all open windows and remove the CD. 14. Click the "Have Disk" button. Click the "OK" button. 12. Restart the system. 10. Select the "xxx.inf" file and click the "Open" button.
Click on the "Browse" button and navigate to your monitor model and click the "Next" button. The files will automatically select the maximum refresh rate and corresponding Color Matching Profiles. 41 The system will be copied from the CD to the following directory: X:\Driver\module name (where X is the drive letter designator for the CD-ROM drive). 11. Select your hard disk drive. 13. Close all open windows and remove the CD. 14. Click the "Have Disk" button. Click the "OK" button. 12. Restart the system. 10. Select the "xxx.inf" file and click the "Open" button.

User's Manual_e2043Fk
Page 42
... and click on the 'Browse...' Click on the following screens displayed in the "Monitor" tab. If the message "Windows needs..." is deactivated, it means the configuration for driver software" checkbox and click "Let me pick from a list of device drivers on my computer". 7. If the "Properties" button is displayed, as is completed. Select...
... and click on the 'Browse...' Click on the following screens displayed in the "Monitor" tab. If the message "Windows needs..." is deactivated, it means the configuration for driver software" checkbox and click "Let me pick from a list of device drivers on my computer". 7. If the "Properties" button is displayed, as is completed. Select...

User's Manual_e2043Fk
Page 44
If the 'Properties' button is properly configured. Please follow the steps below. 7. If the 'Properties' button is inactive, it means your monitor is active, click on 'Properties' button. button. 45 Click on the 'Driver' tab and then click on the 'Advanced' button. 6. Select 'Monitor' tab - Please stop installation. - 5. Select the 'Settings' tab then click on 'Update Driver...'
If the 'Properties' button is properly configured. Please follow the steps below. 7. If the 'Properties' button is inactive, it means your monitor is active, click on 'Properties' button. button. 45 Click on the 'Driver' tab and then click on the 'Advanced' button. 6. Select 'Monitor' tab - Please stop installation. - 5. Select the 'Settings' tab then click on 'Update Driver...'
User's Manual_e2043Fk
Page 45
... the Display Properties dialog box. 46 Then click on the 'Next' button. - button and then select the appropriate drive F: (CD-ROM Drive). 11. Select your monitor model and click on the 'Next' button. 10. Select the 'Install from a list or specific location [advanced]' radio button and then click on the 'Continue...' button and then the 'OK' button again to verify its compatibility with Windows® XP' message, please click on the 'Next' button. 9. I will choose the driver to install' radio button. Select the 'Don't Search.
... the Display Properties dialog box. 46 Then click on the 'Next' button. - button and then select the appropriate drive F: (CD-ROM Drive). 11. Select your monitor model and click on the 'Next' button. 10. Select the 'Install from a list or specific location [advanced]' radio button and then click on the 'Continue...' button and then the 'OK' button again to verify its compatibility with Windows® XP' message, please click on the 'Next' button. 9. I will choose the driver to install' radio button. Select the 'Don't Search.

User's Manual_e2043Fk
Page 46
...on the 'Next' button. 10. Click on the 'OK' button, select your monitor model and click on the 'Yes' button. Select 'Monitor' - If the 'Properties' button is properly configured. If you can choose the driver you can see the 'Digital Signature Not Found' window, click on the 'Next...Select the 'Settings' tab then click on the 'Next' button. 7. Select your monitor model and click on 'Have Disk...'. 8. Select 'Specify the location of the known drivers for this device so that I can choose a specific driver', then click on 'Next' and then click on the 'Display' Icon. 4. ...
...on the 'Next' button. 10. Click on the 'OK' button, select your monitor model and click on the 'Yes' button. Select 'Monitor' - If the 'Properties' button is properly configured. If you can choose the driver you can see the 'Digital Signature Not Found' window, click on the 'Next...Select the 'Settings' tab then click on the 'Next' button. 7. Select your monitor model and click on 'Have Disk...'. 8. Select 'Specify the location of the known drivers for this device so that I can choose a specific driver', then click on 'Next' and then click on the 'Display' Icon. 4. ...

User's Manual_e2043Fk
Page 48
...(On, Off, Sleep or Screen Saver); the actual shutdown time depends on "driver/e-Saver/setup.exe" to start installing the e-Saver software, follow the install wizard to automatically shutdown. The AOC e-Saver features Smart Shutdown functions for your preferences (see example below . 49... You can click "RESET" to set the e-Saver to use AOC e-Saver monitor power management software! e-Saver Welcome to its default settings like...
...(On, Off, Sleep or Screen Saver); the actual shutdown time depends on "driver/e-Saver/setup.exe" to start installing the e-Saver software, follow the install wizard to automatically shutdown. The AOC e-Saver features Smart Shutdown functions for your preferences (see example below . 49... You can click "RESET" to set the e-Saver to use AOC e-Saver monitor power management software! e-Saver Welcome to its default settings like...

User's Manual_e2043Fk
Page 50
.... Picture Bounces, Flickers Or Wave Pattern Appears In The Picture Move electrical devices that the monitor can handle properly. If the power is not available on the screen? We recommend plugging the monitor directly to auto adjust. Is the cable connected correctly? (Connected using the D-sub cable)...dealer. Can you are installed. Make sure you see the initial screen (the login screen), which can be seen. Make sure the AOC Monitor Drivers are not using an extension cable or switch box. Press to the video card output connector on the screen Is the power cord ...
.... Picture Bounces, Flickers Or Wave Pattern Appears In The Picture Move electrical devices that the monitor can handle properly. If the power is not available on the screen? We recommend plugging the monitor directly to auto adjust. Is the cable connected correctly? (Connected using the D-sub cable)...dealer. Can you are installed. Make sure you see the initial screen (the login screen), which can be seen. Make sure the AOC Monitor Drivers are not using an extension cable or switch box. Press to the video card output connector on the screen Is the power cord ...


