
U2868PQU Data Sheet
Page 1
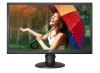
.... So whether you are a designer, gamer, photographer, or someone who needs rich detail, AOC's U2868PQU will deliver exactly that takes delivering clear crisp images to -gray) response time and 70,000,000:1 mega dynamic contrast ratio. This 4K ... Fast 1ms response time and over 1 billion colors for Rich Details AOC's 4K Ultra HD display is a 28-inch professional monitor with sleek hairline texture, featuring two 3-watt speakers AOC Monitors 4K monitor 68 Series 28", 3840 x 2160 U2868PQU 28-inch 4K Ultra HD Professional Monitor for rich details • VGA, DVI with HDCP, HDMI (MHL),...
.... So whether you are a designer, gamer, photographer, or someone who needs rich detail, AOC's U2868PQU will deliver exactly that takes delivering clear crisp images to -gray) response time and 70,000,000:1 mega dynamic contrast ratio. This 4K ... Fast 1ms response time and over 1 billion colors for Rich Details AOC's 4K Ultra HD display is a 28-inch professional monitor with sleek hairline texture, featuring two 3-watt speakers AOC Monitors 4K monitor 68 Series 28", 3840 x 2160 U2868PQU 28-inch 4K Ultra HD Professional Monitor for rich details • VGA, DVI with HDCP, HDMI (MHL),...
U2868PQU Data Sheet
Page 2
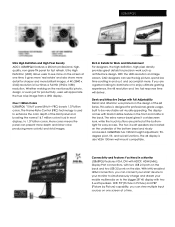
...great details for fast refresh. Connectivity and Features You Need in and out, and accomplish more brilliant images. U2868PQU Ultra High Definition and High Pixel Density AOC's U2868PQU features a 28-inch professional, highquality, non-glare TN panel for precision work such as architecture design. Ultra ... and large screen, CAD designers can connect your smart device to your monitor to simultaneously charge and stream your mobile multimedia on to see the big picture, spend less time scrolling in a Monitor U2868PQU features VGA, DVI with HDCP, HDMI (MHL), Display Port connections, ...
...great details for fast refresh. Connectivity and Features You Need in and out, and accomplish more brilliant images. U2868PQU Ultra High Definition and High Pixel Density AOC's U2868PQU features a 28-inch professional, highquality, non-glare TN panel for precision work such as architecture design. Ultra ... and large screen, CAD designers can connect your smart device to your monitor to simultaneously charge and stream your mobile multimedia on to see the big picture, spend less time scrolling in a Monitor U2868PQU features VGA, DVI with HDCP, HDMI (MHL), Display Port connections, ...
U2868PQU Data Sheet
Page 3
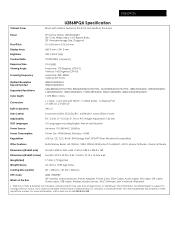
U2868PQU Cabinet Color U2868PQU Specification Black with Hairline Texture in the front and matte in the back Panel Pixel Pitch Display Area Brightness Contrast Ratio Response Time Viewing Angle ...
U2868PQU Cabinet Color U2868PQU Specification Black with Hairline Texture in the front and matte in the back Panel Pixel Pitch Display Area Brightness Contrast Ratio Response Time Viewing Angle ...

U2868PQU User Manual
Page 1
All Rights Reserved. LCD Monitor User Manual U2868PQU LED backlight 1 www.aoc.com ©2014 AOC.
All Rights Reserved. LCD Monitor User Manual U2868PQU LED backlight 1 www.aoc.com ©2014 AOC.
U2868PQU User Manual
Page 2
... ...9 Contents in Box ...9 Setup Base ...10 Wall Mounting ...11 Adjusting Viewing Angle...12 Using "MHL(Mobile High-Definition Link)"...13 Connecting the Monitor...14 Adjusting ...16 Setting Optimal Resolution ...16 Windows Vista ...16 Windows ME/2000...17 Windows 8 ...18 Hotkeys ...20 OSD Setting...22 Luminance ...Image Setup ...24 Color Setup...25 Picture Boost ...26 OSD Setup ...27 PIP Setting...28 Extra ...29 Exit...30 LED Indicator ...31 Driver ...32 Monitor Driver ...32 Windows 8 ...32 Windows 7 ...36 Windows Vista ...40 Windows 2000 ...42 Windows ME...42 i-Menu ...43 e-Saver ...44 Screen+...
... ...9 Contents in Box ...9 Setup Base ...10 Wall Mounting ...11 Adjusting Viewing Angle...12 Using "MHL(Mobile High-Definition Link)"...13 Connecting the Monitor...14 Adjusting ...16 Setting Optimal Resolution ...16 Windows Vista ...16 Windows ME/2000...17 Windows 8 ...18 Hotkeys ...20 OSD Setting...22 Luminance ...Image Setup ...24 Color Setup...25 Picture Boost ...26 OSD Setup ...27 PIP Setting...28 Extra ...29 Exit...30 LED Indicator ...31 Driver ...32 Monitor Driver ...32 Windows 8 ...32 Windows 7 ...36 Windows Vista ...40 Windows 2000 ...42 Windows ME...42 i-Menu ...43 e-Saver ...44 Screen+...
U2868PQU User Manual
Page 5
...consult your outlet does not accommodate the three-wire plug, have an electrician install the correct outlet, or use an adapter to power surges. The monitor is equipped with a three-pronged grounded plug, a plug with a third (grounding) pin. Unplug the unit during a lightning storm or when it... ground the appliance safely. The wall socket shall be installed near the equipment and shall be easily accessible. 5 This plug will protect the monitor from the type of time. This will fit only into a grounded power outlet as a safety feature. Do not overload power strips and ...
...consult your outlet does not accommodate the three-wire plug, have an electrician install the correct outlet, or use an adapter to power surges. The monitor is equipped with a three-pronged grounded plug, a plug with a third (grounding) pin. Unplug the unit during a lightning storm or when it... ground the appliance safely. The wall socket shall be installed near the equipment and shall be easily accessible. 5 This plug will protect the monitor from the type of time. This will fit only into a grounded power outlet as a safety feature. Do not overload power strips and ...

U2868PQU User Manual
Page 6
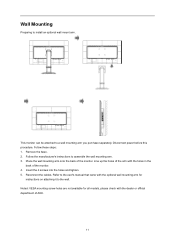
... kit approved by the manufacturer and follow the kit instructions. Do not place the front of the product on the monitor cabinet. Leave some space around the monitor when the monitor is installed on the wall or with the stand: Installed on an unstable cart, stand, tripod, bracket, or...inadequate hence overheating may cause a fire or damage to this product. See below the recommended ventilation areas around the monitor as shown below. Installation Do not place the monitor on the wall Installed with stand 6 Never spill liquids on a wall or shelf, use mounting accessories recommended ...
... kit approved by the manufacturer and follow the kit instructions. Do not place the front of the product on the monitor cabinet. Leave some space around the monitor when the monitor is installed on the wall or with the stand: Installed on an unstable cart, stand, tripod, bracket, or...inadequate hence overheating may cause a fire or damage to this product. See below the recommended ventilation areas around the monitor as shown below. Installation Do not place the monitor on the wall Installed with stand 6 Never spill liquids on a wall or shelf, use mounting accessories recommended ...

U2868PQU User Manual
Page 8
Other If the product is emitting a strange smell, sound or smoke, disconnect the power plug IMMEDIATELY and contact a Service Center. Do not knock or drop the monitor during operation. Make sure that the ventilating openings are not blocked by a table or curtain. Do not engage the LCD monitor in severe vibration or high impact conditions during operation or transportation. For display with glossy bezel the user should consider the placement of the display as the bezel may cause disturbing reflections from surrounding light and bright surfaces. 8
Other If the product is emitting a strange smell, sound or smoke, disconnect the power plug IMMEDIATELY and contact a Service Center. Do not knock or drop the monitor during operation. Make sure that the ventilating openings are not blocked by a table or curtain. Do not engage the LCD monitor in severe vibration or high impact conditions during operation or transportation. For display with glossy bezel the user should consider the placement of the display as the bezel may cause disturbing reflections from surrounding light and bright surfaces. 8
U2868PQU User Manual
Page 9
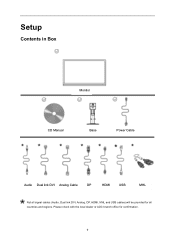
Setup Contents in Box Monitor CD Manual Base Power Cable Audio Dual link DVI Analog Cable DP HDMI USB MHL Not all countries and regions. Please check with the local dealer or AOC branch office for all signal cables (Audio, Dual link DVI, Analog, DP, HDMI, MHL and USB cables) will be provided for confirmation. 9
Setup Contents in Box Monitor CD Manual Base Power Cable Audio Dual link DVI Analog Cable DP HDMI USB MHL Not all countries and regions. Please check with the local dealer or AOC branch office for all signal cables (Audio, Dual link DVI, Analog, DP, HDMI, MHL and USB cables) will be provided for confirmation. 9

U2868PQU User Manual
Page 10
Setup: Remove: 10 Please place the monitor on a soft and flat surface to prevent the scratch. Setup Base Please setup or remove the base following the steps as below.
Setup: Remove: 10 Please place the monitor on a soft and flat surface to prevent the scratch. Setup Base Please setup or remove the base following the steps as below.
U2868PQU User Manual
Page 11
Remove the base. 2. Refer to the user's manual that came with the dealer or official department of AOC. 11 Insert the 4 screws into the holes and tighten. 5. Follow these steps: 1. Noted: VESA mounting screw holes are not available for all models, please ...check with the optional wall mounting arm for instructions on attaching it to install an optional wall mount arm. This monitor can be attached to assemble the wall mounting arm. 3. Follow the manufacturer's instructions to a wall mounting arm you purchase separately. Line up the holes ...
Remove the base. 2. Refer to the user's manual that came with the dealer or official department of AOC. 11 Insert the 4 screws into the holes and tighten. 5. Follow these steps: 1. Noted: VESA mounting screw holes are not available for all models, please ...check with the optional wall mounting arm for instructions on attaching it to install an optional wall mount arm. This monitor can be attached to assemble the wall mounting arm. 3. Follow the manufacturer's instructions to a wall mounting arm you purchase separately. Line up the holes ...

U2868PQU User Manual
Page 12
Hold the stand so you will not topple the monitor when you change the monitor's angle. NOTE: Do not adjust the viewing angle over 21.5 degrees in order to 21.5 °. You are able to adjust the monitor's angle from -5° to avoid damage. 12 Adjusting Viewing Angle For optimal viewing, it is recommended to look at the full face of the monitor, and then adjust the monitor's angle to your own preference.
Hold the stand so you will not topple the monitor when you change the monitor's angle. NOTE: Do not adjust the viewing angle over 21.5 degrees in order to 21.5 °. You are able to adjust the monitor's angle from -5° to avoid damage. 12 Adjusting Viewing Angle For optimal viewing, it is recommended to look at the full face of the monitor, and then adjust the monitor's angle to your own preference.

U2868PQU User Manual
Page 13
... function, you encounter any problem when using the MHL cable. When the MHL cable is used, [HDMI / MHL] is the only port on this monitor that supports MHL) on the device manufacturer's website. When the mobile device is not connected or does not support MHL If MHL mode is...
... function, you encounter any problem when using the MHL cable. When the MHL cable is used, [HDMI / MHL] is the only port on this monitor that supports MHL) on the device manufacturer's website. When the mobile device is not connected or does not support MHL If MHL mode is...
U2868PQU User Manual
Page 14
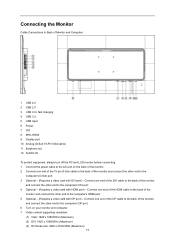
... connect the other end to the computer's DVI port. 4 Optional - (Requires a video card with DVI port) - Connecting the Monitor Cable Connections In Back of Monitor and Computer: 1 USB 2.0 2 USB 2.0 3 USB 3.0+ fast charging 4 USB 3.0 5 USB input 6 Power 7 DVI 8 MHL-HDMI 9 Display port 10 Analog (D-Sub ...-Pin VGA cable) 11 Earphone out 12 AUDIO IN To protect equipment, always turn off the PC and LCD monitor before connecting. 1 Connect the power cable to the AC port on your monitor and computer. 7 Video content supporting resolution: (1) VGA: 1920 x 1080/60Hz (Maximum) (2) DVI: 1920 x 1080/...
... connect the other end to the computer's DVI port. 4 Optional - (Requires a video card with DVI port) - Connecting the Monitor Cable Connections In Back of Monitor and Computer: 1 USB 2.0 2 USB 2.0 3 USB 3.0+ fast charging 4 USB 3.0 5 USB input 6 Power 7 DVI 8 MHL-HDMI 9 Display port 10 Analog (D-Sub ...-Pin VGA cable) 11 Earphone out 12 AUDIO IN To protect equipment, always turn off the PC and LCD monitor before connecting. 1 Connect the power cable to the AC port on your monitor and computer. 7 Video content supporting resolution: (1) VGA: 1920 x 1080/60Hz (Maximum) (2) DVI: 1920 x 1080/...

U2868PQU User Manual
Page 15
If it does not display an image, please refer Troubleshooting. 15 (4) HDMI: 3840 x 2160/30Hz (Maximum) (5) DP: 3840 x 2160/60Hz (Maximum) If your monitor displays an image, installation is complete.
If it does not display an image, please refer Troubleshooting. 15 (4) HDMI: 3840 x 2160/30Hz (Maximum) (5) DP: 3840 x 2160/60Hz (Maximum) If your monitor displays an image, installation is complete.

U2868PQU User Manual
Page 20
Volume / > When there is no OSD, press Auto/Source button continuously about 2 second to turn on/off the monitor. Press Source button continuously to select the input source showed in the message bar, press Menu/Enter button to change to display the OSD or ...
Volume / > When there is no OSD, press Auto/Source button continuously about 2 second to turn on/off the monitor. Press Source button continuously to select the input source showed in the message bar, press Menu/Enter button to change to display the OSD or ...
U2868PQU User Manual
Page 22
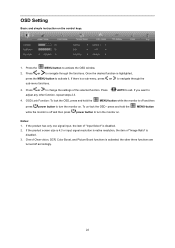
...Press or to activate it. OSD Lock Function: To lock the OSD, press and hold the MENU-button while the monitor is off and then press power button to turn the monitor on. Press the MENU-button to exit. Press adjust any other three functions are turned off and then press power... button to turn the monitor on the control keys. 1. AUTO to activate the OSD window. 2. If there is disabled. 2. to 4. Notes: 1. If the product screen size is 4:3 or input ...
...Press or to activate it. OSD Lock Function: To lock the OSD, press and hold the MENU-button while the monitor is off and then press power button to turn the monitor on. Press the MENU-button to exit. Press adjust any other three functions are turned off and then press power... button to turn the monitor on the control keys. 1. AUTO to activate the OSD window. 2. If there is disabled. 2. to 4. Notes: 1. If the product screen size is 4:3 or input ...

U2868PQU User Manual
Page 27
..., (A) DP-out outputs full image which is from DP-in if DP-in if DP graphic card outputs single monitor data. (B) DP-out outputs next 1 or 2 monitor image(s) if DP graphic card outputs 2 or 3 monitor images by daisy chain. 27 OSD Setup 1 Press MENU (Menu) to display menu. 2 Press or to select (OSD...
..., (A) DP-out outputs full image which is from DP-in if DP-in if DP graphic card outputs single monitor data. (B) DP-out outputs next 1 or 2 monitor image(s) if DP graphic card outputs 2 or 3 monitor images by daisy chain. 27 OSD Setup 1 Press MENU (Menu) to display menu. 2 Press or to select (OSD...
U2868PQU User Manual
Page 32
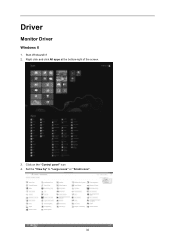
Click on the "Control panel" icon 4. Right click and click All apps at the bottom-right of the screen. 3. Set the "View by" to "Large icons" or "Small icons". 32 Start Windows® 8 2. Driver Monitor Driver Windows 8 1.
Click on the "Control panel" icon 4. Right click and click All apps at the bottom-right of the screen. 3. Set the "View by" to "Large icons" or "Small icons". 32 Start Windows® 8 2. Driver Monitor Driver Windows 8 1.

U2868PQU User Manual
Page 34
Click the "Driver" tab. 10. Open the "Update Driver Software-Generic PnP Monitor" window by clicking on "Update Driver... " and then click the "Browse my computer for driver software" button. 34 Click the "Monitor" tab and then click the "Properties" button. 9. 8.
Click the "Driver" tab. 10. Open the "Update Driver Software-Generic PnP Monitor" window by clicking on "Update Driver... " and then click the "Browse my computer for driver software" button. 34 Click the "Monitor" tab and then click the "Properties" button. 9. 8.


