2036Sa Specifications
Page 1
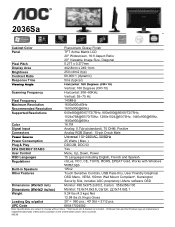
...User Friendly Graphical OSD Menu, VESA 100mm Wall Mount Compliant*, Kensington Security Slot, includes AOC proprietory i-Menu software OSD Dimensions (WxHxD mm) Dimensions (WxHxD inches) Weight Monitor: 496.5x375.2x90.2, Carton: 558x356x130 Monitor: 19.6x14.8x3.6, Carton: 22.0x14.0x5.1 9.24 lbs (4.2 kgs) Net ...Loading Qty w/pallet UPC Code 12.98 lbs (5.9 kgs) Gross 20' = 960 pcs.; 40' Std = 2112 pcs. 685417024582 Note: Specifications are subject to change without notice. *Wall mount arm & bracket not included. 2036Sa...
...User Friendly Graphical OSD Menu, VESA 100mm Wall Mount Compliant*, Kensington Security Slot, includes AOC proprietory i-Menu software OSD Dimensions (WxHxD mm) Dimensions (WxHxD inches) Weight Monitor: 496.5x375.2x90.2, Carton: 558x356x130 Monitor: 19.6x14.8x3.6, Carton: 22.0x14.0x5.1 9.24 lbs (4.2 kgs) Net ...Loading Qty w/pallet UPC Code 12.98 lbs (5.9 kgs) Gross 20' = 960 pcs.; 40' Std = 2112 pcs. 685417024582 Note: Specifications are subject to change without notice. *Wall mount arm & bracket not included. 2036Sa...

User's Manual 2036Sa
Page 2
... ...5 Installation ...6 Cleaning...8 Other ...9 Setup ...10 Contents in Box ...10 Setup Stand & Base...11 Adjusting Viewing Angle...12 Connecting the Monitor...13 Wall Mounting ...14 Adjusting ...15 Setting Optimal Resolution ...15 Windows Vista ...15 Windows XP ...17 Windows ME/2000...18 Hotkeys ...19...23 Luminance ...25 Image Setup ...27 Color Temperature ...29 Picture Boost ...31 Extra Setting ...33 Exit...35 LED Indicator ...36 Driver ...37 Monitor Driver ...37 Windows 2000 ...37 Windows ME...37 Windows XP ...38 Windows Vista ...41 i-Menu ...43 Troubleshoot ...44 Specification...46 General ...
... ...5 Installation ...6 Cleaning...8 Other ...9 Setup ...10 Contents in Box ...10 Setup Stand & Base...11 Adjusting Viewing Angle...12 Connecting the Monitor...13 Wall Mounting ...14 Adjusting ...15 Setting Optimal Resolution ...15 Windows Vista ...15 Windows XP ...17 Windows ME/2000...18 Hotkeys ...19...23 Luminance ...25 Image Setup ...27 Color Temperature ...29 Picture Boost ...31 Extra Setting ...33 Exit...35 LED Indicator ...36 Driver ...37 Monitor Driver ...37 Windows 2000 ...37 Windows ME...37 Windows XP ...38 Windows Vista ...41 i-Menu ...43 Troubleshoot ...44 Specification...46 General ...
User's Manual 2036Sa
Page 5
The monitor is equipped with a three-pronged grounded plug, a plug with UL listed computers which have UL,CSA ...the unit during a lightning storm or when it will not be used for monitors with the attached power adapter (Output 12Vdc) which have an electrician install the correct outlet, or use the monitor only with a third (grounding) pin. To ensure satisfactory operation, use an...not defeat the safety purpose of power source indicated on the label. This plug will protect the monitor from the type of the grounded plug. If you are not sure of the type of time. Power The...
The monitor is equipped with a three-pronged grounded plug, a plug with UL listed computers which have UL,CSA ...the unit during a lightning storm or when it will not be used for monitors with the attached power adapter (Output 12Vdc) which have an electrician install the correct outlet, or use the monitor only with a third (grounding) pin. To ensure satisfactory operation, use an...not defeat the safety purpose of power source indicated on the label. This plug will protect the monitor from the type of the grounded plug. If you are not sure of the type of time. Power The...

User's Manual 2036Sa
Page 6
...cart combination should be inadequate hence overheating may cause a fire or damage to this product. See below the recommended ventilation areas around the monitor as shown below. Follow the manufacturer‟s instructions when installing the product and use a mounting kit approved by the manufacturer and follow...any object into the slot on the floor. Do not place the front of the product on the monitor cabinet. Leave some space around the monitor when the monitor is installed on the wall or on a wall or shelf, use mounting accessories recommended by the manufacturer ...
...cart combination should be inadequate hence overheating may cause a fire or damage to this product. See below the recommended ventilation areas around the monitor as shown below. Follow the manufacturer‟s instructions when installing the product and use a mounting kit approved by the manufacturer and follow...any object into the slot on the floor. Do not place the front of the product on the monitor cabinet. Leave some space around the monitor when the monitor is installed on the wall or on a wall or shelf, use mounting accessories recommended by the manufacturer ...
User's Manual 2036Sa
Page 9
Make sure that the ventilating openings are not blocked by a table or curtain. Do not engage the LCD monitor in severe vibration or high impact conditions during operation or transportation. 9 Do not knock or drop the monitor during operation. Other If the product is emitting a strange smell, sound or smoke, disconnect the power plug IMMEDIATELY and contact a Service Center.
Make sure that the ventilating openings are not blocked by a table or curtain. Do not engage the LCD monitor in severe vibration or high impact conditions during operation or transportation. 9 Do not knock or drop the monitor during operation. Other If the product is emitting a strange smell, sound or smoke, disconnect the power plug IMMEDIATELY and contact a Service Center.
User's Manual 2036Sa
Page 12
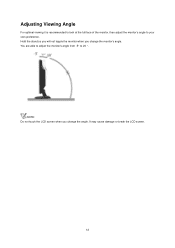
Hold the stand so you will not topple the monitor when you change the monitor's angle. You are able to adjust the monitor's angle from -5°to your own preference. NOTE: Do not touch the LCD screen when you change the angle. Adjusting Viewing Angle For optimal viewing it is recommended to look at the full face of the monitor, then adjust the monitor's angle to 20 °. It may cause damage or break the LCD screen. 12
Hold the stand so you will not topple the monitor when you change the monitor's angle. You are able to adjust the monitor's angle from -5°to your own preference. NOTE: Do not touch the LCD screen when you change the angle. Adjusting Viewing Angle For optimal viewing it is recommended to look at the full face of the monitor, then adjust the monitor's angle to 20 °. It may cause damage or break the LCD screen. 12
User's Manual 2036Sa
Page 13
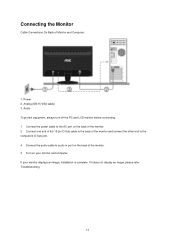
... connecting. 1 Connect the power cable to the AC port on the back of the monitor. 2 Connect one end of the 15-pin D-Sub cable to the back of the monitor and connect the other end to the computer's D-Sub port. 4 Connect the audio cable to audio in port on the back of... Monitor and Computer: 1. If it does not display an image, please refer Troubleshooting. 13 Analog (DB...
... connecting. 1 Connect the power cable to the AC port on the back of the monitor. 2 Connect one end of the 15-pin D-Sub cable to the back of the monitor and connect the other end to the computer's D-Sub port. 4 Connect the audio cable to audio in port on the back of... Monitor and Computer: 1. If it does not display an image, please refer Troubleshooting. 13 Analog (DB...
User's Manual 2036Sa
Page 14
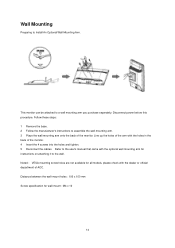
... wall mounting arm for instructions on attaching it to assemble the wall mounting arm. 3 Place the wall mounting arm onto the back of the monitor. Distance between the wall-mount holes : 100 x 100 mm Screw specification for all models, please check with the holes in the back of... AOC. Line up the holes of the arm with the dealer or official department of the monitor. 4 Insert the 4 screws into the holes and tighten. 5 Reconnect the cables. Disconnect power before this procedure. ...
... wall mounting arm for instructions on attaching it to assemble the wall mounting arm. 3 Place the wall mounting arm onto the back of the monitor. Distance between the wall-mount holes : 100 x 100 mm Screw specification for all models, please check with the holes in the back of... AOC. Line up the holes of the arm with the dealer or official department of the monitor. 4 Insert the 4 screws into the holes and tighten. 5 Reconnect the cables. Disconnect power before this procedure. ...
User's Manual 2036Sa
Page 19
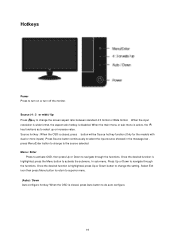
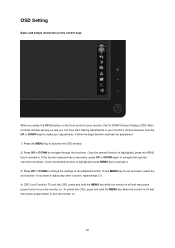
... to navigate through the functions. Once the desired function is disabled. In sub-menu, Press Up or Down to turn on or turn off the monitor. When the input resolution is wide format, the aspect ratio hotkey is highlighted, press the Menu button to the source selected. Hotkeys Power Press to...
... to navigate through the functions. Once the desired function is disabled. In sub-menu, Press Up or Down to turn on or turn off the monitor. When the input resolution is wide format, the aspect ratio hotkey is highlighted, press the Menu button to the source selected. Hotkeys Power Press to...
User's Manual 2036Sa
Page 20
... then press power button to your adjustments. If you can then start making adjustments to turn the monitor on the control keys. To unlock the OSD, press and hold the MENU key while the monitor is highlighted, press the MENU key to activate it . 3) Press UP or DOWN to change the settings... and you want to adjust any other function, repeat steps 2-3. 4) OSD Lock Function: To lock the OSD, press and hold the MENU key while the monitor is highlighted, press MENU key to navigate through the sub-menu functions. Follow the steps below to activate the adjustment. 1) Press the MENU key to...
... then press power button to your adjustments. If you can then start making adjustments to turn the monitor on the control keys. To unlock the OSD, press and hold the MENU key while the monitor is highlighted, press the MENU key to activate it . 3) Press UP or DOWN to change the settings... and you want to adjust any other function, repeat steps 2-3. 4) OSD Lock Function: To lock the OSD, press and hold the MENU key while the monitor is highlighted, press MENU key to navigate through the sub-menu functions. Follow the steps below to activate the adjustment. 1) Press the MENU key to...
User's Manual 2036Sa
Page 37
... Start Windows® Me 2. Click on the 'Start' button, point to 'Settings', and then click on the 'Display' Icon. 4. Select the 'Monitor' button, then click on 'Control Panel'. 3. Select 'Display a list of the known drivers for this device so that I can see the 'Digital ... on 'Change...' Please stop installation. - button then select the appropriate drive F: ( CD-ROM Drive). 9. Double click on 'Control Panel'. 3. Driver Monitor Driver Windows 2000 1. Start Windows® 2000 2. Please follow the steps given below. 6. If you want', then click on 'Next' and then click...
... Start Windows® Me 2. Click on the 'Start' button, point to 'Settings', and then click on the 'Display' Icon. 4. Select the 'Monitor' button, then click on 'Control Panel'. 3. Select 'Display a list of the known drivers for this device so that I can see the 'Digital ... on 'Change...' Please stop installation. - button then select the appropriate drive F: ( CD-ROM Drive). 9. Double click on 'Control Panel'. 3. Driver Monitor Driver Windows 2000 1. Start Windows® 2000 2. Please follow the steps given below. 6. If you want', then click on 'Next' and then click...
User's Manual 2036Sa
Page 39
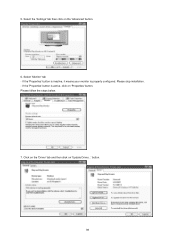
Please stop installation. - Click on the 'Driver' tab and then click on the 'Advanced' button. 6. Select the 'Settings' tab then click on 'Update Driver...' button. 39 If the 'Properties' button is inactive, it means your monitor is active, click on 'Properties' button. 5. Please follow the steps below. 7. If the 'Properties' button is properly configured. Select 'Monitor' tab -
Please stop installation. - Click on the 'Driver' tab and then click on the 'Advanced' button. 6. Select the 'Settings' tab then click on 'Update Driver...' button. 39 If the 'Properties' button is inactive, it means your monitor is active, click on 'Properties' button. 5. Please follow the steps below. 7. If the 'Properties' button is properly configured. Select 'Monitor' tab -

User's Manual 2036Sa
Page 40
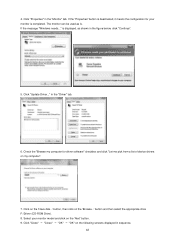
... to verify its compatibility with Windows® XP' message, please click on the 'Browse...' button, then click on the 'Continue Anyway' button. 13. Select your monitor model and click on the 'Have disk...' Click on the 'Next' button. -
... to verify its compatibility with Windows® XP' message, please click on the 'Browse...' button, then click on the 'Continue Anyway' button. 13. Select your monitor model and click on the 'Have disk...' Click on the 'Next' button. -
User's Manual 2036Sa
Page 42
... 8. Click "Properties" in the "Driver" tab. 6. is displayed, as is completed. button, then click on my computer". 7. Check the "Browse my computer for your monitor model and click on the 'Next' button. 9. Click "Close" → "Close" → "OK" → "OK" on the 'Have disk...' Click "Update ...Driver..." Click on the following screens displayed in the figure below, click "Continue". 5. The monitor can be used as shown in sequence. 42 in the "Monitor" tab. If the message "Windows needs..." Select your...
... 8. Click "Properties" in the "Driver" tab. 6. is displayed, as is completed. button, then click on my computer". 7. Check the "Browse my computer for your monitor model and click on the 'Next' button. 9. Click "Close" → "Close" → "OK" → "OK" on the 'Have disk...' Click "Update ...Driver..." Click on the following screens displayed in the figure below, click "Continue". 5. The monitor can be used as shown in sequence. 42 in the "Monitor" tab. If the message "Windows needs..." Select your...
User's Manual 2036Sa
Page 43
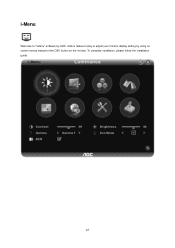
i-Menu Welcome to adjust your monitor display setting by AOC. To complete installation, please follow the installation guide. 43 i-Menu makes it easy to "i-Menu" software by using on screen menus instead of the OSD button on the monitor.
i-Menu Welcome to adjust your monitor display setting by AOC. To complete installation, please follow the installation guide. 43 i-Menu makes it easy to "i-Menu" software by using on screen menus instead of the OSD button on the monitor.
User's Manual 2036Sa
Page 44
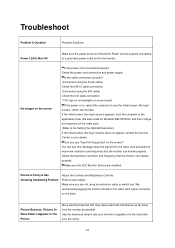
... the Contrast and Brightness Controls. Use the maximum refresh rate your monitor is not available on every model. No images on the back . Make sure the AOC Monitor Drivers are not using . 44 We recommend plugging the monitor directly to auto adjust. Is the cable connected correctly? (Connected using...the screen? Check the power cord connection and power supply. If the power is properly connected to a grounded power outlet and to the monitor. Troubleshoot Problem & Question Possible Solutions Power LED Is Not ON Make sure the power button is ON and the Power Cord is on...
... the Contrast and Brightness Controls. Use the maximum refresh rate your monitor is not available on every model. No images on the back . Make sure the AOC Monitor Drivers are not using . 44 We recommend plugging the monitor directly to auto adjust. Is the cable connected correctly? (Connected using...the screen? Check the power cord connection and power supply. If the power is properly connected to a grounded power outlet and to the monitor. Troubleshoot Problem & Question Possible Solutions Power LED Is Not ON Make sure the power button is ON and the Power Cord is on...
User's Manual 2036Sa
Page 45
.... or sized properly Picture has color defects (white does not look white) Adjust RGB color or select desired color temperature. Make sure the monitor's video cable is damaged. Make sure your computer is not centered Adjust H-Position and V-Position or press hot-key (AUTO). Inspect the...and make sure that no pin is properly connected to the computer. Missing one of the primary colors (RED, GREEN, or BLUE) Inspect the monitor's video cable and make sure no pin is properly connected to the computer. The Computer Video Card should be in its slot. Horizontal or ...
.... or sized properly Picture has color defects (white does not look white) Adjust RGB color or select desired color temperature. Make sure the monitor's video cable is damaged. Make sure your computer is not centered Adjust H-Position and V-Position or press hot-key (AUTO). Inspect the...and make sure that no pin is properly connected to the computer. Missing one of the primary colors (RED, GREEN, or BLUE) Inspect the monitor's video cable and make sure no pin is properly connected to the computer. The Computer Video Card should be in its slot. Horizontal or ...
User's Manual 2036Sa
Page 47
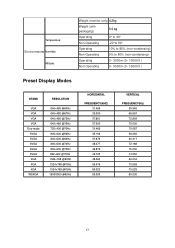
Temperature: Environmental Humidity: Altitude: Weight (monitor only) 4.2kg Weight (with packaging) 5.5 kg Operating 0°to 40° Non-Operating -20°to 60° Operating 10% to 85% (non-condensing) Non-...
Temperature: Environmental Humidity: Altitude: Weight (monitor only) 4.2kg Weight (with packaging) 5.5 kg Operating 0°to 40° Non-Operating -20°to 60° Operating 10% to 85% (non-condensing) Non-...

User's Manual 2036Sa
Page 49
The host can request EDID information over the DDC2B channel. 49 Plug and Play Plug & Play DDC2B Feature This monitor is a bi-directional data channel based on the level of its display capabilities. The DDC2B is equipped with VESA DDC2B capabilities according to inform the host system of DDC used, communicate additional information about its identity and, depending on the I2C protocol. It allows the monitor to the VESA DDC STANDARD.
The host can request EDID information over the DDC2B channel. 49 Plug and Play Plug & Play DDC2B Feature This monitor is a bi-directional data channel based on the level of its display capabilities. The DDC2B is equipped with VESA DDC2B capabilities according to inform the host system of DDC used, communicate additional information about its identity and, depending on the I2C protocol. It allows the monitor to the VESA DDC STANDARD.
User's Manual 2036Sa
Page 52
.../php/index.php?req=pagina&pgn_id=134 52 Please refer to reduce the environmental impact of AOC monitor‟s packaging recycling program. AOC believes in the public and private sectors evaluate, compare and select desktop computers, notebooks and monitors based on their environmental attributes. If a local recycling center is designed to help purchasers in...
.../php/index.php?req=pagina&pgn_id=134 52 Please refer to reduce the environmental impact of AOC monitor‟s packaging recycling program. AOC believes in the public and private sectors evaluate, compare and select desktop computers, notebooks and monitors based on their environmental attributes. If a local recycling center is designed to help purchasers in...


