
2036Sa Specifications
Page 1
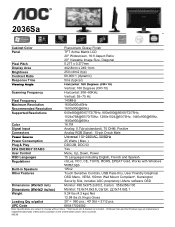
2036Sa Cabinet Color Panel Piano-black Glossy Finish TFT Active Matrix LCD 20" ...RGB Signal: 15-pin D-sub Male Universal 110~240VAC, 50/60Hz 25 Watts ( Max. ) DDC/2B, DDC/CI Yes Menu, Up, Down, Power 15 Languages including English, French and Spanish cULus, FCC, CE, TUV/S, ROHS, EPEAT Gold, Works with...Other Features Vista Logo 1Wx2 Touch Sensitive Controls, USB Pass-thru, User Friendly Graphical OSD Menu, VESA 100mm Wall Mount Compliant*, Kensington Security Slot, includes AOC proprietory i-Menu software OSD Dimensions (WxHxD mm) Dimensions (WxHxD inches) Weight Monitor: 496.5x375.2x90.2,...
2036Sa Cabinet Color Panel Piano-black Glossy Finish TFT Active Matrix LCD 20" ...RGB Signal: 15-pin D-sub Male Universal 110~240VAC, 50/60Hz 25 Watts ( Max. ) DDC/2B, DDC/CI Yes Menu, Up, Down, Power 15 Languages including English, French and Spanish cULus, FCC, CE, TUV/S, ROHS, EPEAT Gold, Works with...Other Features Vista Logo 1Wx2 Touch Sensitive Controls, USB Pass-thru, User Friendly Graphical OSD Menu, VESA 100mm Wall Mount Compliant*, Kensington Security Slot, includes AOC proprietory i-Menu software OSD Dimensions (WxHxD mm) Dimensions (WxHxD inches) Weight Monitor: 496.5x375.2x90.2,...

User's Manual 2036Sa
Page 2
... Extra Setting ...33 Exit...35 LED Indicator ...36 Driver ...37 Monitor Driver ...37 Windows 2000 ...37 Windows ME...37 Windows XP ...38 Windows Vista ...41 i-Menu ...43 Troubleshoot ...44 Specification...46 General Specification ...46 Preset Display Modes ...47 Pin Assignments ...48 Plug and Play...49 Regulation...50 FCC Notice ...50 WEEE...
... Extra Setting ...33 Exit...35 LED Indicator ...36 Driver ...37 Monitor Driver ...37 Windows 2000 ...37 Windows ME...37 Windows XP ...38 Windows Vista ...41 i-Menu ...43 Troubleshoot ...44 Specification...46 General Specification ...46 Preset Display Modes ...47 Pin Assignments ...48 Plug and Play...49 Regulation...50 FCC Notice ...50 WEEE...
User's Manual 2036Sa
Page 19
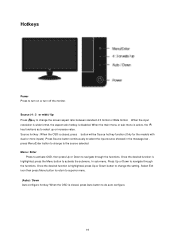
...function (Only for the models with dual or more inputs) .Press Source button continuously to select the input source showed in the message bar , press Menu/Enter button to the source selected. Source (4 : 3 or wide)/ Up Press key to change to change the screen aspect ratio between standard 4:3 format... or Wide format. When the input resolution is wide format, the aspect ratio hotkey is highlighted, press the Menu button to turn on or turn off the monitor. Once the desired function is disabled. Hotkeys Power Press to activate the submenu.
...function (Only for the models with dual or more inputs) .Press Source button continuously to select the input source showed in the message bar , press Menu/Enter button to the source selected. Source (4 : 3 or wide)/ Up Press key to change to change the screen aspect ratio between standard 4:3 format... or Wide format. When the input resolution is wide format, the aspect ratio hotkey is highlighted, press the Menu button to turn on or turn off the monitor. Once the desired function is disabled. Hotkeys Power Press to activate the submenu.
User's Manual 2036Sa
Page 20
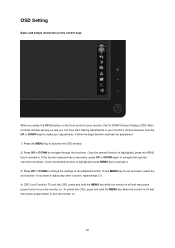
... any other function, repeat steps 2-3. 4) OSD Lock Function: To lock the OSD, press and hold the MENU key while the monitor is off and then press power button to navigate through the sub-menu functions. OSD Setting Basic and simple instruction on . 20 If you can then start making adjustments to... activate it . If the function selected has a sub-menu, press UP or DOWN again to turn the monitor on the front control of the selected function. Once the desired function is off and then ...
... any other function, repeat steps 2-3. 4) OSD Lock Function: To lock the OSD, press and hold the MENU key while the monitor is off and then press power button to navigate through the sub-menu functions. OSD Setting Basic and simple instruction on . 20 If you can then start making adjustments to... activate it . If the function selected has a sub-menu, press UP or DOWN again to turn the monitor on the front control of the selected function. Once the desired function is off and then ...
User's Manual 2036Sa
Page 26
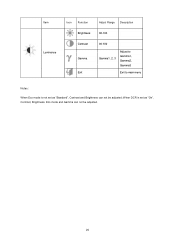
Item Luminance Icon Function Adjust Range Description Brightness 00-100 Contrast Gamma Exit 00-100 Gamma1, 2, 3 Adjust to Gamma1, Gamma2, Gamma3 Exit to main menu Notes : When Eco mode is set as "On", Contrast, Brightness, Eco mode and Gamma can not be adjusted. 26 When DCR is not set as "Standard", Contrast and Brightness can not be adjusted;
Item Luminance Icon Function Adjust Range Description Brightness 00-100 Contrast Gamma Exit 00-100 Gamma1, 2, 3 Adjust to Gamma1, Gamma2, Gamma3 Exit to main menu Notes : When Eco mode is set as "On", Contrast, Brightness, Eco mode and Gamma can not be adjusted. 26 When DCR is not set as "Standard", Contrast and Brightness can not be adjusted;
User's Manual 2036Sa
Page 28
Item Icon Function Adjust Range Description Image Setup Clock 00-100 Phase 00-100 H.Position 00-100 V.Position 00-100 Adjust picture Clock to main menu Notes : When the input source is digital signal like DVI or HDMI, Image Setup can not be adjusted. 28 Adjust the horizontal position of the picture. Adjust Picture Phase to reduce Horizontal-Line noise Adjust the vertical position of the picture. Exit Exit to reduce Vertical-Line noise.
Item Icon Function Adjust Range Description Image Setup Clock 00-100 Phase 00-100 H.Position 00-100 V.Position 00-100 Adjust picture Clock to main menu Notes : When the input source is digital signal like DVI or HDMI, Image Setup can not be adjusted. 28 Adjust the horizontal position of the picture. Adjust Picture Phase to reduce Horizontal-Line noise Adjust the vertical position of the picture. Exit Exit to reduce Vertical-Line noise.
User's Manual 2036Sa
Page 32
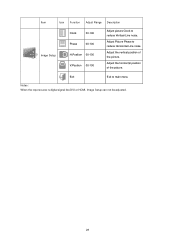
Item Picture Boost Icon Function Adjust Range Horizontal Position 00-100 Vertical Position 00-100 Contrast 00-100 Description Adjust Frame horizontal Position Adjust Frame vertical Position Adjust Frame Contrast Brightness 00-100 Adjust Frame Brightness Frame Size Bright Frame Exit 14-100 Adjust Frame Size on or off Disable or Enable Bright Frame Exit to main menu Notes : One of DCR, Color Boost, and Picture Boost functions is active, the other two function is turned off accordingly. 32
Item Picture Boost Icon Function Adjust Range Horizontal Position 00-100 Vertical Position 00-100 Contrast 00-100 Description Adjust Frame horizontal Position Adjust Frame vertical Position Adjust Frame Contrast Brightness 00-100 Adjust Frame Brightness Frame Size Bright Frame Exit 14-100 Adjust Frame Size on or off Disable or Enable Bright Frame Exit to main menu Notes : One of DCR, Color Boost, and Picture Boost functions is active, the other two function is turned off accordingly. 32

User's Manual 2036Sa
Page 34
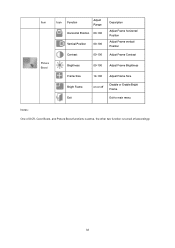
Item Icon Function Adjust Range Description Language Select the OSD language Reset yes or no Turn ON/OFF DDC-CI Support Extra Setting Timeout 05-120 Transparence 00-100 H. Position 00-100 V. Position 00-100 Off Timer 00-24 Adjust the OSD Timeout Adjust the transparence of OSD Adjust the vertical position of OSD Adjust the horizontal position of OSD Adjust the DC off time Exit Exit to default DDC-CI yes or no Reset the menu to main menu 34
Item Icon Function Adjust Range Description Language Select the OSD language Reset yes or no Turn ON/OFF DDC-CI Support Extra Setting Timeout 05-120 Transparence 00-100 H. Position 00-100 V. Position 00-100 Off Timer 00-24 Adjust the OSD Timeout Adjust the transparence of OSD Adjust the vertical position of OSD Adjust the horizontal position of OSD Adjust the DC off time Exit Exit to default DDC-CI yes or no Reset the menu to main menu 34
User's Manual 2036Sa
Page 43
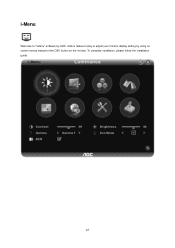
i-Menu makes it easy to "i-Menu" software by using on screen menus instead of the OSD button on the monitor. To complete installation, please follow the installation guide. 43 i-Menu Welcome to adjust your monitor display setting by AOC.
i-Menu makes it easy to "i-Menu" software by using on screen menus instead of the OSD button on the monitor. To complete installation, please follow the installation guide. 43 i-Menu Welcome to adjust your monitor display setting by AOC.