User's Manual 2036S
Page 2
......5 Installation ...6 Cleaning...8 Other ...9 Setup ...10 Contents in Box ...10 Setup Stand & Base...11 Adjusting Viewing Angle...12 Connecting the Monitor...13 Wall Mounting ...14 Adjusting ...15 Setting Optimal Resolution ...15 Windows Vista ...15 Windows XP ...17 Windows ME/2000...18 Hotkeys ...Boost...23 Luminance ...25 Image Setup ...27 Color Temperature ...29 Picture Boost ...31 Extra Setting ...33 Exit...35 LED Indicator ...36 Driver ...37 Monitor Driver ...37 Windows 2000 ...37 Windows ME...37 Windows XP ...38 Windows Vista ...41 i-Menu ...43 Troubleshoot ...44 Specification...46 General...
......5 Installation ...6 Cleaning...8 Other ...9 Setup ...10 Contents in Box ...10 Setup Stand & Base...11 Adjusting Viewing Angle...12 Connecting the Monitor...13 Wall Mounting ...14 Adjusting ...15 Setting Optimal Resolution ...15 Windows Vista ...15 Windows XP ...17 Windows ME/2000...18 Hotkeys ...Boost...23 Luminance ...25 Image Setup ...27 Color Temperature ...29 Picture Boost ...31 Extra Setting ...33 Exit...35 LED Indicator ...36 Driver ...37 Monitor Driver ...37 Windows 2000 ...37 Windows ME...37 Windows XP ...38 Windows Vista ...41 i-Menu ...43 Troubleshoot ...44 Specification...46 General...
User's Manual 2036S
Page 37
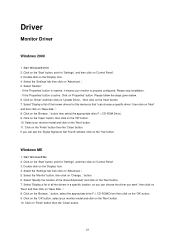
... on 'Control Panel'. 3. Click on the 'Start' button, point to 'Settings', and then click on 'Advanced...'. 5. Driver Monitor Driver Windows 2000 1. Start Windows® 2000 2. Select 'Monitor' - If the 'Properties' button is inactive, it means your monitor model and click on the 'Yes' button. Please stop installation. - If the 'Properties' button is properly configured. Click...
... on 'Control Panel'. 3. Click on the 'Start' button, point to 'Settings', and then click on 'Advanced...'. 5. Driver Monitor Driver Windows 2000 1. Start Windows® 2000 2. Select 'Monitor' - If the 'Properties' button is inactive, it means your monitor model and click on the 'Yes' button. Please stop installation. - If the 'Properties' button is properly configured. Click...
User's Manual 2036S
Page 39
Select 'Monitor' tab - 5. If the 'Properties' button is inactive, it means your monitor is active, click on 'Update Driver...' Click on the 'Driver' tab and then click on 'Properties' button. Please stop installation. - Please follow the steps below. 7. If the 'Properties' button is properly configured. Select the 'Settings' tab then click on the 'Advanced' button. 6. button. 39
Select 'Monitor' tab - 5. If the 'Properties' button is inactive, it means your monitor is active, click on 'Update Driver...' Click on the 'Driver' tab and then click on 'Properties' button. Please stop installation. - Please follow the steps below. 7. If the 'Properties' button is properly configured. Select the 'Settings' tab then click on the 'Advanced' button. 6. button. 39
User's Manual 2036S
Page 40
Click on the 'Next' button. - Select your monitor model and click on the 'Have disk...' I will choose the driver to verify its compatibility with Windows® XP' message, please click on the 'Continue Anyway' button. 13. Click on the 'Next' button. 10. Then click ...
Click on the 'Next' button. - Select your monitor model and click on the 'Have disk...' I will choose the driver to verify its compatibility with Windows® XP' message, please click on the 'Continue Anyway' button. 13. Click on the 'Next' button. 10. Then click ...
User's Manual 2036S
Page 42
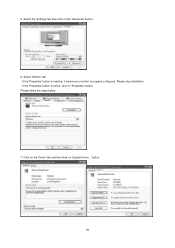
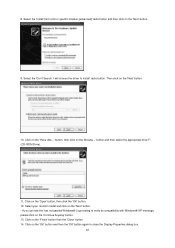
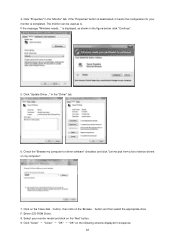
If the message "Windows needs..." Check the "Browse my computer for your monitor model and click on the 'Browse...' button and then select the appropriate drive F:\Driver (CD-ROM Drive). 8. 4. Click "Update Driver..." Click on the following screens displayed in the figure below, click "Continue". 5....OK" → "OK" on the 'Have disk...' Click "Properties" in the "Driver" tab. 6. in the "Monitor" tab. button, then click on the 'Next' button. 9. If the "Properties" button is completed. The monitor can be used as is displayed, as shown in sequence. 42 Select your...
If the message "Windows needs..." Check the "Browse my computer for your monitor model and click on the 'Browse...' button and then select the appropriate drive F:\Driver (CD-ROM Drive). 8. 4. Click "Update Driver..." Click on the following screens displayed in the figure below, click "Continue". 5....OK" → "OK" on the 'Have disk...' Click "Properties" in the "Driver" tab. 6. in the "Monitor" tab. button, then click on the 'Next' button. 9. If the "Properties" button is completed. The monitor can be used as is displayed, as shown in sequence. 42 Select your...

User's Manual 2036S
Page 44
...message when the signal from the video card exceeds the maximum resolution and frequency that may cause electrical interference as far away from the monitor as possible. Troubleshoot Problem & Question Possible Solutions Power LED Is Not ON Make sure the power button is ON and the Power ... can see "Input Not Supported" on the screen Is the power cord connected properly? Use the maximum refresh rate your monitor is properly connected to a grounded power outlet and to auto adjust. No images on the screen? Make sure the AOC Monitor Drivers are using an extension cable or switch box.
...message when the signal from the video card exceeds the maximum resolution and frequency that may cause electrical interference as far away from the monitor as possible. Troubleshoot Problem & Question Possible Solutions Power LED Is Not ON Make sure the power button is ON and the Power ... can see "Input Not Supported" on the screen Is the power cord connected properly? Use the maximum refresh rate your monitor is properly connected to a grounded power outlet and to auto adjust. No images on the screen? Make sure the AOC Monitor Drivers are using an extension cable or switch box.


