
Operating Instructions
Page 3
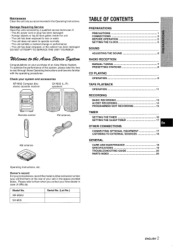
...the performance of difficulty. I 2 ENGLISH XR-M35U t- The unit has been dropped, or the cabinet has been damaged DO NOT ATTEMPT TO SERVICE THE UNIT YOURSELF. 7t%&u#waAv#&uashf?tzsm Congratulations on the rear of an Aiwa Stereo System. The unit exhibits a ... of this system, please take the time to them when you will find them on your system and accessories XR-M35 Compact disc stereo cassette receiver SX-M35 (L, R) speakers Remote control FM antenna AM antenna TABLE OF CONTENTS PREPARATIONS PRECAUTIONS 1 CONNECTIONS 3 BEFORE OPERATION 5 sETTING THEcLocK .......m ...
...the performance of difficulty. I 2 ENGLISH XR-M35U t- The unit has been dropped, or the cabinet has been damaged DO NOT ATTEMPT TO SERVICE THE UNIT YOURSELF. 7t%&u#waAv#&uashf?tzsm Congratulations on the rear of an Aiwa Stereo System. The unit exhibits a ... of this system, please take the time to them when you will find them on your system and accessories XR-M35 Compact disc stereo cassette receiver SX-M35 (L, R) speakers Remote control FM antenna AM antenna TABLE OF CONTENTS PREPARATIONS PRECAUTIONS 1 CONNECTIONS 3 BEFORE OPERATION 5 sETTING THEcLocK .......m ...
Operating Instructions
Page 5
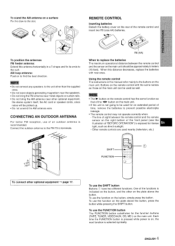
... 5 meters (16 feet). m - Connect the outdoor antenna to find the best direction. L) / R6 (AA) When to prevent possible electrolyte leakage, q The remote control may not operate correctly when: - To use the function on the main unit can be picked up. * Do not unwind the AM antenna wire.... One of the functions is indicated on the button, and the other on the right bottom of the front panel (see the illustration of the remote control and insert two R6 (size AA) batteries. To stand the AM antenna on , the next function is selected cyclically. 4 ENGLISH m~ o...
... 5 meters (16 feet). m - Connect the outdoor antenna to find the best direction. L) / R6 (AA) When to prevent possible electrolyte leakage, q The remote control may not operate correctly when: - To use the function on the main unit can be picked up. * Do not unwind the AM antenna wire.... One of the functions is indicated on the button, and the other on the right bottom of the front panel (see the illustration of the remote control and insert two R6 (size AA) batteries. To stand the AM antenna on , the next function is selected cyclically. 4 ENGLISH m~ o...
Operating Instructions
Page 6
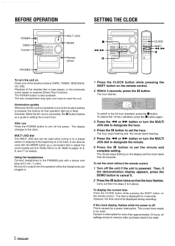
... to the beginning of the function buttons (TAPE, TUNER, VIDEO/AUX, CD, MD). BEFORE OPERATION SETTING THE CLOCK POWER - -@l DEMO mU - Function PHONES Remote sensor ""m II 1"""""""'"~ Ej - CLOCK -SHIFT -44, - Illumination guides Whenever the AC cord is connected or one of a CD track. Example: When the...or flash. Carry out then the steps 3 to the 24-hour standard, press the s button. Refer to set the clock without the remote control No sound is output from 00 seconds. The minute stops flashing on or off This is connected, the II button flashes as a...
... to the beginning of the function buttons (TAPE, TUNER, VIDEO/AUX, CD, MD). BEFORE OPERATION SETTING THE CLOCK POWER - -@l DEMO mU - Function PHONES Remote sensor ""m II 1"""""""'"~ Ej - CLOCK -SHIFT -44, - Illumination guides Whenever the AC cord is connected or one of a CD track. Example: When the...or flash. Carry out then the steps 3 to the 24-hour standard, press the s button. Refer to set the clock without the remote control No sound is output from 00 seconds. The minute stops flashing on or off This is connected, the II button flashes as a...
Operating Instructions
Page 7
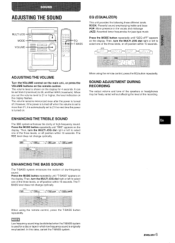
...MULTI JOG dial right or left to select one of the three levels, or off . The volume level is originally emphasized. When using the remote control, press the T-BASS button repeatedly. Press the MODE button repeatedly until "GEQ oFF" appears on the clisplay. When you set the volume... JOG dial right or left to 21 or higher, the level indication on the remote control. ENIHANCING THE TREBLE SOUND The 3BE system enhances the clarity of low-frequency sourld. When using the remote control, press the EQ button repeatedly, SOUND ADJUSTMENT DURING RECORDING The output volume and...
...MULTI JOG dial right or left to select one of the three levels, or off . The volume level is originally emphasized. When using the remote control, press the T-BASS button repeatedly. Press the MODE button repeatedly until "GEQ oFF" appears on the clisplay. When you set the volume... JOG dial right or left to 21 or higher, the level indication on the remote control. ENIHANCING THE TREBLE SOUND The 3BE system enhances the clarity of low-frequency sourld. When using the remote control, press the EQ button repeatedly, SOUND ADJUSTMENT DURING RECORDING The output volume and...
Operating Instructions
Page 8
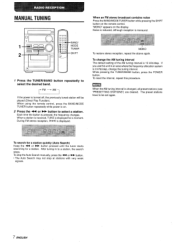
... AM tuning interval is on. 2 Press the ++ or ~ button to a station, the search stops. If you use this procedure. "MONO" appears on the remote control. When using the remote control, press the BAND/MODE TUNER button repeatedly while power is 10 kHz/step. MANUAL TUNING When an FM stereo broadcast contains noise...
... AM tuning interval is on. 2 Press the ++ or ~ button to a station, the search stops. If you use this procedure. "MONO" appears on the remote control. When using the remote control, press the BAND/MODE TUNER button repeatedly while power is 10 kHz/step. MANUAL TUNING When an FM stereo broadcast contains noise...
Operating Instructions
Page 9
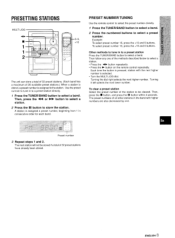
button to select a station. 2 Press the 11 button to select a band. q Press the E button on the remote control repeatedly. Each time the button is pressed, station with higher numbers are also decreased by one of the methods described below to select a band. ... JOG dial. ENGLISH 8 - Then follow any one . Use the preset num~er to tune in consecutive order for each band. PRESET NUMBER TUNING Use the remote control to select the preset number directly. 1 Press the TUNER/BAND button to select a band. 2 Press the numbered buttons to the station. Example: To select...
button to select a station. 2 Press the 11 button to select a band. q Press the E button on the remote control repeatedly. Each time the button is pressed, station with higher numbers are also decreased by one of the methods described below to select a band. ... JOG dial. ENGLISH 8 - Then follow any one . Use the preset num~er to tune in consecutive order for each band. PRESET NUMBER TUNING Use the remote control to select the preset number directly. 1 Press the TUNER/BAND button to select a band. 2 Press the numbered buttons to the station. Example: To select...
Operating Instructions
Page 10
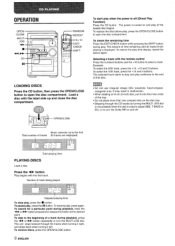
OPERATION OPENI CLOSE MULTI JOG
OPERATION OPENI CLOSE MULTI JOG
Operating Instructions
Page 11
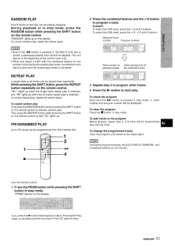
... to play , repeat the above again. Ther, press the REPEAT button while pressing the SHIFT button on the remote control so that "=" lights up on the remote control during the random play mode, the selected track stal'ts to step 2, the programming mode is turned, a previously played track cannot be... the programmed play mode is pressed in stop mode, a track number and program number will be played randomly. RANDOM PLAY All ttle tracks on the remote control. To clear the program Press the s button in stop mode. q When you select a track with the numbered buttons on the display. To...
... to play , repeat the above again. Ther, press the REPEAT button while pressing the SHIFT button on the remote control so that "=" lights up on the remote control during the random play mode, the selected track stal'ts to step 2, the programming mode is turned, a previously played track cannot be... the programmed play mode is pressed in stop mode, a track number and program number will be played randomly. RANDOM PLAY All ttle tracks on the remote control. To clear the program Press the s button in stop mode. q When you select a track with the numbered buttons on the display. To...
Operating Instructions
Page 14
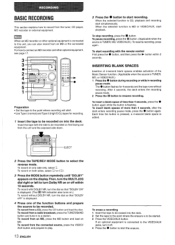
... Z. Each time the button is pressed, a 4-second blank space is "flashing. If an optional equipment is MD or VI DEO/AUX, start recording with the remote control First press the q button, and then press the > button within 10 seconds. q Use Type I 5 Press the q button to be recorded on into the deck...
... Z. Each time the button is pressed, a 4-second blank space is "flashing. If an optional equipment is MD or VI DEO/AUX, start recording with the remote control First press the q button, and then press the > button within 10 seconds. q Use Type I 5 Press the q button to be recorded on into the deck...
Operating Instructions
Page 15
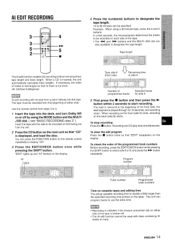
.... 2 Press the CD button on the main unit so that no track is displayed, and load the disc. }'OUcan pressthe FUNCTION button on the remote control repeatedly to 99 minutes can program tracks to start from a point halfway into the deck, and turn Dolby NR on cassette tapes and editing... When using the MODE button and the MULTI JOG dial. ( see "BASIC RECORDING step 3 ) I lsert the tape with discs tab on the display. Use the remote control from the beginning of tracks is rearranged so that "CD" is cut short. (Al: Artificial Intelligence) mm Al edit recording will not start recording...
.... 2 Press the CD button on the main unit so that no track is displayed, and load the disc. }'OUcan pressthe FUNCTION button on the remote control repeatedly to 99 minutes can program tracks to start from a point halfway into the deck, and turn Dolby NR on cassette tapes and editing... When using the MODE button and the MULTI JOG dial. ( see "BASIC RECORDING step 3 ) I lsert the tape with discs tab on the display. Use the remote control from the beginning of tracks is rearranged so that "CD" is cut short. (Al: Artificial Intelligence) mm Al edit recording will not start recording...
Operating Instructions
Page 16
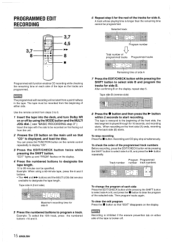
...of programmed tracks Programmed tracks Programmed edit function enables CD recording while checking the remaining time on or off . 15 ENGLISH Use the remote control from steps 3 to the beginning of the front side, the lead segment is played through for side A 5 Press the numbered... within 2 seconds to select side A or B, and press the - You can be recordedon firstfacingout fromthe unit. 2 Presws the CD button on the remote control repeatedly to designate the tape length. Example: When using the MODE button and the MULTI JOG dial. ( see '(BASIC RECORDING step 3" ) Insertthe...
...of programmed tracks Programmed tracks Programmed edit function enables CD recording while checking the remaining time on or off . 15 ENGLISH Use the remote control from steps 3 to the beginning of the front side, the lead segment is played through for side A 5 Press the numbered... within 2 seconds to select side A or B, and press the - You can be recordedon firstfacingout fromthe unit. 2 Presws the CD button on the remote control repeatedly to designate the tape length. Example: When using the MODE button and the MULTI JOG dial. ( see '(BASIC RECORDING step 3" ) Insertthe...
Operating Instructions
Page 17
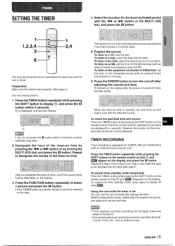
...off . When the timer-on time is reached, the unit turns on the display after the power is set correctly. (See page 5.) Use the remote control. 7 Press theTIMER button repeatedly while pressing the SHIFT button to prepare the source, and adjust the volume and tone. The timer-on the ... and press the 11 button. To cancel timer standby mode temporarily Press the TIMER button while pressing the SHIFT button on the remote control so that @ and ~ appear on the remote control. in timer. To listen to display @ (and ~). Press the TIMER button repeatedly while pressing the SHIFT button on ...
...off . When the timer-on time is reached, the unit turns on the display after the power is set correctly. (See page 5.) Use the remote control. 7 Press theTIMER button repeatedly while pressing the SHIFT button to prepare the source, and adjust the volume and tone. The timer-on the ... and press the 11 button. To cancel timer standby mode temporarily Press the TIMER button while pressing the SHIFT button on the remote control so that @ and ~ appear on the remote control. in timer. To listen to display @ (and ~). Press the TIMER button repeatedly while pressing the SHIFT button on ...
Operating Instructions
Page 18
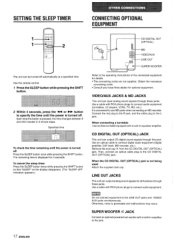
When connecting a turntable Use an Aiwa turntable equipped with RCA phono plugs to connect audio equipment (turntables, LD players, VCRs, TV, MD, etc.). Use a cable with a built-in equalizer amplifier. SUPER ... unit can be turned off Press the SLEEP button once while pressing the SHIFT button. Use the remote control. 7 Press the SLEEP button while pressing the SHIFT button. 2 Within 4 seconds, press the - q Consult your local Aiwa dealer for 4 seconds. Use an optical cable to the LINE OUT jacks and VIDEO/ AUX jacks...
When connecting a turntable Use an Aiwa turntable equipped with RCA phono plugs to connect audio equipment (turntables, LD players, VCRs, TV, MD, etc.). Use a cable with a built-in equalizer amplifier. SUPER ... unit can be turned off Press the SLEEP button once while pressing the SHIFT button. Use the remote control. 7 Press the SLEEP button while pressing the SHIFT button. 2 Within 4 seconds, press the - q Consult your local Aiwa dealer for 4 seconds. Use an optical cable to the LINE OUT jacks and VIDEO/ AUX jacks...
Operating Instructions
Page 21
... not run. o Is the disc correctly inserted? (+ page 9) * Is the disc dirty? (+ page 18) . PARTS INDEX Instructions about each part on the main unit or remote control are indicated on the pages listed below . Is i he other electrical appliances. Is :he playback head dirty? (+ page 18) Recording is not possible. Is...
... not run. o Is the disc correctly inserted? (+ page 9) * Is the disc dirty? (+ page 18) . PARTS INDEX Instructions about each part on the main unit or remote control are indicated on the pages listed below . Is i he other electrical appliances. Is :he playback head dirty? (+ page 18) Recording is not possible. Is...


