
Operating Instructions
Page 3
... unit exhibits a marked change in the Operating Damage Requiring Service Have the units serviced by a qualified service technician if: - TABLE OF CONTENTS Precautions l PREPARATIONS CONNECTIONS . ..m 3 REMOTE CONTROL 5 BEFORE OPERATION 5 SOUND AUDIO ADJUSTMENTS m 6 GRAPHIC EQUALIZER 6 RADIO RECEPTION MANUAL TUNING 7 PRESETTING STATIONS 7 TAPE PLAYBACK BASIC OPERATIONS m 8 CD PLAYING BASIC OPERATIONS 9 PROGRAMMED PLAY 10 RECORDING...
... unit exhibits a marked change in the Operating Damage Requiring Service Have the units serviced by a qualified service technician if: - TABLE OF CONTENTS Precautions l PREPARATIONS CONNECTIONS . ..m 3 REMOTE CONTROL 5 BEFORE OPERATION 5 SOUND AUDIO ADJUSTMENTS m 6 GRAPHIC EQUALIZER 6 RADIO RECEPTION MANUAL TUNING 7 PRESETTING STATIONS 7 TAPE PLAYBACK BASIC OPERATIONS m 8 CD PLAYING BASIC OPERATIONS 9 PROGRAMMED PLAY 10 RECORDING...
Operating Instructions
Page 4
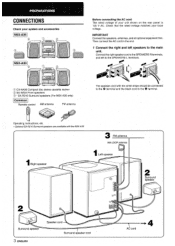
... connect the AC cord in the end. 1 Connect the right and Ieft,.speakers to the SPEAKERS L terminals. @ CX-NA30 Compact disc stereo cassette reciver @ SX-NA34 Front speakers @ * SX-R21 O Surround speakers (For NSX-A35 only) Remote control :~ . AM antenna -' FM antenna I *$?=j; ~ m EEE2' @ \~"p%.:",:r.~.. -f?s3J Before connecting the AC cord The rated voltage of your...
... connect the AC cord in the end. 1 Connect the right and Ieft,.speakers to the SPEAKERS L terminals. @ CX-NA30 Compact disc stereo cassette reciver @ SX-NA34 Front speakers @ * SX-R21 O Surround speakers (For NSX-A35 only) Remote control :~ . AM antenna -' FM antenna I *$?=j; ~ m EEE2' @ \~"p%.:",:r.~.. -f?s3J Before connecting the AC cord The rated voltage of your...
Operating Instructions
Page 6
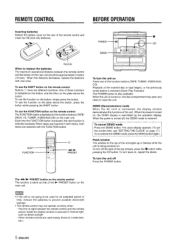
...inserted in both decks, both decks are used for the function buttons (TAPE/ DECK 1/2, TUNER, VIDEO/AUX,CD) on the main unit. Other remote controls are selected with new ones, To use the function cm the plate above . Flash window The window on . To turn off Press the POWER ...main unit should be used nearby (those of the function buttons (TAPE, TUNER, VIDEO/AUX, CD). The line of sight between the remote control and the sensor on the remote control Buttons @ have two clifferent functions. To turn the unit cm Press one of a television, etc.) To turn back on , the ...
...inserted in both decks, both decks are used for the function buttons (TAPE/ DECK 1/2, TUNER, VIDEO/AUX,CD) on the main unit. Other remote controls are selected with new ones, To use the function cm the plate above . Flash window The window on . To turn off Press the POWER ...main unit should be used nearby (those of the function buttons (TAPE, TUNER, VIDEO/AUX, CD). The line of sight between the remote control and the sensor on the remote control Buttons @ have two clifferent functions. To turn the unit cm Press one of a television, etc.) To turn back on , the ...
Operating Instructions
Page 7
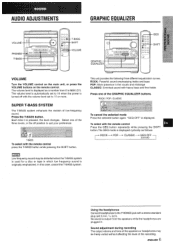
... and tone of the speakers or headphones may be freely varied without affecting the level of the three levels, or the off with the remote control press the T-BASS button while pressing the SHIFT button. This unit provides the following three different equalization curves. CLASSIC- 1 GEC?OFF (...in . GRAPHIC EQUALIZER GEQ SHIFT GRAPI EQUAL VOLUME Turn the VOLUME control on the main unit, or press the VOLUME buttons on the remote control. The volume level is output from O to the PHONES jack with the remote control Press the GEQ button repeatedly while pressing the SHIFT button. In ...
... and tone of the speakers or headphones may be freely varied without affecting the level of the three levels, or the off with the remote control press the T-BASS button while pressing the SHIFT button. This unit provides the following three different equalization curves. CLASSIC- 1 GEC?OFF (...in . GRAPHIC EQUALIZER GEQ SHIFT GRAPI EQUAL VOLUME Turn the VOLUME control on the main unit, or press the VOLUME buttons on the remote control. The volume level is output from O to the PHONES jack with the remote control Press the GEQ button repeatedly while pressing the SHIFT button. In ...
Operating Instructions
Page 8
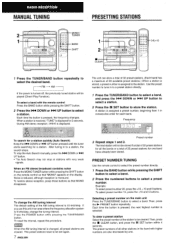
... select a band with very weak :;ignals. When an FM stereo broadcast contains noise Press the MONO TUNER button while pressing the SHIFT button orl the remote control so that MONO disappears. When the A'M tuning interval is pressed, the frequency changes. Example: To select preset number 20, press the +10, +... can store a total of 32 preset stations. (Each band has a maximum of the station to be cleared. Tc stop at stations with the remote control Press the BAND button while pressing the SHIFT button. 2 Press the l++ DOWN or B+l UP button to the station. PRESET NUMBER TUNING Use the...
... select a band with very weak :;ignals. When an FM stereo broadcast contains noise Press the MONO TUNER button while pressing the SHIFT button orl the remote control so that MONO disappears. When the A'M tuning interval is pressed, the frequency changes. Example: To select preset number 20, press the +10, +... can store a total of 32 preset stations. (Each band has a maximum of the station to be cleared. Tc stop at stations with the remote control Press the BAND button while pressing the SHIFT button. 2 Press the l++ DOWN or B+l UP button to the station. PRESET NUMBER TUNING Use the...
Operating Instructions
Page 10
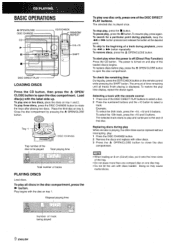
..., press the + or B-P button repeatedly. To play , press the 1I button. To pause play all tracks finish playing is turned on the remote control while pressing the SHIFT botton. To skip to the beginning of the DISC DIRECT PLAY buttons to select a disc. 2 Press the numbered buttons and...replace discs before play, press the ~ OPEN/CLOSE button to open the disc compartment. To restore the play , press again. Selecting a track with the remote control 1 Press one disc tray. To select the 10th track, press the +1O and O buttons. BASIC OPERATIONS 4 OPEN/CLOSE z EDIT/CHECK DISC DIRECT...
..., press the + or B-P button repeatedly. To play , press the 1I button. To pause play all tracks finish playing is turned on the remote control while pressing the SHIFT botton. To skip to the beginning of the DISC DIRECT PLAY buttons to select a disc. 2 Press the numbered buttons and...replace discs before play, press the ~ OPEN/CLOSE button to open the disc compartment. To restore the play , press again. Selecting a track with the remote control 1 Press one disc tray. To select the 10th track, press the +1O and O buttons. BASIC OPERATIONS 4 OPEN/CLOSE z EDIT/CHECK DISC DIRECT...
Operating Instructions
Page 11
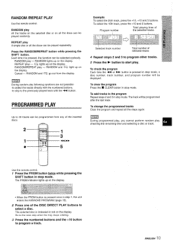
... disc is pressed once in step 1, the unit enters the KARAOKE PROGRAM (page 16). 2 Press one of the inserted discs, 2 1 3 .1 ++-, s 5 u Use the remote control. 1 Press the PRGM button twice while pressing the SHIFT button in stop mode. RANDOM/REPEAT play following oprations are not possible: -to select the tracks... can be programmed from the display. button to the program Repeat steps 2 and 3 in stop mode. RANDOM /REPEAT PLAY Use the remote control, RANDOM play All the tracks on the selected disc or on all the discs can be programmed after the last track. Press the RANDOM...
... disc is pressed once in step 1, the unit enters the KARAOKE PROGRAM (page 16). 2 Press one of the inserted discs, 2 1 3 .1 ++-, s 5 u Use the remote control. 1 Press the PRGM button twice while pressing the SHIFT button in stop mode. RANDOM/REPEAT play following oprations are not possible: -to select the tracks... can be programmed from the display. button to the program Repeat steps 2 and 3 in stop mode. RANDOM /REPEAT PLAY Use the remote control, RANDOM play All the tracks on the selected disc or on all the discs can be programmed after the last track. Press the RANDOM...
Operating Instructions
Page 14
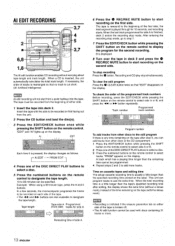
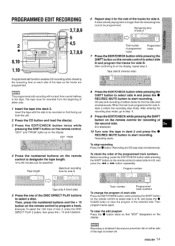
... 31 tracks or more tracks. The tape must be recorded from the beginning of the tape. C:EDIT and "Al" lights up on the remote control to display the program for the second recording. Al EDIT - and ~ buttons are also available to designate the tape length. Track number Programmed... which has a playing time longer than the specified recording time printed on the second side. q Recording is inhibited if the erasure prevention tab on the remote control to select side A or B, and press the ++ or - button repeatedly. , I Program number To add tracks from other discs to the edit...
... 31 tracks or more tracks. The tape must be recorded from the beginning of the tape. C:EDIT and "Al" lights up on the remote control to display the program for the second recording. Al EDIT - and ~ buttons are also available to designate the tape length. Track number Programmed... which has a playing time longer than the specified recording time printed on the second side. q Recording is inhibited if the erasure prevention tab on the remote control to select side A or B, and press the ++ or - button repeatedly. , I Program number To add tracks from other discs to the edit...
Operating Instructions
Page 15
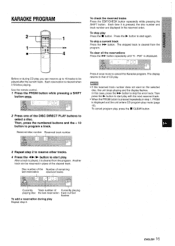
...DIRECT PLAY buttons to be specified. ENGLISH 1 't "EDIT and "PRGM" lights up on the display. 4 Press the numbered buttons on the remote control for side B. To stop simultaneously. Then, press the numbered buttons and the + 10 button on the display. To clear the edit program Press... the s button twice so that "EDIT disappears on the remote control to start from the beginning of the tape as the tracks are programmed. CD play stop recording Press the u button. Program number ...
...DIRECT PLAY buttons to be specified. ENGLISH 1 't "EDIT and "PRGM" lights up on the display. 4 Press the numbered buttons on the remote control for side B. To stop simultaneously. Then, press the numbered buttons and the + 10 button on the display. To clear the edit program Press... the s button twice so that "EDIT disappears on the remote control to start from the beginning of the tape as the tracks are programmed. CD play stop recording Press the u button. Program number ...
Operating Instructions
Page 17
... reservation is cleared from the program. After a track is played, it is cleared when it once more to start play mode (page lo). Use the remote control. 1 Press the PRGM button while pressing a SHIFT button ~. 2 Press one of CD play Currently playing track number flashes ENGL/S/-/ 16 Reserved disc number Reserved track...
... reservation is cleared from the program. After a track is played, it is cleared when it once more to start play mode (page lo). Use the remote control. 1 Press the PRGM button while pressing a SHIFT button ~. 2 Press one of CD play Currently playing track number flashes ENGL/S/-/ 16 Reserved disc number Reserved track...
Operating Instructions
Page 18
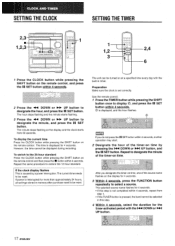
... step is displayed, and the hour flashes. Repeat the same procedure to designate the hour, and press the 11 SET button. Use the remote control. 1 Press the TIMER button while pressing the SHIFT button once to select a source. After you do not press the 11SET button within ...period with the M< DOWN or IW UP button. 17 ENGLISH The current time needs to designate the minute of the source name flashes on the remote control and then press the s button within 4 seconds. .2 Press the - Repeat to be displayed during recording. SETTING THE CLOCK SETTING THE TIMER 1...
... step is displayed, and the hour flashes. Repeat the same procedure to designate the hour, and press the 11 SET button. Use the remote control. 1 Press the TIMER button while pressing the SHIFT button once to select a source. After you do not press the 11SET button within ...period with the M< DOWN or IW UP button. 17 ENGLISH The current time needs to designate the minute of the source name flashes on the remote control and then press the s button within 4 seconds. .2 Press the - Repeat to be displayed during recording. SETTING THE CLOCK SETTING THE TIMER 1...
Operating Instructions
Page 68
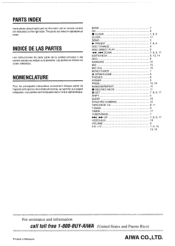
... se indican en orden alfabetico. Les parties sent indiquees clans I'ordre alphabetique. PARTS INDEX Instructions about each part on the main unit or remote control are listed in Malaysia AIWA CO.,LTD. BAND 7 CD 9 s CLEAR 7, 8, 9 CLOCK 17 DEMO 5 > PRESET 7, 8, 9 DISC CHANGE 9 DISC DIRECT PLAY 9 44, M DOWN 7, 8, 9, 17 EDIT/CHECK 9, 13, 14 GEQ 6 KARAOKE...
... se indican en orden alfabetico. Les parties sent indiquees clans I'ordre alphabetique. PARTS INDEX Instructions about each part on the main unit or remote control are listed in Malaysia AIWA CO.,LTD. BAND 7 CD 9 s CLEAR 7, 8, 9 CLOCK 17 DEMO 5 > PRESET 7, 8, 9 DISC CHANGE 9 DISC DIRECT PLAY 9 44, M DOWN 7, 8, 9, 17 EDIT/CHECK 9, 13, 14 GEQ 6 KARAOKE...

