Operating Instructions
Page 1
d OPERATING INSTRUCTIONS MANUAL DE INSTRUCCIONES MODE D'EMPLOI CT-X410 YU STEREO CAR CASSETTE RECEIVER RADIO-CASSETTE ESTEREOFONICO PARA AUTOMOVIL ENGLISH ESPAÑOL FRANÇAIS OWNER'S RECORD For your set) in case of your convenience, record the model number and serial number (you will find them on the right side of difficulty. Model No. CT-X410 Serial No. Please refer to them when you contact your AIWA dealer in the space provided below.
d OPERATING INSTRUCTIONS MANUAL DE INSTRUCCIONES MODE D'EMPLOI CT-X410 YU STEREO CAR CASSETTE RECEIVER RADIO-CASSETTE ESTEREOFONICO PARA AUTOMOVIL ENGLISH ESPAÑOL FRANÇAIS OWNER'S RECORD For your set) in case of your convenience, record the model number and serial number (you will find them on the right side of difficulty. Model No. CT-X410 Serial No. Please refer to them when you contact your AIWA dealer in the space provided below.
Operating Instructions
Page 2
... DC negative-ground electrical system only. • To prevent short-circuiting, disconnect the negative car battery terminal until the unit has been mounted and connected completely. • When replacing the fuse, be sure to remove the pad before operating it. • Keep the volume at such a level that you are not expressly approved by one whose amperage rating is no guarantee...
... DC negative-ground electrical system only. • To prevent short-circuiting, disconnect the negative car battery terminal until the unit has been mounted and connected completely. • When replacing the fuse, be sure to remove the pad before operating it. • Keep the volume at such a level that you are not expressly approved by one whose amperage rating is no guarantee...
Operating Instructions
Page 3
ENGLISH TABLE OF CONTENTS PARTS AND CONTROLS ...3 DETACHING AND ATTACHING THE FRONT PANEL 4 SETTING THE CLOCK ...5 RADIO OPERATION ...5 PRESETTING STATIONS ...6 MY INFORMATION SWITCH ...8 TAPE PLAYBACK ...9 SOUND ADJUSTMENTS ...10 CONNECTING A PORTABLE CD/MD/MP3 PLAYER OR OTHER EQUIPMENT 12 SETTING THE BEEP TONE ...13 MAINTENANCE ...13 SPECIFICATIONS ...14 ENGLISH 2 CTX410(YU)-total-En-3
ENGLISH TABLE OF CONTENTS PARTS AND CONTROLS ...3 DETACHING AND ATTACHING THE FRONT PANEL 4 SETTING THE CLOCK ...5 RADIO OPERATION ...5 PRESETTING STATIONS ...6 MY INFORMATION SWITCH ...8 TAPE PLAYBACK ...9 SOUND ADJUSTMENTS ...10 CONNECTING A PORTABLE CD/MD/MP3 PLAYER OR OTHER EQUIPMENT 12 SETTING THE BEEP TONE ...13 MAINTENANCE ...13 SPECIFICATIONS ...14 ENGLISH 2 CTX410(YU)-total-En-3

Operating Instructions
Page 4
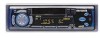
...Rear panel Front panel 1 FUNC (function) button 2 PWR (power on/off)/MUTE button 3 Jog Dial 4 z (eject) button 5 TUNE i button 6 TUNE k button 7 Cassette compartment 8 DIRECTION f/g button 9 A.ME (Auto Memory)/PS (Preset Scan) button 0 % (release) button ! BAL (balance) indicator = FAD (fader) indicator q MUTE indicator w MY INFO (My Information) indicator eAUX indicator r H-BASS (High BASS) indicator t Main display section y AM/PM (clock) indicator u ST (stereo) indicator i Subdisplay section o d (tape direction) indicators p LO (local) indicator [ Audio level indicator Rear panel ] Antenna...
...Rear panel Front panel 1 FUNC (function) button 2 PWR (power on/off)/MUTE button 3 Jog Dial 4 z (eject) button 5 TUNE i button 6 TUNE k button 7 Cassette compartment 8 DIRECTION f/g button 9 A.ME (Auto Memory)/PS (Preset Scan) button 0 % (release) button ! BAL (balance) indicator = FAD (fader) indicator q MUTE indicator w MY INFO (My Information) indicator eAUX indicator r H-BASS (High BASS) indicator t Main display section y AM/PM (clock) indicator u ST (stereo) indicator i Subdisplay section o d (tape direction) indicators p LO (local) indicator [ Audio level indicator Rear panel ] Antenna...
Operating Instructions
Page 5
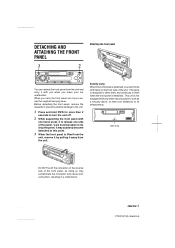
... the front panel from the unit and carry it away from the unit, remove it by pulling it with you when you carry the front panel out of your car unattended. LED lamp Do NOT touch the connector on the front side of the unit. This unit is lifted from the unit. It may contaminate the connector and cause poor connection, resulting...
... the front panel from the unit and carry it away from the unit, remove it by pulling it with you when you carry the front panel out of your car unattended. LED lamp Do NOT touch the connector on the front side of the unit. This unit is lifted from the unit. It may contaminate the connector and cause poor connection, resulting...
Operating Instructions
Page 6
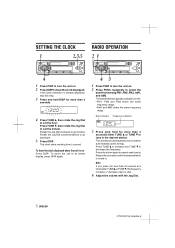
... step. 4 Adjust the volume with the Jog Dial. 5 ENGLISH CTX410(YU)-total-En-6 Press TUNE k, then rotate the Jog Dial to set the hour. Press the button again to decrease the frequency. Rotate the Jog Dial clockwise to go backward. 5 Press DISP. Rotate the Jog Dial counterclockwise to go forward. SETTING THE CLOCK RADIO OPERATION 1 Press PWR to turn the unit on...
... step. 4 Adjust the volume with the Jog Dial. 5 ENGLISH CTX410(YU)-total-En-6 Press TUNE k, then rotate the Jog Dial to set the hour. Press the button again to decrease the frequency. Rotate the Jog Dial clockwise to go backward. 5 Press DISP. Rotate the Jog Dial counterclockwise to go forward. SETTING THE CLOCK RADIO OPERATION 1 Press PWR to turn the unit on...

Operating Instructions
Page 7
... a total of 30 stations). • When the auto memory operation is completed, the station assigned to preset station button 1 is in . • To stop this button for more than 2 seconds. FM1 FM2 FM3 AM1 AM2 * Tape Play mode (available while a cassette is tuned in the unit) 1 Press PWR to turn the unit off Press and hold A.ME/PS for less than 2 seconds to activate the automatic presetting function.
... a total of 30 stations). • When the auto memory operation is completed, the station assigned to preset station button 1 is in . • To stop this button for more than 2 seconds. FM1 FM2 FM3 AM1 AM2 * Tape Play mode (available while a cassette is tuned in the unit) 1 Press PWR to turn the unit off Press and hold A.ME/PS for less than 2 seconds to activate the automatic presetting function.
Operating Instructions
Page 8
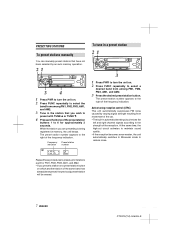
.... PRESETTING STATIONS To preset stations manually You can manually preset stations that you wish to preset with TUNE i or TUNE k. 4 Press and hold one of the preset station buttons 1 to reduce noise. Active tuning reception control (ATRC) This unit automatically suppresses FM noise caused by an auto memory operation. While the station you preset a station on a preset station button on . 2 Press FUNC repeatedly to select the band from movement of the car. • The built-in memory, the unit beeps. The preset station number...
.... PRESETTING STATIONS To preset stations manually You can manually preset stations that you wish to preset with TUNE i or TUNE k. 4 Press and hold one of the preset station buttons 1 to reduce noise. Active tuning reception control (ATRC) This unit automatically suppresses FM noise caused by an auto memory operation. While the station you preset a station on a preset station button on . 2 Press FUNC repeatedly to select the band from movement of the car. • The built-in memory, the unit beeps. The preset station number...
Operating Instructions
Page 9
... set the minute. The timer indication flashes. 8 Set the time you wish the unit to select the band. 6 Tune in Radio mode at the preset turn-on and off times automatically. Band indicator 5 Press FUNC to turn on in Radio mode. Press TUNE k, then rotate the Jog Dial to set the hour. Press TUNE k, then rotate the Jog Dial to set the hour. Your setting is stored in memory, and the unit turns...
... set the minute. The timer indication flashes. 8 Set the time you wish the unit to select the band. 6 Tune in Radio mode at the preset turn-on and off times automatically. Band indicator 5 Press FUNC to turn on in Radio mode. Press TUNE k, then rotate the Jog Dial to set the hour. Press TUNE k, then rotate the Jog Dial to set the hour. Your setting is stored in memory, and the unit turns...
Operating Instructions
Page 10
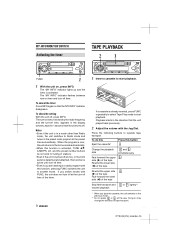
... the unit played back previously. 2 Adjust the volume with the Jog Dial. To check the setting With the unit off time of the timer. 9 ENGLISH 1 Insert a cassette to Radio mode and tunes in stations. • Even if the unit is activated, TUNE i/k, A.ME/PS, LO, and the preset number buttons do this Press this function is turned off . Notes • Even if the unit is in a mode other than Radio mode, the unit switches to...
... the unit played back previously. 2 Adjust the volume with the Jog Dial. To check the setting With the unit off time of the timer. 9 ENGLISH 1 Insert a cassette to Radio mode and tunes in stations. • Even if the unit is activated, TUNE i/k, A.ME/PS, LO, and the preset number buttons do this Press this function is turned off . Notes • Even if the unit is in a mode other than Radio mode, the unit switches to...
Operating Instructions
Page 11
... rear speakers speakers Decreases the volume level Increases the volume level Without selecting any cassette. If necessary, take up the slack by rotating the Jog Dial. Tapes of 90 minutes or longer are not recommended. 1 Press PWR to turn the unit on the other than Tape Play mode, inserting a cassette switches the unit to the audio control indications in the display window. Each time you wish to adjust from: BASS...
... rear speakers speakers Decreases the volume level Increases the volume level Without selecting any cassette. If necessary, take up the slack by rotating the Jog Dial. Tapes of 90 minutes or longer are not recommended. 1 Press PWR to turn the unit on the other than Tape Play mode, inserting a cassette switches the unit to the audio control indications in the display window. Each time you wish to adjust from: BASS...
Operating Instructions
Page 12
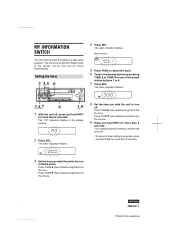
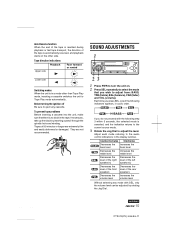
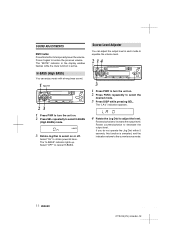
... button to turn the unit on or off. Select "On" to select the desired mode. 3 Press DISP while pressing SEL. The "MUTE" indicator in each mode to equalize the volume level. 1 Press PWR to turn the unit on. 2 Press SEL repeatedly to select H-BASS (High BASS) mode. 3 Rotate Jog Dial to select on . 2 Press FUNC repeatedly to obtain powerful bass. H-BASS (High BASS) You can adjust the output level in the display window flashes while the mute function is...
... button to turn the unit on or off. Select "On" to select the desired mode. 3 Press DISP while pressing SEL. The "MUTE" indicator in each mode to equalize the volume level. 1 Press PWR to turn the unit on. 2 Press SEL repeatedly to select H-BASS (High BASS) mode. 3 Rotate Jog Dial to select on . 2 Press FUNC repeatedly to obtain powerful bass. H-BASS (High BASS) You can adjust the output level in the display window flashes while the mute function is...

Operating Instructions
Page 13
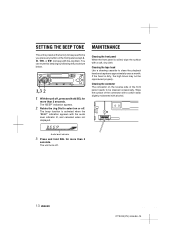
... AUX IN jack (3.5-mm dia.) of VOL, BASS, TRE, BAL, FAD, H-BASS, and source level can be returned to the factory settings with a simple operation. 1 With the unit off, press and hold DISP for that equipment. Returning to the factory settings Adjusted settings of the unit. 4 Press FUNC repeatedly to select AUX IN mode to the factory settings. The "LA--" indication appears, and all sound settings are returned to output sound received from the connected...
... AUX IN jack (3.5-mm dia.) of VOL, BASS, TRE, BAL, FAD, H-BASS, and source level can be returned to the factory settings with a simple operation. 1 With the unit off, press and hold DISP for that equipment. Returning to the factory settings Adjusted settings of the unit. 4 Press FUNC repeatedly to select AUX IN mode to the factory settings. The "LA--" indication appears, and all sound settings are returned to output sound received from the connected...
Operating Instructions
Page 14
... the connector The connector on the reverse side of the connector with a cotton swab slightly moistened with the audio level indicator lit, and canceled when not displayed. The unit turns off. 13 ENGLISH CTX410(YU)-total-En-14 Audio level indicator 3 Press and hold SEL for more than 2 seconds. Wipe the surface of the front panel needs to clean the playback head and...
... the connector The connector on the reverse side of the connector with a cotton swab slightly moistened with the audio level indicator lit, and canceled when not displayed. The unit turns off. 13 ENGLISH CTX410(YU)-total-En-14 Audio level indicator 3 Press and hold SEL for more than 2 seconds. Wipe the surface of the front panel needs to clean the playback head and...
Operating Instructions
Page 15
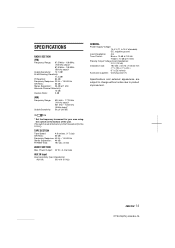
.... * Set the frequency increment for your area using the switch on the bottom of the unit. (The switch is set at the factory to the 10k position [for the U.S.A.]) TAPE SECTION Tape Speed: 4.8 cm/sec. (1 7/8 ips) S/N Ratio: 50 dB Frequency Response: 40 Hz - 14,000 Hz Stereo Separation: 40 dB FF/REW Time: 190 sec. (C-60) AUDIO SECTION Max. Power Output: 40 W × 4 channels AUX IN input Input...
.... * Set the frequency increment for your area using the switch on the bottom of the unit. (The switch is set at the factory to the 10k position [for the U.S.A.]) TAPE SECTION Tape Speed: 4.8 cm/sec. (1 7/8 ips) S/N Ratio: 50 dB Frequency Response: 40 Hz - 14,000 Hz Stereo Separation: 40 dB FF/REW Time: 190 sec. (C-60) AUDIO SECTION Max. Power Output: 40 W × 4 channels AUX IN input Input...


