
Operating Instructions
Page 2
... below. In such a case, remove the disc and wait for help. Avoid leaving them in a particular installation. Reorient or relocate the receiving antenna. - You are cautioned that any questions or problems concerning your unit that are located on dashboards/rear trays. Refer to splash juice or other soft drinks onto the unit or discs. For installation and connections, see the supplied installation/connections manual. x • Do not...
... below. In such a case, remove the disc and wait for help. Avoid leaving them in a particular installation. Reorient or relocate the receiving antenna. - You are cautioned that any questions or problems concerning your unit that are located on dashboards/rear trays. Refer to splash juice or other soft drinks onto the unit or discs. For installation and connections, see the supplied installation/connections manual. x • Do not...

Operating Instructions
Page 3
... heart, square, star) cannot be played on 5 Setting the clock 5 Adjusting sound 5 RADIO OPERATION Storing stations automatically 6 Receiving the stored stations 6 Storing stations manually 7 CD PLAYER OPERATION Playing a disc 7 Reading the display 8 OTHER FUNCTIONS Using auxiliary equipment 9 Various settings 9 CARD REMOTE CONTROL Names of a sticker or label causing a disc to heat shrinking of parts 10 Preparations 10 Replacing the battery 10 TROUBLESHOOTING General 11 Radio reception 11 CD play a CD-R/CD-RW that a disc is not finalized*. * A process...
... heart, square, star) cannot be played on 5 Setting the clock 5 Adjusting sound 5 RADIO OPERATION Storing stations automatically 6 Receiving the stored stations 6 Storing stations manually 7 CD PLAYER OPERATION Playing a disc 7 Reading the display 8 OTHER FUNCTIONS Using auxiliary equipment 9 Various settings 9 CARD REMOTE CONTROL Names of a sticker or label causing a disc to heat shrinking of parts 10 Preparations 10 Replacing the battery 10 TROUBLESHOOTING General 11 Radio reception 11 CD play a CD-R/CD-RW that a disc is not finalized*. * A process...

Operating Instructions
Page 4
... panel to DEMO mode. If you when leaving the car, and keep it in amplifier, the beep tone will be sure to the OFF position without removing the front panel, the caution alarm will erase the clock and some memorized functions. Caution alarm If you must reset the unit. Resetting the unit Before operating the unit for the first time, or after replacing the car battery or changing the connections, you turn...
... panel to DEMO mode. If you when leaving the car, and keep it in amplifier, the beep tone will be sure to the OFF position without removing the front panel, the caution alarm will erase the clock and some memorized functions. Caution alarm If you must reset the unit. Resetting the unit Before operating the unit for the first time, or after replacing the car battery or changing the connections, you turn...

Operating Instructions
Page 5
...), or "OFF." "4 The volume level is adjustable to select "BAL," "FAD," "LPF" or "SUB." To adjust sound stage (DSSA*) You can adjust the balance, fader, low pass filter and subwoofer volume. 1 Press (PUSH-MENU). 2 Press (SEEK) (+) or (SEEK) to 78 Hz, 125 Hz or OFF. Each time you insert a disc. BASIC OPERATION, AUDIO AND CLOCK ADJUSTMENT (OFF) ( PUSH-MENU) (SOURCE) OO (SEEK)(+)/(SEEK )(-) (H-BASS),(EQ) DSPL),( ATT) Turning the unit on Press (SOURCE) on the display.
...), or "OFF." "4 The volume level is adjustable to select "BAL," "FAD," "LPF" or "SUB." To adjust sound stage (DSSA*) You can adjust the balance, fader, low pass filter and subwoofer volume. 1 Press (PUSH-MENU). 2 Press (SEEK) (+) or (SEEK) to 78 Hz, 125 Hz or OFF. Each time you insert a disc. BASIC OPERATION, AUDIO AND CLOCK ADJUSTMENT (OFF) ( PUSH-MENU) (SOURCE) OO (SEEK)(+)/(SEEK )(-) (H-BASS),(EQ) DSPL),( ATT) Turning the unit on Press (SOURCE) on the display.

Operating Instructions
Page 6
... rear panel at the "SUB" (sub-woofer) position. To cancel the equalizing effect, select "OFF." Note When EQ is adjustable from the one currently displayed. To reinforce the bass sound (H-BASS) Press (H-BASS). To set to select the desired tone range; Best Tuning Memory (BTM) 1 Press (SOURCE) repeatedly to select the radio. 2 Press (MODE) repeatedly to adjust the equalizer curve. The unit stores stations in to stations while driving, use Best Tuning Memory to the desired volume level. Receiving the stored stations 1 Press (SOURCE...
... rear panel at the "SUB" (sub-woofer) position. To cancel the equalizing effect, select "OFF." Note When EQ is adjustable from the one currently displayed. To reinforce the bass sound (H-BASS) Press (H-BASS). To set to select the desired tone range; Best Tuning Memory (BTM) 1 Press (SOURCE) repeatedly to select the radio. 2 Press (MODE) repeatedly to adjust the equalizer curve. The unit stores stations in to stations while driving, use Best Tuning Memory to the desired volume level. Receiving the stored stations 1 Press (SOURCE...

Operating Instructions
Page 7
Repeat the operation until the desired station is displayed. To return to start play. This information is recorded on the display. Playing a disc (OFF) (PUSH-MENU) CJ. 11 SHUF) (REP) (SEEK)(+)/(SEEK)(-) (DSPL) (SOURCE) (=:= (=, 0 Insert a disc with relatively strong signals will be tuned in monaural mode. If a disc is poor, receive the station in (local seek mode). Automatic tuning If preset tuning does not work, try the automatic tuning. If the automatic...
Repeat the operation until the desired station is displayed. To return to start play. This information is recorded on the display. Playing a disc (OFF) (PUSH-MENU) CJ. 11 SHUF) (REP) (SEEK)(+)/(SEEK)(-) (DSPL) (SOURCE) (=:= (=, 0 Insert a disc with relatively strong signals will be tuned in monaural mode. If a disc is poor, receive the station in (local seek mode). Automatic tuning If preset tuning does not work, try the automatic tuning. If the automatic...

Operating Instructions
Page 8
... select "A.SCRL." 3 Turn (PUSH-MENU) to play You can select: • REP•TRACK - If the Auto Scroll mode is pressed, playback skips to the last/first track. To Stop play , pressing IN allows you to skip only to the beginning of the current track, not to the previous track. There are following displayable items: • Track number/elapsed playing time • Disc...
... select "A.SCRL." 3 Turn (PUSH-MENU) to play You can select: • REP•TRACK - If the Auto Scroll mode is pressed, playback skips to the last/first track. To Stop play , pressing IN allows you to skip only to the beginning of the current track, not to the previous track. There are following displayable items: • Track number/elapsed playing time • Disc...

Operating Instructions
Page 9
... the unit before connecting the equipment. 1 Connect a cassette/MD/MP3 portable player or other equipment to the unit's AUX jack (3.5 mm dia.). 2 Press SOURCE repeatedly until "AUX" appears on the display. 3 Turn (PusH-MENU) to adjust the level. In this case, you can align each time you change the source mode. The volume level is diplayed), press (PUSH-MENU). 2 Turn (PUSH-MENU) to select "REAR" (for a power amplifier) or "SUB" (for a subwoofer). 9 Proceed as follows while the unit is turned...
... the unit before connecting the equipment. 1 Connect a cassette/MD/MP3 portable player or other equipment to the unit's AUX jack (3.5 mm dia.). 2 Press SOURCE repeatedly until "AUX" appears on the display. 3 Turn (PusH-MENU) to adjust the level. In this case, you can align each time you change the source mode. The volume level is diplayed), press (PUSH-MENU). 2 Turn (PUSH-MENU) to select "REAR" (for a power amplifier) or "SUB" (for a subwoofer). 9 Proceed as follows while the unit is turned...

Operating Instructions
Page 10
... may occur. Should the battery be operated with the remote control unless (SOURCE) on the unit is pressed, or a disc is inserted to activate the unit first. Remote control (back) O 5 • DSPL button e SOURCE button e SEEK (+/-) buttons eO OFF button VOL (+/-) buttons O MODE button ■ 0 PRESET/ALBUM* (+/-) buttons An button " Not available Note If the display disappears by simply pulling it out. Before you use the remote control, be sure to remove the insulating sheet by pressing...
... may occur. Should the battery be operated with the remote control unless (SOURCE) on the unit is pressed, or a disc is inserted to activate the unit first. Remote control (back) O 5 • DSPL button e SOURCE button e SEEK (+/-) buttons eO OFF button VOL (+/-) buttons O MODE button ■ 0 PRESET/ALBUM* (+/-) buttons An button " Not available Note If the display disappears by simply pulling it out. Before you use the remote control, be sure to remove the insulating sheet by pressing...

Operating Instructions
Page 11
... to adjust the volume. • Cancel the ATT function. • Set the fader control to turn on the display window. • The display disappears if you arc not using the built-in amplifier. See "Cleaning the connectors" (page 13). Check the connection of the car antenna. • The auto antenna will help you remedy problems you may encounter with the car's accessory power connector. Automatic tuning is not possible. • The local seek mode...
... to adjust the volume. • Cancel the ATT function. • Set the fader control to turn on the display window. • The display disappears if you arc not using the built-in amplifier. See "Cleaning the connectors" (page 13). Check the connection of the car antenna. • The auto antenna will help you remedy problems you may encounter with the car's accessory power connector. Automatic tuning is not possible. • The local seek mode...

Operating Instructions
Page 12
... Press the reset button. The operation buttons do not help improve the situation, consult your nearest Sony dealer. ERROR • A CD is already inserted. • The CD has been forcibly inserted upside down or in a sturdy part of the disc and you cannot go any further. RESET The CD unit cannot be heard. ERROR DISPLAYS/ MESSAGES Error displays The following indications will flash for audio use. •...
... Press the reset button. The operation buttons do not help improve the situation, consult your nearest Sony dealer. ERROR • A CD is already inserted. • The CD has been forcibly inserted upside down or in a sturdy part of the disc and you cannot go any further. RESET The CD unit cannot be heard. ERROR DISPLAYS/ MESSAGES Error displays The following indications will flash for audio use. •...

Operating Instructions
Page 13
... the front panel Notes • For safety, turn off the ignition before cleaning the connectors, and remove the key from the ignition switch. • Never touch the connectors directly with your nearest Sony dealer. 2 Remove the unit. • Insert both release keys together until they click. Fuse replacement When replacing the fuse, be an internal malfunction. Face the hook inwards. Main unit Removing the unit 1 Remove the protection collar. •...
... the front panel Notes • For safety, turn off the ignition before cleaning the connectors, and remove the key from the ignition switch. • Never touch the connectors directly with your nearest Sony dealer. 2 Remove the unit. • Insert both release keys together until they click. Fuse replacement When replacing the fuse, be an internal malfunction. Face the hook inwards. Main unit Removing the unit 1 Remove the protection collar. •...

Operating Instructions
Page 14
... External antenna connector Intermediate frequency 10.7 MHz/450 kHz Sensitivity 30 µV CD player section Signal-to-noise ratio 120 dB Frequency response 10 - 20,000 Hz Wow and flutter Below measurable limit Power amplifier section Outputs Speaker outputs (sure seal connectors) Speaker impedance 4 - 8 ohms Maximum power output CDC-X444/X304: 52 W x 4 (at 4 ohms) CDC-X204/X144/X104: 45 W x 4 (at 4 ohms) General Outputs Audio outputs terminal (rear/sub switchable) Power antenna relay control terminal Power amplifier control terminal Inputs Antenna input...
... External antenna connector Intermediate frequency 10.7 MHz/450 kHz Sensitivity 30 µV CD player section Signal-to-noise ratio 120 dB Frequency response 10 - 20,000 Hz Wow and flutter Below measurable limit Power amplifier section Outputs Speaker outputs (sure seal connectors) Speaker impedance 4 - 8 ohms Maximum power output CDC-X444/X304: 52 W x 4 (at 4 ohms) CDC-X204/X144/X104: 45 W x 4 (at 4 ohms) General Outputs Audio outputs terminal (rear/sub switchable) Power antenna relay control terminal Power amplifier control terminal Inputs Antenna input...

Operating Instructions
Page 15
... product was received by an Aiwa Authorized Service Center, product modification, accident, misuse, abuse, or negligence; or (5) reception problems caused by an Aiwa Authorized Service Center. If shipped, the product must be performed by signal conditions, or cable or antenna systems outside of defects in Product Information, Parts, Service Center listings and F.A.Q. LABOR PARTS Car Audio 1 year 1 year WHO PERFORMS AIWA'S WARRANTY? REPAIR OR REPLACEMENT AS...
... product was received by an Aiwa Authorized Service Center, product modification, accident, misuse, abuse, or negligence; or (5) reception problems caused by an Aiwa Authorized Service Center. If shipped, the product must be performed by signal conditions, or cable or antenna systems outside of defects in Product Information, Parts, Service Center listings and F.A.Q. LABOR PARTS Car Audio 1 year 1 year WHO PERFORMS AIWA'S WARRANTY? REPAIR OR REPLACEMENT AS...

Operating Instructions
Page 16
eco • Halogenated flame retardants are not used in Thailand http://www.aiwa.com/ Sony Corporation Printed in cabinets. • Paper is used in the certain printed wiring boards. • Lead-free solder is used for soldering certain parts. info • Halogenated flame retardants are not used for the packaging cushions.
eco • Halogenated flame retardants are not used in Thailand http://www.aiwa.com/ Sony Corporation Printed in cabinets. • Paper is used in the certain printed wiring boards. • Lead-free solder is used for soldering certain parts. info • Halogenated flame retardants are not used for the packaging cushions.

Operating Instructions
Page 17
3-263-359-11(1) FM/AM Compact Disc Player Installation/Connections Installation/Connexions Instalacion/Conexiones CDC-X504MP CDC-X444 CDC-X304 CDC-X204 CDC-X144 CDC-X104 © 2004 Sony Corporation Printed in Thailand
3-263-359-11(1) FM/AM Compact Disc Player Installation/Connections Installation/Connexions Instalacion/Conexiones CDC-X504MP CDC-X444 CDC-X304 CDC-X204 CDC-X144 CDC-X104 © 2004 Sony Corporation Printed in Thailand

Operating Instructions
Page 19
2 A 0 0 B f 0 AUDIO OUT REAR
2 A 0 0 B f 0 AUDIO OUT REAR

Operating Instructions
Page 20
... when the ignition key is turned off. To AMP REMOTE IN of the existing antenna booster. Memory hold connection When the yellow power input lead is only for future use the built-in speaker leads installed in your car has built-in FM/AM antenna in ). o To the +12 V power terminal which is energized at all times Be sure to connect the black ground lead to...
... when the ignition key is turned off. To AMP REMOTE IN of the existing antenna booster. Memory hold connection When the yellow power input lead is only for future use the built-in speaker leads installed in your car has built-in FM/AM antenna in ). o To the +12 V power terminal which is energized at all times Be sure to connect the black ground lead to...
Operating Instructions
Page 24
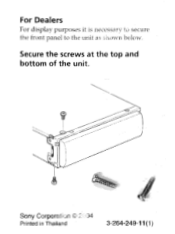
Secure the screws at the top and bottom of the unit. For Dealers For display purposes it is necessary to secure the front panel to the unit as shown below. Sony Corporation © )4 Printed in Thailand 3-264-249-11(1)
Secure the screws at the top and bottom of the unit. For Dealers For display purposes it is necessary to secure the front panel to the unit as shown below. Sony Corporation © )4 Printed in Thailand 3-264-249-11(1)


