
Operating Instructions
Page 1
OPERATING INSTRUCTIONS MANUAL DE INSTRUCCIONES MODE D'EMPLOI CDC-X427 YUC STEREO CAR CD RECEIVER RADIO-TOCADISCOS DE CD ESTEREOFONICO PARA AUTOMOVIL ENGLISH ESPAÑOL FRANÇAIS OWNER'S RECORD For your convenience, record the model number and serial number (you contact your set) in case of difficulty. Model No. CDC-X427 Serial No. 8C-KCG-901-01 011120ATM-OX Please refer to them when you will find them on the bottom side of your AIWA dealer in the space provided below.
OPERATING INSTRUCTIONS MANUAL DE INSTRUCCIONES MODE D'EMPLOI CDC-X427 YUC STEREO CAR CD RECEIVER RADIO-TOCADISCOS DE CD ESTEREOFONICO PARA AUTOMOVIL ENGLISH ESPAÑOL FRANÇAIS OWNER'S RECORD For your convenience, record the model number and serial number (you contact your set) in case of difficulty. Model No. CDC-X427 Serial No. 8C-KCG-901-01 011120ATM-OX Please refer to them when you will find them on the bottom side of your AIWA dealer in the space provided below.
Operating Instructions
Page 2
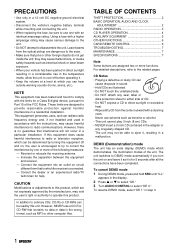
... help. These limits are designed to select "DE 0." Reorient or relocate the receiving antenna. - However, there is encouraged to try to disassemble the unit. This equipment generates, uses, and can hear outside warning sounds (horns, sirens, etc.). Increase the separation between the equipment and receiver. - TABLE OF CONTENTS THEFT PROTECTION 2 BASIC OPERATION, AUDIO AND CLOCK ADJUSTMENT 2 RADIO OPERATION 3 CD PLAYER OPERATION 4 AUXILIARY EQUIPMENT 5 OTHER FUNCTIONS 6 CARD REMOTE CONTROL 6 TROUBLESHOOTING 7 MAINTENANCE 7 SPECIFICATIONS 7 Note Some buttons...
... help. These limits are designed to select "DE 0." Reorient or relocate the receiving antenna. - However, there is encouraged to try to disassemble the unit. This equipment generates, uses, and can hear outside warning sounds (horns, sirens, etc.). Increase the separation between the equipment and receiver. - TABLE OF CONTENTS THEFT PROTECTION 2 BASIC OPERATION, AUDIO AND CLOCK ADJUSTMENT 2 RADIO OPERATION 3 CD PLAYER OPERATION 4 AUXILIARY EQUIPMENT 5 OTHER FUNCTIONS 6 CARD REMOTE CONTROL 6 TROUBLESHOOTING 7 MAINTENANCE 7 SPECIFICATIONS 7 Note Some buttons...
Operating Instructions
Page 3
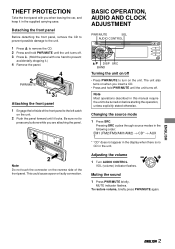
... manual require the unit to be turned on before starting the operation, unless explicitly stated otherwise. To restore volume, briefly press PWR/MUTE again. THEFT PROTECTION Take the front panel with one hand to prevent accidentally dropping it.) 4 Remove the panel. The unit also turns on the unit. 2 Push the panel forward until the unit turns off. Changing the source mode 1 Press SRC. Adjusting the volume 1 Turn AUDIO CONTROL. VOL (volume) indicator flashes. Attaching the front panel...
... manual require the unit to be turned on before starting the operation, unless explicitly stated otherwise. To restore volume, briefly press PWR/MUTE again. THEFT PROTECTION Take the front panel with one hand to prevent accidentally dropping it.) 4 Remove the panel. The unit also turns on the unit. 2 Push the panel forward until the unit turns off. Changing the source mode 1 Press SRC. Adjusting the volume 1 Turn AUDIO CONTROL. VOL (volume) indicator flashes. Attaching the front panel...
Operating Instructions
Page 4
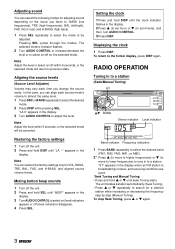
.... 3 ENGLISH Restoring the factory settings 1 Turn off within 5 seconds, or the selected mode will return to adjust the level. Adjusting sound You can select the following modes for adjusting sound depending on the music you change the source mode. Displaying the clock 1 Press DISP. The unit locates a station automatically (Seek Tuning). • Press i or k repeatedly to select on /off the unit. 2 Press and hold i or k until "LA --" appears in the display. 3 Turn AUDIO CONTROL to select the desired mode. 2 Press DISP...
.... 3 ENGLISH Restoring the factory settings 1 Turn off within 5 seconds, or the selected mode will return to adjust the level. Adjusting sound You can select the following modes for adjusting sound depending on the music you change the source mode. Displaying the clock 1 Press DISP. The unit locates a station automatically (Seek Tuning). • Press i or k repeatedly to select on /off the unit. 2 Press and hold i or k until "LA --" appears in the display. 3 Turn AUDIO CONTROL to select the desired mode. 2 Press DISP...
Operating Instructions
Page 5
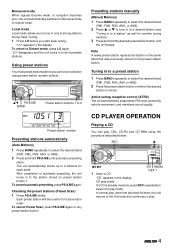
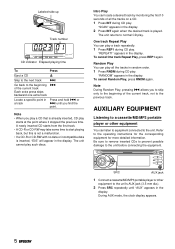
... k to tune in to the station stored on that preset station button. CD PLAYER OPERATION Playing a CD You can tune in to play CDs, CD-Rs and CD-RWs using preset station number buttons. In normal play, when the last track finishes, the unit returns to the first track and continues to all receivable stations. i/k PS/A.ME BAND Preset station buttons 1 to 6 Preset station number Presetting stations automatically (Auto Memory) 1 Press BAND repeatedly to a station" as well for another tuning method...
... k to tune in to the station stored on that preset station button. CD PLAYER OPERATION Playing a CD You can tune in to play CDs, CD-Rs and CD-RWs using preset station number buttons. In normal play, when the last track finishes, the unit returns to the first track and continues to all receivable stations. i/k PS/A.ME BAND Preset station buttons 1 to 6 Preset station number Presetting stations automatically (Auto Memory) 1 Press BAND repeatedly to a station" as well for another tuning method...
Operating Instructions
Page 6
... detailed information. During AUX mode, the clock display appears. 5 ENGLISH To cancel Random Play, press RNDM again. Labeled-side up Track number CD indicator Elapsed playing time To Press Eject a CD z Skip to the next track t Go back to the beginning of the current track, not to the previous track. SRC AUX jack 1 Connect a cassette/MD/MP3 portable player or other equipment...
... detailed information. During AUX mode, the clock display appears. 5 ENGLISH To cancel Random Play, press RNDM again. Labeled-side up Track number CD indicator Elapsed playing time To Press Eject a CD z Skip to the next track t Go back to the beginning of the current track, not to the previous track. SRC AUX jack 1 Connect a cassette/MD/MP3 portable player or other equipment...
Operating Instructions
Page 7
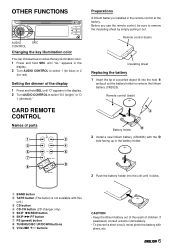
... battery with this unit.) 3 CD button 4 CD-CH button (CD changer only) 5 SKIP f/REW button 6 SKIP g/FF button 7 PS (preset) button 8 TUNING/DISC UP/DOWN buttons 9 VOLUME +/- ENGLISH 6 OTHER FUNCTIONS AUDIO CONTROL SRC Changing the key illumination color You can choose blue or red as the key illumination color. 1 Press and hold SEL until "D" appears in the display. 2 Turn AUDIO CONTROL to select "D 0 (bright)" or "D 1 (dimmed)." Remote control (back) Insulating sheet Replacing the battery 1 Insert the tip of the display...
... battery with this unit.) 3 CD button 4 CD-CH button (CD changer only) 5 SKIP f/REW button 6 SKIP g/FF button 7 PS (preset) button 8 TUNING/DISC UP/DOWN buttons 9 VOLUME +/- ENGLISH 6 OTHER FUNCTIONS AUDIO CONTROL SRC Changing the key illumination color You can choose blue or red as the key illumination color. 1 Press and hold SEL until "D" appears in the display. 2 Turn AUDIO CONTROL to select "D 0 (bright)" or "D 1 (dimmed)." Remote control (back) Insulating sheet Replacing the battery 1 Insert the tip of the display...
Operating Instructions
Page 8
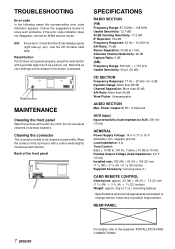
... contains valid data. REAR PANEL 7 ENGLISH For details, refer to solve such problems. If the error code indication does not disappear, consult an AIWA service center. E03 Focus error. Note that the CD is pressed. Follow the suggestions below to the separate "INSTALLATION AND CONNECTIONS". Cleaning the connector The connector needs to 16 V allowable), DC, negative ground Load Impedance: 4 Ω Tone Control: Bass ± 10...
... contains valid data. REAR PANEL 7 ENGLISH For details, refer to solve such problems. If the error code indication does not disappear, consult an AIWA service center. E03 Focus error. Note that the CD is pressed. Follow the suggestions below to the separate "INSTALLATION AND CONNECTIONS". Cleaning the connector The connector needs to 16 V allowable), DC, negative ground Load Impedance: 4 Ω Tone Control: Bass ± 10...

