
Operating Instructions
Page 1
Please refer to them on the right side of your AIWA dealer in the space provided below. Model No. ]CDC-X116 1 Serial No. ~ I I ~~gAA DIGITAL AUDIO CDC"XI16Y" STEREO CAR CD RECEIVER RADIO-TOCADISCOS DE CD ESTEREOFONICO PARA AUTOMOVIL OWNER'S RECORD For your convenience, record the model number and serial number (you will find them when you contact your set) in case of difficulty.
Please refer to them on the right side of your AIWA dealer in the space provided below. Model No. ]CDC-X116 1 Serial No. ~ I I ~~gAA DIGITAL AUDIO CDC"XI16Y" STEREO CAR CD RECEIVER RADIO-TOCADISCOS DE CD ESTEREOFONICO PARA AUTOMOVIL OWNER'S RECORD For your convenience, record the model number and serial number (you will find them when you contact your set) in case of difficulty.
Operating Instructions
Page 2
... car battery terminal until the unit has been mounted and connected completely. Increase the separation between the equipment and receiver. - q Make sure that you for your car was parked in direct sunlight resulting in a considerable rise in a particular installation. If this manual carefully. Consult the dealer or an experienced radio/ TV technician for a Class B digital device, pursuant to disassemble this operating instructions manual, be determined by turning...
... car battery terminal until the unit has been mounted and connected completely. Increase the separation between the equipment and receiver. - q Make sure that you for your car was parked in direct sunlight resulting in a considerable rise in a particular installation. If this manual carefully. Consult the dealer or an experienced radio/ TV technician for a Class B digital device, pursuant to disassemble this operating instructions manual, be determined by turning...
Operating Instructions
Page 3
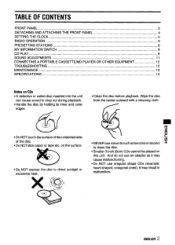
... a cleaning cloth. TABLE OF CONTENTS FRONT PANEL ...3 DETACHING AND AITACHING THE FRONT PANEL 4 SETTING THE CLOCK ...5 RADIO OPERATION ...5 PRESETTING STATIONS ...6 MY INFORMATION SWITCH ...8 CD PLAY ...9 SOUND ADJUSTMENTS ...11 CONNECTING A PORTABLE CASSETTE/MD PLAYER OR OTHER EQUIPMENT 12 TROUBLESHOOTING ...12 MAINTENANCE ...13 SPECIFICATIONS ...13 Noteson CDs qAdefective orsoiled disc inserted into the unit can cause sound to clean the disc. qDo NOT expose the disc to dkect sunlight or excessive heat. . q Do...
... a cleaning cloth. TABLE OF CONTENTS FRONT PANEL ...3 DETACHING AND AITACHING THE FRONT PANEL 4 SETTING THE CLOCK ...5 RADIO OPERATION ...5 PRESETTING STATIONS ...6 MY INFORMATION SWITCH ...8 CD PLAY ...9 SOUND ADJUSTMENTS ...11 CONNECTING A PORTABLE CASSETTE/MD PLAYER OR OTHER EQUIPMENT 12 TROUBLESHOOTING ...12 MAINTENANCE ...13 SPECIFICATIONS ...13 Noteson CDs qAdefective orsoiled disc inserted into the unit can cause sound to clean the disc. qDo NOT expose the disc to dkect sunlight or excessive heat. . q Do...
Operating Instructions
Page 4
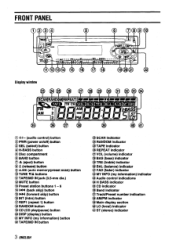
... control) button @ PWR (power otioff) button @ SEL (select) button @ H.BASS button @Disc compsrtmsnt @BAND bunon @ A (eject) button @ ~ (release) button @ A.ME (auto memory/preset SCWt) fXtttOtI @TUNE 71A buttons @TAPE/MD IN jack (3.5-mm dia.) @ MUTE button @Preset station buttons 1-6 @ W (back skip) button @ bPf (forward skip) button @IINT (intro) button @ REP1 (repeat 1) button @ RANDOM button @CD (CD play/pause) button @ DISP (display) button @MY INFO (my information) button @TAPEhID IN button 3 ENGLISH o39 @SCAN indicator @ RANDOM indicator @JTAPE indicator @REPEAT indicator @ VOL (volume...
... control) button @ PWR (power otioff) button @ SEL (select) button @ H.BASS button @Disc compsrtmsnt @BAND bunon @ A (eject) button @ ~ (release) button @ A.ME (auto memory/preset SCWt) fXtttOtI @TUNE 71A buttons @TAPE/MD IN jack (3.5-mm dia.) @ MUTE button @Preset station buttons 1-6 @ W (back skip) button @ bPf (forward skip) button @IINT (intro) button @ REP1 (repeat 1) button @ RANDOM button @CD (CD play/pause) button @ DISP (display) button @MY INFO (my information) button @TAPEhID IN button 3 ENGLISH o39 @SCAN indicator @ RANDOM indicator @JTAPE indicator @REPEAT indicator @ VOL (volume...
Operating Instructions
Page 5
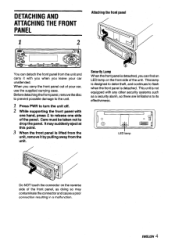
... detaching the front panel, remove the disc to prevent possible damage to thle unit. 1 Press PWR to flash when the front panel is not equipped with one hand, press I?Ito rele!ase one side of the panel. It may contaminate the connector and cause a poor connection resulting in a malfunction. This lamp is detached, you leave your car, use the supplied carrying...
... detaching the front panel, remove the disc to prevent possible damage to thle unit. 1 Press PWR to flash when the front panel is not equipped with one hand, press I?Ito rele!ase one side of the panel. It may contaminate the connector and cause a poor connection resulting in a malfunction. This lamp is detached, you leave your car, use the supplied carrying...
Operating Instructions
Page 6
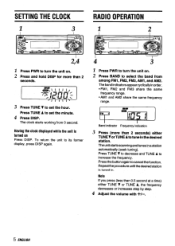
... (more than 2 seconds. SETTING THE CLOCK 1 3 RADIO OPERATION 1 2 2,4 I Press PWR to turn the unit on. 2 Press BAND to select the band from O second. s Press TUNE 7 to cancel the function. Press the button again to set the hour. Note If you press (less than 2 seconds) either TUNE V or TUNE A, the frequency decreases or increases step by step. 4 Adjust the volume with +/-. 5 ENGLISH The clock starts working from among FM1...
... (more than 2 seconds. SETTING THE CLOCK 1 3 RADIO OPERATION 1 2 2,4 I Press PWR to turn the unit on. 2 Press BAND to select the band from O second. s Press TUNE 7 to cancel the function. Press the button again to set the hour. Note If you press (less than 2 seconds) either TUNE V or TUNE A, the frequency decreases or increases step by step. 4 Adjust the volume with +/-. 5 ENGLISH The clock starts working from among FM1...
Operating Instructions
Page 7
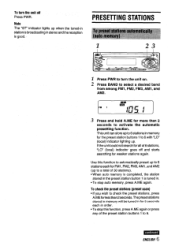
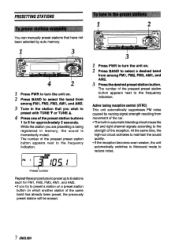
... to turn the unit off and starts searching for weaker stations again. PRESETTING STATIONS 1 23 1 Press PWR to 6 stations each in stereo and the reception is tuned in memory for more than 2 seconds to check the preset stations, press A. Use this function, press A.ME again or press any of 6 stations, "LO (local) indicator goes off Press PWR. q When auto memory is completed, the station stored in the preset station button...
... to turn the unit off and starts searching for weaker stations again. PRESETTING STATIONS 1 23 1 Press PWR to 6 stations each in stereo and the reception is tuned in memory for more than 2 seconds to check the preset stations, press A. Use this function, press A.ME again or press any of 6 stations, "LO (local) indicator goes off Press PWR. q When auto memory is completed, the station stored in the preset station button...
Operating Instructions
Page 8
... switches to Monaural mode, to the strength of the-pressed preset station button appears next to maintain the sound quality. Active tuning reception control (ATRC) This unit automatically suppresses FM noise caused by varying signal strength resulting from among FM1, FM2, FM3, AM1, snd AM2. 3 Tune in memory, the sound is being registered in the station that have not been selected by auto memory. 1 3 4 2 1 Press PWR to turn...
... switches to Monaural mode, to the strength of the-pressed preset station button appears next to maintain the sound quality. Active tuning reception control (ATRC) This unit automatically suppresses FM noise caused by varying signal strength resulting from among FM1, FM2, FM3, AM1, snd AM2. 3 Tune in memory, the sound is being registered in the station that have not been selected by auto memory. 1 3 4 2 1 Press PWR to turn...
Operating Instructions
Page 9
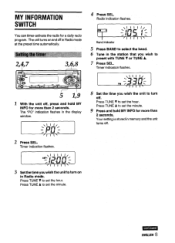
... radio program. Press TUNE A to set the minute. Band indicator 5 Press BAND to select the bsnd. 6 Tune in the station that you wish the unit to set the hour. The "PO indication flashes in Radio mode. Press TUNE V to preset with TUNE V or TUNE A. 7 Press SEL. Press TUNE Y to turn on in the display window. 8 Set the time you wish to set the hour. The unit turnson and off in memory and the unit turns off...
... radio program. Press TUNE A to set the minute. Band indicator 5 Press BAND to select the bsnd. 6 Tune in the station that you wish the unit to set the hour. The "PO indication flashes in Radio mode. Press TUNE V to preset with TUNE V or TUNE A. 7 Press SEL. Press TUNE Y to turn on in the display window. 8 Set the time you wish to set the hour. The unit turnson and off in memory and the unit turns off...

Operating Instructions
Page 10
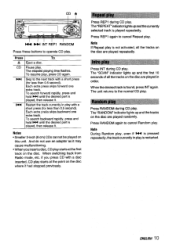
... number and elapsed playing time appear. To check the setting With the unit off . Pressing CD changes the unit to TAPE/MD IN mode. Notes q Even if the unit is activated. Pressing BAND changes the unit to start CD play . MY lltlF&'MlwlSTW/ImTCH CD PLAY ( d,~,q D_ BAND TAPE/MD IN *- ) CD 1 ~ With the unit on time, followed by the radio frequency and the turn -off time, appears in the preset radio program...
... number and elapsed playing time appear. To check the setting With the unit off . Pressing CD changes the unit to TAPE/MD IN mode. Notes q Even if the unit is activated. Pressing BAND changes the unit to start CD play . MY lltlF&'MlwlSTW/ImTCH CD PLAY ( d,~,q D_ BAND TAPE/MD IN *- ) CD 1 ~ With the unit on time, followed by the radio frequency and the turn -off time, appears in the preset radio program...
Operating Instructions
Page 11
...disc, CD play is restarted. Note If Repeat play starts at the point on the disc are played randomly. Press RANDOM during CD play is not activated, all the tracks on this unit. Note During Random play, even if ~ is played, then release it may cause malfunctioning. ENGLISH 10 Press To & Eject a disc... tracks on the disc where it . 144 - To resume play . When switching back from Radio mode, etc. The "SCAN indicator lights up and the tracks on the disc. When the desired track is played repeatedly. CQ & W ~ INTREP1 RANDOM Press these buttons to operate CD play , press CD ...
...disc, CD play is restarted. Note If Repeat play starts at the point on the disc are played randomly. Press RANDOM during CD play is not activated, all the tracks on this unit. Note During Random play, even if ~ is played, then release it may cause malfunctioning. ENGLISH 10 Press To & Eject a disc... tracks on the disc where it . 144 - To resume play . When switching back from Radio mode, etc. The "SCAN indicator lights up and the tracks on the disc. When the desired track is played repeatedly. CQ & W ~ INTREP1 RANDOM Press these buttons to operate CD play , press CD ...
Operating Instructions
Page 12
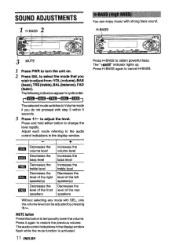
... display window flash while the mute function is activated. 1 I 3 MUTE 1 Press PWR to turn the unit on, 2 Press SEL to obtain powerful bass. MUTE button Press this button to adjust the Iaval. Press it again to change the level rapidly. The" figASS" indicator lights up. Press and hold eit~er botton to restore the previous volume. Adjust each mode referring to the audio control indications in the display window. 1- + Increases the volume level Increases the bass level...
... display window flash while the mute function is activated. 1 I 3 MUTE 1 Press PWR to turn the unit on, 2 Press SEL to obtain powerful bass. MUTE button Press this button to adjust the Iaval. Press it again to change the level rapidly. The" figASS" indicator lights up. Press and hold eit~er botton to restore the previous volume. Adjust each mode referring to the audio control indications in the display window. 1- + Increases the volume level Increases the bass level...
Operating Instructions
Page 13
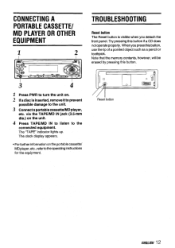
... press this button if a CD does not operate properly. CONNECTING A PORTABLE CASSETTE/ MD PLAYER OR OTHER EQUIPMENT 1 2 TROUBLESHOOTING Reset button The Reset button is inserted, remove it to prevent possible damage to the unit. 3 Connect a potiab!e cassette/MD player, etc. When you detach the front panel. c For further information on the unit. 4 Press TAPE/MD IN to listen to the connected equipment. The clock display appears. Reset button ENGLISH 12...
... press this button if a CD does not operate properly. CONNECTING A PORTABLE CASSETTE/ MD PLAYER OR OTHER EQUIPMENT 1 2 TROUBLESHOOTING Reset button The Reset button is inserted, remove it to prevent possible damage to the unit. 3 Connect a potiab!e cassette/MD player, etc. When you detach the front panel. c For further information on the unit. 4 Press TAPE/MD IN to listen to the connected equipment. The clock display appears. Reset button ENGLISH 12...
Operating Instructions
Page 14
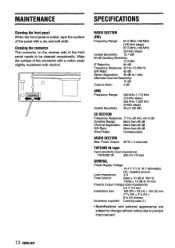
... AUDIO SECTION Max. MAINTENANCE SPECIFICATIONS Cleaning the front panel When the front panel is soiled, wipe the surface of the panel with alcohol. Wipe the surface of the front panel needs to product improvement. 13 ENGLISH Cleaning the connector The connector on the reverse side of the connector with a cotton swab slightly moistened with a dry and soft cloth. RADIO SECTION (FM) Frequency...
... AUDIO SECTION Max. MAINTENANCE SPECIFICATIONS Cleaning the front panel When the front panel is soiled, wipe the surface of the panel with alcohol. Wipe the surface of the front panel needs to product improvement. 13 ENGLISH Cleaning the connector The connector on the reverse side of the connector with a cotton swab slightly moistened with a dry and soft cloth. RADIO SECTION (FM) Frequency...

